In order to assemble and install a satellite television set at home on your own, without any practical knowledge, you need to follow a certain step-by-step sequence of work.
Let's look at the main points that you should pay special attention to when assembling the plate, wiring diagrams, and also focus on common mistakes that inexperienced installers make.
Installation materials
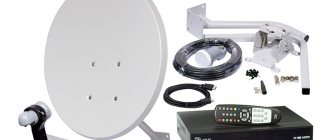
Let's start with the necessary materials. For assembly you will need:
- the plate itself
- multifeeds – fasteners for heads
Without them, if you have several heads, you will end up with a tree like this.
- mounting bracket - “leg”
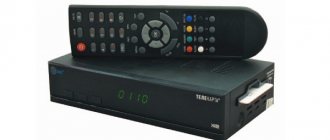
- TV tuner or receiver
- RF coaxial cable with a characteristic impedance of at least 75 Ohms (RK 75 or Western analogue RG and SAT) + F connectors for it
- converters or heads - usually from one to 3 pieces (when assembling the so-called “Gorynych”)
- Diseqc switch – it switches the signal from one head to another when there are several of them
- multiswitch
You will need it if you want to simultaneously connect several TVs from one dish.
Multiswitch connection diagrams
The multiswitch itself must be selected depending on the number of cables and TVs in your home. The wiring diagrams for the most popular satellites are as follows:
- For the Amos 2/3 4.0w satellite, one SAT cable is enough. The connectors are connected to the ports as shown in the picture below:
- Astra 5.0E will require two cables. Connection ports:
- for Eutelsat 36.0E, where the NTV+ channels are located, two cables are also needed. Their connection diagram:
- for Eutelsat 36.0E, but with channels from Tricolor you can get by with one cable. It connects to the H, Hi input.
If you also have a regular television antenna, then the multiswitch must have a TerrTV input.
Connection diagram for the ABS-2A satellite via a multiswitch to receive a package of channels from MTS:
Keep in mind that when using a multiswitch, Daisik=Diseqc is no longer needed.
Possible problems
Connecting a satellite dish yourself can be quite difficult. Especially for those who have never encountered such a problem before. When connecting, the most common errors made are:
- Incorrect plate diameter selected. If the antenna size is incorrectly selected, it may cause deterioration in sound or picture quality during adverse weather conditions. This problem can only be eliminated by replacing the plate;
- The traverse is installed incorrectly. It should be noted that it must be secured below the bracket, and not above it. If done incorrectly, there may be signal problems;
- Pass-through sockets are used. If you use this type of socket, the signal may disappear completely. It is best to use the finished sockets that come with the television sockets;
- Using splitters or splitters. This element is suitable exclusively for analog TV. The fact is that satellite channels are transmitted in a form that a conventional splitter is not able to pass through;
- Using a large number of connections. This leads to the loss of a useful signal, which means the reception quality deteriorates.
What problems can arise directly with the Tricolor TV module? The most common problem is no signal. What is meant by this problem? If there is no image on the screen, but there is noise or just blackness, this does not mean at all that there is no signal. This screen indicates that the receiver is not connected to the TV. It should be noted that the physical connection and the cord inserted into both connectors do not guarantee that the TV can be seen by the receiver. In this case there is a connection, but the receiver may still not work.
If the TV receiver shows the message “No signal,” the problem can be corrected. To do this, press the “Menu” button on the receiver’s remote control. If the main menu appears on the screen, it means that the set-top box is connected to the television device. If the menu does not appear and the “No Signal” message continues to appear on the screen, the problem may be that the TV does not see the receiver. In the latter case, you won’t be able to watch Tricolor TV.
How to watch encrypted channels on TV? To do this you need to get special access. A TV smart card allows you to get more features. Using the card, the equipment can decode encrypted channels. This means that the number of channels with the card on the TV will become much larger.
Now you know how to watch satellite channels on TV. It turns out that installing an antenna yourself is not at all difficult. An attentive person can easily cope with this task.
Satellite dish assembly
The assembly tool usually requires a pair of open-end wrenches for 10 and 13, plus a Phillips screwdriver. To mount it to the wall you will need a hammer drill and anchor bolts.
When you have decided on the package, first of all you need to correctly assemble the plate itself. There are several nuances here.
For example, when assembling the traverse, pay attention that the transverse bar, which is attached to the mirror of the plate itself, should be placed on top of it.
If you screw it on the other side, and this is physically possible, then:
- first, you will have poor hole alignment
- secondly, the opposite end of the traverse, where the heads cling, will go out of focus
As a result, it will initially be difficult to catch at least some signal. In addition, the mount that goes to the bracket, when setting up satellites above the horizon (relative to your geographic residence), must cling with the adjustable part down.
And for satellites located below the horizon - on the contrary, with the adjustable part up.
Since in this case, you will no longer need to raise, but lower the mirror.
How to collect a multifeed
Assembling a multifeed also involves some special features. The collapsible kit initially comes with two unequal “ears”. One is more, the other is less.
The small one is put on a tube assembled with plastic.
The large one is attached to the central crossbeam. In this case, both ears can be positioned relative to each other in two different ways.
At the same level or in different planes. Most installers place them exactly in one plane.
Although if you do the opposite, this will make it easier to perform the very initial setup of the satellite dish and will save time when searching for additional side satellites.
The assembled heads will be at different levels, one higher, the other lower.
Actually, the satellites themselves fly across the horizon.
But this is of course true if your converters pick up three different satellites. When two heads are picking up the same satellite, for example Eutelsat 36E, but with different software packages, then place them in the same plane.
But mount the third head as described above. The spacing between the converters also depends on the diameter of the mirror. The smaller its size, the closer the heads will be located relative to each other.
After the bar is screwed on, try, at least by eye, to position the head so that the central axis of the plastic (where the two halves of the casting meet), and this very attachment to the traverse, are at an angle of 90 degrees. Further, everything will be regulated relative to this initial position.
The order in which multifeeds are interleaved also matters. The first and closest to the dish should be the multifeed whose satellite position is closer to your place of residence.
For example, if you live beyond 40 degrees, then Eutelsat 36.0E should appear on your dish first, then Hotbird 13E, and lastly Astra 5.0E. The same is true for other satellites.
After fixing the dish to the wall or roof, lay coaxial cables from this place to the tuner or switch.
Label each end with which head it comes from.
If you have a Dysec, there will be one output cable.
Antenna operating principle
A satellite dish collects the received signal at one point and amplifies it. The size of the mirror directly depends on the range of the orbital position of the space device. The parabolic shape of the mirror reflects the received signal to the antenna, which is installed in the center of the structure. A horn feed with automatic adjustment is attached to the plate coordinator. This element is an amplifier of reflected signals. The front heads of the converter remove radio waves from the focal point and transmit them to the down-conversion unit. The horn converts electromagnetic signals and radio waves into electrical vibrations. In this case, their spectrum is adjusted. The signal then moves along the converter – receiver – TV chain.
F connector connection
To connect coaxial cables, you need to strip them and put F-connectors on them. There are two ways to do this.
Method 1 – cut off only the outer sheath of the cable with a knife at a distance of 20-25mm. The screen must not be damaged.
Carefully bend all the wires onto the shell.
Now you need to remove the insulation from the central core. It should protrude from the screen by a maximum of 2mm.
After this, screw on the F connector.
Shorten the excess stock of the central core, leaving no more than 5mm from the plane of the connector.
Method 2 is easier. Take the utility knife again. Step back approximately 1cm from the edge of the cable and cut off all the insulation. Including external and internal, up to the central core.
Then, retreating 3mm, cut off only the outer braid.
Make sure that no lint or wires get between the braid and the central core.
There is no need to remove any more insulation or bend anything. Just insert and screw on the f connector from above.
Next, you lay out cables throughout the apartment in all the rooms where you have TVs. You sign them all too.
At the same time, it is much safer to run the cable directly into the device rather than connect it through a satellite TV outlet. This may be associated with either a loss of quality or a complete loss of signal.
The wiring diagram when using a multiswitch may look like this:
Diseqc connection
If you only have a dashcam, connecting and configuring satellites is carried out in the following sequence.
Remember that any self-respecting store of satellite equipment and similar systems always sells tuners already programmed for certain channels and satellites. Otherwise, competitors will simply drive him out of the market.
At the same time, when purchasing, be sure to ask the seller to write you the Diseqc ports of the switch, since they were set by him during the settings. It is through these ports that you will have to make all cable connections.
When installing, you first connect the cables to the heads, and then run them to the dashik. Just on it, it is advisable to connect everything initially with the “factory” tuner settings.
If you have any satellite in the receiver configured to the first port, then accordingly it should not go to port No. 1. If it is on the second one, then port No. 2 is also used in the switch, etc.
All input ports are always signed. The central single connector is the output to the tuner itself.
Equipment setup
After finding the desired direction, you should attach the convectors to the plate. Next, disconnect the cable from them, connect the disk drive and run a single wire from it to the receiver.
Advice! If no more than two heads are connected and there is no disk drive, you can not connect it, but run a separate cable from each convector. There are two antenna inputs on the body of any satellite receiver.
The receiver is connected to the TV using an RCA wire or HDMI cable. The latter has higher bandwidth and if channels in 4K format are connected, only it will output high-definition images. The satellite dish tuner has already been configured before searching for directions; there is no need to change it.
Search for satellite and channels
Setting up and searching for a satellite can be done without fancy devices using the receiver itself.
True, you will have to drag the tuner itself + some small TV onto the roof.
Unless, of course, you install a motorcycle suspension.
This setup can also be done by two people. One person on the roof moves a plate, another uses a cell phone to control the house's TV signal.
If you are not satisfied with either one or the second option, you can buy a cheap portable device from the Chinese for setting up and analyzing the satellite signal - here or here.
Then setting up will not be difficult at all. By the way, it will be useful in the future if after a strong wind your signal deteriorates or you want to add a satellite over time, or maybe even change the heads. Configure satellites with MTS and Tricolor, instead of Amos, Astra, etc.
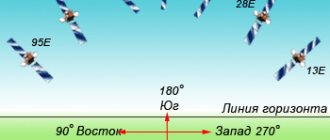
Start setting from the central head. Initially, place the plate with a slight rise towards the horizon. To find your bearings, look at your closest neighbors.
Nowadays, you will clearly no longer be a pioneer, and finding a couple of tuned cymbals will not be difficult. Sometimes there are so many of them that they interfere with each other.
As a last resort, you can use programs on smartphones - Satellite Director or SatFinder.
You install the program, launch it and start turning your smartphone in different directions in search of the desired satellite. The coordinates of most of them are already entered into the program and there is no need to search for anything.
An icon marked with a circle or cross will indicate the correct direction for the satellite dish. Refer to it.
Turn on the tuner, select a satellite from the central converter and look for at least some signal from this head. The search is performed by raising, lowering and rotating the antenna itself.
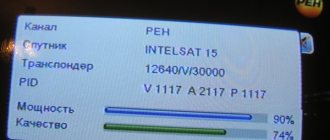
The signal quality is indicated as a percentage scale and is located at the bottom of the screen. You want to achieve the highest possible value.
To do this, very, very slowly begin to turn the plate in different directions. The mirror itself cannot be covered.
If there is no signal, or it is of very poor quality, the dish drops slightly. Then the process of turning around is repeated. As soon as a good quality signal is found in height, the dish is preliminarily fixed vertically.
After which, you can again turn it left and right to find the highest possible quality. There will never be 100%, just look for the highest possible figure - 68-75%, etc.
Having found the best position, finally clamp the rotating mechanism to the right and left. Just don’t fully tighten one bolt at a time, otherwise the plate will move to the side a couple of degrees. Tighten the nuts evenly, like on car wheels or an engine head.
When the corners are all set, it is necessary to again adjust the entire structure in height. Having loosened the fasteners, you begin to raise or lower it vertically, all the time monitoring the signal.
Remember that the maximum is always found using the downward method.
If you found it and went further, in the direction of decrease, raise the plate back a little higher and reach the point where the maximum signal is just beginning.
Why is this needed and what does it give? During long-term operation under the weight of snow, wind, and rain, the dish will still go down a little, worsening the signal.
You need to put it on a stretch, as it were. This will preserve the signal quality for a long time.
Keep in mind that the plate must initially be fixed level to the wall or roof.
If this is not observed, then having found the horizontal maximum of the signal, you will begin to look for the vertical maximum. And in the process of this, the horizontal position will go away. You will have to adjust the horizontal-vertical several times.
Next, proceed to the next stage of setup - scrolling around its axis of the central converter clockwise or counterclockwise. Here you can also achieve a signal improvement of several percent.
This way you have adjusted the plate itself and the central head. Let's move on to setting up side converters from other satellites.
Switch the tuner to the next satellite and call up its information line. Thanks to the multifeed, the converter of this satellite can also be rotated up and down, brought closer or further away from the dish.
Just like with the middle head, first look for the maximum on the vertical, and then move the side converter closer or farther towards the central one. At the end of the settings, rotate it around the axis.
When setting up satellites from the side converters, pay special attention to where you stand relative to the dish. On the side heads, the signal from the satellite arrives at the center of the mirror and, reflected like in a billiard, hits the converter.
So, in order not to block this signal with your body, you should be located on the nearest side of the tuning head, and not on the opposite side.
After searching and setting up a satellite from all three converters, the process can be considered complete. Hide and seal the cable from rain and precipitation, and securely secure the satellite cables with clamps to prevent them from being blown around by the wind.
TOP 5 reliable satellite television providers in Russia
In addition to the purchase and installation of equipment, there remains one more important detail - the choice of a satellite TV operator. Today, there are quite a lot of companies providing such services throughout the country.
This raises the question: “Which operator is better to connect to?” Let's consider proven and popular providers in Russia.
- NTV plus. The first domestic operator to start broadcasting in satellite television format. To date, viewers have access to 200 channels, 30 of which are broadcast in HD format. Satellite location: 36°E.
- Rainbow TV. A package of Russian and international TV channels designed for a wide audience. The broadcast network includes sports, children's, music and film channels. Satellite location: 75°E.
- TV MTS. A new service from a well-known mobile operator. Once connected, 130 TV channels are available, 30 of them in high definition format. The receiver has an intuitive interface and takes television broadcasting to a completely new level.
In particular, viewers can watch live broadcasts and pause, rewind, and watch video on demand.
- Telecard. Today, it is the most affordable satellite television operator operating in all regions of the country. There are two types of connection equipment: SD and HD, which imply different tariff plans that differ in the broadcast network and broadcast quality.
- Tricolor TV. Currently it is the largest provider in the Russian region. The key advantages of purchasing equipment are the absence of a subscription fee and a reliable signal level, regardless of external factors. The broadcast network includes 38 TV channels, and a paid package is available.
In addition, you can pay attention to the operators “DV Platform”, “Continent”, “HD Platform”. Providers offer a wide selection of thematic and educational channels in high image quality
In conclusion, we offer you to watch an intelligent video that will help you cope with the task yourself:

