Satellite Internet operators:
Gazprom
Tricolor
KiteNet
Lansat
Map link:
Setting the satellite dish tilt angle (elevation angle)
To correctly adjust the satellite dish according to the elevation angle, you need to know the parameters of your antenna. For an offset antenna, the main parameter is the offset angle β. You can find out the value of this parameter in the antenna datasheet or on the manufacturer’s website. For most manufacturers it is within 18°-27°.
Having found out the value of the offset angle β, you can calculate the value of the inclination angle Y=α-β for tuning to the satellite of your choice. Angle α—elevation angle for the selected satellite.
Do not be alarmed if, as a result of the calculations, you get a negative Y value; for offset antennas this is normal; the antenna will be directed slightly “to the ground”.
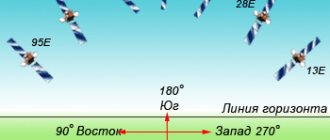
Setting the antenna rotation angle in azimuth (in the horizontal plane)
The azimuth of the antenna's beam axis to the satellite means the angle, expressed in degrees, formed between the line indicating the geographic direction to the north and the projection of the axis of the main lobe of the antenna's radiation pattern onto the plane of the ground surface at the installation site of the antenna aimed at the satellite.
The positive azimuth direction is determined by moving the antenna from the north direction clockwise.
True azimuth, or geographic azimuth, is the angle measured clockwise between the geographic meridian and the direction to an object.
Magnetic azimuth is the angle laid clockwise between the magnetic meridian (the direction of the compass needle to North) and the direction to the object.
Setting the rotation angle of the satellite dish converter
A positive value of the rotation angle corresponds to turning the converter clockwise, a negative value - counterclockwise. The rotation of the converter is indicated from the side where the satellite dish is located.
To receive signals from satellites broadcasting in circular polarization (TricolorTV, NTV+), the angle of rotation of the converter is not important.
Magnetic declination
Magnetic declination is the angle between the true meridian and the magnetic one. The eastern magnetic declination is considered positive, the western magnetic declination negative.
Determining the maximum height of an obstacle to be overcome
If, while working with an interactive map, there is an obstacle (tree, building, etc.) on the direction line to the satellite, near the installation site of the antenna system, you need to check whether this object is shielding the signal from the satellite.
To determine the maximum height of the obstacle to be overcome, move the marker
-symbolizing an obstacle to the place where the object under study is located.
In the Distance to obstacle column, the distance from the antenna installation site to the object will be displayed, in the Height of obstacle to be overcome column, the maximum height of the obstacle that will not interfere with satellite reception will be indicated.
Selecting a satellite (from a group of satellites)
This list contains the names of satellites located in geostationary orbit at the previously selected position (“Select satellite” menu).
Beam selection
Each satellite has a number of transponders (receivers). Depending on the direction of the transmitting antennas, transponders are divided into groups. The direction in which a group of transponders transmit is called a beam.
Since the same satellite can broadcast a signal to different parts of the earth (for example, to Russia and Africa), you need to select the beam of interest that covers the place where the satellite signal is supposed to be received.
How to use the card
Self-tuning of a satellite dish using a map
Determining satellite dish settings:
Enter the name of the satellite.
Select the name (coordinates) of the satellite you are interested in in the “Select satellite” list, or indicate the name of the satellite television operator (for example, MTS, Tricolor TV, NTV+)
Find the antenna installation address on the map.
To search for the coordinates of a satellite dish installation on the map, enter the address of the object in the “Address or object” field (located in the upper left part of the map). If the system finds several addresses that match the search parameters, you will be asked to select one of them. When you select the required address, the map will automatically adjust to the object of interest.
An alternative method for finding your current address is to use the Locate button. The method is especially effective if you are near the place where the satellite dish will be set up, and to access the map you use a device equipped with GPS (for example, a smartphone or tablet). In this case, the center of the map will be moved to the point with the coordinates obtained from the GPS device.
Specify the exact location of the satellite dish installation
On the satellite map it is necessary to specify the coordinates of the antenna installation location as accurately as possible. To do this, the map scale is increased, “Map Type” switches to the display mode of satellite images Google Map or Yandex Map (depending on which map is more detailed for your region). Use the left mouse button to mark the mounting point of the satellite dish. A marker with a line directed towards the satellite will appear at the specified location. The location of the marker can be changed by dragging it around the map.
Make sure that nothing interferes with the reception of the satellite signal - the direction line to the satellite does not cross large trees, tall buildings, etc. If the line crosses a large object, you need to make sure that it will not interfere with the signal reception. To do this, you can use the “Calculate obstacles” button. Drag the marker symbolizing the obstacle onto the object being examined. In the “Height of obstacles to be overcome” column, the maximum height of an object that will not interfere with reception will be calculated. If an object located in the satellite signal path is higher than this value above the antenna, it may interfere with reception. In this case, you will have to increase the height of the antenna installation, or choose a different location.
Selecting satellite dish size
Different satellites over different regions transmit signals of different strengths. This parameter is called Equivalent Isotropically Radiated Power (EIRP). The size of the satellite dish depends on the EIRP at the receiving point. You can determine the size of the satellite antenna required for reliable reception of satellite television from the table included with the receiving equipment. If you do not have such information, you can use the “Satellite coverage area map” (the Coverage area button).
After completing the above steps, all the necessary data for fine-tuning the satellite dish will be displayed above the map. From the antenna installation site, a direction line to the satellite will be drawn. If tuning to the selected satellite in a given location is not possible, the message “Reception of a signal from this satellite in the selected location is not possible!” will appear.
Satellite dish setup:
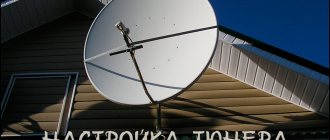
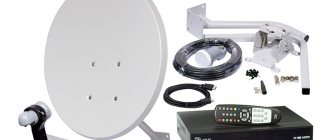
Assembly and installation of a satellite dish
Assemble the satellite dish according to the attached instructions, install the converter on it (if a linear polarization converter is used, it must be rotated to the required angle; for a circular polarization converter, this setting is not needed). Attach the bracket to the installation location and hang the antenna on it.
Pre-setting by azimuth (angle in the horizontal plane)
Make an approximate adjustment of the antenna in the horizontal plane - pointing the antenna towards a pre-selected object on the map (it is convenient to select the object on the direction line to the satellite).
If the adjustment is made using a compass, rotate the antenna at an angle equal to the value of the “Magnetic azimuth” parameter (rotation is carried out clockwise from the direction to North).
If during installation you do not have the opportunity to use a compass (or installation using a compass is not possible due to magnetic anomalies), and there are no obvious reference points for alignment on the satellite map, you can adjust by the sun. To do this, you need to click on the Sun direction button, after which a line will be built on the map from the installation location in the direction of the sun (the construction is made for the current time and changes during the day). Having determined the difference in angles between the direction towards the sun and towards the satellite, adjust the antenna (during installation it is convenient to navigate by the shadow).
Pre-setting by elevation angle (angle in the vertical plane)
Set the tilt angle of the satellite dish equal to the “Elevation Angle” parameter. If using an offset antenna, be sure to subtract the offset angle. The offset angle value can be taken from the documentation for the satellite dish or from the manufacturer’s website; usually it is within the range of 18°-27°. Do not be alarmed if during the installation process you find that the antenna is directed towards the ground; this is quite a common occurrence for offset dishes.
Fine tuning to satellite
If you do not use special devices to tune to the satellite, then connect a satellite receiver to the antenna. On the TV screen, in the satellite receiver settings, two scales “Signal Strength” (Signal Level) and “Signal Quality” will be displayed. Slowly rotate the antenna in a horizontal plane to the left and right by 10°-15°, trying to achieve a value on the “Signal Quality” scale of more than 70. If, after rotating the antenna, it was not possible to achieve this value (or the “Signal Quality” value has not changed at all), change the tilt of the antenna in the vertical plane a couple of degrees and repeat the above steps.
Source
How to set up an antenna for a satellite
If the initial pre-installation of the antenna using a compass or map did not bring results. That is, there is no image on the TV screen or the power and quality are low. Then it is necessary to more accurately point the antenna at the satellite. To do this, we will use the method of scanning the space at the expected location of the satellite. The essence of the method is clearly reflected in the figure:
We need to smoothly rotate the antenna in the horizontal plane, shifting it in steps of 1..2 cm. After each shift, we pause for 3..5 seconds to allow the receiver to process the signal. We control signal strength and quality levels on the TV screen. As soon as you find the satellite, the power value will first increase, and then the quality.
If, when the antenna is rotated horizontally, the signal is not “captured”, it is necessary to move to the vertical displacement of the antenna. To do this, without changing the position of the antenna, move the upper edge of the antenna approximately 1 cm forward or backward, fix this vertical position and repeat the horizontal search the required number of times after moving the vertical one step. We continue until we get approximately the following values:
These values are quite sufficient for high-quality Telecard reception in Volgograd. After which the antenna setup can be considered complete. Tighten all bolts and nuts tightly. At the same time, we control the values of the power and quality parameters.
Setting up the IntelSat 15 85E satellite (Continent TV) in 5 minutes.
To set up a satellite dish, you don’t have to resort to the services of specialists; you can do it yourself, and I’ll tell you how in this article.
For setup we will use the universal spectrum analyzer Dr.HD 1000S.
As an example, let’s take a more complex satellite 85 degrees, this is the well-known “Continent-Telecard”.
Approximately we turn the converter towards the satellite and, turning the antenna, look at the location of the satellite along the spectrum.
Having detected a spike in the graph, we check which satellite we are targeting.
We turn on automatic scanning of transponders and the analyzer determines what degree and satellite we are tuned to.
As you can see in the screenshot, the analyzer from transponder 12601 read information about the satellite and determined that it was Continent TV and was hanging at 85 degrees.
The first task is completed, the dish is pointed at the satellite, now we need to more accurately adjust it to the best signal reception.
Fine tuning is carried out according to the usual strength-quality scales.
The operator is automatically determined - Orion Express and the signal quality is 49, which is quite acceptable.
You can also go to the “info” menu and view information about the satellite, operator, and transponder modulation.
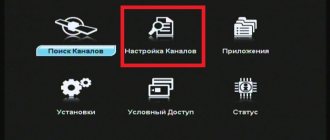
Go to services and see what channel package is on the satellite.
And if you want to scan them and watch them, then you need to go to the channel search mode, select from the list the provider that interests us, in our case this is Continent TV.
We found 38 open access channels that you can watch freely.
As you can see, you can quickly and easily set up an antenna for almost any satellite using a spectrum analyzer.
Below you can see a video on the practical use of a spectrum analyzer when setting up a satellite dish.
Source
| Ren TV | TV channel 2×2 | TV channel football | Vh2 Classic |
| Home TV channel | SET | Eurosport | National Geographic Channel |
| Our favorite movie | TV XXI | Extreme Sports Channel | Telecafe |
| Universal Channel | AXN Sci-Fi | Discovery World | Ocean TV |
| TV 3 | Phoenix+Kino | Discovery Travel & Living | Expert TV |
Initialization of the NCC
1.Start the virtual machine, select the installation language and click “Install Continent...”. Platform type – “Custom” The installation of the Continent OS will begin. After installing the OS, you need to initialize the NCC. In the main menu, select “Initialization” – “Security node with network management center” :
The network device initialization process will start, followed by a message indicating successful initialization. After this you need to configure:
- System time. Required for logging. “Settings” – “System time” ;
- Create and upload certificates. You must create a root certificate and a NCC management certificate. “Certificates” in the main menu . To create a root certificate, you must select “CA Certificates,” press F2 and fill in the data for the certificate.
To create a NCC management certificate, select “Certificates” – “Management Certificates” – F2.
- After creating the certificates, you need to configure the NCC. In the main menu, click “Configure NCC” admin account . After that, select the management interface.
To control the NCC, we use the ge-2-0 (eth2) . Set the interface address – 192.168.1.1/24 . “Gateway” field empty. A connection will be made to this address to manage the Continent network.
Apply the specified settings. The NCC has been successfully configured. We can log in and view information about the device.
Setting up Telekarta TV channels: step-by-step instructions
Published: October 22, 2013 (as amended on February 14, 2021) Section(s): Video and sound Views: 422223 Comments: 8
In this article we will talk about the Telekart provider and its set of equipment for receiving a television signal in SD quality with the Globo X90 satellite receiver. I will tell you about my own experience of setting up a satellite dish without measuring instruments with a minimal set of tools. After reading this article, everyone will be able to do this.
The first time I encountered television satellite dishes was about 20 years ago, when I purchased and installed one at work. Then these were large saucers, more than a meter in diameter. They were usually installed on the roof and were not accessible to many people. And the setup for the uninitiated was comparable to a flight into space.
At that time, you could only watch foreign channels, since there weren’t any of your own, but there was the MTV channel, understandable without translation, thanks to which new music appeared in the house, and Beavis and Butt-head to boot :-).
Will Telecard work?
Before purchasing and installing an antenna, it is necessary to check whether the Telecard will be received in the location we need.
Telekarta is broadcast from the American satellite Intelsat-15. Its position in geostationary orbit is 85.15° East.
First you need to look at the coverage area. It will be very good if you find yourself in a reception area where a dish with a diameter of 0.6 meters is sufficient. If, according to the map, a larger satellite dish size is recommended in your area, then do not forget this when you purchase the Telekart satellite television set.
The second important point is to determine the direction to the satellite (azimuth) at the point of intended installation of the satellite dish. You should know that each area has its own geomagnetic declination. That is, if you accurately point the compass at the Intelsat-15 satellite, it will show a completely different value than 85.15° east longitude. And for proper setup we need to know the geomagnetic declination at the installation site.
The azimuth value for your locality, taking into account magnetic declination, can be found by calling the toll-free number 8 (800) 100-104-7. But I was unlucky, for some reason the operator gave the wrong information, as it turned out later, and it confused me, or rather, it increased the time it took to orient the antenna to the satellite. By the way, many people on the Internet complain about such “incorrectness” of the data provided by phone.
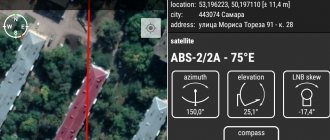
Therefore, let's take a simpler route and look at the Satellite Finder website. Which will clearly show us the direction to the satellite on GoogleMaps. To do this, enter the name of your city and use the map to select the place where we will install the antenna. Then select the satellite from the menu. The green line on the map will show the direction.
Under the map there is data useful for setting up, namely the magnetic azimuth for the compass - Azimuth (magn.): 122.4° and the converter rotation angle - LNB Skew [?]: -29.9°
The above satellite weighs a little low above the horizon compared to others; its elevation angle in my case is only 22.1°. But I was lucky with Telekarta, we will install the dish at the height of the 6th floor, and in the direction of the satellite there is a private sector immediately behind the house, that is, there are no obstacles.
On the map you need to find visual reference points for the direction of the satellite. For example, trees, buildings, structures and other stationary objects are clearly visible from the installation site of the satellite dish. It is desirable that they be at a relatively large distance of 1..2 km. This will reduce the antenna pre-installation error.
The telecard is now in MPEG4!
Kits have appeared on sale in Siberia that make it possible to watch more channels on Telekart for the same money! The package, within which the subscriber will have access to almost 30 TV channels, including federal ones in the version for Siberia, received the “popular” name “Telekarta Plus”.
Kits have appeared on sale in Siberia that make it possible to watch more channels on Telekart for the same money! The package, within which almost 30 TV channels will be available to the subscriber, received the “popular” name “Telecard Plus”. “Telecard Plus” activations are already available in test mode, which will last until December 20.
WHAT CHANNELS WILL BE AVAILABLE ON TELECARD PLUS? All channels that are available in a regular Telecard, as well as TV channels included in the free Continent TV package! In total - almost 30 TV channels!
Free after paid subscription ends:
1. First 2. First (+4) 3. Russia 1 4. Russia 1 (+4) 5. NTV 6. Russia 2 7. Russia K 8. Russia 24 9. Channel 5 10. Star 11. Carousel 12. Rain 13. TVC 14. Success 15. First educational 16. TV Mall 17. Channel 8 18. Open World 19. Always with you 20. Info channel 21. Promotional channel: one of the TV channels of the paid package “Continent TV”
For 2 rubles@ per day or 600 rubles per year:
22. Discovery 23. Universal 24. STS 25. Home 26. Ren TV 27. Male 28. Country Life 29. KHL
We remind you that Telekart provides TV channels free of charge only for 6 months after the end of the paid subscription (it is enough to pay for at least one day every six months). If there has been no payment for more than 6 months, the card is completely blocked. To restore broadcasting, the Subscriber needs to pay 150 rubles for re-activation, as well as 2 rubles@ for one day of access to the package of TV channels. If the subscription is renewed for a year - 600 rubles, re-activation is free.
The number of TV channels in the paid package “Telecard Plus” will be expanded.
WHAT IS NEEDED TO CONNECT TO TELECARD PLUS? To connect to Telekarta Plus, you need to purchase and install a set of equipment:
Special Continent TV card with a sticker “Suitable for Telecard Plus”
Continent Receiver:
The access card is activated for the Telecard Plus package according to all the rules for activating Continent TV cards.
CAN I ACTIVATE “TELECARD PLUS” FOR CONTINENT TV?
No you can not. “Telecard Plus” cards only have an annual subscription to the “Telecard Plus” package.
I HAVE ALREADY CONNECTED TO TELECART PLUS! CAN I WATCH MORE TV CHANNELS?
Yes you can! You have several options:
METHOD 1. Install an additional converter on the YAMAL-201 satellite
or a GI-205 converter, a TELECART-PLUS subscriber can receive additional FREE channels, including hourly versions for Siberia and the Urals!
1 TNT(+2); 2.TNT(+4);. 3.NTV(+2); 4.NTV(+4); 5.REN(+4); 6.REN(+7); 7. Russia24; 8.Knowledge; 9.Fight Club; 10.RAP.RU; 11.YAMAL-Region; 12.OTV-Primorye; 13.Amur Regional TV.
METHOD 2. Connect additional Continent TV packages!
Additional Continent TV packages are available for Telekart Plus subscribers: 1. Erotic package “1001 Nights”: world famous TV channels PlayBoy and Blue Hustler for only 149 rubles/month 2. Russian football channel “Our Football” - 300 rubles/month 3. National TV channel Tatarstan “Tatarstan New Century” (TNV) - 15 rubles/month
METHOD 3. Go to Continent TV!
Telekarta Plus subscribers can become Continent TV subscribers without replacing equipment! Already today, more than 60 TV channels are available on Continent TV, and their number will be significantly increased in 2012!
HOW MUCH DOES A TELECARD PLUS COST?
The estimated cost of a complete set of equipment for a subscriber (receiver with an annual card, antenna and other components) is about 5,000 rubles.