Let's be honest, we can't live without TV anymore. Of course, there is a computer, laptop, smartphone, but people still treat television with trepidation. People don’t have enough simple channels – they want something more interesting and varied. In this case, you cannot do without satellite TV. This means you need to choose the best satellite television operator.
There are several good companies operating in Russia that offer services for displaying pay TV channels. Some do this for a nominal fee, while others work for decent money. In many ways, the matter depends on whether the signal from the satellite can be received in a certain area. At the moment, the satellite TV operator Telekarta is wildly popular. They offer many advantages: from low prices to good coverage.
Preparing to install satellite equipment: what degree can be used?
Before purchasing equipment, you should make sure whether the Telecard will reliably receive a signal at the installation site. The company's website contains information about satellites on which you can watch all channels and from which one the signal broadcasts better. This is the American Intelsat-15 satellite, located in geostationary orbit 85.15 east longitude.
After making sure that there are no problems with the setup, you can begin installing the antenna. To prepare for installation, you must follow the following instructions:
- You need to carefully study and choose the coverage area for which Telecard TV works best. If the house is located on its edge, you should purchase a large dish that will receive the signal.
- An important point will be to clarify the azimuth, since each point on the ground may have a different geomagnetic declination. Simply put, the longitude 85.15 East indicated on the official website, at which most antennas pick up, will be incorrect at some points, and the satellite directed in their direction will not receive the signal. For correct operation, it is necessary to clarify the exact geomagnetic declination of the area. This data can be found on the Satellite Finder website.
- You need to make sure that nothing will block the signal. It could be a tree, or a tall building. A satellite dish installed on the roof of a house works best.
When done correctly, these steps increase the chances that the equipment will work properly.
Antenna installation
Regardless of which manual for assembling and installing the antenna will be used, it is important to remember one rule - the structure must be firmly fixed on a flat surface.
The pipe on which the receiving device is attached must be placed vertically. The provider's website has detailed instructions on how to quickly and correctly install the plate.
After the brackets are installed, you need to proceed to installing the antenna. After connecting the cable, you will need to turn the converter to the south. It is better to do this on the ground while the receiving structure is in a comfortable position. If you install it on the wall, then it will be difficult to reach the converters. Until the television works normally, the nuts do not need to be tightened completely; the product may have to be adjusted additionally.
How to install?
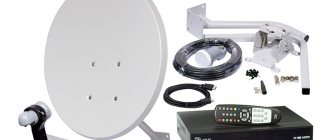
There is a lot of information on the Internet about installing satellite equipment, which can be used by a person who does not want to contact specialists. So the solution to this problem should not lead to a dead end. The most important thing is to securely fasten the antenna. For this you will need:
- perforator;
- self-tapping screws;
- dowels;
- level;
- spanners.
There are quite difficult moments that cannot be avoided. These include fixing and separating the cable. To do this, you will have to turn the converter in a circle. It is not advisable to do this on a fixed antenna because the equipment is very fragile and can be easily damaged.
After hanging the antenna, you only need to lightly tighten it, without tightening the bolts too much. There is a possibility that you will still have to turn it in order to catch the signal.
Connection conditions
Connecting to Telecard is quite simple, you just need to fill out an agreement and pay the entire cost of connection, which includes the fee for the connection itself, the price of the tariff, the cost of equipment, equipment installation and system setup. All this is provided by the company itself, so the cost justifies everything.
If you are interested in the rules and conditions under which the provider operates, then all the relevant information can be found on the “Subscription Agreement” page of the Telecard website. There is the contract itself, the rules for the provision of services and other information.
Specifics of connecting the Internet via a dish from Telekart
It is also important to note some features that distinguish the company from the technical side. Firstly, this is coverage of the entire country, without exception, no matter where the subscriber is, the signal will still reach, since the broadcasting system is so good that it will reach even remote country houses
Firstly, this is coverage of the entire country, without exception, no matter where the subscriber is, the signal will still reach, since the broadcasting system is so good that it will reach even remote country houses.
Secondly, the provider supplies the most modern equipment, which competes with all other companies on an equal basis. That is why the reception quality is almost impossible to reduce, which means that the work will be uninterrupted, the picture will be clear, and watching TV channels will be enjoyable.
Thirdly, Telekarta has more than seventy thousand employees who will go to any destination to install and configure all satellite equipment, which significantly eases the subscriber’s burden.
Self-tuning TV
Having installed the antenna, you need to start tuning it. First, connect the equipment to the TV. In this case, a prerequisite is that all equipment used is de-energized. You can connect the receiver using the SCART output or “tulips”.
After that, turn on the receiver and TV. First, the message “No signal” appears. It means that the equipment is connected correctly, all that remains is to figure out what parameters to configure it with. To do this, press the “Menu” button on the TV remote control and select “Antenna settings”. Channel tuning should happen automatically. If the installer does not correctly select which satellite to use, the antenna will be configured incorrectly and will produce a weak signal, which can reduce its quality by up to 5%.
How to set up the Telekarta-TV antenna for a satellite
To carry out the correct setup, you first need to check whether the settings already exist, and if they have been lost, then enter new data.
First you need to perform the following manipulations:
- Turn off the equipment from the network, connect all wires. Otherwise the receiver will be damaged. The device has special inputs - tulips, or use “Scart”.
- An image will appear on the screen indicating that the receiver is working, but the antenna is not receiving a signal from the satellite.
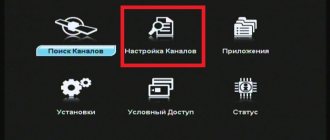
- On the remote control you need to press the “Menu” key, in which you need to find the antenna settings item.
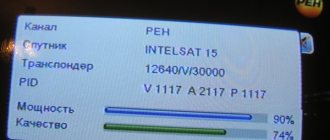
- If the signal is weak or absent altogether, then the parameters of the Telekarta TV channels will be approximately 45% of the potential signal strength. And the quality value is no more than 50%. With such indicators, the user will not see anything. The antenna must be installed in such a way that the power is at least 90% and the signal quality is at least 70%. The picture, in principle, will appear at 50%, but such a reception will be uncertain, and at the slightest deterioration of the weather it may disappear. If the equipment works normally, the set-top box will immediately pick up 18 channels.
Setting up the Intelsat-15 satellite
If the satellite is not on the receiver, then you need to add it manually. This is not difficult to do, especially if the parameters are known. You can find them on the official website.
Basic parameters that may be needed when adding a new satellite
The converter frequency is 10600. For some regions, the indicator 9750-10600 may be relevant, in particular for the Sverdlovsk region. The converter power supply must be turned on when setting up.
Transponder parameters:
- symbol rate – 30 thousand Msim/s;
- frequency – 12640 MHz;
- FEC – 5/6;
- polarization – vertical;
- broadcast format – MPEG-2, DVB-S.
If there is still no signal from the satellite, even if the equipment is configured correctly, then you need to check the local time setting. Perhaps this is the reason - the system sometimes perceives such failures as a software error, which is why it cannot start working in normal mode.
Users are recommended to register on the website of the satellite television operator in order to view news about new types of equipment or changes in signal reception parameters.
Pointing the antenna at Intelsat-15
If the installation and configuration did not bring the desired result, the signal quality is low, this indicates that you need to try to turn more accurately towards the satellite.
This can be done this way: carefully move the antenna a couple of centimeters, making a delay of several seconds so that the receiver has time to react. We perform these steps until a signal quality of 90% is achieved. This is quite enough for the smooth operation of the Telecard. After this, you can attach the antenna. At this point, the setup can be successfully completed.
Setting up and installing a satellite dish can take several hours. When carrying out work, you must be extremely careful not to damage the equipment.
According to experts, anyone can handle installing and configuring a satellite dish. It just takes a different amount of time for everyone. It is necessary to purchase equipment from official suppliers, who also provide a guarantee of its performance.
Before installing a satellite dish yourself, you must read the instructions in detail. Incorrect settings can lead to equipment failure and, as a result, unnecessary costs.
How much does it cost to use a Telecard?
Today, using the Telecard is free. Subscribers pay exclusively for the selected tariff plan and purchase additional equipment if necessary, and also pay for its installation if they cannot install the equipment themselves.
This point is spelled out in more detail in the contract that the client signs with the company when connecting to services.
The contract also describes other services and principles of cooperation with the company, conditions for each party and other key points of cooperation.
Accordingly, for the entire period of using Telecard services, the subscriber pays only an amount that depends on the selected tariff plan.
In addition, if necessary, the selected tariff plan can be easily and simply changed to another tariff - cheaper or containing more channels available upon connection.
Write-offs at the selected tariff can be either monthly or uniform for the year. More detailed information, as well as the exact payment amount, can be found on the company’s official website by going to the tariff plans menu and selecting the desired connection option.
Precise antenna positioning
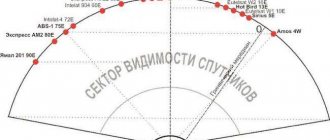
Select (determine) the direction to the south. It should be open, there should be no tall trees, buildings, structures, etc. The best option is if the 90 degree sector (45 to the right and left of the main direction) is completely open.
At the same time, the antenna installation site should be well protected from winds. These are two contradictory requirements, but ideally this should be the case.
After preparing the site, it is necessary to clarify the direction of the antenna. The Earth's magnetic field has its own characteristics, and it often happens that when the compass is directed from the antenna installation point to 85.15° E. d. it suddenly turns out that the satellite is not there. The easiest way to find out the real direction to the satellite is to ask one of your neighbors who has already installed and configured an antenna.
If the first attempts to align the antenna with the satellite using a compass or map did not produce results (there is no image on the screen, or there is one, but the quality is very low), then it is necessary to more accurately point the antenna at the satellite. To do this, a method is used to manually scan the space at the expected location of the satellite. The point of the method is to smoothly and slowly rotate the antenna within an imaginary plane, in the center of which is the point where the satellite is supposed to be located, and the dimensions of the plane are limited to 10 degrees along the horizontal arc and 6 degrees along the vertical arc. The antenna must first be pointed at the point where the satellite is supposedly located, and then carefully slowly rotate it, taking steps of no more than 1-2 cm, and after each step, pausing for a few seconds so that the receiver has time to “realize” whether there is a signal here, or not. In this case, you need to look at the TV screen. As soon as the satellite is caught, the power and then the quality will immediately begin to increase.
Installation of equipment
Installation of equipment should be carried out in the recommended direction. Installation involves simply securing the antenna at the desired height in a suitable manner.
The antenna is installed on the outside of the building.
Usually the equipment has special fasteners for installation. The equipment can be secured with ordinary self-tapping screws, or using pre-dowels - the choice of fastening method depends solely on the material of the surface to which you plan to attach the equipment.
The antenna can be adjusted in two directions at once - in azimuth or in the angle of the signal reception location.
Principles for adjusting the location of an antenna dish on a building
A slight adjustment to the location of the equipment can either increase the signal level from the satellite or completely reduce it to zero.
Telecard TV connection
Among the companies that provide satellite TV there are different offers. Some companies make quality products that are expensive, others are cheaper, but not so good.
It is also important to take into account the existence of such things as tariffs. Many companies provide a large number of them at once, which adds additional choice to the buyer
Among all those presented on the market, the best option is inexpensive and quite good - Telekarta TV. This is the ideal combination of price/quality and the optimal solution for the average person, since this thing is not so expensive, but the functionality is really impressive.
Now that you have already made your choice and calculated all the nuances, the first stage of the adventure begins - contacting the company and connecting the satellite television itself. To do this, you just need to contact the official phone number or go to the company’s website.
By contacting the provider company, you can find out about everything you are interested in. Also, when registering a connection, the company will definitely provide a complete connection in a short time and the entire package of equipment.
But the most important thing at this stage is the choice of connection tariff. It is worth familiarizing yourself with all Telecard offers in order to make an informed decision.
Setting up the Telecard set-top box
In order to enjoy all the delights of satellite broadcasting, it is not necessary to call a specialist and pay him for installation and connection of equipment. You can do this yourself using special recommendations. Brief instructions on how to set up a Telekart dish yourself are as follows:
- First you will need to purchase equipment for receiving television in DVB-S format. You should also determine the most suitable antenna size.
- Next, you need to select the installation location of the dish and select the correct vector in relation to the satellite.
- After this, the receiving structure must be firmly fixed on a stationary and level surface.
- Now the antenna should be directed in relation to the satellite as accurately as possible, using special formulas and calculations.
- All cables and connectors must be connected.
- The next step is to connect the set-top box and TV receiver.
- To get the most powerful and high-quality signal possible, you should rotate and tilt the antenna towards the satellite.
- After the channels have been found, and the signal and quality level scale has exceeded the 70% mark, you need to securely fix all connecting components.
Now about how to set up the Telekart set-top box. First of all, you need to connect all the cables, but this is done with the equipment turned off from the network. Connecting the tuner to the TV receiver is done through various interfaces, through tulips or outdated SCART. Now you can connect the set-top box and TV to the network and start the equipment. Using the remote control, you must select to display a picture on the screen from an external source. If the message “No signal” is displayed, do not be alarmed, this indicates that all devices are working, but communication with the azimuth has not yet been established. Next, the setup is done like this:
- On the remote control, press the button to go to the main Menu.
- Next, you need to select the “Antenna Settings” section.
- If the dish is not configured correctly, the signal strength will be below 50%, and the quality level may not exceed 5%.
- In order to view your favorite channels, you need to increase the signal level to 90%, and its quality must be at least 70%.
Users who are lucky enough to set up their equipment right away may not need to proceed to further steps. If the signal strength is weak and the channels were not found, you will need to perform more precise dish tuning. It must be slowly rotated horizontally, shifting it no more than 1-1.5 cm. After each shift, it is recommended to pause for 5-6 seconds so that the tuner has time to process the signal. If the horizontal displacement does not bring positive results, the receiving device will need to be moved vertically. This must be done until the signal strength and quality level reach high values.
What is this service?
Reliable satellite television Telekarta is the choice of those who want to have a good service for relatively little money. This is a budget option that involves cardsharing, sharing, antennas and has many channels, both free and paid.
It is positioned as:
- High quality satellite TV.
- Professional home cardsharing.
- Perfectly matched gears.
- Inexpensive cardsharing.
- Professional antennas.
All broadcasting of all channels is carried out from one satellite, which covers the entire territory of the Russian Federation. You will receive not just a high-quality signal, but also stable quality.
Antennas for the Telecard should be selected at your discretion. Of course, the cheapest antennas may be somewhat inadequate. However, if you purchase antennas from the middle price range, then reliable operation is guaranteed.
For those who know what Continent TV is, it can be noted that Telekarta is their analogue, but such card sharing costs much less. But the number of channels is also more modest. Basically, it only accommodates streams that have a special broadcast protocol. A detailed list of channels can be seen on the website.
You can determine exactly how many channels a provider broadcasts using the list provided by the official website. This way you can find out what to expect when purchasing such cardsharing. Reviews of Telecard satellite TV, as well as the price, are also available on the website.
Determining the direction to the satellite
This procedure can be done using a compass or using a map. Let's consider both methods.
Using a compass
First, you need to check with the service department the azimuth of the village in which you live, taking into account the magnetic deviation. It is also necessary to find out the vertical tilt angles of the dish and the rotation angles of the receiving and amplifying external device. To clarify this information, you can call 8 (800) 1001047. For example, let’s take data for Moscow:
- azimuth with magnetic deviation = 137 degrees;
- the angle of inclination in the vertical plane is -11°, it is directed downwards;
- the rotation angle of the external receiving device is 27°.
Now you can take the compass and go outside. On the street, turn your back to the wall in the southeast of your house. Determine the north using the compass (the arrow points to 0°), and plot the azimuth on the device (137°). Fix the direction in which the arrow will point at azimuth 137. You can make a note for yourself for further orientation, for example, a tree or house standing in the distance. This is the direction towards satellites.
Using a card
To determine the direction to the satellites using a map, you must, in the same way as in the previous method, clarify the settings for your locality through the call center. For example, take the data for g
Moscow, which were also taken into account in the previous method
Determining guidelines for installing the plate
We take a map of your locality, you can simply print it from any search engine. Additional tools we will need are a protractor and a pencil. Use a pencil to mark the object on which the antenna is installed. When determining which direction north is, search engines usually mark the cardinal directions on their maps. From the north guide, use a protractor to mark 127° - this is the direction to the Intelsat15 and Horizons2 satellites. Using the map, you can make a note for yourself, for example, the edge of the roof of a house standing in the distance.
With a map on which the marks are marked, go out of the house and look for the landmark visually made earlier on the map, and then evaluate where on the building you can install the dish so that there is no obstacle to the signal in the direction of the satellite. If you have decided on the installation location, proceed to the next step.
Connection and first work with the receiver menu
When the position of the Telekart dish is found, it is time to connect. As usual, this is done with the equipment turned off; it was not enough to pick up the “short one” at such a crucial moment.
Let’s get started in the comfort of your own home:
- We turn on the TV receiver.
- We turn on the receiver (you are already familiar with the terminology, of course).
- We switch the receiver to a signal from an external source (AV).
- In this situation, a professional would take up the equipment, but you can also turn to the capabilities of the TV.
- We see that, indeed, the problem is in the antenna - the signal power does not reach 50%, and its quality is less than 10%. The minimum goal is to make these indicators 90 and 70 respectively.
- Only experience in the future will tell you that 50–60% is often enough, but if we talk about a stable signal, you should always strive for more.
How can I find out my remaining balance?
You can find out the account balance in several ways.
In particular, you can find out the amount of money using:
- Information windows in your personal account;
- Mobile phone (call the hotline number);
- Request by email to the company;
- Using a mobile application for the client and so on.
Information on account balances is updated regularly by the company, which means that the information you see will be complete and reliable in any situation.
List of available channels for a client who paid for services on time
Thus, the client can find out account balances and replenish it in a timely manner for uninterrupted provision of services.
Authorization window in the client’s personal account
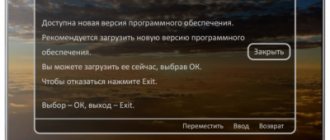
It is important to remember that in the event of lack of payment, the company has the right to interrupt the broadcast without warning, and in the case of prolonged absence of payment, completely block the client’s accounts, completely limiting access to the service. https://www.youtube.com/embed/NCROy7r0lNM
Step-by-step instructions for setting up Telecard channels
Setting up channels from Telekarta will not take much time, because this operator cares about the convenience of its customers. Each user can independently make most of the settings, use the entire range of services, connect and disconnect various broadcast packages. The absence of the need to call a specialist for every issue is a big plus for Telecard subscribers.
When setting up channels yourself, you must follow the following instructions:
- Before setting up, it is advisable to turn off the TV and receiver from the network for a few seconds, and then turn it on again.
- Using the remote control, switch to AV mode. If there is no image on the TV screen (but it works), this means that the settings have been reset to factory settings successfully and you can start tuning channels.
- Open the “Menu”, select the “Antenna Settings” section and enter the parameters for the corresponding region.
These are general steps; then you need to take into account the features of a particular receiver. Let's look at the example of receivers from the EVO line:
- Open “Search for channels” in the “Menu” and make sure that there are no channels.
- Return to “Menu” and select “System Settings”.
- Open the “Transponder List” and enter a password of 4 zeros.
- Press the red button on the receiver's remote control.
- Enter the values in the lines: “Flow speed” – 44948; “Frequency” – 10981; “Polarization” – top.
- To confirm the search, you need to press the blue button on the receiver.
- In the “Scan Mode” window that opens, click the “OK” button.
It should also be taken into account that each receiver model has small configuration features that are easy to figure out on your own.
After completing all the steps, you will have to wait for some time while the receiver searches for channels, usually it takes about 15 minutes. To successfully complete the process, do not turn off the TV at this time. Once the channels are found, they will begin broadcasting. If this does not happen, you may need to reboot the receiver or remove and reinsert the card, after which the setup should work.
Setting up free channels
In addition to paid broadcast packages, the satellite television operator Telekarta provides a small list of free TV channels. Sometimes they disappear and additional configuration is required. For example, on “GLOBO” type receivers, it is performed as follows:
- After resetting the settings to factory settings, the message “No channels detected” will appear on the TV screen; you must click the “OK” button.
- Select “Satellite”, from the proposed list click “(KU)Express...” and confirm the search.
- Free channels installed by the provider will be found automatically.
The TV channel update scheme for all receiver models is approximately the same. If for some reason you were unable to configure it yourself, you should contact a specialist.