Today, many people use a mobile phone to temporarily store information, but gradually the reserve becomes full and it becomes necessary to move it to a flash drive. Even if you have a memory card without an adapter, the electronic media can be connected via an adapter and recorded. You can immediately transfer all data from the device, bypassing the computer, which will significantly save time. This method can also be used to transfer videos that take up a lot of space.
On the phone, information can be stored both on the internal memory and on the built-in memory. Before moving data, connect the device to your computer and evaluate the internal load. If the videos are on the card, they can be extracted and used as storage media. In cases where this is impossible to do or when moving to a specific flash drive is required, you need to follow the algorithm described in this article.
How to transfer a downloaded movie to a flash drive. How to write a large file to a flash drive
So often we want to download something from the Internet.
Some people want to download music to a flash drive, some want to download movies, some want to download games. Downloading from the Internet and saving files on your computer or flash drive is quite simple. You just need to find the desired file on the Internet, click the “Download” or “Save” button, and then select the location on the disk where we will save this movie, music or any other files. Let's figure out how to download a movie or any other file to a flash drive. Let's take a closer look at how to download a movie to a flash drive. First you need to decide where you will download the movie from. Maybe you have already downloaded it and stored it somewhere on your computer’s hard drive? If yes, then you can simply copy it to a flash drive. If not, then most likely you will need to download it from the Internet. You can generally download a movie from torrents or file hosting services.
You can download the movie to your hard drive first, and then burn it to a flash drive.
In order to see what is already on your flash drive, you need to go to “My Computer” and find your flash drive in devices with removable media.
Please note that films are usually quite large in size. Typically, movie sizes range from 700 MB to 2.50 GB. The film must be of such a size that it can fit on your flash drive. Modern flash drives on average range in size from 2 GB to 32 GB. So your film should probably fit.
So, you probably already know the name of your film. It is better to download from torrents, as it is free. In case of downloading from file hosting services, you will have to pay for high speed. Enter the name of the movie + the word torrent into the Yandex or Google search bar. For example:
Men in Black 3 torrent download
You must have any torrent client installed on your computer, for example, µTorrent. If it is not there, download it too from the official website. You can download it. Then install.
After that, go to one of the suggested sites and look for the “Download” button. You may need to register on the site to start downloading. Register.
After the movie is downloaded to your computer, find it on your hard drive and copy it by right-clicking on it (Copy). Next, log into your flash drive and insert this movie by right-clicking on the flash drive (Insert). That's it, you downloaded the movie to the flash drive!
Now you know how to download a movie to a flash drive. Similarly, you can download music, games, and any other files from the Internet. It's time to put your knowledge into practice.
Greetings, dear users! In my previous articles, I have already written articles on the topic of USB storage media, namely, what needs to be done if, or another example, and important data for us remains on it, what to do in such a situation in order to recover data from a flash drive .
If you really don’t know what to do in such situations, then I recommend that you read these articles. Since I started today’s article by talking about flash media, today we will learn another useful point directly related to the flash drives themselves.
Imagine that you decided to write an image of some program or toy onto your flash drive (by the way, I already wrote an article about what an image is, you can read more). Let's imagine that the volume of your flash drive is 16 GB, and your flash drive is completely empty and formatted. In turn, the volume of the recorded image is about 6 GB. At the moment when you try to write an image to a USB drive, a notification of the following nature appears: “Not enough disk space”. Agree that the appearance of a notification of this kind puts you in a kind of dead end situation, because the flash drive itself is completely empty and has 16 GB of free space.
And if we simply copy a file whose size is less than 4 GB to a USB drive, then in this case the file itself is successfully placed on the flash drive and no errors associated with a lack of free space arise. The question arises, ?
At one time, I also had to deal with a similar phenomenon when a file with a volume of 5.7 GB was not written to a removable disk, while another file whose volume was approximately 4.3 GB was written to a flash drive without any problems. So what exactly is the problem then, you ask?
In this article, we will try to understand why files larger than 4-5 GB may not be written to your flash drive. Do you know why such large files are not written to flash media? In general, more and more often, many users who encounter this problem are asking questions: how to write a file larger than 4 GB to a flash drive. Regarding the current issue, I can tell you that I have heard different answers, or rather arguments, reasoning from users who have not encountered a similar phenomenon before.
For example, on one of the forums, a user suggested the following answer options: files are not written to the flash drive because there is a virus there, which takes up the entire free disk space of the flash drive, or the flash drive is damaged or burned out. I will tell you that in such a situation, when large files (more than 4-5 GB) are not written to the flash drive, this does not mean at all that it is damaged, or that there is some kind of virus or malware on it. And the reason for this is the fact that the flash drive has a FAT32 file system. By the way, I recommend that you also read my article:
From here you should remember once and for all that this file system is not capable of supporting large volumes of files (more than 4-5 GB) for work.
Therefore, if you want files larger than 4 GB to be successfully copied to a USB drive and then used by you for a specific purpose, then in this case you first of all need a flash drive with the NTFS file system. In general, they say that the NTFS file system has the ability to contact such files, the volume of which can reach up to 16TB. From all of the above, it follows that in order to write a file larger than 4 GB to a flash drive, you will need a flash drive with the NTFS file system. There is no need to specifically run to the first computer store you come across to purchase such a flash drive.
I suggest you move on to the practical part of this article to clearly see how to independently convert the file system of your flash drive. So, I hope it is now clear to you that we will need to perform a number of necessary steps to create a flash drive with the NTFS file system.
In this article we will look at several options that will allow you to convert the file system. Therefore, if you have difficulties copying large files, then this article will help you solve your problem.
First option:
So, after you have connected the flash drive to your computer, and the latter has successfully identified and recognized the USB drive, you will now need to go to the properties of the removable device.
To do this, open “My Computer” and right-click on the removable device.
From the context menu that appears, select Format. As a result, a special window will open in which you will need to click on the drop-down menu in the “File system” line and select NTFS.
Please note that if there are documents on your removable media, you will need to copy them to your computer.
Then all you have to do is click on the “Start” button. After a short time, the removable media will be formatted, after which the removable media will have the NTFS file system. However, one caveat should be noted here. If your computer still uses the Windows XP operating system, then in this case you will not be able to immediately format the flash drive in the NTFS file system.
In such a situation, you will need to open the “Device Manager” and select the value of removable storage, and then, as shown in the figure below, you just have to go to the “Policy” tab to activate the corresponding option.
Finally, you should open the properties of the flash drive again and format it.
After the flash drive is formatted, do not forget to set the parameter value in the “Policy” tab to its original value.
Second Option:
The second option involves changing the file system of a removable device using the “Convert” operation.
To begin, you will need to launch the command line by clicking on the “Start” button and typing “cmd” in the search bar and then pressing “Enter.”
Now in the window that opens, you should specify a special command, which will convert the file system of your flash drive. The command looks like this:
Then just press “Enter”. However, you should know that before converting a removable device, you will need to copy all the data to the hard drive, because you risk losing it.
I also draw your attention to the fact that you need to carefully enter the command and indicate the correct letter of your removable device. Otherwise, the conversion operation will not be completed and an error will appear indicating that the flash drive label is invalid.
At the end of this article, I would like to add that in addition to the above methods, they also resort to using various programs that also do a good job of changing the file system of a removable drive. However, if there are options for changing the file system that do not require installing software, then it is best to use these simple options, thereby not burdening your computer with the installation of unnecessary software.
For today, that’s all I wanted to tell you about today in terms of transferring data via removable devices. Have you ever seen errors of this kind when copying a large file and wondered how to write a file larger than 4 GB to a flash drive? I hope today's article was useful to you. See you all in the next article, dear readers!
PS Finally, I suggest watching a video clip of a meteorite falling on Chelyabinsk!
How to download a movie to a flash drive.
So often we want to download something from the Internet. Some people want to download music to a flash drive, some want to download movies, some want to download games. Downloading from the Internet and saving files on your computer or flash drive is quite simple. You just need to find the desired file on the Internet, click the “Download” or “Save” button, and then select the location on the disk where we will save this movie, music or any other files. Let's figure out how to download a movie or any other file to a flash drive.
Let's take a closer look at how to download a movie to a flash drive. First you need to decide where you will download the movie from. Maybe you have already downloaded it and stored it somewhere on your computer’s hard drive? If yes, then you can simply copy it to a flash drive. If not, then most likely you will need to download it from the Internet. You can generally download a movie from torrents or file hosting services.
You can download the movie to your hard drive first, and then burn it to a flash drive.
In order to see what is already on your flash drive, you need to go to “My Computer” and find your flash drive in devices with removable media.
Please note that films are usually quite large in size. Typically, movie sizes range from 700 MB to 2.50 GB. The film must be of such a size that it can fit on your flash drive. Modern flash drives on average range in size from 2 GB to 32 GB. So your film should probably fit.
So, you probably already know the name of your film. It is better to download from torrents, as it is free. In case of downloading from file hosting services, you will have to pay for high speed. Enter the name of the movie + the word torrent into the Yandex or Google search bar. For example:
Men in Black 3 torrent download
You must have any torrent client installed on your computer, for example, µTorrent. If it is not there, download it too from the official website. You can download it. Then install.
After that, go to one of the suggested sites and look for the “Download” button. You may need to register on the site to start downloading. Register.
After the movie is downloaded to your computer, find it on your hard drive and copy it by right-clicking on it (Copy). Next, log into your flash drive and insert this movie by right-clicking on the flash drive (Insert). That's it, you downloaded the movie to the flash drive!
Now you know how to download a movie to a flash drive. Similarly, you can download music, games, and any other files from the Internet. It's time to put your knowledge into practice.
A flash drive is a convenient, modern portable medium for storing data. Its use does not require special knowledge and skills; the flash drive is very simple. However, many who purchase a flash drive for the first time do not know how to use it. One of the frequently asked questions is how to download a movie to a flash drive. We will tell you about it.
What to do next
So, you have downloaded music from the Internet, and the flash card is in the USB port. Now you can proceed directly to copying. You can do what is most convenient for you, for example, copy the folder and paste it on a removable disk, or cut and paste. If you use the first method, you will have music not only on a flash drive, but also on your computer. If you cut a folder, it will be deleted from the PC memory. See for yourself what suits you best, because everything is individual.
Please note that the folder size should not exceed the size of your removable storage device. If this condition is not met, then you are unlikely to succeed.
As you can see, everything is simple here, so let's go further and deal with another elementary, but very important point.
Downloading a movie to a flash drive
First, make sure that the film will fit on the flash drive. To do this, you need to see how much free memory there is on the flash drive, and how much the film weighs. Information about the movie can be obtained from the place where you download it. If the movie has already been downloaded from the Internet, then you just need to select it with the left mouse button, right-click on the selected movie, and select “Properties”. There you will find information about how much the film weighs.
The same thing with a flash drive. In the “My Computer” menu, select the flash drive, select it with the left mouse button, right-click and find out the memory status of the flash drive. The film should not weigh more than the free space on the flash drive. If everything is in order, then we do this:
- After inserting the flash drive into the computer, the flash drive window will appear on the screen either by itself, or the flash drive can be opened through “My Computer” by double-clicking on it with the left key.
- The flash drive window is open, the movie is on the computer. Now select the movie and hold down the left mouse button on it. Without releasing the button, drag the movie onto the flash drive. If you want to send a movie to a specific folder on a flash drive, you must first create it and then open it. Then the movie will be saved in the desired folder. If you want the movie to be saved only on a flash drive, then after selecting it on your computer, right-click on the movie, select “Cut,” move to the flash drive folder, right-click in it and select “Paste.” You can also quickly transfer a movie to a flash drive without dragging it by selecting it, choosing not “Cut”, but “Copy”, and again in the flash drive folder using the right mouse button “Paste”. In this case, the film will be saved both on the computer and on the flash drive.
- Now we are waiting for the film to be copied. A new window will appear in front of you, in which you can watch the movie being copied to the flash drive. The copying speed depends on the operating system installed on your computer and the weight of the film itself. After this window disappears, the film will be copied completely to the flash drive.
- There is a simpler option. If the computer recognizes the flash drive, you just need to select the movie on the computer, right-click on it, select “Send...” and specify the path to the flash drive. The movie will be copied, you will need to wait.
How to download movies for free to a flash drive? The methods we described are absolutely free; they represent standard operations for working with files and folders. You can download films for free on special Internet resources. To find them, enter “download movie (movie name) for free” into your browser search. You can also install free programs on your computer that will allow you to quickly download movies from different sites, for example, from Contact. Now you know how to download a movie to a flash drive.
If you have or will have a flash drive with a capacity of more than 4GB, then this advice will definitely be useful to you! You may have already encountered a situation where, when you try to write to an empty flash drive with a capacity of, for example, 8GB of one file larger than 4GB, the system displays the error “Not enough disk space.” What is the reason? After all, the flash drive is empty and there is plenty of space on it!
And the reason is the file system, which is installed at the manufacturer. I don’t know why, but the manufacturer installs the FAT32 file system, but it does not support files larger than 4GB. To work with files larger than 4GB, the file system of the flash drive must be NTFS - this system allows you to work with files up to 16TB in size.
In order for the NTFS system to appear on the flash drive, it must be formatted accordingly in this system. To do this you need to do the following:
1. Insert the USB flash drive into the computer.
2. Open “My Computer” (key combination “WIN+E”).
3. Select a flash drive.
4. Click on the flash drive with the RIGHT mouse button and select “Format...” from the menu. Just first save all the information from the flash drive on another medium.
5. In Windows 7, everything is simple - you can immediately select NTFS in the “File system” drop-down list, but in Windows XP there is no such option, but you can enable it. Therefore, if you have Windows XP, read the following points. If Windows 7, select NTFS and format. 6. On the “My Computer” desktop icon, right-click and select the “Manage” menu item, or perhaps you can immediately select “Device Manager” in this menu. 7. If there is no “Device Manager” item in the menu, then select it after clicking on the “Management” item. 8. In the “Device Manager” window, click the plus sign on the “Disk devices” item and double-click the LEFT mouse button to open the properties window of the connected flash drive. 9. In the properties window, go to the “Policy” tab and select the “Optimize for execution” option. 10. Click the “OK” button.
11. Remove the flash drive from the computer and insert it again.
12. Repeat steps 2-5. Only now in the “File system” drop-down list you will be able to select NTFS. Now you can easily write a file larger than 4GB to a flash drive. In addition, by formatting the flash drive in NTFS, you increase the chances of data recovery after deletion.
It just so happens that over time, MP3 players have lost quite a lot of importance, since they are easily replaced by any smartphone. The main reason is convenience, because, for example, if you own an iPhone, music can be transferred to the device in completely different ways.
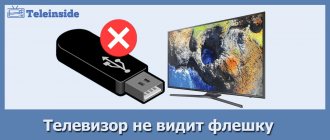
Why is this happening
This occurs due to the file system (FS) and is associated with some of its features. Typically, flash drives have one of the versions of FAT - File Allocation Table. It is this that prevents you from writing a large file to an external drive. Even on a 128 GB flash drive.
There is another FS - NTFS or New Technology File System. It is widely used in Microsoft Windows. And it does not block downloading if the file exceeds 4 GB. In NTFS, the size of each cluster is much smaller - this is a certain area into which information is added.
Before attempting to write a file larger than 4 GB, check the file system type of the flash drive.
To make an analogy, imagine a piece of paper with a tic-tac-toe board on it. One cell equals a cluster. If you put a cross in it, you will fill it out entirely (that is, you will no longer be able to write any data there). Even if there is still room left in it. For both file systems, the total size of this field is the same - for example, one notebook sheet. In FAT, it fits 9 cells (3 by 3 field). And in NTFS - 49 (field 7 by 7). Because in the second case the clusters (cells) are smaller.
In addition, in NTFS you can configure quotas and set access rights. There is logging, which increases reliability.
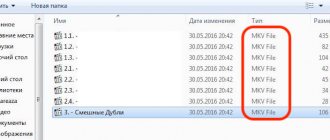
If, when copying, you see the warning “The file is too large for the destination file system,” then the drive is set to FAT. To check this:
- Insert the flash drive into the USB port.
- Open My Computer. Your flash drive should be displayed there.
- Right-click on it.
- Select Properties. The information you need will be there.
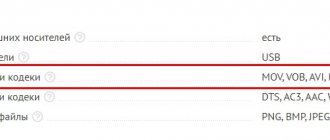
It’s easy to find out the file type - to do this, go to Media Properties
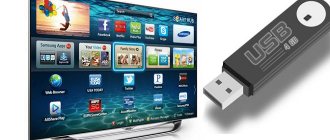
If "FAT" is indicated, it means that only data up to 4 GB in size can be written to the disk. But what if you downloaded a video and want to watch it on TV? Or do you need to transfer an archive of photos?
You can remove the maximum volume limit. Before copying a large file to a flash drive, change the FS. If the drive is a boot disk, you must leave FAT.
Ways to transfer music from iPhone to computer
As it turns out, there are more options for importing music from your computer to your iPhone than you might have thought. All of them will be discussed later in the article.
Method 1: iTunes
iTunes is the main program of any Apple user, since it is a multifunctional processor that serves, first of all, as a means for transferring files to a smartphone. Previously on our website we have already discussed in detail how music is transferred from iTunes to an i-device, so we will not dwell on this issue.
Read more: How to add music to iPhone via iTunes
Method 2: AcePlayer
In place of AcePlayer there can be almost any music player or file manager, since these applications support many more music formats than the standard iPhone player. So, using AcePlayer, you can play the FLAC format, which has high sound quality. But all subsequent actions will be performed through iTunes.
Read more: File managers for iPhone
- Download AcePlayer on your smartphone.
- Connect your Apple device to your computer and launch iTunes. Go to the device management menu.
- On the left side of the window, open the “Shared Files” section.
- Find AcePlayer in the list of applications, select it with one click. A window will appear to the right into which you will need to drag music files.
- iTunes will automatically start syncing files. Once it is completed, launch AcePlayer on your phone and select the “Documents” section - the music will appear in the application.
Method 3: VLC
Many PC users are familiar with such a popular player as VLC, which is available not only for computers, but also for iOS devices. If both your computer and iPhone are connected to the same network, music transfer can be done using this application.
- Install the VLC for Mobile application. You can download it completely free from the App Store using the link above.
- Launch the installed application. First, you need to activate the function of transferring files over Wi-Fi - to do this, tap on the player menu button in the upper left corner, and then move the toggle switch next to the “Access via WiFi” item to the active position.
- Pay attention to the network address that appears under this item - you will need to open any browser on your computer and follow this link.
- Add music in the VLC control window that opens: you can either immediately drag it into the browser window, or simply click the plus sign icon, after which Windows Explorer will appear on the screen.
- Once the music files are imported, synchronization will automatically start. After waiting for it to finish, you can launch VLC on your smartphone.
- As you can see, all the music is displayed in the application, and now it is available for listening without access to the network. This way you can add as many favorite songs as you want until the memory runs out.
Method 4: Dropbox
In fact, absolutely any cloud storage can be used here, but we will show the further process of transferring music to an iPhone using the example of the Dropbox service.
- To use this you will need to have the Dropbox app installed on your device. If you don't already have it downloaded, download it from the App Store.
- Transfer the music to the Dropbox folder on your computer and wait for the synchronization to complete.
- You can now run Dropbox on your iPhone. As soon as the synchronization is completed, the files will appear on the device and will be available for listening directly from the application, but with a small clarification - you will need a network connection to play them.
- In the same case, if you want to listen to music without the Internet, you will need to export the songs to another application - this can be any third-party music player.
- To do this, tap the menu button in the upper right corner, and then select “Export”.
- Select the “Open in...” button, and then the application into which the music file will be exported, for example, the same VLC discussed above.
Read more: Best players for iPhone
Method 5: iTools
As an alternative to iTunes, a lot of successful analogue programs have been developed, among which I would especially like to mention iTools due to its simple interface with support for the Russian language, high functionality and conveniently implemented ability to transfer files to Apple devices. Using this instrument as an example, we will consider the further process of copying music.
Read more: iTunes analogues
- Connect your iPhone to your computer using a USB cable, and then launch iTools. On the left side of the window, open the “Music” tab, and select “Import” at the top.
- An Explorer window will appear on the screen, in which you will need to select the tracks that will be transferred to the device. Once selected, confirm copying the music.
- The process of transferring songs will begin. As soon as it is completed, you can check the result - all downloaded songs have appeared on the iPhone in the Music application.
Each of the presented methods is easy to implement and allows you to transfer all your favorite tracks to your smartphone. We hope this article was useful to you.
We are glad that we were able to help you solve the problem. Thank the author and share the article on social networks. Describe what didn't work for you. Our specialists will try to answer as quickly as possible.
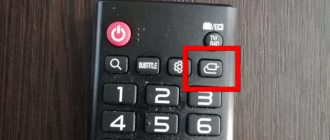
Forget HDMI
First of all, you need to concentrate on connecting to the DisplayPort connector and forget about HDMI.
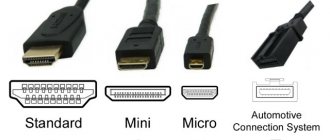
You won't find a USB-C hub that offers better HDMI capabilities than DisplayPort, but you can find hubs that offer higher resolution and refresh rates via DisplayPort. I suspect that most hubs with HDMI support internally simply work via DisplayPort and a DisplayPort to HDMI converter. This is because video can be transmitted more efficiently via DisplayPort to USB-C at the same frequency and resolution than via HDMI. DualMode DisplayPort++ connectors are capable of functioning as HDMI connectors with a simple passive adapter (it converts 3.3V to 5V). Regular DisplayPort connectors cannot do this and require an active HDMI adapter. I don't know of any other differences between these two types of DisplayPort.
Connecting a flash drive
To do this, you need to go to File Explorer on your computer. Depending on the version of Windows, you will have to launch the My Computer, Computer utility, or click on the yellow folder on the taskbar. It displays all connected drives, both built-in and external. Usually you can see three main partitions: C, D, and the optical drive. The letter that is assigned to the laser drive is automatically determined by the system depending on the settings, as well as what other drives are determined by the system. Some people partition their memory into more sections. When you connect your flash drive, it will appear here. In addition, it will automatically be assigned its own letter.
Almost always, the first time you turn on an external drive, the system will display an autorun window in which it will ask what you want to do with this media. You may be offered options to play media files, copy photos, or launch Explorer to view all content. Choose the last option. If this window does not appear, the disk will still be automatically displayed in Windows Explorer.
Find your flash drive in device explorer
If you have autorun activated, then each subsequent time you connect the flash drive to the computer, an explorer window will automatically launch, in which you can see all the stored files. If they are not there, an empty folder will be displayed. In addition, you can see the name of your drive in the lists of all drives. Usually by default it matches the manufacturer's name.
Downloading songs from the Internet
Often, users puzzle over how to download music from VK or any other social network. However, it is easier to record the desired song on your computer and then download it to a flash drive from specialized resources. The best sites for downloading music on the RuNet are:
- zaycev.net;
- drivemusic.cc;
- mzmuz.ru.
You can download music to your computer or laptop from these resources without prior registration. The presented libraries contain many Russian and foreign songs. However, the functionality of the sites is limited. For example, they cannot be used to cut music from a video or trim the melody to a ringtone.
You can download the desired song to your computer or laptop and then immediately transfer it to a flash drive using the search bar:
Enter the appropriate query into the search engine and press Enter.
Click on the site with the required melody.
Click on the “Download mp3” button.
As you can see, everything is very simple. Even removing protection from a flash drive is more difficult than finding the right song and recording it on your computer or laptop.
Recording music to a flash drive
Let's assume that you have already prepared all the songs in advance and copied them to one folder on your hard drive. Now let's look at . This can be done in several ways.
Method 1
- Via the context menu (method 1).
The simplest option. To begin, go to the folder on your hard drive in which your songs are stored for recording. Next, right-click on the folder name and select the “Copy” option. This folder is now on your computer's clipboard. The system remembers that you copied this folder. Now you need to show the place where you want to place the copied files. In Explorer, open your flash drive, right-click again and select the “Paste” option. A window will immediately appear showing how many files have been copied and how much time is left until the procedure is completed. Wait a few seconds or minutes and you will see that the music is now located on the flash drive. With these manipulations you can copy music
Method 2
- Via the context menu (method 2). Go to the folder where the music tracks are located, right-click on the desired files or the entire directory, then click “Send”, in the pop-up menu of which you will see the name of your portable media. Select it, after which the same window will appear, displaying the progress of file transfer.
- Using a key combination.
How to download your favorite songs from your computer to a flash drive, without using the mouse or the Windows Explorer context menu at all? Go to the folder on your hard drive from where you want to download music from your computer to the flash drive, select all the files by pressing the Ctrl + A button combination, then go to your flash drive and press another combination, this time Ctrl + V. A pop-up window will appear again, showing how much has already been copied and how much is left. These key combinations are very easy to use. - Drag and drop files and folders.
Another alternative option that allows you to do without remembering any combinations or context menu items. The Windows Explorer window is structured as follows: the main window on the right side, which is much wider than the left, and a quick access menu to drives and folders on the computer on the left side. Go to the desired directory on your computer’s hard drive, select the desired music file, then, while holding the left mouse button, drag it into the left window, moving the cursor to the name of the flash drive. If some folders are already recorded on it, be careful not to miss the main partition of its file system and the songs do not end up in another directory. In a couple of minutes the copying process will be completed. Just drag and drop files by selecting them with your mouse
Connect to a computer: how to do it
In order to understand how to download music from a computer to your phone, use the included instructions and select the most appropriate synchronization option.
So, let's say you have a USB cable. However, for some unknown reason, the phone is not detected by your personal computer. What could this be connected with and how to emerge victorious from a difficult situation? It's simple - you need to install the necessary drivers.
- Enter your phone model and the phrase “synchronization with computer” in the search bar of your browser.
- Download and install the appropriate software. However, remember that, as a rule, the data cable should be disconnected from the PC when installing a synchronizing application.
- Once the installation is complete, connect your phone and wait a moment while the system initializes your device.
This is the most traditional way to download music from a computer to a phone. Let's move on to a more interesting connection method.
Article information
This article was produced by our experienced team of editors and researchers, who reviewed it for accuracy and comprehensiveness.
Categories: Computers and laptops
In other languages:
English: Save Files to a USB Flash Drive, Italiano: Salvare Documenti in una Chiave USB, Español: guardar archivos en una memoria USB o lápiz de memoria (pendrive), Français: sauvegarder des fichiers sur un périphérique USB, Deutsch: Dateien auf USB Laufwerken speichern, Português: Salvar Arquivos em um Pendrive, Bahasa Indonesia: Menyimpan File ke dalam USB Flash Drive, Nederlands: Bestanden opslaan op een USB stick, 中文: 将文件保存到优盘中, العربية: حفظ الملفات على ذاكرة تخزين محمولة, ไทย : เซฟไฟล์ลงแฟลชไดรฟ์ USB, Tiếng Việt: Lưu tập tin vào USB, 한국어: USB 저장하는 방법, हिन्दी: यूएसबी फ़्लैश ड्राइव (USB Flash Drive) में फाइल ्स सेव करें (Save Files to a USB Flash Drive), Türkçe: Dosyalar USB Flash Belleğe Nasıl Kaydedilir, 日本語: USBフラッシュドライブにファイルを保存する
This page has been viewed 25,959 times.
Was this article helpful?
Not really
About typical problems
We have already figured out a little about how to download music from the Internet to a flash drive, and now a few words about how to fix the most common problems with removable media. If the material does not transfer to the flash drive, then try inserting it into another USB port, as it may be faulty. Next, you need to right-click on the icon of the new equipment that appears and click on “Properties”. You will see whether the device is working normally and how much free space there is. When downloading music, always remember that you can pick up a virus that will infect both the card and the operating system. In any case, the malfunction comes either from the USB port or directly from your flash drive. Everything can be solved by changing the nest or going to a service center.