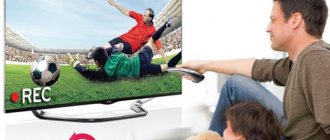
Television is an important invention of mankind, because with its help you can keep abreast of all the news, as well as spend your leisure time pleasantly and usefully.
Unfortunately, it is not always possible to be in front of the screen at the moment when an interesting program or a long-awaited film is being broadcast. In such situations, a real salvation is the program recording function, but this will require a modern TV or a special set-top box.
Another condition is the presence of digital TV, since devices with this option can capture and transfer digital streams to the media. Recording a TV program is actually not that difficult; the main thing is to find out from the instructions whether the TV supports this technology or not.
What devices can record programs
You can find out whether your TV supports the broadcast signal capture function from the included instructions or on the manufacturer’s official website.
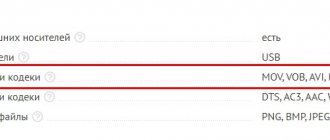
It is worth saying that the ability to record video is available to owners of almost all Smart TV models from LG and Samsung. You can't record video from your TV to any external drive.
The flash drive should be:
- Compatible with TV device. To make sure that the removable disk is compatible with the TV, you will need to connect the flash drive to the screen, press the “Source” button on the remote control, select “USB” and open the “Tools” submenu. Information about the possibility of recording a TV show on the connected flash drive will be displayed on the TV screen.
- Formatted. You can format a removable disk either on a computer or on the TV itself. In the second case, the user will simply need to select the initialization tool from the already mentioned “Tools” submenu. You can also start formatting from the Smart Hub section.
It should be noted that sometimes even after formatting the flash drive, users encounter an error when saving videos.
In such a case, to solve the problem, you should purchase another removable disk and repeat the steps described just above. The reason for the incompatibility of the flash drive with the TV may be hidden in the outdated version of the latter’s firmware.
Recording programming
To start the process you need:
- Go to the “Program Manager” and select “Add Programming”.
- Select the TV channel from which you will need to record the program.
- Set a start date for recording (on a specific date or any other order of days), indicate the start and end time of recording.
- To stop current program recordings, use the lowest right button on the remote control and confirm stopping recording. You will be prompted to go to the recorded programs and view the recordings made.
How to record a program from a TV to a flash drive (external USB drive):
How to record video from LG TV
The broadcast is recorded on LG smart TVs using the standard Time Machine utility.
The functionality of this application allows you to:
- set up recording of a video stream according to a schedule, thanks to which you can, for example, save TV programs broadcast while the user is away from home;
- play a recorded movie on the TV screen without using any additional devices;
- play the video shown in real time in reverse order - the function is called Live Playback.
A user who wants to record streaming video must consider the following features of Time Machine:
- when the TV device receives a signal from a satellite dish, the TV program recording function may not be available;
- It will not be possible to capture streaming video if the television provider encrypts the broadcast signal;
- You can only view the recorded video on the TV used for capturing.
The algorithm for saving streaming video offline is as follows:
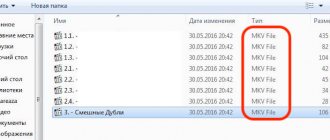
- Connecting a removable drive to the USB connector of the TV device. When TV asks for permission to initialize the drive, the user can only agree to this action - as a result, all content will be deleted from the flash drive.
- Activate the TV recording function. The application is part of the software and is located in the system menu. To start capturing a video stream, click on “Record”.
- Turn on the required TV channel. While playing a broadcast program, the device will automatically record the video stream to the connected flash drive. To stop recording, you need to click the button with the corresponding name in the Time Machine menu.
The saved broadcast can be found in the “Recorded TV Programs” section.
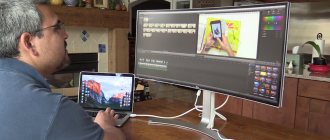
Fourth method: using an old video camera
This method is noticeably more complicated than the previous ones, however, the result will be better and more stable. An old video camera from a well-known manufacturer like Sony will show excellent signal conversion quality, because at one time they asked for a lot of money for this device.
You will need:
- Good VCR;
- Mini-DV video camera with a pass-through channel, namely an analog video input. Typically this is an S-video input;
- PCI-E Controller with ieee 1394, FireWire, i.Link, DV connectors (different companies had different connector names);
- The ieee 1394 cable is 4 or 6 pin depending on the connector on the camera, but you can buy a universal 4/6 pin;
- Cable for connecting the VCR to the camera. Most often S-video;
- A computer or old laptop with an ieee 1394 input (then you don’t need to buy a PCI-E controller);
- A video digitizing program that captures screens.
You can search for a video camera on ad sites. We are not interested in the quality and ability to record in this situation. The main thing is that the device itself works and can receive and transmit information. Accordingly, you need to buy a cable to connect the VCR to the camera and a cable with ieee 1394 connectors, another name for FireWire, i.Link or simply DV. Most often, the connectors in cameras are 4 or 6 pin, but this point is worth clarifying or buying a universal cable.
Further - more difficult. On modern PCs/laptops it is difficult to find the right connector. For a PC, you will have to buy a PCI-E Controller with ieee 1394 connectors, costing about 1,500 rubles. If you have an old laptop, there may be either the required connector itself, or an expresscard into which you can insert an adapter without loss of quality.
As an alternative, you can find an adapter for USB, but here the loss in image quality will be very significant. And then this method will make no sense at all. So it’s better to buy an old Windows XP PC for digitization. Moreover, powerful hardware is not required for our manipulations, and old drivers will take root much more reliably in the version of the system for which they were written.
If everything was connected and installed correctly, then items with devices will appear in the task manager. Next, launch the On-Screen Camera program, turn on the VCR and capture the video and audio stream.
Screen Camera Capture
If you decide to use such a complex method, we recommend buying one of the best models of old tape recorders. This will give a better result than a simple device with mezzanines.
Sony KDL43W756C
Please help! We can’t look at the flash drives, we can’t find a pointer or icon for the usb input anywhere
Answers 13
The whole family looked up and down and the usb icon does not appear
So in the picture it is directly drawn where look at the top of the page, on the back panel where the antenna is connected there and the USB
The flash drive is inserted and we can’t find where to turn it on. There’s no usb reflection on the screen
We looked through it and sorry, persistence. Maybe it’s not for us. We didn’t find anything and sorry again
For example, look at a photo like this from a flash drive
- Connect a USB device or network device to the TV.
- Press the HOME button, then select - the USB device, server or specified folder containing the file you want to play - the folder or file from the list. If you selected a folder, select a file.
And look here
Using standard Windows tools
First, let's look at the methods by which we can write data to disk without installing and downloading third-party programs. Small-soft recording tools began to be added to their systems with the release of Windows XP. But, as you can guess, these tools were constantly modified and improved with the release of newer versions of the OS.
Option 1: as a flash drive
The function of freely writing data to disk assumes that you have CD-DVD-RW drives. Thus, in the future, you will be able to freely overwrite or edit those files that you recorded earlier.
In addition, it is important to consider that this method is recommended to be used if in the future you intend to use the recorded disc only when working with a computer. Saved videos and music may not play correctly on players and turntables
First, you will need to insert the disc into the drive. If the system recognizes the drive, it will be assigned a Latin letter of the alphabet, and it will be displayed in the “Devices and drives” list.
Select the files you would like to transfer. Having selected one or more, apply RMB to them. In the context list that appears, select “Send”, and then specify the previously recognized drive.
Next, you will be given the opportunity to add a name, as well as choose one of two options for recording data. We are interested in “Like a USB flash drive”. Once selected, click Next.
After selecting the required option, the formatting process will begin, that is, cleaning before recording.
After successful formatting, you will be able to see an empty folder (drive), into which you can easily move files, similar to the process of transferring data to a flash drive. To do this, copy the files using the Ctrl + C key combination, and paste them by pressing Ctrl + V in the desired place.
Option 2: with CD/DVD player
But this method will allow you to play saved files in music centers and DVD players. You can use both RW and R disc formats for recording.
- After inserting the disc into the drive for reading, the Explorer service will prompt you to select the type for further reading of the disc. In the window that appears, select “With CD/DVD player”.
- Next, you will need to copy the required files and paste them into the newly prepared disk.
- After successfully transferring the required multimedia files, the list with it will be called “Files prepared for writing to disk”. In the directory area, call up the context window by right-clicking and select the “Burn to disk” function.
- The Recording Wizard window will then appear. Give the drive a name and click Next. (It is better to change the recording speed to medium or minimum values for better playback and data reading).
- The recording process will begin, upon completion of which you can remove the drive and use the latter for its intended purpose.
Burning a disc from an ISO image
This option will be of interest to those who want to reinstall or restore the system, or place a ready-made image with the application for installation on another computer. To do this, we will need an .iso file, which we will burn. Right-click on it and select the “Burn disc image” function.
Next, you will see the image recording service integrated into Win10. By default, recording will be done to the drive in your drive. Click "Next" to begin the transfer.
Once the process is complete, you will receive an installation disc ready for use.
Using the Windows Media program
If you don't have a DVD at hand and want to burn music to CD-RW (CD-R), then the best option would be to use the standard Windows Media program. With it, you can record music in mp3 format, with the possibility of subsequent playback on players, very quickly and efficiently.
- To begin, select the list of music files that you would like to record. Apply RMB to them and select “Add to WM player playlist” in the drop-down list.
- Wait for the track to start playing. In the upper right corner we will be interested in the button “Switch to library”. Click on it.
- At the top of the interface, find and click on the “Record” button.
- In the “Recording list” window that appears, click on the inscription “Import Unsaved list”.
- The previously selected tracks are now ready for recording. Select the “Start Recording” function at the top of the program.
- The recording process has begun. You can see the transfer status in the window above the files. Once the transfer is complete, you can use the newly created Audio CD. Also, you can clear the list of files, or write a second copy.