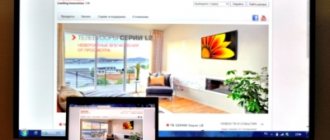
It often happens that you need to duplicate the screen of a computer or mobile device onto a TV. For example, when there are photos and videos that you want to share with family or friends on a large modern screen. Just a few years ago, not everyone would have been able to cope with this difficult task, but today new technologies make it possible to easily solve it both for modern TVs and for more outdated models. To do this, you must first select the necessary computer devices and applications.
There are three most common ways to transfer images from an external screen to a TV:
- HDMI cable;
- Chromecast;
- Miracast;
- EZcast;
- AirServer.
Mirror photos and videos to TV via HDMI
The simplest and highest quality way to send a PC screen to a TV receiver is to use HDMI. The high-definition HDMI (High-Definition Multimedia Interface) interface is usually included with the TV. It can be purchased at any mobile equipment store. Digital devices of modern TV models use HDMI to receive and transmit high quality images to the screen simultaneously with sound transmission. This method can be used for any mobile devices and laptop models without an HDMI port through a special micro-USB to HDMI adapter, which can also be purchased at any gadget store.
How to connect your phone to TV via wifi
Modern smartphones that support the Android or iOS operating system provide users with all the functions that are present on every PC. Smartphones have advanced cameras that allow users to capture interesting moments in their lives. In order to present beautiful pictures/videos to your family and friends, you need to connect your smartphone to the TV.
When purchasing a new TV, people often wonder how to connect via their smartphone on their own without the help of a professional. Sometimes even a modern TV with the Smart version needs to be configured. Only after this can you transfer content from your mobile phone or tablet to the big screen. The article discusses several methods:
- 2 devices are connected to the same wifi network, you need to install a special program on your home TV. Mostly they recommend allshare for Samsung TV or smartshare for LG;
- when connecting the TV to the network via cable, wifi support is not required;
- smartphones that have the Andro operating system >
Note! When choosing a specific method, you need to know about the functions of your TV. In almost all cases, a prerequisite is connection to a single network.
Equally important is connecting your smartphone via a router. If there is a home network in the house, then you will have to use a router. All modern mobile phones are equipped with a communication option to gain access to a wireless network. You can easily connect to the router via the Internet using your mobile device.
Screen mirroring using HDMI
Sequencing:
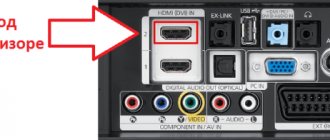
- Find an HDMI port, connect one end to the TV and the other to the PC.
- Turn on both devices and press “Enter” with the TV remote control.
- Select HDMI from options. Now you can see your monitor on TV.
Sound settings:
- you need to right-click on the speaker icon on your PC;
- select the following options in sequence: “Playback device” > “Playback” tab > “Digital output device (HDMI)” > “Yes”.
That's it, the connection is ready.
As you can see, this method is easy, reliable and of high quality, but it has disadvantages caused by certain inconveniences for users due to the limited length of the cable, which can interfere, for example, with children playing in front of the TV.
Method #2: YouTube broadcast
YouTube is the most popular video hosting site. It is most often used to watch videos, but recently progress has stepped forward and made it possible to use it to synchronize several devices with each other.
This function will be available if the TV is equipped with a Smart TV - such a device already has YouTube. This application is already installed on many mobile devices; otherwise, it can be downloaded from the Play Market.
To use the application as an intermediary between your smartphone and TV, you need to follow the instructions:
- Launch YouTube on your smartphone. Select any video you like from it and launch it.
- As soon as the video starts playing, you will need to click the wi-fi screen icon (the rectangle with the wi-fi icon in the upper right corner). This icon will be active if a TV with Smart TV is turned on nearby on your phone.
- After activation, a search for a suitable TV device will be carried out. If there is only one, then the contact will be made in a matter of seconds and the video that was launched on the mobile device will be played on the TV screen.
- If there are several TVs, then you will need to independently select the appropriate one from the list.
How to connect your phone to TV to watch YouTube is explained in the following video:
Transfer video to TV via Wi-Fi
Screen mirroring is easily achievable; if your mobile device and TV are made by the same manufacturer, they will likely have a "screen mirroring" feature (or something similar) on both devices. This will allow you to immediately see on TV everything that is on your smartphone without hassle. If the devices are produced by different manufacturers, then you need to enable the DLNA (Wi-Fi Direct) function on the TV and download the DLNA application to your smartphone via GooglePlay.
You can use a good app called AllCast (free for iOS and Android). For those who have an AppleTV, iPhone or iPad, you can connect via the AirPlay app to share with your TV. Older brands of TV and mobile equipment do not have such built-in functions, so you will have to use special Chromecast, Miracast and EZcast adapters.
Features of connecting your phone to TVs from different manufacturers
Today you can buy TVs from the most popular brands, such as Philips, Panasonic, LG, Thomson, which offer many interesting features. Among them it should be noted:
Samsung
TVs of this brand are based on the Tizen platform, part of the Linux family. In 2021, a new version of the operating system was released - Tizen 3.0. However, according to users, it is not much different from the previous one.
Note! In any case, the platform has proven itself to be stable and reliable.
Users note the consistency and convenience of the interface and navigation in general, for which the proprietary Smart Hub technology is “responsible”. By the way, thanks to the powerful quad-core processor that the latest models are equipped with, “smart television” from Samsung is particularly fast.
Most of the pre-installed programs are designed for streaming (broadcast online) content from various video hosting sites and online cinemas - Netflix, Amazon Instant Video, YouTube, etc.
Note! Many applications available for downloading fall specifically into the category of video streaming and access to gaming resources.
Almost all modern Samsung models have a built-in Wi-Fi receiver, so connecting and setting up network access will not take much time and effort. The TV itself will find available connections; all you have to do is select the one you need and enter the network password. Afterwards, you will need to activate the Smart Hub mode in the “Support” menu - and you can begin active use.
The advantages of Samsung TVs with Smart TV technology include a clear shell interface - the developers are confidently moving towards simplifying it. However, there are also disadvantages, for example, most applications in the official store are paid.
Since 2014, the manufacturer has been using the WebOS operating system for Smart TVs. Among the possibilities of the latter:
- location on the display of several running applications at the same time, for example, terrestrial television and Internet content;
- The TV can be used as an audio player even without turning on the screen.
Note! The webOS-based smart TV interface consists of a taskbar at the bottom of the screen. It's fast-paced, which can be a little confusing at first.
Smart TV from LG provides access to such applications, including Russian-language ones, such as:
- video services;
- news and weather;
- games;
- training programs.
Most of the TVs with the Smart TV function from LG are equipped with built-in Wi-Fi, so setting it up will not be a problem. However, to download and install new applications from the LG Store, you will need to create a personal account. The advantages of LG TVs are a convenient remote control with a gyroscope and the ability to voice control.
Sony Bravia
The manufacturer relied on one of the most popular operating systems - Android. Android for TV is adapted to a large television screen, and most importantly, there is no touch control.
The shell interface, unlike those of competitors, is a full-screen menu. Developers consider large icon sizes to be the best option, since the TV is usually located much further away than the computer or phone screen. Chromecast technology allows you to enjoy your favorite movie on the big screen.
Important! Using a smartphone, you can share the contents in your device with just one click of a button. All functions of the remote control can be performed by a smartphone based on Android or iOS.
In conclusion, it should be noted that to connect a TV device to the network from your phone, you need to download the appropriate application. Any software will allow you to transfer information over a local network.
How
to connect
Beeline
TV to a TV via
a router.
Advantages and disadvantages of Chinese SMART TV
-top .
. Set-top boxes for TVs
with
Wifi
for watching online
TV
and accessing the Internet.
How
to connect your phone to
Smart
TV
using
Wi
-
Fi
Direct.
. You need to go into the program on your phone
and
connect
to the selected
TV
.
. Technology for transmitting the Internet through
the power grid: equipment and characteristics. 0. 04/15/2019.
A laptop monitor does not always allow you to comfortably watch your favorite movies, play games, or search for information on the Internet. Therefore, many users are interested in how
to connect
a laptop
to
a TV
via WiFi
.
also connect
with .
Modern methods of synchronizing a mobile phone with any TV model via Wi-Fi allow you to connect these devices to exchange content and play information from a mobile device on the big screen. There are several ways to connect a smartphone to a TV via Wi-Fi.
Chromecast streaming device
Screen mirroring to a TV is a very reliable and widely used method all over the world. This is a streaming device designed to connect a PC and any mobile gadgets produced in 2010 and later to a TV. You can use it to listen to your music or watch photos and online videos from sites like YouTube.
Chromecast connection sequence:
- Connect the Chromecast HDMI cable to the TV port, and then connect the USB cable to a compatible port on any gadget.
- Install the Google Cast extension on your mobile gadget by downloading it from the Google Chrome store.
- Open a new window in the browser and click the “Yes” button, when the gadget detects external devices, find the TV icon and click on it.
- There is only one drawback of this connection - it works via Wi-Fi; if the connection is weak or overloaded, then the quality and speed of transferring photo/video/voice files may be low.
Options for connecting your phone to TV
In practice, several options are considered to correctly connect the phone to the TV.
Lightning Digital AV adapter
To connect your iPhone to your TV, you will need a special adapter. The Lightning device can transmit images in 1080p format.
Note! iPhone users can instantly convert a lower-quality image to HD.
Miracast
Modern Android phones support Miracast. The wireless standard is being released. Unfortunately, there are slight delays when working with Miracast. This only applies to broadcasting images from a mobile phone directly to a TV screen.
Connection via SlimPort
The standard option, which is most often used in practice, is SlimPort. Widely used for LG and Samsung companies. Generally, SlimPort displays better quality images. When working with SlimPort, there is no failure when transferring pictures or video files.
Note! The maximum image quality transmitted to the TV screen is 1080p.
Among the disadvantages are the high quality requirements for the HDMI cable. When purchasing a device at a low price, you need to prepare for noise and even the absence of a signal.
Screen mirroring using a Miracast adapter
There is a second way to stream images via a newer standard called Miracast, which will be especially useful for Windows 10 users. It is often called "HDMI over Wi-Fi" because it allows various devices to establish a connection using wireless networks. First used in Windows 8.1 and later versions. Almost all laptops and modernized operating systems use the mentioned technology. Miracast is capable of playing not only HD video on the TV, but also displaying all current monitor activities.
Miracast connection sequence:
- Go to your computer settings and click "Devices".
- Then go to the “Connected devices” tab and click “Add device”.
- Wait until the computer finishes detecting the device from the available options and click on the TV icon.
- If your computer doesn't automatically connect to your TV, right-click and select Display Settings, set multiple displays under the Duplicate These Displays tab, and then click Connect to a Wireless Display.
- After detecting the TV, click the “Connect” button to display the PC on the TV receiver.
- Although this gadget can be considered a breakthrough in terms of connectivity, it has one drawback as it cannot detect certain TV models.
Not happy with screen mirroring using Miracast? Here is another wireless solution - the EZcast device for transmitting media content to TV.
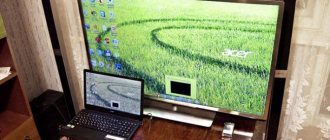
How to duplicate the screen from a computer
You can connect your laptop or desktop computer to an external monitor using the Intel Wireless Display interface. This wireless connection standard allows you to transmit video in FullHD resolution and with surround sound (5.1), which is enough for comfortable watching movies and surfing the web on a large TV screen.
To work with WiDi, the computer must meet the following requirements:
- Core family processor based on Ivy Bridge core;
- WiFi 802.11n support;
- Windows 7 or later operating system;
- installed Intel Wireless Display utility.
The process of displaying an image from a desktop or laptop to a TV is as follows:
1. Setting up WiDi on your TV.
Typically, setting up the “Wireless Display” is not required - the manufacturer of the TV device independently installs and activates all the drivers necessary for connection.
You can check the status of the parameters in the system “Settings”, which is accessed through the Smart menu: for example, on Samsung TVs you will need to open the “Network” section and go to the “Mirroring” tab.
If the WiDi parameters are lost, and the user is confident that the TV is compatible with this interface, it is necessary to update the device software:
- download the latest firmware version for your existing TV model from the manufacturer’s official website;
- “upload” the update to a flash drive formatted in FAT32;
- connect the removable disk to the TV via a USB port;
- open the “Software Update” section and scan external devices;
- start the update installation and wait for it to finish;
- reboot the device.
2. Setting up a Windows computer.
At this stage the user will need to do:
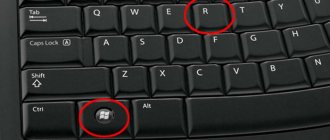
- calling the system Charm Bar;
- go to the “Devices” section;
- selecting “Projector”;
- opening the “Add a wireless display” section;
- selecting the desired monitor and requesting a connection.
3. Launch Wireless Display on a laptop or desktop.
After launching the utility, you will need to confirm the selection of the external monitor, after which the program will prompt the user with a special password, which must be entered in the field that automatically appears on the television screen.
You also have to choose one of the interface operating modes: “main display”, “duplication” or “extended desktop” - you can change the set parameter at any time. After pairing the devices, the image will begin broadcasting from the laptop to the TV. To mirror the contents of the macOS screen, you must use the AirPlay standard, which is supported by Apple TV set-top boxes and a number of television devices that have undergone a special certification procedure.
Connecting PC and mobile devices to Sony TVs
Before you perform Sony screen mirroring, you should read the user manual and check the output ports on your PC to confirm the connection settings and select the correct connection cable. If possible, it is best to use an HDMI connection or a DVI connection, as these options combine video and audio signals in one cable and also offer a high-definition extension to the TV receiver screen.
Connection sequence:
- Connect one end of the connection cable to the appropriate port on the side or back of the computer, and the other end to the appropriate port on the back of the TV.
- Each port on the TV is clearly marked with its function, so there should be no problem identifying the correct port. Turn on Sony.
- Press the AV or EXT button on the TV remote control until the PC output appears on the TV screen.
- If the display is stretched or cut off at the edges, you will need to change the resolution settings on your computer.
- To configure PC to TV settings, click the Start button on the taskbar on your desktop, go to Control Panel, and then select the Appearance and Personalization tab.
- Click on the “Adjust screen resolution” feature and select your preferred resolution from the drop-down menu.
- Experiment with different resolutions until you find a setting that displays correctly on Sony.
- Click the "Apply" button to confirm and save the settings.
Duplicating the Samsung screen, PC screens, smartphone screens of other mobile devices is carried out using the Screen Mirroring function, which is present on Samsung F, J, K, M-series TVs. If mobile devices or TV do not have this function, then Smart View software, which even works with iOS, is used for transmission. The screen mirroring procedure is the same as above.
Connection by cable
The number of connection options depends simultaneously on both units of equipment. The choice of method and the possibility of its use is influenced by the set of connectors and input/output ports on the equipment.
For example, there is a laptop with two graphics outputs at the end of the case - VGA and HDMI. There is also a TV that does not have HDMI, but does have VGA. This means that it is advisable to use a VGA cable.
Of course, you can output a picture from a laptop via an HDMI cable, and feed the signal into the TV using a VGA cable. But then you will need to additionally use a converter adapter that converts the digital signal to analog. Accordingly, the picture quality will be lost. Therefore, such a connection already causes difficulties, and there is no point in it. It's easier to use a simple VGA-VGA cable without any adapters.
If we talk about old and new equipment, then everything is going to the point that most previously used ports are no longer mounted in devices. At the moment, the highest quality, most popular and preferred port is the HDMI port. The image is transmitted in high quality (FULL HD), and an audio channel is also transmitted via cable.
New TVs and laptops can already contain only one type of graphics connector - HDMI. This both simplifies and complicates the connection process.
- No adapters or additional devices are needed. You just need to buy an HDMI cable that will output both sound and picture simultaneously to the TV.
- But the cost of a cord, especially a high-quality one, may not be the smallest. In addition, some “unexplained” problems may arise. For example, sometimes for some reason an image is transmitted via HDMI with stripes, constant picture disappearances, and periodic appearance of a black screen. Moreover, when connected to a monitor, the image works, there are no problems. But there is some kind of “incompatibility” with a completely new TV.
There are other cords that may be involved when connecting a regular TV to a "laptop computer".
- VGA. A popular connector whose direct purpose is to connect graphics cards of computers and laptops to external monitors. Previously it was built into all video cards on laptops. But now it is often missing, especially if the laptop is expensive. There will be only HDMI on the side of the case. Similarly with televisions - old televisions were equipped with a connector. New models contain either only HDMI, or HDMI along with an audio-video input (tulips, 3RCA). While the described connection is appropriate for monitors, it is not entirely convenient for TVs. Sound is not transmitted over the cable, only the image is transmitted. This means that the audio will be played on the speakers built into the laptop or on external speakers connected to it. If you need to output sound through television speakers, you need to run an additional cable from the laptop's audio jack for headphones to the audio port of the TV. The sound output method also depends on the connectors on the TV panel. You can use a 3.5-2RCA cord to connect sound to the TV receiver with two tulips, red and white, to transmit the right and left audio channels, respectively.
- DVI. Needed to transmit a digital or analog signal. Suitable for both types of signal. There are two types - Single and Dual. The second has a doubled number of contacts, which gives an advantage in transmitted quality over the Single interface. The connector is not built into laptops. Used in fairly old models of desktop PCs.
- S-Video. Like DVI, it is already outdated. You definitely won’t find this connector in laptops. But on older computers you can still see it, but it’s still better to connect through the previously described interfaces - HDMI or VGA.
- 3RCA. It has the well-known name “tulips”. This is a cable for transmitting analog signals (video and audio). Externally it looks like three wires connected together. At the end of each wire there is a plug (tulip). The color of the plug is different, it matches the color of the same type of connector on the TV. To connect, you need to insert a tulip of a specific color into the same port on any device. It is difficult to confuse, but sometimes due to inattention, users insert plugs into the wrong connectors, which is why no sound or video signal is transmitted. Yellow is responsible for video, red and white for audio. It will not be possible to connect to a laptop without using adapters, since it does not have ports for tulips. Therefore, if there are tulips on the TV and you want to make a similar connection, you will need to get a converter. The output of the converter should be AV, consisting of three tulips. The input will be VGA or HDMI, depending on what cable is available.
Connection via HDMI
- To connect your TV to your laptop via an HDMI cable, you will first need to turn off the equipment. This is done for security purposes so as not to damage the operation of the port (system).
- Next, both ends of the cable must be inserted into the required ports on both devices.
- The devices come back into operation.
- If the picture itself is not displayed on the television screen, you need to independently select the display source and make some settings on the laptop.
- The signal source is set in the TV menu under the same name. There is almost always a “Source” button on the control panel. It can be signed with the word “Source” or indicated by a wire with a plug. How the button is designated is determined by the manufacturer and model of the TV device. For example, on both almost identically priced TVs from different brands, the button has different symbols. On the Samsung TV remote control the button is labeled “SOURCE”. On the remote control from LG Smart TV, instead of an inscription, there is an icon directly on the button. Click on the desired button and select the source. On older TVs, the button may be labeled "AV". Then you need to press the button until the name of the desired source appears on the screen. There may also be a button that is immediately responsible for switching the TV to output a signal from HDMI.
Next, you need to select the display mode on the laptop. The steps depend on the operating system installed.
Setting up on Windows 7
Right-click on an empty area of the desktop and select the “Screen Resolution” menu item.
- In the “Screen” settings, select your TV. If there is only one item in the list (laptop screen), then click on the “Find” button. Windows will scan devices connected to the video card. If there are no problems with the physical connection via HDMI, then check the “Screen” item again. The TV should appear. Select it as the displayed screen.
- The “Multiple Screens” item allows you to configure the display mode. There are several options to choose from, which is determined by the purpose of using the connected TV receiver. We will discuss the modes in the paragraph below.
- In the “Resolution” line you can set the picture quality. The maximum screen resolution is determined by the characteristics of the selected screen or the mode selected in the Multiple Screens setting. The higher the resolution, the higher the image quality. It is always recommended to choose the highest possible resolution in order to get rid of blurriness, squares on the screen, and a picture that is disproportionate in aspect ratio.
Now let's look at the detailed description and purpose of the modes.
- Display the desktop only on... Must be used when you currently need to display the video signal only on a specific device - a laptop or a television device. To understand what number the TV is located under, click on the “Detect” button. A number will appear on the laptop display, which indicates the number of the screen built into the laptop.
- Expand screen. Both image output devices become one. That is, there is no division into different screens. Both screens will work simultaneously. Only if in the first mode each screen is separate, then when the expansion mode is turned on, the work area is combined. The operating principle is as follows: if you move the cursor to the right edge of the main screen (computer) and move further, the mouse pointer will come out from the left edge of the TV screen. The information on both screens is different. The mode is useful when there is not enough space on the main screen and you need to increase it. Then connect a second monitor or TV, select the “Expand” display mode. Ultimately, you will be able to do your own tasks on different monitors. For example, watch movies from a laptop on a TV, and work on another screen (as an option).
- Duplicate. The image will be displayed on both devices simultaneously. The disadvantage of this mode is that the picture resolution is set to what is supported by the minimum screen. Thus, it is not always possible to achieve a high-quality picture in duplication mode if the difference in resolution of the two screens is very different.
Screen customization in Windows 10
- Right-click on the desktop and select “Display Settings”. You will be taken to the “Display” subsection of the general “Settings” window in Windows
- The setup principle is similar to the configuration in Windows. The only difference is in the names of the sections and display parameters items. You need to look for the necessary settings on the right side of the window.
Universal mirror receiver using AirServer
Mirroring your computer screen to your TV using AirServer is popular and can easily transform a simple large screen or projector into a universal mirror receiver. It does this by combining all the major mirroring technologies such as AirPlay, Google Cast and Miracast into one universal receiver. With AirServer on the Big Screen, users can use their own devices such as iPhone, iPad, Mac, Android, Nexus, Pixel, Chromebook or Windows 10 PC to wirelessly display video on the big screen.
Thus, today there are quite a few different technologies that allow you to duplicate the screens of iPads, PCs, laptops in offices, educational institutions, conference rooms or at home and turn any plasma TV into a state-of-the-art multimedia center.
Method number 4: mobile applications for synchronization
Special applications have been developed to wirelessly connect a smartphone to a TV. They are based on the process of duplicating or mirroring on the TV display what is happening on the smartphone screen.
The most popular mobile applications for download on Android:
- MirrorOP;
- iMediaShare;
- Bubble UPnP UPnPDLNA;
- Samsung Smart View.
How to connect your phone to a Samsung TV via Smart View is explained in the video below:
Do you have a smart TV
If the TV you purchased does not have WiFi functionality, then you need to use a more traditional solution - via an HDMI cable.
Next, start sending data by enabling the Screen Mirroring function on our device. On some devices, this option may have a different name, for example, Cast, Miracast.
Then select the device you want to send the image to. In our case, we connect to the TV by selecting the appropriate item in the list, and in this way we complete the procedure for connecting devices.
Many modern devices are equipped with this option. Connecting via Wi-Fi Direct is one of the most practical ways to connect a smartphone to a TV.
- Take your smartphone and go to Google Play.
- Find the DLNA Server app and download it.
- Open the main menu of the utility.
- Add a new server.
- In the appropriate line, enter its name (home Wi-Fi network).
- Switch to the “Root” tab, mark the folder that can be viewed. Save your changes.
- Return to the main application menu. Now the pre-created Media Server is displayed there.
- Click on the "Start" button to start the server.
- Open your TV's settings and go to the "Video" section.
- Find the server name there, and then select it. Folders that you can browse will be displayed on the screen. Run the required file.
Method No. 5: smartphone as a media server
This synchronization method is feasible when both devices have Miracast or DLNA technology in their functionality. Additional condition: both devices must have access to the same Internet network.
You can use your smartphone as a media server to transfer data to a TV via Wi-Fi using the following instructions (relevant for smartphones running Android OS):
- On your mobile, go to the Play Market and install the DLNA server.
- Launch the application, open the menu and add a new DLNA Server. It must be given a name in the appropriate line. The name is the name of your home Internet network.
- Go to the Root section. Here you will need to mark those folders that will be available for viewing. Save all changes made.
- Return to the main menu, click on the “Start” button and launch the newly created media server.
- Open “Settings” in the TV menu. Open the “Video” section.
- In the list that opens, find the name of the newly created server and select it.
- After this, all the folders previously selected for viewing will be displayed on the screen.
- Select the required file and start viewing.
Video instructions for synchronizing your smartphone and TV via DLNA are presented in the video below:
Owners of an iPhone (iOS OS) can use a similar method to synchronize with TV devices. The sequence of actions is as follows:
- Connect your iPhone and TV to a single Internet network.
- You will need to install a special application on your TV device. Thus, the Smart Share application has been developed for LG TVs, and AllShare for Samsung. Other TV models also support similar services.
- On your iPhone, go to the AppStore and download one of the free applications: Twonky Beam, iMediaShare, TV Assist, Belkin MediaPlay. They all function similarly to each other. They are based on a number of built-in services that reproduce images from a smartphone to a TV. In addition to services, a built-in browser is installed. After activating the application, you need to manually select the device through which the file will be played.
The disadvantage of these applications is that they are oversaturated with advertising. Because of this, if you plan to regularly connect your iPhone to the TV using the presented method, it is better to download a paid service.
By using one of the presented methods for connecting your phone to a TV via Wi-Fi, you can expand the capabilities of your mobile device’s screen. This is convenient for viewing videos or photos on a large screen or demonstrating presentations. The main thing is that the TV and smartphone support wireless communication functions and have the ability to synchronize with other devices.