In the set of satellite equipment, the Tricolor TV receiver is a digital receiver for viewing a package of operator television channels. Thanks to the latest developments by specialists, it has become possible to watch Tricolor TV without a receiver. The household appliances market offers a wide selection of television receivers with a built-in tuner that supports a slot for the CI CAM module and all the necessary standards. Having secured the antenna and configured it, it is not necessary to use a receiving device from Tricolor TV to receive the signal.
Pairing a satellite dish and TV
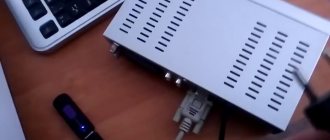
To receive a signal from a satellite, you need to connect the antenna to the F-connector located next to the socket for connecting an analog antenna.
This method of signal reception has a number of advantages:
- a minimum of wires are used;
- no additional space is required to install the receiver;
- there is no mandatory purchase of a receiving device;
- Viewing is controlled using the television remote control.
In order to decode received signals from a satellite, you need to purchase and connect a special conditional access card (smart card) and module. If these devices are not available, only free channels can be received.
Work on installing the CAM module must be carried out with the equipment disconnected from the power supply. The smart card is installed into the module and inserted into the PCMCI slot of the TV receiver. During installation, it is important to ensure the correct location of the module. The bar code should be positioned towards the monitor.
Television receivers with built-in DVB-S/S2 digital tuners are compatible with these modules. To determine the presence of a built-in receiver, you need to look at the back of the TV. There should be another connector on the back panel next to the regular antenna connector.
The tuner can support two standards: DVB-S and DVB-S2. If the instructions indicate the presence of only the first option, the TV will be able to open about 50 channels of mpeg2 format. If the TV supports two standards, with the module installed and the corresponding software version, reception of all Tricolor TV channels is ensured.
After the module is installed correctly, the cable connection phase begins. Next, the TV switches on to channel search mode.
In the menu, using the remote control, you need to select the signal source (satellite) and search for channels. In this case, a list of only open channels will be determined. After scanning is completed, the system will save all found channels. A series of steps to search for channels is necessary to check the collection of the connection diagram, as well as the compatibility of the module and the TV.
Satellite pay TV card registration process
After concluding a subscription agreement, it is necessary to activate the access card to the services of the satellite operator Tricolor TV. All required actions are performed online on the main website of the satellite provider. The user needs to indicate the desired channel package, enter the subscriber agreement number and ID card. In the line called “Terminal model” you should put CI+.
The completed form is sent for further processing by Tricolor TV specialists and subsequent registration. Until the connection has occurred, it is important not to turn off the TV. It must be included on any of the encrypted channels from the package indicated in the application. After a couple of hours, an automatic connection will occur, and the user will have access to his favorite TV channels.
Best operator in Russia
Tricolor can rightfully be called one of the most modern operators in Russia, which tries in every possible way to offer its subscribers only the best services at competitive prices. The choice of packages is actually small, however, each of them includes a large selection of different channels for children and adults. We are very pleased with the affordable prices for the packages offered - you just need to pay from 150 to 900 rubles once a year and you don’t have to worry about anything. For a low cost, each subscriber will be able to watch their favorite TV shows and movies in the highest quality.
Tricolor TV has been operating for more than fifteen years and offers customers a variety of equipment and service support. And now customers can take advantage of a completely new and very convenient service for watching satellite channels without additional equipment - they only need to purchase a module that is inserted into the TV. There is nothing superfluous - no waste of money, no wires, no unnecessary equipment. Subscribers have only one thing left to do - enjoy a high-quality signal and a wide variety of channels from Tricolor.
Description of the module and its functions
Receiving a signal without a receiver makes it possible to receive broadcasts from a satellite and transmit it to a TV. In order for the module to become a replacement for a receiver, one condition must be met - the television receiver must have a corresponding connector. Almost every new TV set has it, and the instructions from the TV will help you identify it. Thanks to the CAM module, it becomes possible to watch high-quality HD channels.
The module installed in the TV performs many useful functions:
- decodes the signal received from the satellite;
- protects against unauthorized reception of broadcasts;
- transmits a signal to the TV without degrading quality;
- frees up additional space occupied by the receiver;
- saves energy consumption;
- has a low cost compared to the receiver.
The module only works with license access cards that have 14-digit identification numbers. To extend the life of the module, you need to follow some simple rules:
- Do not use the device near a source of strong radio waves;
- installation and removal of the module must be performed according to the instructions with the TV turned off;
- Do not remove the module from the TV unless necessary.
The slot on the TV for the module is shallow, so there is no need to try to push the module into it completely. The image quality directly depends on the TV model, since with a normal connection the receiver is responsible for this.
Satellite television has a number of advantages over regular terrestrial or cable television. Firstly, this is a much larger number of channels - entertaining and educational, for adults and children, where everyone can find something interesting for themselves. Secondly, it is high quality image and sound. Installation of equipment for displaying satellite television is usually carried out for a fee by the service provider, but if you know the correct sequence of steps, you can connect the satellite dish to the TV yourself.
Principle of operation
Unlike cable television, satellite television does not involve paying a subscription fee for each channel, but connecting when purchasing an antenna or after a whole package of TV channels for every taste and budget. Moreover, depending on the selected operator, you can watch from 20 to 300 channels of various types and genres. The main condition for connection is the purchase and installation of a special satellite antenna, which is popularly called a dish.
The principle of its operation is to reflect the signal from the satellite and transmit it to the receiver. And from it the image and sound are sent to the TV screen.
Despite the simple principle of operation for the average person, professionals understand how complex it is. And therefore, much attention is paid to the correct connection of the satellite dish . Otherwise, the standard fine adjustments may be damaged, and the signal transmission to the receiver may be distorted or may not exist at all. Although today the television dish is presented in various types on the market, the general principle of operation is the same for all of them . But the principle of connecting the antenna to the TV may still differ.
However, before you start connecting the dish to the TV yourself, you need to determine what type it is. The sequence of actions will depend on this. Today there are several varieties of this device on the market.
- The round antenna is the most popular type. It is available in different diameters and by different operators and companies. Their surface is smooth and continuous. It is a round dish that is the best antenna option in cases where the source of the signal itself is very far away. By the way, in our country these antennas are in greatest demand. Such an antenna is suitable for the country house, for the home, and even for installation on an office building.
- Mesh models today are outdated and practically not produced. This is a simple grille on a stand that both receives the signal and simultaneously transmits it to the TV. It usually acts as an indoor antenna. There is no separate receiver provided here; such devices are not suitable for use in regions where satellite television coverage is weak.
- Multifocal antennas have several convectors inside them. They allow you to receive a signal from several satellites at once and simultaneously transmit it to one or more receivers. Such antennas are not suitable for private home use - they receive a weak signal, and for normal operation at home they must be made particularly bulky.
- Oval or offset TV dishes work on the same principle as round ones. Under optimal conditions, they can reflect a signal from two sources at once. They work in tandem with the receiver. But judging by the reviews in the work, such plates are no better, and sometimes even worse, than their round counterparts.
Satellite equipment - functionality and installation
As you know, a satellite chosen by the user at his own discretion (usually Sirius 5.0E, Amos 4.0W, Hotbird 13.0E or others) transmits the signal. The task of the satellite dish is to reflect it onto a converter, which converts the received data and, in turn, sends it to the set-top box . And only the receiver sends the signal to the TV receiver via cable.
What is needed to install the plate
A typical satellite dish mounting kit includes the following items.
- A dish for transferring a signal from a satellite to a converter. The minimum diagonal is 60 cm, the maximum is 120 cm. The required size depends on the area where installation is taking place, as well as on the obstacles located in front of the plate.
- Bracket (selected according to the diagonal of the plate), anchors for fastening.
- Converter or head. The device is designed to convert the signal reflected from the dish and then transmit it to the set-top box.
- Disek, which serves to combine two or more converters.
- TV cable.
- Receiver. To watch free channels, you can purchase the simplest set-top box. If you plan to view paid content, you will need a receiver with a card acceptor.
- F-connectors required for connecting the cable.
Installing the plate
Satellite dishes should be installed in an easily accessible location. This is necessary to always be able to repair or adjust the equipment.
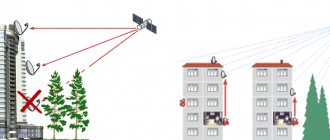
Important! The antenna should initially be pointed south. There should be no obstacles of any kind in its path: buildings, branches, trees and the like, since such obstacles significantly degrade the quality of the received signal.
The equipment always comes with instructions, and the plate must be assembled in accordance with the recommendations outlined in this document. In this case, during the installation process the following important points should be taken into account:
- the bracket with the antenna must be very firmly fixed to the wall so that a strong gust of wind does not tear off or damage the equipment;
- correct installation of the bracket requires the converter to be directed downwards;
- the cable must be sealed and securely secured with ties and electrical tape;
- it must be mounted so that the satellite dish rotates freely in all planes, which is required for ease of setup.
Configure the Tricolor antenna yourself - detailed instructions
When considering how to set up the Tricolor antenna, you need to prepare an initial list of tools, without which installation and further setup will be impossible:
- a plate with a diameter of at least 60 centimeters;
- hammer drill or ready-made holes for installing the bracket;
- basic and additional fasteners;
- electrical tape, wrenches, working level;
- If desired, you can use a special device that allows you to automatically check the signal level and quality of the resulting image. This issue will be further discussed in the appropriate section.
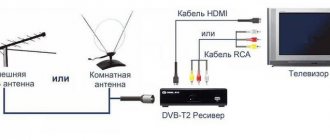
Connecting to TV directly
Modern television panels are equipped with a DVB-S2 tuner, which allows you to do without a receiver to receive satellite broadcasts. It is worth knowing that a TV connected in this way will catch free TV channels, but only in a foreign language .
To watch domestic channels you will need a CAM module, which connects to the TV via a PCMCIA connector. It can be purchased separately or together with a satellite television package from any of the numerous operators, be it Tricolor TV, MTS or NTV PLUS.
To connect this antenna to a TV receiver directly, insert a television cable equipped with an F connector into the “LNB Satellite In” input. Next you need to configure the channels. On television panels from LG, Samsung, Philips, Sony Bravia, Toshiba, Panasonic and other manufacturers, this process is very similar; the only differences will be in the menu interface and names.
So, after connecting the antenna, you need to turn on the TV, open the settings and automatically search for channels. Be sure to mark the satellite as the signal source, after which you will be able to select the required satellite. Next, if you plan to watch only free content, you need to indicate that encrypted channels must be skipped. After completing the search, you can start watching satellite TV.
TVs with a built-in receiver have a number of advantages. Firstly, there are no wires connecting the television panel and the set-top box, and secondly, it is ease of control, because in this case one remote control is used instead of two, which are usually required when connecting an antenna through a separate set-top box.
How to watch Tricolor TV on a computer via the Internet
Watching your favorite channels on a laptop or computer is more difficult than on a smartphone, since the operator has not provided a separate program or widget for accessing TV on a PC. To access broadcasts, users will have to download a special emulator that simulates a smartphone on laptops and install the application on it. After that, all you have to do is use the instructions below for phones.
An alternative connection option is to connect the computer to the receiver via a cable and use the monitor as a regular TV.
Both described approaches cannot be called convenient, but the provider does not provide alternative service options.
Connecting to a TV via a receiver
The simplest and most common way to connect satellite equipment to a TV is to connect through a receiver . To connect the set-top box to the television panel, you can use the following connectors:
- antenna input;
- RCA, also known as “tulip” - for transmitting an analog signal;
- component connector;
- SCARD;
- HDMI.
Important! Connecting the set-top box to a TV receiver via a tulip or television cable with a standard antenna plug or F-connector provides a low-quality image. The best picture can be obtained when connected via HDMI. And from the converter to the receiver the signal is transmitted through a television cable with a connection through the F-connector.
In addition to its main purpose, an external receiver performs a number of additional functions, for example, playing photos, videos or audio from a flash drive or hard drive, connecting a TV to the Internet, etc.
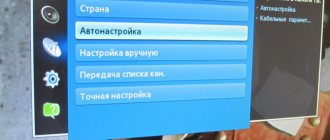
Searching for a satellite and tuning channels
Once all the cables are connected, the TV and receiver are turned on, and the satellite dish is installed and pointed south, you can begin setting up the antenna.
With multiple converters
If several converters are connected, you need to start working with the middle one, tuning it to the Sirius satellite. The sequence of actions will look like this.
- The receiver needs to set the frequency to 11766, speed to 27500 and “H” polarization. 2 bars will appear on the screen: red, which indicates the connection of the dish and the receipt of a signal from the satellite, and yellow, indicating the level of this flow. When the antenna is aligned correctly, the first bar will be at the 40% mark.
- To adjust the signal level, which is initially at 0%, you need to point the antenna dish up and turn it to the left as much as possible. Next, smoothly turning the antenna to the right, you need to find the best signal.
- If there is no result, you should lower the antenna 2-3 mm and repeat the steps described above.
- The antenna must be lowered lower and lower until the yellow bar reaches 21%.
- Having remembered the position, you should lower the antenna slightly, turn to the right and check if the signal improves. If it gets worse, return the antenna to its original direction, turn left, lower and raise. Check the location of the strip. Actions must be performed until the signal improves to 40%.
- Next you need to move on to setting up the converter. Smoothly rotating it clockwise and then counterclockwise, you need to move the yellow strip to the 65-70% mark. At this signal level, the image quality will not be affected by precipitation, wind or other weather conditions.
In the same way, you need to configure the remaining two converters: the first is tuned to the Amos satellite, frequency 10722, speed 27500, “H” polarization, and the second is tuned to the Hotbird satellite, frequency 11034, speed 27500, “V” polarization.
Setting up channels
The process of setting up satellite antennas for any other satellites, at the user’s request, is similar. This will require data on their location and approximate frequency.
After completing the antenna setup and achieving a good signal level, you can begin searching for channels on the set-top box. To do this, you need to start a scan, after which a list of all available channels will appear.
Algorithm
The setup procedure is simple, although it consists of a certain number of steps and requires consumables and some tools.
The equipment required for setting up TricolorTV usually includes three things - a dish, a receiver and an antenna. Also, you need to stock up on cables for all this and arm yourself with installation tools in order to install everything quickly and safely.
The general algorithm looks like this:
- You purchase a dish + receiver set from TricolorTV.
- Once at home, you secure the plate outside the windows of your apartment/house.
- Run the necessary cables from the dish to the receiver, and from the receiver to the TV.
- You adjust the signal level through the receiver software.
- Register as a TricolorTV user.
- Search for channels and leave the equipment to “calibrate”.
The time you will spend on this installation is at least 2 hours. In addition, you should also include a free period for registration and calibration of equipment.
Connection nuances
When installing and connecting satellite equipment, there are a number of nuances that need to be taken into account. The main ones will be discussed below.
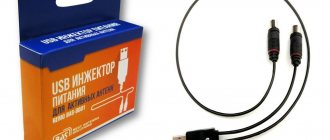
F connector connection
The television cable is attached to all devices using an F-connector. To connect it, you first need to cut off the top insulation by 10-15 mm and bend the shielding braid underneath onto the cable. Then you need to cut off the second layer of insulation and expose the central core.
Next, you need to screw the F-connector onto the television cable over the screen so that the cable core protrudes beyond its edge by 2-3 mm. Then you need to cut off the shielding braid protruding beyond the edges of the F-connector. The cable prepared in this way is connected to the converter, TV or disk.
Diseqc connection
Diseqc (or disek) is a device that is required to connect several converters . A cable must be connected from each converter to the disk and connected using an F-connector. In the same way, the cable from Diseqc is attached to the receiver.
Advice! The disk must be carefully hidden from moisture during precipitation. The cable connections do not need to be wrapped with electrical tape, as this will lead to the formation of steam. It is better to use heat shrink; it fits much more tightly to the cable and the F-connector.
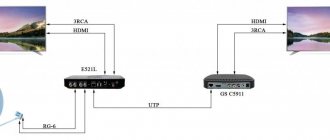
Multiswitch connection diagrams
A multiswitch or switch is a device designed to multiply a signal from one dish to several receivers, be it a receiver or a TV, and at the same time provide the devices with independent viewing of different channels in different polarizations.
On a note! Some multiswitches allow you to send a signal to one TV receiver from several independent satellite dishes, as well as from an over-the-air street or indoor antenna.
The cable length from the antennas to the multiswitch can reach up to 50 meters, and from the switch to receivers or TVs - up to 100 meters. For large lengths or multiple joints, it is recommended to use amplifiers; they will help compensate for signal loss.
The connection diagram is as follows. Wires from all antennas converge to the multiswitch, are connected, after which a cable runs from the switch to the connected devices (set-top boxes or television panels). Their number can vary from 4 to 80.
Multifeed assembly
A multifeed is a device that is used when installing additional converters on a satellite dish to achieve the correct angle and required height in relation to the central head . The use of several converters is relevant when the satellites are close to each other, and the angle between them is no more than 10°. In this case, the main converter is tuned to the satellite from which the weakest signal is received, because only part of the antenna reflector works for the additional heads.
The most common antennas in the Russian Federation are Supral. The multifeed assembly for them looks like this:
- a clamp assembled from two halves is attached to the converter and tightened with a connecting bolt;
- the clamp with the head is attached to one of the strips, after which it must be tightened with a bolt;
- the strip with a fixed clamp and the empty strip are installed perpendicularly in the adjusting bracket and tightened with screws;
- A free adjustment bracket is fixed into the head holder on the satellite dish, and a bar with the assembled multifeed is inserted into it at an angle of 90°.
The location of the multifeed in relation to the central converter depends on where the satellites are located. To make adjustments, tighten or loosen the screws on the brackets. Once the converters are set up, all connections must be carefully tightened.
Common mistakes and ways to solve them
When connecting satellite television, the following mistakes are often made.
- Incorrect diameter of the antenna dish. This may result in poor signal quality during changing weather conditions. To fix the problem, you should replace the plate.
- Incorrect installation of the traverse for attaching the converters. It should be secured not on top of the bracket, but under it, otherwise there may be problems with the signal even on the main head.
- Use of pass-through sockets. In this case, the signal may disappear completely. They should be replaced with terminal ones that come with television sets.
- Using splitters. They are only suitable for analog TV. Usually satellite channels are broadcast in two polarizations, which the splitter is not able to pass through. As a result, some content on one of the TVs will be unavailable.
- Lots of connections and cheap cable. This also leads to signal loss or degradation.
- Insulate the dysec with a plastic bag or use electrical tape to wrap the joints. All this will lead to the formation of condensation. It is better to use heat shrink for connections, and it is recommended to put dysec in a moisture-proof box.
- Wrapping F-connectors with electrical tape. It is also better to cover them with heat shrink to avoid the formation of moisture and, as a result, rust. You need to put a protective cap on the free outlet of the dysec.
As you can see, anyone can install a satellite dish with their own hands. The main thing is to know the correct sequence of actions and avoid mistakes that constantly occur when installing such equipment.
Best Selling TVs of 2021
TV LG 43UK6200 on Yandex Market
Sony KD-55XF9005 TV on Yandex Market
Satellite television has a number of advantages over regular terrestrial or cable television. Firstly, this is a much larger number of channels - entertaining and educational, for adults and children, where everyone can find something interesting for themselves. Secondly, it is high quality image and sound. Installation of equipment for displaying satellite television is usually carried out for a fee by the service provider, but if you know the correct sequence of steps, you can connect the satellite dish to the TV yourself.
An alternative way to watch Tricolor TV on your computer for free
Be that as it may, connecting to Tricolor TV services forces the user to pay a certain amount of money. Even if you don't use a satellite dish, you still need to purchase a receiver. This is also not the cheapest equipment. To save money, the client can use the official Tricolor Online application for Smart TVs, smartphones and tablets. You can download it through the App Store or Google Play.
Personal computer users have a more difficult time. In any case, they are forced to buy a receiver if they want to watch all the channels that are available through the Tricolor Online service. But there is a workaround.
In order not to purchase expensive equipment, just download an Android emulator to your PC. This special program makes the interface of a smartphone or tablet accessible within one utility. Thus, a person will be able to install an application on a computer that was originally intended for Android devices. Accordingly, you won’t have to pay money for the receiver.
One of the best emulators at the moment is Nox App Player. The program is downloaded from the developer’s website, and after installation your PC turns into an Android smartphone or tablet. On it you download the “Tricolor Online” application, where you will only need to log in and sign up for a subscription, which will allow you to watch all the channels available with the standard connection method.
Satellite equipment - functionality and installation
As you know, a satellite chosen by the user at his own discretion (usually Sirius 5.0E, Amos 4.0W, Hotbird 13.0E or others) transmits the signal. The task of the satellite dish is to reflect it onto a converter, which converts the received data and, in turn, sends it to the set-top box . And only the receiver sends the signal to the TV receiver via cable.
What is needed to install the plate
A typical satellite dish mounting kit includes the following items.
- A dish for transferring a signal from a satellite to a converter. The minimum diagonal is 60 cm, the maximum is 120 cm. The required size depends on the area where installation is taking place, as well as on the obstacles located in front of the plate.
- Bracket (selected according to the diagonal of the plate), anchors for fastening.
- Converter or head. The device is designed to convert the signal reflected from the dish and then transmit it to the set-top box.
- Disek, which serves to combine two or more converters.
- TV cable.
- Receiver. To watch free channels, you can purchase the simplest set-top box. If you plan to view paid content, you will need a receiver with a card acceptor.
- F-connectors required for connecting the cable.
Installing the plate
Satellite dishes should be installed in an easily accessible location. This is necessary to always be able to repair or adjust the equipment.
Important! The antenna should initially be pointed south. There should be no obstacles of any kind in its path: buildings, branches, trees and the like, since such obstacles significantly degrade the quality of the received signal.
The equipment always comes with instructions, and the plate must be assembled in accordance with the recommendations outlined in this document. In this case, during the installation process the following important points should be taken into account:
- the bracket with the antenna must be very firmly fixed to the wall so that a strong gust of wind does not tear off or damage the equipment;
- correct installation of the bracket requires the converter to be directed downwards;
- the cable must be sealed and securely secured with ties and electrical tape;
- it must be mounted so that the satellite dish rotates freely in all planes, which is required for ease of setup.
Features of choice
In order not to be disappointed in your purchase, but to enjoy high-quality satellite television for many years, you need to choose the right antenna. To do this, you need to take into account the basic purchase criteria.
- Place and frequency of use. It is only at first glance that such indicators seem unimportant. But if a satellite dish or television antenna is purchased for a summer residence or rare viewing, then it is quite possible to get by with an inexpensive budget option. In this case, there is simply no need to purchase a powerful multi-channel antenna. In addition, a compact device, such as a mesh device, can be easily connected and disconnected independently if necessary, without fear of damaging the signal quality. However, if the plate is purchased for frequent use and for a large family, then there is no need to save money here. In a city or remote village, it is better to install round dishes with a strong signal, which will allow you to enjoy your favorite channels constantly.
- Number of TVs. Another important selection parameter is that the more there are, the stronger the antenna should be. At the same time, experts say that mesh antennas are suitable only in cases where only one device will be used. In other cases, it is necessary to purchase special devices designed to transmit a signal to 2 or 4 TVs. In some cases, it may be necessary to purchase additional receivers. The main thing is to ensure that the connectors of the receiver and the TV match.
- Antenna size . This indicator is also one of the key ones. And here everything is simple - the larger the area of the dish itself, which receives and reflects the signal, the better the quality of the image itself will be. If the signal level in the region is weak or frequently interrupted, then it is necessary to choose antennas whose main operating area is at least 60 cm in diameter. The more channels the dish receives and transmits to the receiver, the larger its size should be. Typically, satellite television operators independently take these parameters into account and offer their customers an antenna that is optimally balanced according to these parameters.
- Antenna material . Most often, customers are offered antennas made from materials such as: aluminum - such dishes and antennas are very light, they are easy to transport and connect independently; They transmit and receive satellite signals in good quality;
- steel antennas are slowly leaving the market, more often only multifunctional antennas are made from this material; household devices made from this material are heavy and difficult to install;
- plastic models are easy to use and install, perfectly receive and transmit signals and have a long service life; They have one minus - their fragility;
- Fiberglass antennas are considered today the best option, so if the device will be mounted outdoors and there are no plans to remove it at all, you should choose a television dish made of this particular material.
Important! Old-style indoor mesh antennas are almost all made of aluminum, but new modern models are made not only of it, but also of heavy-duty plastic.
Connecting to TV directly
Modern television panels are equipped with a DVB-S2 tuner, which allows you to do without a receiver to receive satellite broadcasts. It is worth knowing that a TV connected in this way will catch free TV channels, but only in a foreign language .
To watch domestic channels you will need a CAM module, which connects to the TV via a PCMCIA connector. It can be purchased separately or together with a satellite television package from any of the numerous operators, be it Tricolor TV, MTS or NTV PLUS.
To connect this antenna to a TV receiver directly, insert a television cable equipped with an F connector into the “LNB Satellite In” input. Next you need to configure the channels. On television panels from LG, Samsung, Philips, Sony Bravia, Toshiba, Panasonic and other manufacturers, this process is very similar; the only differences will be in the menu interface and names.
So, after connecting the antenna, you need to turn on the TV, open the settings and automatically search for channels. Be sure to mark the satellite as the signal source, after which you will be able to select the required satellite. Next, if you plan to watch only free content, you need to indicate that encrypted channels must be skipped. After completing the search, you can start watching satellite TV.
TVs with a built-in receiver have a number of advantages. Firstly, there are no wires connecting the television panel and the set-top box, and secondly, it is ease of control, because in this case one remote control is used instead of two, which are usually required when connecting an antenna through a separate set-top box.
Connecting to a TV via a receiver
The simplest and most common way to connect satellite equipment to a TV is to connect through a receiver . To connect the set-top box to the television panel, you can use the following connectors:
- antenna input;
- RCA, also known as “tulip” - for transmitting an analog signal;
- component connector;
- SCARD;
- HDMI.
Important! Connecting the set-top box to a TV receiver via a tulip or television cable with a standard antenna plug or F-connector provides a low-quality image. The best picture can be obtained when connected via HDMI. And from the converter to the receiver the signal is transmitted through a television cable with a connection through the F-connector.
In addition to its main purpose, an external receiver performs a number of additional functions, for example, playing photos, videos or audio from a flash drive or hard drive, connecting a TV to the Internet, etc.
Check before purchasing
Before purchasing an antenna for your cottage or home, you need to make sure that its installation is possible and that nothing will interfere with the reception of the signal from the satellite. If there are multi-story buildings, tall trees or other obstacles around, the signal will be unstable, and the image on the screen will be of poor quality or will be interrupted. You also need to make sure that the necessary equipment is included in the kit. In addition to the dish, converter and receiver, the box must contain a television cable, fasteners, operating instructions, a smart card, a cable for connecting the receiver to the TV, etc. You can check the contents using the user manual.
Searching for a satellite and tuning channels
Once all the cables are connected, the TV and receiver are turned on, and the satellite dish is installed and pointed south, you can begin setting up the antenna.
With multiple converters
If several converters are connected, you need to start working with the middle one, tuning it to the Sirius satellite. The sequence of actions will look like this.
- The receiver needs to set the frequency to 11766, speed to 27500 and “H” polarization. 2 bars will appear on the screen: red, which indicates the connection of the dish and the receipt of a signal from the satellite, and yellow, indicating the level of this flow. When the antenna is aligned correctly, the first bar will be at the 40% mark.
- To adjust the signal level, which is initially at 0%, you need to point the antenna dish up and turn it to the left as much as possible. Next, smoothly turning the antenna to the right, you need to find the best signal.
- If there is no result, you should lower the antenna 2-3 mm and repeat the steps described above.
- The antenna must be lowered lower and lower until the yellow bar reaches 21%.
- Having remembered the position, you should lower the antenna slightly, turn to the right and check if the signal improves. If it gets worse, return the antenna to its original direction, turn left, lower and raise. Check the location of the strip. Actions must be performed until the signal improves to 40%.
- Next you need to move on to setting up the converter. Smoothly rotating it clockwise and then counterclockwise, you need to move the yellow strip to the 65-70% mark. At this signal level, the image quality will not be affected by precipitation, wind or other weather conditions.
In the same way, you need to configure the remaining two converters: the first is tuned to the Amos satellite, frequency 10722, speed 27500, “H” polarization, and the second is tuned to the Hotbird satellite, frequency 11034, speed 27500, “V” polarization.
Setting up channels
The process of setting up satellite antennas for any other satellites, at the user’s request, is similar. This will require data on their location and approximate frequency.
After completing the antenna setup and achieving a good signal level, you can begin searching for channels on the set-top box. To do this, you need to start a scan, after which a list of all available channels will appear.
Signal setup
Sometimes you can’t do without adjusting the tilt and rotation of the antenna during setup. This is one of the important points, since a low signal level will not allow the receiver to decode and broadcast channels to you.
According to these instructions, you did not secure the plate to the bracket completely. This will allow you to configure it faster and without additional movements. It is also recommended that two people perform the procedure, especially if the TV is not visible from the place where the plate is attached.
The signal is configured as follows:
- Turn on the TV.
- Press the i button (f1 on some receivers).
- The screen will display two scales with signal level divisions. In order for the equipment to work at full capacity and the channels to be broadcast in the best quality, the values must be at least 80%.
- If the values on the screen are less than this number, begin to slowly turn the plate from side to side (do not touch the tilt angle).
- This tuning step is complete when you position the dish to reach 80% signal (or higher).
Important! Both scales must be filled out. If only one has reached 80 percent, the adjustment cannot be stopped. This just indicates that you managed to catch the broadcast of channels with the encoding of another service provider.
After achieving a positive result, secure the plate to the bracket in the desired position.
Connection nuances
When installing and connecting satellite equipment, there are a number of nuances that need to be taken into account. The main ones will be discussed below.
F connector connection
The television cable is attached to all devices using an F-connector. To connect it, you first need to cut off the top insulation by 10-15 mm and bend the shielding braid underneath onto the cable. Then you need to cut off the second layer of insulation and expose the central core.
Next, you need to screw the F-connector onto the television cable over the screen so that the cable core protrudes beyond its edge by 2-3 mm. Then you need to cut off the shielding braid protruding beyond the edges of the F-connector. The cable prepared in this way is connected to the converter, TV or disk.
Diseqc connection
Diseqc (or disek) is a device that is required to connect several converters . A cable must be connected from each converter to the disk and connected using an F-connector. In the same way, the cable from Diseqc is attached to the receiver.
Advice! The disk must be carefully hidden from moisture during precipitation. The cable connections do not need to be wrapped with electrical tape, as this will lead to the formation of steam. It is better to use heat shrink; it fits much more tightly to the cable and the F-connector.
Multiswitch connection diagrams
A multiswitch or switch is a device designed to multiply a signal from one dish to several receivers, be it a receiver or a TV, and at the same time provide the devices with independent viewing of different channels in different polarizations.
On a note! Some multiswitches allow you to send a signal to one TV receiver from several independent satellite dishes, as well as from an over-the-air street or indoor antenna.
The cable length from the antennas to the multiswitch can reach up to 50 meters, and from the switch to receivers or TVs - up to 100 meters. For large lengths or multiple joints, it is recommended to use amplifiers; they will help compensate for signal loss.
The connection diagram is as follows. Wires from all antennas converge to the multiswitch, are connected, after which a cable runs from the switch to the connected devices (set-top boxes or television panels). Their number can vary from 4 to 80.
Multifeed assembly
A multifeed is a device that is used when installing additional converters on a satellite dish to achieve the correct angle and required height in relation to the central head . The use of several converters is relevant when the satellites are close to each other, and the angle between them is no more than 10°. In this case, the main converter is tuned to the satellite from which the weakest signal is received, because only part of the antenna reflector works for the additional heads.
The most common antennas in the Russian Federation are Supral. The multifeed assembly for them looks like this:
- a clamp assembled from two halves is attached to the converter and tightened with a connecting bolt;
- the clamp with the head is attached to one of the strips, after which it must be tightened with a bolt;
- the strip with a fixed clamp and the empty strip are installed perpendicularly in the adjusting bracket and tightened with screws;
- A free adjustment bracket is fixed into the head holder on the satellite dish, and a bar with the assembled multifeed is inserted into it at an angle of 90°.
The location of the multifeed in relation to the central converter depends on where the satellites are located. To make adjustments, tighten or loosen the screws on the brackets. Once the converters are set up, all connections must be carefully tightened.
Common mistakes and ways to solve them
When connecting satellite television, the following mistakes are often made.
- Incorrect diameter of the antenna dish. This may result in poor signal quality during changing weather conditions. To fix the problem, you should replace the plate.
- Incorrect installation of the traverse for attaching the converters. It should be secured not on top of the bracket, but under it, otherwise there may be problems with the signal even on the main head.
- Use of pass-through sockets. In this case, the signal may disappear completely. They should be replaced with terminal ones that come with television sets.
- Using splitters. They are only suitable for analog TV. Usually satellite channels are broadcast in two polarizations, which the splitter is not able to pass through. As a result, some content on one of the TVs will be unavailable.
- Lots of connections and cheap cable. This also leads to signal loss or degradation.
- Insulate the dysec with a plastic bag or use electrical tape to wrap the joints. All this will lead to the formation of condensation. It is better to use heat shrink for connections, and it is recommended to put dysec in a moisture-proof box.
- Wrapping F-connectors with electrical tape. It is also better to cover them with heat shrink to avoid the formation of moisture and, as a result, rust. You need to put a protective cap on the free outlet of the dysec.
As you can see, anyone can install a satellite dish with their own hands. The main thing is to know the correct sequence of actions and avoid mistakes that constantly occur when installing such equipment.