More recently, digital television was perceived as something new and incomprehensible, but now every TV shows images in high quality, without interference, with excellent sound.
In order for the TV to show digital channels, you need a set-top box. In addition to broadcasting channels, it has wide functionality and capabilities.
With its help, you can stop TV broadcasting, rewind to the desired moment, record your favorite program and much more. In order for all functions to become available, you will need to update the device or, as they say, update the firmware.
How to flash a TV set-top box and improve its performance will be discussed in this article.
Why do you need firmware?
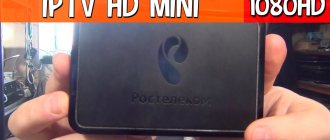
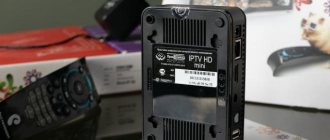
In the domestic market, the most popular devices are from Rostelecom and Cadena. They pick up all free Russian television channels.
Receiving a good quality digital TV signal results in excellent picture and sound. Channels can be caught automatically or searched manually. For those who upgraded the Rostelecom TV set-top box, it became possible to watch TV channels from the playlist, regardless of tariff restrictions. In addition, after updating the firmware, the set-top box turned into a convenient media service with WiFi and DLNA connections.
Negative factors include the lack of some services. The device itself is a modified foreign set-top box, and unnecessary functionality has been removed.
For domestic consumers, the interface is made in Russian. The Cadena console regularly receives updates, which are published on the official website. They mainly affect the interface and menu design. The receiver provides a TV program for the week ahead, support for subtitles and teletext, parental controls and many other useful functions.
For those who like to record certain broadcasts, this function is provided. To do this, you need the appropriate firmware version and a memory card with enough capacity to record video.
In the future, the recorded material can be played back using the media player built into the console.
Connection
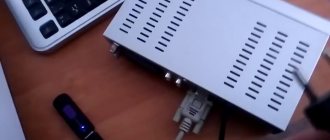
To connect a set-top box for a digital signal to a TV, you must first connect the antenna to the set-top box, and then the set-top box itself to the television receiver.
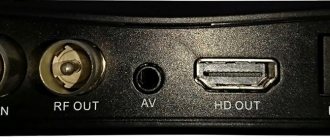
Depending on the TV model, the receiver can connect to it either using an RCA cable (tulip) or using HDMI. Moreover, the latter allows you to observe a much higher quality picture.
The requirements for the antenna are quite simple: the reception frequency must be decimeter. This makes it possible to use a regular indoor antenna for digital TV to connect.
To reliably receive the signal, you may need to raise the antenna we need higher and point it towards the repeater. When connecting the antenna and set-top box via cable, you should use high-quality products that will not negatively affect the signal. After all these manipulations, you can begin to search and configure digital channels.
Connecting the receiver to Soviet TVs
It's no secret that our grandparents often still use televisions that were released back in Soviet times or a little later.
The absence of “tulip” type connectors in them makes it impossible to connect a digital set-top box directly. But don’t rush to save money to buy a new TV. If the old TV has a SCART connector, then the problem is solved by purchasing an RCA-SCART adapter.
However, very old models do not have this either, but only an antenna input. Here a special device will come to the rescue - a modulator, which converts the digital signal into a high-frequency signal that is understandable to the old TV.
Therefore, it is possible to install digital television even on very ancient television receivers; another question is, does this make sense?
Preparation
If the image on your TV has deteriorated or doubts creep in that digital TV is not working as it should, you should think about updating the software.
It is necessary to prepare for this process. To do this, you will need to download the necessary files and have a computer or laptop.
Firmware for a TV set-top box from Rostelecom is done using a computer with a free Ethernet input.
The set-top box will be connected to it. In addition, you will need a network cable that will connect the set-top box and the computer.
The software you will need is mcast.exe and dualserver (or its equivalent). You need to download the latest firmware files from the company's website. They will be called " bootstrap " and " imageupdate ".
It is not recommended to flash the device using third-party tools if at least one official update has not been installed.
Cadena devices will require a USB flash drive with a capacity of up to 8GB formatted in FAT32. The firmware downloaded from the site will be recorded on it.
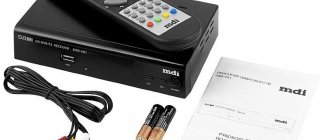
Equipment for receiving digital channels
So, before setting up digital channels, we first have to purchase the necessary equipment. The list of equipment for receiving digital television includes an antenna, the digital set-top box itself and connecting wires.
Of these components, the biggest role for reliable reception of digital TV is played by the tuner itself, how well it is made and what format it is designed for. The antenna and connecting cables contribute a noticeable but less significant influence.
How to flash a TV set-top box (Step-by-step instructions)
Let us analyze in detail the process of flashing the firmware of the Rostelecom set-top box model MAG-250.
- Create a folder on your computer and place the previously downloaded server and program in it: mcast.exe and dhcp. In addition, you need to place two files bootstrap and imageupdate.
- Call the command line by pressing the Win+R keys. You need to enter the ncpa.cpl command in it. A network connections window will open, select the one we will use and right-click on it. By clicking on “Properties”, select the component (TCP/IPv4). In the window that opens, you will need to manually enter the IP address 192.168.1.1 and the mask 255.255.255.0.
- Connect one end of the network cable to the computer and the other to the set-top box.
- Turn on the set-top box and quickly press the “Menu” button, after which the device’s BIOS should open.
- Enable the dhcp server installed in a folder on the computer. To do this, in the command line, specify the path to the folder with the file, for example: C:\Rostelecom\dualserver.exe, and press the Enter key
- Run the mcast.exe program and specify IP 192.168.1.1, then click on the “Select” button. In the menu that appears, you will need to specify the broadcast addresses Steam1: 224.50.0.70:9000 and Steam2: 224.50.0.51:9001. Then, next to each stream you will need to press the “Start” key.
In the BIOS you should follow this path: Upgrade Tools – MC Upgrade .
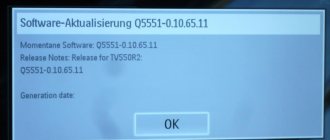
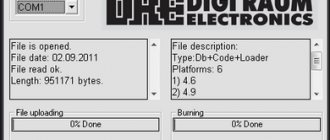
During the loading process the following messages will appear sequentially:
Bootstrap message: Reception of an image is started! Bootstrap message: Writing image to flash. Writing image to flash successfull!
Then the device will reboot and start with the new firmware version.
Setup problems and solutions
There are situations when you correctly set up the reception of digital TV channels, watched them for a long time, and then suddenly stopped showing one or several of them at once. Or do you know that 20 channels are broadcast, but only 10 channels are found, what to do in such cases?
Let's look at the main problems that may arise during the process of setting up or operating digital television and methods for solving them.
- The antenna does not receive or does not receive a digital signal well, but previously received an analog signal well. There may be several options: the antenna is not suitable for receiving a DVB-T2 signal, for example, it is designed for MV, not UHF; The distance to the repeater is too large and the gain of this antenna is not enough for reliable reception. In this case, only buying a new antenna or amplifier will help.
- The antenna was tuned for quite a long time, after a while it stopped receiving a certain channel. Alternatively, the connection on one of the contacts may have broken or the wire has broken. All contacts should be checked for oxidation and the cable should be ringed.
- The tuner does not receive a digital signal. Check if your set-top box does not support DVB-T2 format. Then only replacing it will help.
- The amplifier used to work, but now it doesn't. Most likely, either the amplifier itself or its power supply has failed. It should be taken to a service center for diagnostics.
- Shows only part of the 20 possible channels. Most likely, the antenna has insufficient gain, or is not aimed precisely at the repeater. To show more channels, you should buy a more powerful antenna or orient it more accurately in the direction of the tower.
- Previously it showed 20 channels, but now only 10. The equipment was checked, everything is in order. – The set-top box settings may have gone wrong. In this case, you need to reconfigure the tuner or configure channels manually. If everything worked fine before, but over time problems began to appear, this may indicate the need to replace the equipment or its breakdown.
In general, if problems arise with signal reception, the action algorithm should be as follows:
- Checking the correct connections between all types of equipment: antenna, set-top box, TV, amplifier.
- Checking all receiver settings, adding data manually if necessary: channel number, channel width, etc.
- Determining the location of the transmitter and orienting the antenna towards it as accurately as possible.
Depending on the terrain, it may be necessary to raise the antenna to a greater height.
- Using a tuner, we determine the maximum signal level for various antenna orientations.
- We perform automatic channel search.
If after all these manipulations our TV does not receive all channels, then it means we have a low-power antenna. As a rule, residents of large cities feel more confident when tuning in and watching digital television than residents of rural areas. This is due to the short distance to the transmitting tower, and, consequently, more reliable reception.
An alternative way to flash the MAG-250 console
The best option for an alternative device update is DNA firmware.
Thanks to it, functions such as:
- TV program from Yandex;
- recording broadcasts to disk;
- autostart of iptv broadcasts from Rostelecom;
- Recovery after the update occurs automatically.
It is important to install the original version before installing alternative firmware. Otherwise, problems often arise with updating the device.
The DNA firmware process itself occurs without the use of a network cable. To work, you will need a flash drive with a capacity of up to 8 GB, formatted in FAT32.
Then, on the USB drive you should create a folder with the name of the device and install the firmware files there: “ Bootstrap ” and “ imageupdate ”. In the future, there are two options for updating the device:
- from the internal portal;
- from BIOS.
In the first case, you need to go into the settings and go to the service menu by pressing the “ SETUP ” button. Selecting “ Update software ”, select the option “ via USB ” and click “ Start update ”. Before starting the process, you will need to click the “ Check ” button.
The program will check for the presence of the necessary files on the flash drive. If all requirements are met, the “ Start ” button will light up.
A common error: “Invalid file header.” In this case, it is recommended to reformat the USB drive to FAT32. In addition, you should check the name of the folder on the flash drive. It must be without spaces, for example, MAG250. If this does not help, then you should use the firmware option from the BIOS.
After connecting a USB drive with files, you need to reboot the device. In this case, you should hold down the “ Menu ” button. After the menu appears, select “ Upgrade Tools ”, then go to “ USB Bootstrap ”.
If everything is in order with the information on the flash drive, the process of updating the software version will begin. The successful completion of the installation will be indicated by the message: “ Writing image to flash successfull ”.
Then, the device will reboot and will start with the new firmware.
Checking signal quality and solving setup problems
If you see obvious noise in the picture, check the quality of the signal coming from the antenna. To do this, press the Info key on the remote control several times. Look at the strength and intensity indicators: if their value is below 60 - 70%, then there is a problem with the signal. You need to change the position of the antenna and its direction. To do this, you will need help: someone must move the antenna slowly, and someone must monitor the picture quality (is it improving or deteriorating). When the interference disappears, fix the antenna position.
For a stable signal, the antenna must be pointed clearly at the tower
If you cannot find the desired antenna position, most likely the tower is located far from you - hence the weak signal. Usually this situation occurs outside the city. In the homes of urban residents, the signal is usually received well. In this case, you need to purchase an additional amplifier for the antenna or buy a new, more powerful antenna. It is also worth placing the antenna as high as possible - if possible, on the roof itself.
If possible, look up information on the Internet regarding the location of towers in your area so you know where to point the antenna.
If everything is in order with the indicators in the Info section (70% and above), but interference is still present, then the problem is with the set-top box. It may not be configured correctly. If you changed any of its parameters, return the factory settings back or reset the settings to factory settings, and then start the automatic or manual channel search again.
Reset the set-top box settings and search for channels again
There could be a different situation: the set-top box initially found less than 20 channels or began to show fewer of them some time after successful setup. The solutions in this case are the same as for interference: look at the signal level, restart the channel search, change the position of the antenna. If the problem persists, you need to buy a new antenna or amplifier for the old one and place it as high as possible.
It is also possible that the problem is a hardware malfunction, if everything was fine before, but now some of the channels have suddenly disappeared. Only a specialist can say for sure that the set-top box or antenna is faulty, so it would be advisable to call a specialist to your home to determine and eliminate the causes of the malfunction.
The antenna cable is connected to the TV tuner, and from the set-top box there is a cable to the TV (HDMI, “tulip” or coaxial cable). Next, the setup is carried out - first automatic, and then manual, if the first does not produce results. If you do not receive all channels or they show poorly, change the position of the antenna. If necessary, purchase an amplifier for it.
Content
For more than 5 years now, free digital terrestrial television has been broadcast in our country. The territory in which its signals can be received is increasing every day. In the next year or two, it is planned to completely stop broadcasting analogue television and switch only to digital.
Therefore, you should now configure your TV to receive digital broadcasts. True, there are several nuances here: if you have a model that is a couple of years old, then most likely it already has a built-in DVB-T2 TV tuner and then there will be no difficulties when connecting. Otherwise, you will need to purchase a special receiver, and here a logical question arises: how to configure this set-top box to receive available digital channels?
We will give the answer to this within the framework of this article. In addition to this, we will consider difficulties that may arise during the process of both setting up and connecting equipment and offer options for solving them.
Updating DVB T2 set-top box
The process of flashing such set-top boxes is similar to the devices from Rostelecom described above. After downloading all the necessary files and installation manual from the official website, you need to place a file with the extension .ssu .
Having gone to the set-top box menu, select the “ System ” tab and select the “ Update and save ” item. Then, you should reboot the device and disconnect the power from the network.
After turning on, the set-top box will have a new firmware version. All that remains is to configure dvb t2 to automatically or manually search for channels.
Receiver setup
The steps to find digital channels will be as follows:
- Using the remote control, go to the main menu of the tuner.
- We find the item that is responsible for the settings.
- In the country field, select our country.
- Next, select the signal type, in our case DVB-T2.
- Select automatic setting.
- We wait a few minutes until the digital receiver finds available channels.
After successful completion of this procedure, we save the found channels and can view them at any time.
There are cases. When the automatic search cannot find any channel. This means that you will have to manually enter the settings. Then we do the same, but select manual search.
A window will open in front of us in which we must indicate the frequency at which digital channels are broadcast. Its meaning can be found on the Internet for your city.
Flashing Android TV BOX
There are two ways to install new software on TV BOX. The first is through Recovery mode:
- Download the firmware file and place it on the device's memory card.
- Plug the device into a power outlet, but do not start it.
- Place the flash card in the console.
- Press the Reset and Power buttons at the same time.
- As soon as you see the inscription with the logo of the console manufacturer, release the buttons. After this, the firmware will be installed automatically.
However, not all devices support this mode. In such a situation, the second method is used, which does not require recording to a memory card. We recommend removing it while the console is being updated.
Connection modes for firmware
In order for the Android TV BOX firmware to be successfully updated, drivers are required. They will serve as a device identifier and allow the computer to “understand” the model of the equipment connected to it. You can find drivers directly on the device (hardware method) or in the archive with firmware (software method). Let's look at each method in more detail.
Hardware method
This method involves using drivers located on the device. The following steps are performed:
- Turn off the device and wait a few seconds.
- Connect the device to the computer with a USB cable.
- Press and hold the Power and Volume Up buttons until you see activity on your computer.
- Wait until the drivers are installed and the notification about this changes to the following.
Sometimes, as a result of a failure, the drivers on the device can be damaged or other errors may occur from which no one is immune. Then we use the second method of installing drivers taken from the firmware archive.