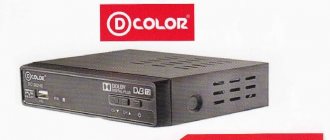
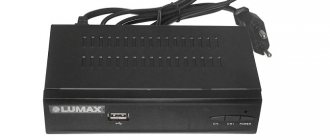
Comparison table of Oriel DVB-T2 set-top boxes models
By and large, if you take the entire model range of released Oriel consoles, you will not find any significant differences in them. New devices may additionally be made of a metal case and may be equipped with Wi-Fi adapters. The rest: menu, format support, connectors, etc., remains the same.
| Options | 120/120D | 105/105D | 101 | 302/302D | 403D | 415D | 421D/421UD | 794 | 963 |
| Material | Metal | Plastic | Plastic | Plastic | Plastic | Plastic | Metal | Metal | Metal |
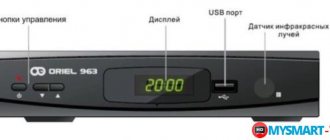
| Display on the body | + | + | — | — | — | + | + | + | + |
| Outputs for DVB-T2 | HDMI and RSA | HDMI and RSA | HDMI and RSA | HDMI and RSA | HDMI and RSA | HDMI and RSA | HDMI and RSA | HDMI and RSA | HDMI and RSA |
| WiFi | — | — | — | — | + | + | + | — | — |
| Remote control | + | + | + | + | + | + | +/+teachable | + | + |
| Nutrition | Internal 220V | External power supply 5V | External power supply 5V | Internal 220V | External power supply 12V | External power supply 5V | Internal 220V | External power supply 12V | Internal 220V |
| USB | + | + | + | + | + | + | + | + | + |
*) Set-top boxes: 403D, 415D, 421D, 421UD – additionally equipped with the ability to receive digital broadcasts from cable television.
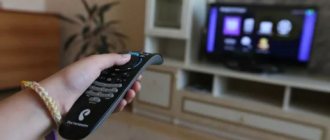
How to connect the Oriel set-top box to your TV
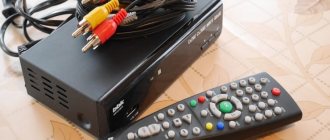
The Oriel set-top boxes come with RSA cables for connecting them to the TV via AV outputs. However, in practice, this option is not suitable for everyone and here it is necessary to further analyze all the options. The general connection diagram will be considered using the example of the most popular Oriel models - 421 and 963. However, the connection principle itself will be identical for all models.
The choice of one or another connection option is arranged in descending order, depending on the capabilities of the cable itself:
- First of all, you need to check if there is an HDMI input on your TV. This transmission standard is more acceptable and should be chosen first. The cable provides the best display (picture) and is also more durable than others. The cost of 1 meter of high-quality cable is from 200-500 rubles.
- If this option is no longer available, then further connections will have to be made via RSA (Tulips). They come in several types, depending on the number of plugs on each side. For Oriel there is not much difference. The main thing is that the TV is adapted to the connection.
- Older TVs, in most cases, will not have HDMI and RSA. These TVs will most likely have a SCART input. On the 961 model, such a connector is present initially and all that is required is to buy the appropriate SCART-SCART cable. It will cost you 200-300 rubles.
If you have an Oriel set-top box model without SCART, then you should buy an adapter with Scart-RSA. It costs from 50 rubles and is sold in all stores
How to set up digital channels on your Oriel set-top box
In order to catch all 20 digital channels, it is not enough just to know the instructions for the set-top box. Please check in advance whether you need a new antenna. The search process itself will be similar for all models of the company's receivers. Therefore, regardless of what model of console you have: 421, 963, 120, etc., the settings will be identical:
Automatic search
- First, select the signal display mode required in your case from the TV menu. It is taken depending on the method in which the console was connected. For example, if this was done using a tulip, then you should switch to AV mode.
- After this, you need to press the power button on the set-top box or its remote control.
- A welcome window will open. It will ask you to indicate your country and select a language. Typically this option is already set. It is better not to touch the remaining settings unless you know the exact ratios for the sides. Click OK.
- An automatic channel search should start. At the same time, the set-top box will pass through all frequency ranges in the visibility zone and find digital channels available for viewing. When finished, the list should save itself.
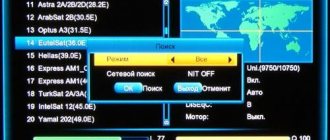
Manual search
If the set-top box, for some reason, could not find 20 channels or does not see signals at all, then you should reconfigure it in manual search. Its meaning is to set the device the exact frequency at which it will scan the entire flow of information and be able to provide you with the digital channels available on it. It's very easy to do this:
- Find out your frequency for DVB-T and DVB-T2 channels. To do this, go to the interactive map of CETV and look at the parameters of the television tower closest to you.
- Press the OK button on the remote control. The device should go to the menu.
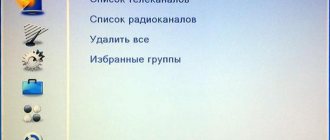
- Select “Manual search” in the channel settings section
- After that, in the search mode, set “By channel” and select the number that was previously taken on the map. If the signal has not changed and the intensity graph shows 0%, then try also turning on the antenna power. It is used if you additionally use a signal amplifier.
Oriel 202 - DVB-T2 TV receiver review. Part 2.
In the first part of the video, we conducted an initial review of the receiver, looked at the design, main menu structure and main characteristics.
To fully use the receiver, it is advisable to connect a USB device to it.
After connecting, you can use the timer and set any channel to record.
The next useful feature in the settings is Image.
The aspect ratio is set depending on which TV is connected to the receiver. For comfortable viewing, 720p resolution is quite suitable
There is no point in touching the video output settings, since we only have HDMI output and composite video output.
The next item is Channel Search. Manual search is of particular importance.
The frequency varies from region to region. The main thing is that the scales responsible for power and quality are at the same level, otherwise the image and sound will be supplied intermittently.
Using these scales you can tune the antenna. The channel number can be found on the central digital television website after you indicate the location of your antenna.
Item Time. In the DVB T2 standard, the time is set automatically.
But if you wish, you can select manual settings and specify the time zone. Also in this section you can set the on and off time.
In the System section, you can enable the Parental Control function by entering a password. You can also set up a password and restore the factory settings. But in this case, all channels will be lost.
Here you can view information about the device.
Function Software update. There are two types of update: USB update and OTA update. Both of these types are practically not used, since the firmware for the receivers is almost never updated.
The last menu item is USB.
There is a Multimedia section where you can play all audio and video files. Please note that the receiver may not reproduce audio in some formats, such as DTS.
Here you can configure photo viewing. To put it simply, set up a slide show.
Setting subtitles allows you to select the color, font, background of the reproduced text.
Setting up PVR allows you to view information about the connected USB device and set the buffer size for Timeshift.
Timeshift – delayed viewing, i.e. you can pause the image, and after some time continue viewing from the same place.
It is possible to rewind the image here, because... all data is saved on a USB disk.
If you press the Info button when using this function, you will see detailed information about the possible recording time, recording speed and free disk space.
It is also possible to record a program using the Record button. The amount of information recorded depends on the amount of free space on the disk.
The recorded material can be found in the USB menu item.
You can also format the USB device, i.e. delete all data.
By pressing the Info button on the remote control once, you can view information about the program you are viewing.
Moreover, the white scale indicates how much time has passed since its beginning. When you press the button twice, you receive a short announcement of the program.
A feature of digital television is that any receiver supports the display of text and subtitles.
Some channels broadcast smart teletext. This feature is intended for people who are hard of hearing. This is done by pressing the Teletext button.
When you switch to the channel of interest, closed subtitles are thus visible.
When you switch to the first channel, you will see the program guide with subtitles.
In conclusion, it must be said that the remote control is quite easy to use, despite its small size.
Basic operations are performed using the central buttons, as well as those that help regulate the playback of media files.
Video link: https://www.youtube.com/watch?v=yUzfLzPiqYw
Like
- < Back
- Forward >
How to connect the Oriel set-top box to a Wi-Fi network
Some of the set-top box models presented in the table above have a built-in WiFi receiver and can easily connect to the Internet. This is very convenient and allows you to turn your device into a real multifunctional cinema. A wireless network allows you to:
- Watch videos on YouTube and Megogo.
- Find out the weather in your region.
- Connect to news feeds.
- Watch more than 20 channels using IPTV.
- Update the device.
To connect, you will additionally need to purchase an adapter, which is a Wifi antenna and connected via USB.
How to update the firmware or reset the Oriel console
When a new version of the set-top box software is released, it may not start working correctly with those TVs that previously had good contact with it. Therefore, in some cases it may be necessary to change the firmware of the set-top box to a new one, or if something goes wrong, return everything to the factory settings. This can be done through the receiver menu:
- To do this, go to “Tools” and select updating the receiver via USB or via OTA.
- In the first case, the new firmware version should be installed on a flash drive.
- In the second case, wi-fi is required.
- If you want to reset all settings to default, you should select factory settings.
Password for resetting the device and entering the update menu: 1234
Connecting WiFi to Oriel set-top boxes
Some of the set-top box models presented in the table above have a built-in WiFi receiver and can easily connect to the Internet. This is very convenient and allows you to turn your device into a real multifunctional cinema. A wireless network allows you to:
- Watch videos on YouTube and Megogo.
- Find out the weather in your region.
- Connect to news feeds.
- Watch more than 20 channels using IPTV.
- Update the device.
To connect, you will additionally need to purchase an adapter, which is a Wifi antenna and connected via USB.
Firmware update and factory reset
When a new version of the set-top box software is released, it may not start working correctly with those TVs that previously had good contact with it. Therefore, in some cases it may be necessary to change the firmware of the set-top box to a new one, or if something goes wrong, return everything to the factory settings.
This can be done through the receiver menu:
- To do this, go to “Tools” and select updating the receiver via USB or via OTA.
- In the first case, the new firmware version should be installed on a flash drive.
- In the second case, wifi is required.
- If you want to reset all settings to default, you should select factory settings.
Password for resetting the device and entering the update menu: 1234
Reviews of Oriel TV set-top boxes
Currently, the company occupies its niche in the field of sales of digital receivers. At the same time, users note the high reliability of the devices and adaptation to a large number of connection options. Some of the latest models of set-top boxes can be successfully connected to a TV using 3-4 connection methods.
This in turn makes these receivers universal. When selling them, you can be 99% sure that the device will be able to contact TVs and will not cause any problems during operation. The cost of the company's receivers today varies around 900-1200 rubles. This is affordable for most TV viewers. Moreover, for that kind of money you will also get the opportunity to connect to the Internet.
Oriel 421 ud firmware
ORIEL firmware
Permanent link to the page: https://dvbpro.ru/?p=4696
About the firmware:
Updating the software (firmware) of your equipment is carried out only in cases where any problems arise, or the update will add useful functions to the device. Flashing devices unnecessarily is not recommended, because... During the firmware update process, there is a possibility of equipment failure. If you are not sure that you can handle updating the firmware on your own, we recommend contacting the appropriate service center and qualified specialists.
Download ORIEL firmware file:
• Oriel 810 receiver firmware file - download (version 3.4) This update is only suitable for receivers with serial numbers from 81111200001 to 81111205050 and from 81120100001 to 81120106060. Firmware instructions. • Oriel 820 receiver firmware file - download (version 1.0 from 08/01/2012). This update is only suitable for receivers with serial numbers from 82120100001 to 82120105280. Firmware instructions. • Oriel 710 receiver firmware file - download (version 1.3.5). This update is only suitable for receivers with serial numbers from 710121000001 to 710130211200. • Oriel 720 receiver firmware file - download (version 1.3.5). This update is only suitable for receivers with serial numbers from 720121000001 to 720130202200. • Oriel 910 receiver firmware file - download. • Oriel 920 receiver firmware file - download.
Official website of the manufacturer:
• You can check the availability of newer software on the manufacturer’s official website - oriel.ru • You can ask questions regarding ORIEL brand swing equipment through the ORIEL company feedback form.
How to update firmware:
Proceed as described in the user manual. If this information is not in the manual, contact technical support for your equipment.
Useful links:
• In order to unzip the firmware file, you may need an archiver program. One of the most popular is the 7ZIP archiver.