How to connect an Oriel digital set-top box to your TV
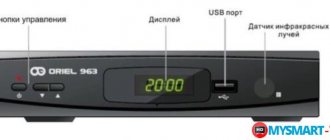
The connection process itself is not complicated, especially if you follow the detailed instructions. An RCA cable is included with the receiver. But, if you have an HDMI cable, it is better to use it, because... it provides better sound and image transmission. You should also initially familiarize yourself with the console itself. The front part contains the main control keys and display:
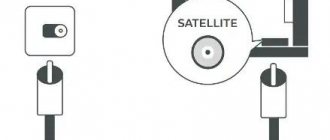
The rear panel has built-in connectors for:
- Antennas.
- HDMI.
- SCART.
- RCA.
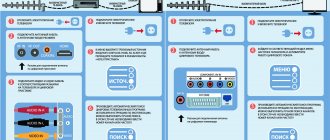
Connecting the device
The connection instructions are suitable for all device models, including 4030, 4150, 403d, 415d, 740, 213, 101, 314, 421ud, 963, 4210. First of all, disconnect all devices from the power supply. Then, depending on the cable used, make the connection. The diagram clearly shows the process for different connectors.
Initial settings
The second step is to make sure there are working batteries in the remote control. When you turn on the TV with the set-top box connected, a welcome window will appear on the screen where you will need:
- Specify country.
- Select language.
- Set the optimal resolution and aspect ratio.
How to connect the Selenga set-top box to a TV to receive digital channels
To save and continue the initial settings, click on “Ok”. Next, an auto search for channels will start, the list of which will be displayed on the screen. The search will be carried out according to the DVB-T2 standard.
If you have any questions or complaints, please let us know
Ask a Question
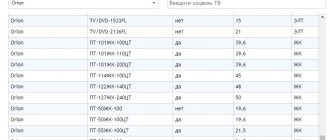
Comparison table of Oriel DVB-T2 set-top boxes models
By and large, if you take the entire model range of released Oriel consoles, you will not find any significant differences in them. New devices may additionally be made of a metal case and may be equipped with Wi-Fi adapters. The rest: menu, format support, connectors, etc., remains the same.
| Options | 120/120D | 105/105D | 101 | 302/302D | 403D | 415D | 421D/421UD | 794 | 963 |
| Material | Metal | Plastic | Plastic | Plastic | Plastic | Plastic | Metal | Metal | Metal |
| Display on the body | + | + | — | — | — | + | + | + | + |
| Outputs for DVB-T2 | HDMI and RSA | HDMI and RSA | HDMI and RSA | HDMI and RSA | HDMI and RSA | HDMI and RSA | HDMI and RSA | HDMI and RSA | HDMI and RSA |
| WiFi | — | — | — | — | + | + | + | — | — |
| Remote control | + | + | + | + | + | + | +/+teachable | + | + |
| Nutrition | Internal 220V | External power supply 5V | External power supply 5V | Internal 220V | External power supply 12V | External power supply 5V | Internal 220V | External power supply 12V | Internal 220V |
| USB | + | + | + | + | + | + | + | + | + |
*Set-top boxes: 403D, 415D, 421D, 421UD - additionally equipped with the ability to receive digital broadcasts from cable television.
Basic Operations
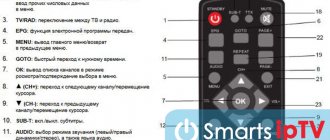
Further configuration will also be carried out using the remote control. You should familiarize yourself with all the button assignments.
Basic operations include setting up the following sections:
- Program Manager.
- Picture parameters.
- Search for broadcasts.
- Setting the time.
- System parameters.
Each item implies several categories. Any user without special knowledge can perform the setup; just follow the instructions.
Program Manager
This section allows you to edit the list of channels. It is located at the very top of the menu. Here you will find a list of broadcasts, radio channels. You can also delete an unnecessary channel or add it to your favorites.
In the broadcast list, editing is carried out as follows:
- To block a specific broadcast, press the red key on the remote control.
- To skip - green.
- To move the channel to another position - yellow.
- Rename the broadcast - blue.
- To move a channel to the list of favorites, use the FAV button.
If you plan to delete all channels at once, you will need to enter the password 1234 (default).
Image Settings
Adjust the image in the third section “System Settings” in the “TV System” tab.
Select the optimal screen resolution. It is recommended to set automatic detection, but sometimes you have to do it manually. In this case, the image resolution depends on the type of connection:
- 480r/i.
- 576i/p.
- 1080p/i.
The aspect ratio must be selected for your TV:
- 4:3 PS.
- 4:3 LB.
- 16:9.
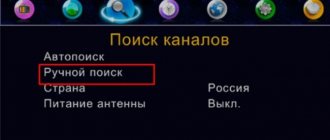
Search channels
The “Channel Search” section is second in the main menu. The following options are available here:
- Automatic channel search. Activate the "Open Only" function to have the system search only for open channels. Leaving this option untouched will detect all broadcasts, including encrypted ones.
- Manual search. Start discovery by channel or frequency. Specify the range in which the search will be carried out - MV or UHF. Next, enter the broadcast number or frequency. Below you will notice visual information about the quality of the incoming signal and intensity.
- In the next tab, indicate the type of broadcasts to be scanned - all, free or encrypted.
- Activate the antenna power point if you are using an active device with a built-in amplifier.
Why doesn’t IPTV Player show on the computer and TV: reasons, how to fix it?
Setting the time
Time settings are located in system settings. Here it is configured:
- Shit. Select the one where you live.
- Application of GMT. By selecting the “By region” option, the system will automatically set the time. By disabling it, you can independently specify the time and time zone.
- Timer. Allows you to record broadcasts and set reminders to watch a specific broadcast.
Setting options
Edit the main menu:
- Select the demonstration time – 1-10 seconds.
- Set transparency – 0-40%.
System Settings
This section includes the following functions:
- Information about installed software.
- Parental control. When using, the system will ask for a password, enter 1234. The function allows you to lock the main menu, specify age restrictions, and change the password.
- Reset parameters to factory settings. This feature is often used to fix serious system errors.
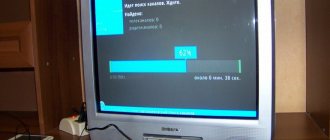
- Software update via USB. Go to the official website of the set-top box manufacturer and download the latest software patch to a flash drive, then insert the drive into the set-top box and in this section select “Update via USB”. Wait for installation.
Basic functions of the device
The Oriel 963 review necessarily includes a description of the functions.
The functionality of the device makes it possible to receive (read on the display) information about the program that is currently running on the channel being shown, or about those programs that will be in the near future. You can also get information about the enabled channel, signal strength and quality.
On the Oriel 963 you can simultaneously record and use the Time Shift function, which makes it possible to pause the TV show you are watching and continue watching it later. But this only works if you have a special flash drive in FAT-32 format. Many users give good reviews about this feature. Finding it is not at all difficult if you carefully read the instruction manual.
- Channel search can be done either manually or automatically.
- There is an electronic program guide for 7 days, a teletext function.
- The device is suitable for use as a player for playing downloaded video and audio content.
- Timer recording function on an external storage device.
- Ability to update new firmware from a flash drive without connecting a computer.
- There is a “Multiview” function, which makes it possible to view several thumbnail images of different channels at once.
How to set up the Oriel console without a remote control
The first step is to connect the Oriel set-top box to the TV, as indicated at the beginning of the article. If you cannot use the remote control, you will have to make settings using the control buttons on the set-top box itself. The front panel has all the required keys.
Due to the absence of most control buttons, you will not be able to use many options. For example, adding a channel to favorites and setting up the list will be problematic. Also, functions that require a password will not be available. But, running channel detection and adjusting the image is not difficult.
Reviews for Oriel consoles
Currently, the company occupies its niche in the field of sales of digital receivers. At the same time, users note the high reliability of the devices and adaptation to a large number of connection options. Some of the latest models of set-top boxes can be successfully connected to a TV using 3-4 connection methods.
This in turn makes these receivers universal. When selling them, you can be 99% sure that the device will be able to contact TVs and will not cause any problems during operation. The cost of the company's receivers today varies around 900-1200 rubles. This is affordable for most TV viewers. Moreover, for that kind of money you will also get the opportunity to connect to the Internet.
Possible problems and their solutions
Sometimes users encounter unexpected problems while using the Oriel set-top box. Often the reason is hidden in a system failure. Most problems can be fixed on your own, but if they happen constantly, then it is better to go to a service center.
Oriel box does not find channels
If the set-top box refuses to detect TV broadcasts, check for updates. Remember that any system requires regular updates. Go to the official website of the developer and check the latest patches in the appropriate section. Download the file to a flash drive, insert it into the set-top box, go to the menu and select “Update via USB”.
If the error persists, try resetting the settings. The function is located in the “System and TV” category. After the procedure, all information will be deleted and settings will be reset.
Does not respond to the remote control or the button does not work
Initially, make sure that the reason is not due to dead batteries. The second reason is the long distance, that is, you are trying to use the remote control while being too far from the console. Are you doing everything right? It may be time to replace the remote control with a new one or send it in for repair.
No signal
The lack of a signal is often due to technical work by the provider. Call the hotline and clarify the question; maintenance work is probably underway and therefore the broadcasts are unavailable. Also, the reason may be due to unfavorable weather or a damaged cable.
Connecting WiFi to Oriel set-top boxes
Some of the set-top box models presented in the table above have a built-in WiFi receiver and can easily connect to the Internet. This is very convenient and allows you to turn your device into a real multifunctional cinema. A wireless network allows you to:
- Watch videos on YouTube and Megogo.
- Find out the weather in your region.
- Connect to news feeds.
- Watch more than 20 channels using IPTV.
- Update the device.
To connect, you will additionally need to purchase an adapter, which is a Wifi antenna and connected via USB.
Firmware update and factory reset
When a new version of the set-top box software is released, it may not start working correctly with those TVs that previously had good contact with it. Therefore, in some cases it may be necessary to change the firmware of the set-top box to a new one, or if something goes wrong, return everything to the factory settings.
This can be done through the receiver menu:
- To do this, go to “Tools” and select updating the receiver via USB or via OTA.
- In the first case, the new firmware version should be installed on a flash drive.
- In the second case, wifi is required.
- If you want to reset all settings to default, you should select factory settings.
Password for resetting the device and entering the update menu: 1234