For more than 5 years now, free digital terrestrial television has been broadcast in our country. The territory in which its signals can be received is increasing every day. In the next year or two, it is planned to completely stop broadcasting analogue television and switch only to digital.
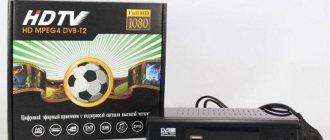
Therefore, you should now configure your TV to receive digital broadcasts. True, there are several nuances here: if you have a model that is a couple of years old, then most likely it already has a built-in DVB-T2 TV tuner and then there will be no difficulties when connecting. Otherwise, you will need to purchase a special receiver, and here a logical question arises: how to configure this set-top box to receive available digital channels?
We will give the answer to this within the framework of this article. In addition to this, we will consider difficulties that may arise during the process of both setting up and connecting equipment and offer options for solving them.
Equipment for receiving digital channels
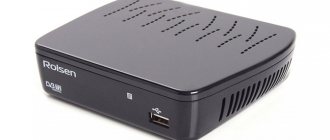
So, before setting up digital channels, we first have to purchase the necessary equipment. The list of equipment for receiving digital television includes an antenna, the digital set-top box itself and connecting wires.
Of these components, the biggest role for reliable reception of digital TV is played by the tuner itself, how well it is made and what format it is designed for. The antenna and connecting cables contribute a noticeable but less significant influence.
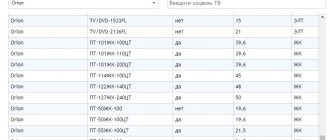
Which Sharp TV receivers allow you to switch to digital reception?
The following Sharp models with the abbreviation LC support the digital television standard:
- LC-22CFE4012E;
- LC-22CFE4012ES;
- LC-22CFE4012EW;
- LC-22CFF4011E;
- 24CHE4012E;
- 24CHF4011ES;
- 24CHF4012E;
- 24CHF4012EW;
- 24CHG5112E;
- 24CHG5112EW;
- 24CHG6002E;
- 24CHG6132EW;
- 24DHF4012E;
- 32CFE5102E;
- 32CFE5111E;
- 32CFE6131E;
- 32CFE6141EW;
- 32CFE6242E;
- 32CFE6252EW;
- 32CFE6352E;
- 32CFE6452E;
- 32CFG6022E;
- 32CFG6032E;
- 32CFG6452E;
- 32CHE4042E;
- 32CHE5111E;
- 2CHE5112E;
- 3CHE5112EW;
- 32HG5142E;
- 32HI5332E.
The list is, of course, incomplete, but these are the most popular brands . You can look at the other models directly in the instructions or on the box where the TV was packaged. There in the technical specifications it is indicated as DVB-T2. If there is such an inscription, it means the TV has a built-in tuner and there is no need to buy additional equipment.
Connection
To connect a set-top box for a digital signal to a TV, you must first connect the antenna to the set-top box, and then the set-top box itself to the television receiver.
Depending on the TV model, the receiver can connect to it either using an RCA cable (tulip) or using HDMI. Moreover, the latter allows you to observe a much higher quality picture.
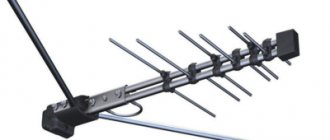
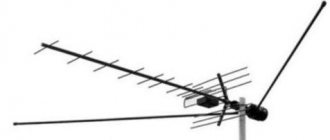
The requirements for the antenna are quite simple: the reception frequency must be decimeter. This makes it possible to use a regular indoor antenna for digital TV to connect.
To reliably receive the signal, you may need to raise the antenna we need higher and point it towards the repeater. When connecting the antenna and set-top box via cable, you should use high-quality products that will not negatively affect the signal. After all these manipulations, you can begin to search and configure digital channels.
Connecting the receiver to Soviet TVs
It's no secret that our grandparents often still use televisions that were released back in Soviet times or a little later.
The absence of “tulip” type connectors in them makes it impossible to connect a digital set-top box directly. But don’t rush to save money to buy a new TV. If the old TV has a SCART connector, then the problem is solved by purchasing an RCA-SCART adapter.
However, very old models do not have this either, but only an antenna input. Here a special device will come to the rescue - a modulator, which converts the digital signal into a high-frequency signal that is understandable to the old TV.
Therefore, it is possible to install digital television even on very ancient television receivers; another question is, does this make sense?
How to connect the set-top box
Let's look at the procedure for connecting the decoder to the TV.
To a modern TV
All modern TVs support image transmission via the HDMI protocol. This is how the console is connected to them. To connect the device you will need to do the following:
- connect the TV and device using an HDMI cable;
- connect the antenna plug to the console connector;
- connect the supplied power supply to the decoder;
- Connect the antenna amplifier adapter to the power supply.
It must be remembered that inexpensive models are often sold without an interface for connection. Because of this, the package does not include an HDMI cable (or an RCA cable is included instead). Therefore, if you purchased a budget model, you will most likely have to separately purchase a cord to connect to the TV.
As for the power supply, in most cases it is sold together with the set-top box. However, the device can be powered without any problems from any twelve-volt adapter. The only thing you need to watch out for is polarity. The required arrangement of contacts in the plug can be found on the back cover of the decoder near the connector for connecting the power supply. If you power the device from an adapter with a different polarity, it may fail.
To the old TV
The procedure for connecting a 20-channel set-top box to an old TV is completely identical to that for a new device. The only difference is the type of cable that is used for this. Older TVs do not have an HDMI connector. Instead, one of their panels has 2 or 3 RCA sockets. They are of different colors and each is responsible for one or another type of information transmitted from an external device:
- yellow – for video signal;
- white – for the left audio channel (or monophonic sound);
- red – for the right audio channel.
In order to connect the decoder to the TV, you need to connect each of the plugs into a socket of the same color as it on both the set-top box and the TV.
Receiver setup
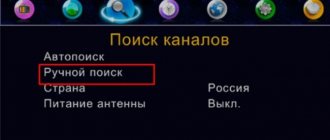
The steps to find digital channels will be as follows:
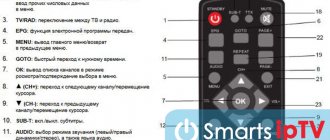
- Using the remote control, go to the main menu of the tuner.
- We find the item that is responsible for the settings.
- In the country field, select our country.
- Next, select the signal type, in our case DVB-T2.
- Select automatic setting.
- We wait a few minutes until the digital receiver finds available channels.
After successful completion of this procedure, we save the found channels and can view them at any time.
There are cases. When the automatic search cannot find any channel. This means that you will have to manually enter the settings.
Then we do the same, but select manual search.
A window will open in front of us in which we must indicate the frequency at which digital channels are broadcast. Its meaning can be found on the Internet for your city.
General information.
The set-top box supports DVB-T and DVB-T2 . To receive digital terrestrial television signals, it uses a MaxLinear MXL608 tuner . The receiver has the function of recording TV programs, it allows you to read files from USB Flash drives. The device's built-in media player supports playback of the most popular network audio, photo and video formats.
D-Color DC1002HD mini receiver is packaged in a branded box, which lists the main features of the device.
Standard delivery includes:
- Receiver D-Color DC1002HD min i;
- Remote control;
- Batteries for the remote control;
- RCA cable;
- Instructions with warranty card.
By the way, the warranty period D-Color digital receivers is 2 years .
The use of a combined processor in this receiver made it possible to reduce the number of radio elements on the printed circuit board. Its dimensions have decreased, and this, in turn, has made it possible to make the body of the D-Color DC1002HD mini quite compact.
- Digital receiver D-COLOR DC1002HD mini
the D-Color DC1002HD mini receiver are made of metal and equipped with ventilation slots. The cover is covered with a protective transport film (the warranty seal is glued on top of this film!? Well, just like some models of Oriel receivers), there are 4 rubber feet on the base.
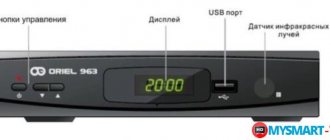
The front panel of the receiver is plastic, the surface is matte with glossy inserts.
display is located in the center of the front panel . When the D-Color DC1002HD mini receiver is in standby mode, the clock is displayed on this display; in operating mode, the TV channel number is shown on the display.
To the right of the display there are buttons for cyclic switching of TV channels and a button for turning the receiver on/off. Above it there is a power indicator. When the set-top box is in operating mode, the indicator lights up green; the red color of this indicator indicates that the device is in standby mode. To the left of the display on the front panel of the D-Color DC1002HD mini there is a USB port .
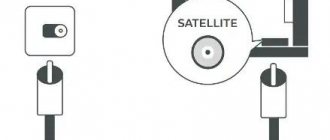
Switching connectors for connecting the set-top box to the TV and antenna are located on the rear panel.
There are: a standard antenna input (RF IN) and a pass-through antenna output (RF LOOP THROUGH), a digital audio/video output (HDMI) and a regular composite video output (VIDEO) along with a stereo audio output (R-AUDIO; L-AUDIO).
- Review of the D-COLOR DC1302HD TV set-top box. Characteristics and description
Checking the signal quality
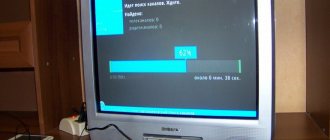
After finding digital terrestrial television channels, you should evaluate the quality of the received signal. To carry out this procedure on the TV set-top box, find the INFO button (the name may differ for different manufacturers) and click on it.
We will see a message about the signal level on the screen:
- If the indicator is more than 60%, then the digital signal reception is quite stable.
- The receiver picks up a low quality signal.
The following actions can correct the situation:
- Place the antenna in a different location or, for example, raise it higher on the mast.
- It is more accurate to orient the antenna in the direction of the repeater tower.
- You can find out the location of transmitters in your area on the Internet.
- Use an amplifier to increase signal strength.
How to switch a device from Smart TV to terrestrial television?
All the latest models of the Japanese manufacturer Sharp have the Smart TV function , which means “smart television”. This TV expands its capabilities by connecting to the Internet. Smart TV allows the user to:
- communicate in online chats;
- take part in online games using a simple TV as a console;
- watch movies in digital format;
- conveniently view media content;
- it is possible to connect a keyboard and mouse;
- record an interesting program or a necessary film.
To set up, you will need an Internet cable or Wi-Fi network and a router. Auto-tuning of digital broadcasting is carried out according to the following instructions:
- Select the Menu button on the remote control.
- When the menu appears on the screen, find the CHANNEL tab in it.
- Loan click on the Auto settings tab.
- Confirm your actions using the “OK” button.
Setting up TV channels
In order to configure your TV set-top box to receive as many channels as possible, you will most likely have to use manual channel tuning. In this case, you need to know that channels are broadcast in packages, multiplexes, at different frequencies.
The first package contains the following channels:
Channel One, Russia 1, Match TV, TVC, Karusel, OTR, Russia 2, Channel 45, NTV, Russia Culture.
Receiving broadcasts from the second multiplex gives access to:
MuzTV, RenTV, STS, Spas, TV3, Friday, Domashny, Mir, Zvezda, TNT.
Also, do not forget that, unlike analog channels, the search for digital channels on the set-top box occurs by packets, and not by channels. This means that nothing will happen on the TV screen for several minutes, and then 10 channels will immediately become available.
It is also worth periodically monitoring information about available free channels etc. if necessary, update the found packages.
You have learned how to set up digital television through a set-top box, all that remains is to deal with possible problems with this.
Setup problems and solutions
There are situations when you correctly set up the reception of digital TV channels, watched them for a long time, and then suddenly stopped showing one or several of them at once. Or do you know that 20 channels are broadcast, but only 10 channels are found, what to do in such cases?
Let's look at the main problems that may arise during the process of setting up or operating digital television and methods for solving them.
- The antenna does not receive or does not receive a digital signal well, but previously received an analog signal well. There may be several options: the antenna is not suitable for receiving a DVB-T2 signal, for example, it is designed for MV, not UHF; The distance to the repeater is too large and the gain of this antenna is not enough for reliable reception. In this case, only buying a new antenna or amplifier will help.
- The antenna was tuned for quite a long time, after a while it stopped receiving a certain channel. Alternatively, the connection on one of the contacts may have broken or the wire has broken. All contacts should be checked for oxidation and the cable should be ringed.
- The tuner does not receive a digital signal. Check if your set-top box does not support DVB-T2 format. Then only replacing it will help.
- The amplifier used to work, but now it doesn't. Most likely, either the amplifier itself or its power supply has failed. It should be taken to a service center for diagnostics.
- Shows only part of the 20 possible channels. Most likely, the antenna has insufficient gain, or is not aimed precisely at the repeater. To show more channels, you should buy a more powerful antenna or orient it more accurately in the direction of the tower.
- Previously it showed 20 channels, but now only 10. The equipment was checked, everything is in order. – The set-top box settings may have gone wrong. In this case, you need to reconfigure the tuner or configure channels manually. If everything worked fine before, but over time problems began to appear, this may indicate the need to replace the equipment or its breakdown.
In general, if problems arise with signal reception, the action algorithm should be as follows:
- Checking the correct connections between all types of equipment: antenna, set-top box, TV, amplifier.
- Checking all receiver settings, adding data manually if necessary: channel number, channel width, etc.
- Determining the location of the transmitter and orienting the antenna towards it as accurately as possible.
Depending on the terrain, it may be necessary to raise the antenna to a greater height.
- Using a tuner, we determine the maximum signal level for various antenna orientations.
- We perform automatic channel search.
If after all these manipulations our TV does not receive all channels, then it means we have a low-power antenna. As a rule, residents of large cities feel more confident when tuning in and watching digital television than residents of rural areas. This is due to the short distance to the transmitting tower, and, consequently, more reliable reception.
Equipment
When organizing each digital television format, the devices discussed above are required to be fully equipped. Of these, the most expensive set is satellite television, which includes a receiver, a receiving head (there may be several of them) and a reflector.
The set-top box remains universal equipment for any digital TV format, which has several purposes:
- Decoder. Decoding the signal and transmitting the image to the TV in both mpeg-2 and mpeg-4 format.
- Dashboard . Using the receiver, you can turn on digital TV and control channels, as well as receive a signal when using the remote control.
- Content support. The set-top box is used to set up television and unblock paid channels.