Desktop computers usually do not have the ability to access the Internet wirelessly. This adapter can be easily connected to the system unit via a USB connector and get full wireless access to the World Wide Web. Set-top boxes allow you to access digital television, but are usually not equipped with Wi-Fi adapters. They must be purchased separately. Lumax DV0002HD has an affordable price and allows you to additionally use the TV to watch content from the World Wide Web.
Characteristics of all Lumax digital set-top boxes
All devices of Lumax set-top boxes are equipped almost identically. Their peculiarity is that even the very first models are equipped with the ability to access the Internet via a WiFi signal. This is especially convenient, for example, during the process of flashing equipment and installing new software.
| Model | DVB-T and DVB-T2 support | Connectors | WiFi | Display | AVI, MPEG, MKV, DivX, MP4, JPEG, MP3, WAV |
| DV1108HD | + | HDMI and RSA | + | + | + |
| DV1110HD | + | HDMI | + | — | + |
| DV1111HD | +DVB-C | HDMI | + | — | + |
| DV2104HD | +DVB-C | HDMI and RSA | + | + | + |
| DV2105HD | +DVB-C | HDMI and RSA | + | + | + |
| DV2108HD | +DVB-C | HDMI and RSA | + | + | + |
| DV2114HD | +DVB-C | HDMI and RSA | + | + | + |
| DV2115HD | +DVB-C | HDMI and RSA | + | + | + |
| DV2118HD | +DVB-C | HD OUT and RSA | + | — | + |
| DV2120HD | +DVB-C | HDMI and RSA | + | + | + |
| DV3201HD | +DVB-C | HDMI and RSA | + | + | + |
| DV3205HD | +DVB-C | HDMI and RSA | + | + | + |
| DV3206HD | +DVB-C | HDMI and RSA | + | + | + |
| DV3208HD | +DVB-C | HDMI and RSA | + | + | + |
| DV3211HD | +DVB-C | HDMI and RSA | + | + | + |
| DV3215HD | +DVB-C | HDMI and RSA | + | + | + |
| DV4201HD | +DVB-C | HDMI and RSA | + | + | + |
| DV4205HD | +DVB-C | HDMI and RSA | + | + | + |
| DV1103HD | +DVB-C | HDMI and RSA | + | + | + |
| DV1105HD | +DVB-C | HDMI and RSA | + | + | + |
*In the table, “+ DVB-C” indicates the device’s ability to work with DVB-T, DVB-T2 and DVB-C.
➦ Download documentation and updates
| Model | Management | Firmware update |
| DV1103HD | DV1103HD_6.pdf | Download update |
| DV1105HD | DV1105HD_5.pdf | Download update |
| DV1107HD | DV1107HD_6.pdf | Download update |
| DV1108HD | DV1108HD_4.pdf | Download update |
| DV1109HD | DV1109HD_5.pdf | Download update |
| DV1110HD | DV1110HD_5.pdf | Download update |
| DV1111HD | DV1111HD_3.pdf | Download update |
| DV1115HD | DV1115HD_1.pdf | Download update |
| DV1120HD | DV1120HD_1.pdf | Download update |
| DV2104HD | DV2104HD_7.pdf | Download update |
| DV2105HD | DV2105HD_4.pdf | Download update |
| DV2107HD | DV2107HD_4.pdf | Download update |
| DV2108HD | DV2108HD_5.pdf | Download update |
| DV2114HD | DV2114HD_3.pdf | Download update |
| DV2115HD | DV2115HD_4.pdf | Download update |
| DV2118HD | DV2118HD_5.pdf | Download update |
| DV2120HD | DV2120HD_4.pdf | Download update |
| DV3201HD | DV3201HD_5.pdf | Download update |
| DV3205HD | DV3205HD_3.pdf | Download update |
| DV3206HD | DV3206HD_4.pdf | Download update |
| DV3208HD | DV3208HD_7.pdf | Download update |
| DV3210HD | DV3210HD_5.pdf | Download update |
| DV3211HD | DV3211HD_4.pdf | Download update |
| DV3215HD | DV3215HD_4.pdf | Download update |
| DV4201HD | DV4201HD_5.pdf | Download update |
| DV4205HD | DV4205HD_2.pdf | Download update |
| DV4207HD | DV4207HD_2.pdf | Download update |
| DVTV5000 | DVTV5000-4.pdf | |
| DVBT2-555HD | Download update | |
| DV2122HD | DV2122HD_2.pdf | Download update |
| DV3218HD | DV3218HD_2.pdf | Download update |
| DV4210HD | DV4210HD_2.pdf | Download update |
| DV2201HD | DV2201HD_1.pdf | Download update |
| DV2117HD | DV2117HD_2.pdf | Download update |
| DV1117HD | DV1117HD_1.pdf | Download update |
| Model | Management |
| DA1202A | DA1202A-2.pdf |
| DA1203A | DA1203A-2.pdf |
| DA1205A | DA1205A.pdf |
| DA1502A | DA1502A.pdf |
| DA1503A | DA1503A.pdf |
| DA2201P | DA2201P-2.pdf |
| DA2202A | DA2202A-2.pdf |
| DA2203P | DA2203P.pdf |
| DA2204A | DA2204A-2.pdf |
| DA2213A | DA2213A.pdf |
| DA2215A | DA2215A.pdf |
| DA2501A | DA2501A-2.pdf |
| DA2502P | DA2502P.pdf |
| DA2503A | DA2503A-2.pdf |
| DA2504P | DA2504P-2.pdf |
| DA2505P | DA2505P.pdf |
| DA2507A | DA2507A.pdf |
| DA2510P | DA2510P.pdf |
| DA2512P | DA2512P.pdf |
| DA2508A | DA2508A.pdf |
| DA2509A | DA2509A.pdf |
| Model | Management | Firmware update |
| DV0002HD | DV0002HD_4.pdf | Download update |
| Model | Management |
| BL8201USB | BL8201USB-1.pdf |
| BL9102USB | BL9102USB-1.pdf |
| BL9201USB | BL9201USB-1.pdf |
| BL9203USB | BL9203USB-1.pdf |
| BL9259USB | BL9259USB-1.pdf |
| Model | Management |
| RD1101 | RD1101-1.pdf |
| RD2102MP | RD2102MP-1.pdf |
| RD2103 | RD2103-1.pdf |
| RD2104MP | RD2104MP-1.pdf |
| RD2201MP | RD2201MP-1.pdf |
| RD2202MP | RD2202MP-1.pdf |
| RD2203MP | RD2203MP_1.pdf |
| Model | Management |
| PSB201Bk | PSB201Bk_Rd_Wh_Bl-1.pdf |
| PSB201Bl | PSB201Bk_Rd_Wh_Bl-1.pdf |
| PSB201Rd | PSB201Bk_Rd_Wh_Bl-1.pdf |
| PSB201Wh | PSB201Bk_Rd_Wh_Bl-1.pdf |
| PSB202Bk | PSB_202BK_RD_SL_GL-1.pdf |
| PSB202Gl | PSB_202BK_RD_SL_GL-1.pdf |
| PSB202Rd | PSB_202BK_RD_SL_GL-1.pdf |
| PSB202Sl | PSB_202BK_RD_SL_GL-1.pdf |
| PSB302Bk | PSB302Bk-1.pdf |
| PSB303Bk | PSB303Bk-1.pdf |
| PSB304Bk | PSB304Rd_Gr_Bk_Bl-1.pdf |
| PSB304Bl | PSB304Rd_Gr_Bk_Bl-1.pdf |
| PSB304Gr | PSB304Rd_Gr_Bk_Bl-1.pdf |
| PSB304Rd | PSB304Rd_Gr_Bk_Bl-1.pdf |
| PSB401Bk | PSB401Bk-1.pdf |
| PSB402Bk | PSB402Bk_Gr_Bl-1.pdf |
| PSB402Bl | PSB402Bk_Gr_Bl-1.pdf |
| PSB402Gr | PSB402Bk_Gr_Bl-1.pdf |
| PSB503Wd | PSB503Wd-1.pdf |
| PSB801Bl | PSB801Gr_Bl-1-1.pdf |
| PSB801Gr | PSB801Gr_Bl-1-1.pdf |
Connecting a digital set-top box Lumax
The procedure and nature of connecting the set-top box depends on the TV itself. Depending on the conditions, up to 3 connection methods can be selected. We will tell you about them.
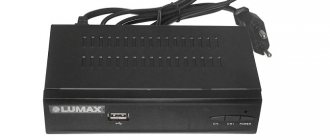
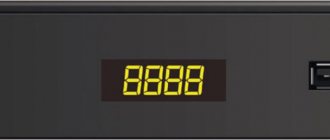
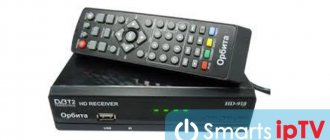
Front panel of the Lumax set-top box with display
For example, let's take the 2 most popular models of Lumax digital set-top boxes - DV1108HD and DV2105HD . If you have a different tuner model, don't worry. The connection procedure is the same for everyone.
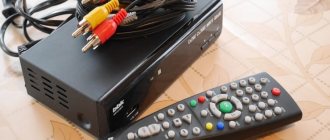
First, let's look at the back panel of the presented console.
The back panel of the Lumax console
There are several options here:
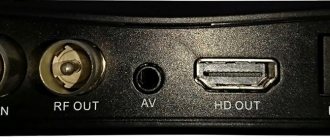
- Ant IN. Output for connecting an antenna to the receiver.
- Loop Out. Needed to connect two receivers and receive a digital signal from one antenna.
- HDTV. One of the HDMI output connectors, through which you can additionally connect not only a TV, but also a computer monitor.
- CVBS, R and L. Corresponding RSA outputs. Yellow is responsible for displaying the picture (Video), and the other two are for the right (R) and left (L) speakers of the TV.
Important! In the absence of grounding on external antennas, Lumax does not guarantee the safety of using the set-top box during a thunderstorm. Therefore, upon the onset of such weather conditions, it is better to unplug the antenna cable
HDMI connection
The most beneficial, in terms of quality characteristics, will be to connect the TV to a digital set-top box via an HDMI connector. Its presence must be checked first. The corresponding cable is usually not included with the device. Its cost is around 500 rubles.
Examples of inputs on a TV
It's better not to skimp when buying. In various stores you can find prices starting from 100 rubles, but the better quality the cable, the longer it will last you
When connecting, HDMI is first installed, then you can insert the antenna and turn on the set-top box to the network.
Connection using RSA or SCART-RSA
Often RSA cables are included in digital set-top boxes. They are also commonly called "Tulips". They are made in different colors and are connected via appropriate connectors.
On some older TVs you can still find a SCART input. In this case, the only option to connect the set-top box is to use a special adapter that converts the signal from RSA to SCART. You can find one of these in any hardware store. It's inexpensive.
Software update
By 2021, in order to improve products, LUMAX has updated its entire line of DVB-T2 digital television receivers on the GX3235S chip.
You can download a new version of system software for a specific model from the Products / Digital TV Receivers section by following the “Download update” link to a USB drive. Install only the software that is designed specifically for your receiver model! Also pay attention in the manual to the type of main chipset: GX3235S should be indicated.
In addition, you can update the software when connecting the DVB-T2 receiver to the Internet according to the instructions.
Remember that only with a software update you will get the maximum range of functions of your receiver!
Setting up and searching for channels on the Lumax digital set-top box
Regardless of which connection method was chosen. The test of operation will be the first launch of the console. In order to do it correctly, you need to select the appropriate mode for displaying the device on the TV.
From the list, select the mode in which you connected the set-top box
In this case, we will choose from 3 options:
- If the connection was made using an HDMI cable, then in the settings you should switch to HDTV or HDMI mode (whichever it will be), depending on the TV model.
- If using RSA, then you should find the AV (Audio Video) icon.
- When using SCART, the corresponding message will be shown.
You should look for this setting in the TV menu. Usually it is in the image parameters.
In some cases, you can see 2 or 3 connectors of the same format. For example, HDMI 1 and 2. In this case, choose the one that carries the signal from the cable. You can view it on the back cover of the device
- Once the required display channel is selected. You should turn on the Lumax set-top box from the remote control.
- When you log in for the first time, the main menu window will open. It is necessary to specify the language settings. If your digital antenna has a signal amplifier, then in the “Power” column you need to set it to ON.
- After that, click search channels.
The device will independently select a convenient signal frequency at which the strongest digital reception strength is observed. Upon completion, the list will be saved and you will be able to watch your favorite shows.
Search by frequency in manual mode
If the automatic search finds too few broadcast TV channels or their quality of display does not suit you, you can try to independently select the required reception frequency from the TV tower and find the corresponding channels on it.
To control menu items, you need to use Vol +/- on the remote control of the set-top box and the OK button to select the parameter
The sequence of searching channels in manual mode is as follows:
- First you need to find out the frequency of digital signal transmission from your nearest television tower. This can be done using the CETV interactive map.
- Then you need to press “Menu” on the remote control. In it, select the channel search section.
- We proceed to a manual search and set the channel number that was taken earlier for your area, according to the previously specified map. We wait a few seconds and look at the signal level, it should change. Click OK.
The device will search for the reception frequency you set and find all available programs on it. This must be done for DVB-T and DVB-T2 parameters.
Connecting the Lumax set-top box to WiFi
All modern Lumax models are equipped with Internet access. First of all, this is necessary for timely updating of company devices and installation of fresh firmware with a new software version. However, Lumax also has additional options that movie buffs will enjoy. We'll talk about them a little later.
In order for the set-top box to freely access the Internet, it must have an appropriate wifi receiver antenna. These transmitters are not included with the device and must be purchased additionally. In stores they cost between 500-700 rubles. And outwardly they look like ordinary flash drives connected via USB.
Firmware update
The firmware on the device is updated manually; for this you need to Download the firmware for Lumax DV-3206-HD. The installation package is downloaded to removable media with the ability to connect via USB.
- Insert the removable drive into the USB connector and wait for the download to finish.
- Open the console menu using the remote control.
- Find the “System” section, click on “Software Update”.
- Select "Update via USB".
- Find the installation file on your removable media, select it and click OK.
For a successful update, wait until the download completes and do not take any action. After installation, remove the media from the device.
Lunax cinemas
It is no coincidence that the company’s devices have become so popular. For all owners of equipment, Lumax gives the opportunity to additionally download some Russian and foreign films and cartoons completely free of charge. The list includes more than 500 options that you can download to your receiver and watch on your TV, with the ability to rewind and stop the broadcast.
To receive a particular film, you must:
- Buy the corresponding branded WiFi adapter for the set-top box - LUMAX DV0002HD. It costs 550 rubles.
- Go to the menu and select “Network and Applications”. Click OK and select “FTP download”
- After that, press the blue button on the remote control.
- The update will begin downloading; its duration depends on the Internet speed. When finished, click OK and confirm the installation.
- Subsequently, in the menu itself, you can go to the “network and applications” section and select the movie you need from the general catalog.
Thus, in addition to 20 free channels, with the purchase of a set-top box you can also watch some premieres for free.
Troubleshooting
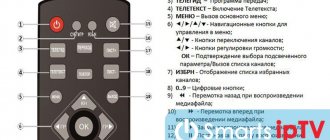
Instructions for the remote control from Lumax
When operating the equipment, various situations may arise that will partially or completely limit the full operation of Lumax devices. In this case, we will provide the most effective solutions, based on popular errors:
The set-top box is not visible on the TV/the image disappears
- If the image periodically disappears, then in most cases this indicates a malfunction of some cable.
- If there is a complete absence of a picture, you must also make sure that the device display mode is selected correctly. We wrote about this earlier.
Finds few channels/does not find them at all
- Check the antenna. To do this, it is best to connect another set-top box to it and see the signal reception level.
- Make sure to select the correct frequency when manually searching.
Long download of updates
The download speed of the set-top box updates depends on the Internet speed in your home. The higher it is, the faster the module will be able to order the necessary files via Wi Fi.
The device randomly turns off and reboots
You need to reset it to factory settings and search for channels again. The reason may also be an outdated software version.
Why is the module needed?
How to make a Wi-Fi adapter for a TV or set-top box yourself
This module is similar to a flash drive. In order to use it, you need to plug it into the connector intended for it. After this, the set-top box will have access to your home wireless network.
Note! The adapter is designed for use with a set-top box. It is necessary that there is compatibility between them. Lumax DV0002HD WiFi is used in conjunction with a set-top box from the same manufacturer, which ensures a high degree of compatibility.
Typically, in a home network, Internet access provided by the provider is via cable. It is connected to the router. Typically there are 4 slots for connecting devices using network cables and access via wireless communication.
The adapter in question provides high-quality access to the Wi-Fi network created by the router. It, when connected to the set-top box, allows the TV to access signals that are transmitted via the Internet, and opens up more possibilities than before.
Reviews about Lumax set-top box
Currently, the company's products are popular among users. Firstly, everyone appreciates the ease of installation of these devices and their overall reliability. On average, one such set-top box can work for more than 5 years, while some devices from other companies burn out after six months of use.
In addition, when purchasing, you have the option of an additional cinema hall, which contains only the most popular films. There are also about 100 Soviet cartoons, which your children will appreciate with a bang.
If we talk about the average rating on the Internet, then the company’s products can be safely given 4.5 on a 5-point scale.