A question has arisen: how to connect and configure the World Vision digital set-top box? Brief instructions will help you understand the issue and solve problems. The World Vision tuner is suitable for broadcasting terrestrial, satellite and cable TV. Many users choose it. Affordable price and many useful options play a role. The right option for family use. It provides the opportunity to get high-quality images and a lot of useful content. Choose packages depending on your needs and pricing policy. The number of channels is not limited. For quick connection you need to buy a separate antenna.
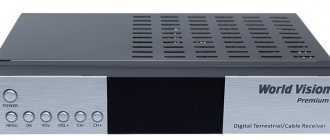
Characteristics of World Vision digital set-top box models
| Model | Price (rubles) | DVB-T2 | CPU | Tuner | Connectors | WiFi | External Power Supply | Remote control |
| 65 | + | Ali3821p | Rafael Micro R836 | HDMI, USB, RSA | — | + | + | |
| 65M | + | Ali3821p | Rafael Micro R836 | HDMI, USB, RSA | — | + | + | |
| T64LAN | 1300 | + | Availink 1506T | Rafael Micro R850 | HDMI, USB, RSA | + | + | + |
| T64D | 990 | + | Availink 1506T | Rafael Micro R850 | HDMI, USB, RSA | + | + | + |
| T64M | 890 | + | Availink 1506T | Rafael Micro R850 | HDMI, USB, RSA | + | + | + |
| T62N | + | GUOXIN GX3235S | MaxLinear MXL608 | HDMI, USB, RSA | + | + | + | |
| T129 | + | Montage M88CT6000 | Rafael Micro R846 | HDMI, USB, RSA | — | + | + | |
| T62A | 1200 | + | GUOXIN GX3235S | MaxLinear MXL608 | HDMI, USB, RSA | + | Interior | Trainable |
| T63 | + | Ali3821p | Rafael Micro R836 | HDMI, USB, RSA | + | + | + | |
| T63M | + | Ali3821p | Rafael Micro R836 | HDMI, USB, RSA | + | + | + | |
| T61M | + | Ali3821p | MaxLinear MXL608 | HDMI, USB, RSA | — | + | + | |
| T70 | + | Ali3821p | MaxLinear MXL608 | HDMI, USB, RSA | — | + | + | |
| T62D | 800 | + | GUOXIN GX3235S | MaxLinear MXL608 | HDMI, USB, RSA | + | + | + |
| T62M | 1300 | + | GUOXIN GX3235S | MaxLinear MXL608 | HDMI, USB, RSA | + | + | + |
| T60M | 900 | + | Ali3821p | MaxLinear MXL608 | HDMI, USB, RSA | — | + | + |
| T59D | + | Montage M88CT6000 | Montage M88TC3800 | HDMI, USB, RSA | + | + | + | |
| T59 | 1000 | + | Montage M88CT6000 | Montage M88TC3800 | HDMI, USB, RSA | + | + | + |
| T59M | 900 | + | Montage M88CT6000 | Montage M88TC3800 | HDMI, USB, RSA | + | + | + |
| T54 | 1000 | + | Ali3821 | MaxLinear MXL608 | HDMI, USB, RSA | — | + | + |
| Premium | 1400 | + | Ali M3821 | Rafael Micro R836 | HDMI, USB, RSA | + | + | + |
| T55Gold | 1400 | + | Ali M3821 | HDMI, USB, RSA | — | + | + | |
| T126 | 1000 | + | Mstar MSD7T01 | Rafael Micro R846 | HDMI, USB, RSA | — | + | + |
| T57M | + | Ali M3821 | HDMI, USB, RSA | — | + | + | ||
| T36 | 800 | + | Mstar MSD7T01 | HDMI, USB, RSA | — | + | + | |
| T57D | + | Ali M3821 | HDMI, USB, RSA | — | + | + | ||
| T57 | + | Ali M3821 | HDMI, USB, RSA | — | + | + | ||
| T56 | 1300 | + | Mstar MSD7T01 | HDMI, USB, RSA | — | + | + | |
| T58 | 1100 | + | Novatek NT78306 | HDMI, USB, RSA | — | + | + | |
| T39 | + | Novatek NT78306 | HDMI, USB, RSA | — | + | + | ||
| T38 | + | Novatek NT78306 | HDMI, USB, RSA | — | + | + | ||
| T37 | 1000 | + | Ali M3821 | HDMI, USB, RSA | — | + | + | |
| T34A | + | Ali M3821 | HDMI, USB, RSA | — | + | + | ||
| T55D | + | Ali M3821 | HDMI, USB, RSA | — | + | + | ||
| T55 | 1400 | + | Ali M3821 | HDMI, USB, RSA | — | + | + | |
| T35 | 800 | + | Ali M3821 | HDMI, USB, RSA | — | + | + | |
| T43 | + | MStar 7802 | HDMI, USB, RSA | — | + | + | ||
| T34i | + | MStar 7802 | HDMI, USB, RSA | — | + | + | ||
| T34 | + | MStar 7802 | HDMI, USB, RSA | — | + | + | ||
| T53 | + | MStar 7802 | HDMI, USB, RSA | — | + | + | ||
| T40 | + | MStar 7802 | HDMI, USB, RSA | — | + | + | ||
| T23CI | + | ALi 3606 | HDMI, USB, RSA | — | + | + | ||
| T411CI | + | ALI M3602 | HDMI, USB, RSA | — | + | + |
*The table contains blank data in the cells with price and DVB-T2 tuner model. In the case of price, the reason is that not all consoles are still on sale and are at the testing stage or have been completely discontinued. In the tuner model data, we could not find out for some set-top boxes. Perhaps this is a trade secret or the data has not yet been added.
Instructions for connecting World Vision set-top boxes to TVs
According to our observations, the most popular World Vision set-top boxes at the moment remain the following models: Premium , T62A and T62D . That is why we will take screenshots of equipment for further instructions for these consoles.
However, we dare to assure you that the instructions are equally suitable for any of the device models of this company, the main thing is to do everything in the same way as the review. The general connection diagram is as follows
The antenna is connected directly to the digital set-top box through the corresponding input. In this case, the connection to the TV itself is made by ONE of 3 options:
- Via HDMI cable. Such a wire is usually not included in the kit. However, if your TV has such an input, then it must be used first. The thing is that HDMI provides the best image quality and is generally more durable. It is best to buy a cable from trusted companies: Twisted Veins, Mediabridge ULTRA, Monoprice. A meter of their cable will cost 2-3 times more than cheap analogues, but their quality will be 5 times higher.
- Via RSA (tulips). Particularly relevant for TVs older than 7-10 years of production. These models do not have HDMI, but there are multi-colored inputs for RSA. They are also called “tulips” for their corresponding color. 2-3 meters of this cable are often included with the set-top box. Its quality leaves much to be desired and when using it, be prepared to replace it after 2-3 months of active use. On some TVs you will find options in which you will need to connect not 3, but 2 or 1 RSA output. The principle does not change here, the main thing is not to make a mistake with the colors.
- Using converters and adapters. This is especially true in case of absence or failure of any output on the TV. Adapter from RSA to SCART. A special SCART output can be found on TVs that are more than 10 years old. According to our observations, many subscribers still have such “tenacious” TVs. In stores, the adapter can be seen for 200-300 rubles.
- RSA-HDMI signal converter. It may be useful if, for example, the output for “Tulips” on your TV is broken. Costs vary, from 500-1000 rubles on average.
Regarding adapters, we will say that they should be used only in case of urgent need. It just doesn’t make sense to resort to their help.
After the device is connected, to turn on the set-top box and check the connection, you must do the following:
- In the TV menu, go to the signal display mode you need. For HDMI, this is the corresponding mode. For RSA, AV (Audio-Video) is usually selected.
- After this, you can turn on the set-top box and press the power button on the remote control.
- If the welcome menu appears, then the connection was made correctly and you can begin directly setting up digital channels.
The company (Gi), widely known for its satellite receivers, last summer introduced a truly unique new product - an over-the-air cable set-top box with Internet functions.
On the one hand, it uses a well-known combined processor (demodulator + CPU) in set-top boxes - . On the other hand, this is the only set-top box equipped not with the usual 64 MB of RAM, but twice as much - 128 MB. And the size of flash memory is also 2 times larger than the standard one - not 4 MB, but 8 MB.
This increase in volume is, of course, associated with Internet functions that have never previously been found in conventional set-top boxes.
But at the same time, its cost starts from p, which is comparable to many set-top boxes, but of course not comparable to the number of functions that World Vision Premium .
This is a truly combined set-top box: in different conditions it can work both as an on-air set-top box, and as a cable set-top box, and as a set-top box.
For example, you can use one function all the time, and when circumstances change, use another. For example, in the city you can use it as a DVB-C cable set-top box, and when you go to the country, you can use it as a DVB-T2 terrestrial set-top box. Well, if somewhere there is no cable or antenna, watch IPTV.
In addition, there is a unique function - broadcasts over the network (you can also to the external Internet) with viewing on a computer, tablet, smartphone or TV with SmartTV. At the same time, switching channels, and in general, you can remotely control almost all functions of the receiver.
Comes in a large colorful purple box:
On the reverse side the main characteristics are listed in three languages:
I’ll immediately note the presence of a paid Dolby Digital (AC-3) license in the processor - the owners of this set-top box will not have the question: “Why do movies from a flash drive play without sound?”
In addition, some cable channels come with Dolby Digital , so having such a license is highly desirable for a cable set-top box.
We open the box, everything inside is laid out in its own compartments and in separate bags:
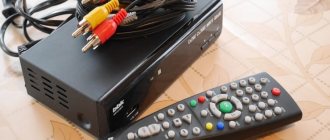
The kit includes the receiver itself in a metal case with buttons and a digital indicator, remote control, HDMI cable, audio-video cords, user manual and batteries:
On the front panel there are as many as 7 buttons, a digital indicator and a red-green power indicator:
With so many buttons, you don’t have to worry about unexpectedly dead batteries or even losing the remote control—the buttons allow you to fully control the menu.
2/3 of the housing cover is perforated with ventilation holes:
If you look closely, you can see that they are all just above the main board.
There is also ventilation on the side:
On the other hand, you can see that the protective factory transport film was peeled back in order to stick a self-destructive warranty sticker on the case:
The bottom is also perforated:
Two support legs are rubber, and two stamped ones are made of metal. The sticker indicates the direct manufacturer of Galaxy Innovations and World Vision receivers - “PRIMUS INTERPARES LTD”. Well, initially "".
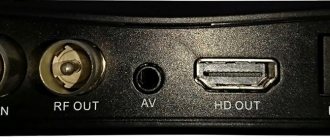
At the back there are all possible connectors for connecting to various TVs:
Antenna jack RF IN , and please note that RF OUT here is not a transit output as in the vast majority of set-top boxes - it is an RF modulator that allows you to connect the set-top box to any TV if it does not have any other inputs, and such models are also found.
The HF modulator can operate on 21 - 69 UHF channels. By default, at 38.
Also on the back there is an HDMI , a USB , an orange digital audio output S/PDIF , RCA audio output jacks - red for the right channel and white for the left channel, and yellow for composite video.
In addition to thick audio-video cords (“tulips”), the kit also includes a thick HDMI cable marked “HIGH SPEED HDMI CABLE”:
Its length is 75 cm, diameter is 5.5 mm.
The console is equipped with a classic full-size remote control:
Works without any issues. Also suitable are remote controls of both types ( and ) from satellite receivers Gi HD Mini, Micro, Matrix Lite, Phoenix and many other satellite receivers on a similar platform (lists and ).
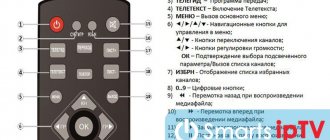
TMS button is TimeShift, P/N is a video mode switch, F1 is a sleep timer.
PAGE button is also a channel switching button.
UHF (UHF) - selecting a frequency channel. Despite the presence of complete settings in the main menu, using a separate button is puzzling, because There is clearly no need to promptly change the channel number of the RF modulator. I hope in the next firmware the manufacturer will still assign the button to call some other more operational function, but for now, unfortunately, it refuses to do this.
In passing, I note that on the Russian market, despite many hundreds of different set-top boxes, only 4 models have a built-in RF modulator:
- General Satellite TE 8714B
- Openbox T2-02 M
- Cadena ST-603AD
- World Vision Premium
After all, sometimes you can even find televisions that are not very ancient, but have only an antenna input and no other inputs. You can also, for example, broadcast a signal via cable to a kitchen TV: let’s say the set-top box is in the living room, watch one of the channels, and then go to the kitchen and continue watching it. Moreover, you can broadcast everything this way, incl. and some of the IPTV channels.
Also, the presence of an HF modulator in some cases allows, for example, to organize a broadcast into the existing cable network of a small hotel/hostel: by receiving the digital signal of multiplexes 1 and 2 with a common antenna, assemble 20 receivers and distribute the broadcast in the form of 20 analogue channels, alternating through one to the local cable network with regular TVs.
Technical details about the operating features of the RF modulator are presented at the very end.
It is impossible not to note the thick user manual brochure in two languages, like the Galaxy Innovations satellite receivers:
34 s - in English and 38 s - in Russian. Total: 72 s. Everything is described in detail, with pictures, although of course it is not always possible to examine the screenshots in all details. To do this, it is still better to study various reviews.
At the same time, the Technical Specifications state the maximum current for powering the active antenna - up to 100 mA. Details of actual measurements are in the technical section.
The cover is made of thick paper, and its back part is also a warranty card:
Moreover, in 5 languages: English, Russian, Ukrainian, Spanish and French. With contact numbers of Service Centers, E-mails and websites in the relevant countries.
For those who are interested in technical details about the insides of the receiver, all this will be discussed at the very end, but now let’s move directly to its functionality.
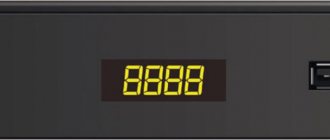
When turned on, the word ON is lit on the front panel, turning into on, then the splash screen appears:
and if the set-top box is configured, then the indicator will show the number of the current channel, which after 3 s will change to a ticking Clock :
those. The clock here works not only in standby mode, but also in the on state: after all, the channel number is usually only needed for a short time, but the clock is always useful both while watching programs and after turning off the set-top box. But if someone needs a constant display of the current channel number in operating mode, then in the menu you can disable the transition to the clock.
The clock shines calmly and does not irritate you at night.
Let me remind you that information about the exact time is obtained from the tower or from the cable operator (if it is configured for this).
Initially, I updated the firmware to the latest official version 2.2.80 dated September 2, 2021.
But then, having read over the past time, I updated to the latest test firmware 2.3.06 dated January 20, 2021. And not through a flash drive, but directly:
And as you can clearly see, one of these changes was the ability to select the font size . The standard ALi font is quite small and the letters look small on old CRT TVs or TVs with a small diagonal.
In the test firmware, fonts of sizes 27 and 33 were added. And it is with the largest font, 33, that all the screenshots below will be shown. At the same time, the graphic scheme itself has hardly changed, which of course sometimes leads to the cutting off of long words. But, for example, I personally don’t want to strain my eyes, so I’m ready to put up with some overlays rather than try to make out the standard ALi font. By the way, those who wish can select the regular “Default” font. It's the default.
But even the largest font 33 fell just short of the standard MStar font:
on the left is the 33 Premium font, and on the right is the MStar font. But in any case, I would definitely like to thank the creators for this opportunity, which is missing in other ALi-based consoles.
The channel list can be displayed in 1, 2 or 3 columns:
After all, this is also a cable box and there can be a lot of channels:
HD channels will be marked with a green HD icon, and paid closed channels $. Of course, Premium only supports open cable broadcasting, and when you switch to a closed channel it will write: Encrypted .
An example of broadcasting open HD cable channels:
*I took all the screenshots and videos from a regular composite video output, so you can evaluate the HD quality by connecting via HDMI to a large-diagonal TV.
If necessary, channels can be . Russian letters are supported.
When switching channels or pressing the INFO , the information panel shows not only the progress of the current program, + the number of minutes before its end, but also the color scales L (Level) and Q (Quality), allowing you to immediately see changes in the state of the signal from the antenna:
And as on most other set-top boxes on ALi processors, the maximum value is always 90%.
The information panel also contains a set of various icons:
TTX - teletext, two computers - WiFi network connection, $ - encrypted, _ - subtitles, >*< - stereo sound, lock - locked, heart - favorites, HD - HD broadcast.
For example, on cable coded - $:
If you pull out the antenna, the set-top box will still show the Quality scale at least - 5% (everything is exactly the same as, for example, on the satellite Gi HD Mini on the ALi M3606):
And if there is no WiFi connection, then the two computers will turn gray with a red cross.
INFO button a second time , details of the current and next transmission will be displayed:
And if you press the red button, it will show technical information about the broadcast channel:
In the case of encrypted cable, you can see the type of encoding used by the cable operator, for example, CONAX:
As a rule, these are channels from additional packages that are connected for an additional fee.
When you switch to Radio , the following music screensaver appears:
You can configure the Start channel - which specific channel should start when the set-top box is turned on:
All this was similar on Gi satellite receivers.
EPG button - the TV guide can be presented in two versions:
or this way:
For :
Let me remind you that in ALi set-top boxes the
Freeze Frame (even without a flash drive):
Just press the pause button - | |.
And I also note that, unlike other processors, ALi set-top boxes have the ability to simultaneously record 2 channels at once and at the same time watch other channels:
Of course, within the same multiplex (same PLP).
zoom button on the remote control 0/ - to enlarge the image:
You can select the degree of magnification and move it around the screen to a specific location or just in the center.
As with satellite receivers, the menu uses the word abbreviated TP , i.e. for the air it is nothing more than just a transmitter. Accordingly, the Blind search for broadcast means the usual full Automatic search . But when setting up an antenna it is better to use:
And just like in satellite, cable has another useful function: Network search - receiving information from the first transmitter about all the following transmitters in the cable network:
Let me remind you that the channel (frequency) of the nearest DVB-T2 terrestrial transmitter can be checked on, and for digital cable DVB-C - you can check on the website of your cable operator.
I note that some cable operators use in their networks not the DVB-C cable standard, but the old terrestrial DVB-T, so you will need to search in the usual mode - “Antenna setup”.
You can read more about setting up cable channels.
Of course, the stability of on-air reception will depend on the correct choice of the UHF antenna, its location and height. In turn, the stability of cable television broadcasting will also depend on the condition of the cable, its length in the apartment, non-contact in the connectors, and the presence of certain splitters. For example, conventional splitters weaken the signal:
- for 2 outputs - 4 dB
- for 3 outputs - 6 dB
- for 4 outputs - 8 dB
Therefore, you should not use splitters with a large number of outputs unless absolutely necessary. Or you can install a mortise amplifier at the entrance to the apartment or directly in the panel. I would like to note that only the subscriber himself is responsible for the entire cabling from the panel to the televisions.
Set-top boxes on the ALi processor can automatically update the channel list themselves:
Auto update TP information, please wait
Sometimes this happens with an unstable weak signal, so make sure the Quality scale is at its maximum. By the way, in set-top boxes on MStar, the Automatic Channel Update function is also enabled, and only in rare models there is an option to forcibly disable it:
Some TV viewers, having modern DVB-T2/C TVs and wanting to get the quality of terrestrial digital data, but not lose cable capabilities, are trying to experimentally combine the reception of terrestrial and cable broadcasts simply using a adder. As a rule, this leads to the fact that broadcast and cable channels crush each other at the same frequency, and depending on who is stronger, broadcast or cable reception suffers, and sometimes both begin to show poorly at a given frequency.
And terrestrial cable Premium is also not intended for such experiments, although it retains all previously found both terrestrial and cable channels in the general list.
Still, it is better to choose one of the signal sources and not try to sit on two chairs at once. Well, in order not to cross the cables from the antenna and from the cable cable every time, you can use a mechanical switch - ANTENNA/CABLE SWITCH:
If they wanted to watch broadcast from an antenna, they switched to ANTENNA; if they wanted cable, they switched to CABLE.
As already mentioned, in the menu you can select the standard of operation of the RF modulator or, for example, adjust the Menu Transparency to 40%:
and
Channel switching mode : black screen or show a still frame of the previous channel at the moment of switching:
In the Additional settings , you can, for example, change the information panel settings:
There is an interesting item Debugging via USB , which allows you to see the receiver log. log folder is automatically created on the flash drive , in which a file with a name like:
log_22030b000006a6_2.2.80_hs_2.72_2017_02_04.txt All this will be discussed in more detail at the end.
Also, for the purpose of possible debugging, there is a unique function, i.e. the entire multilpex:
[TP][0.0E]DVB-T_754000_H_0-79
is automatically created on the flash drive , i.e. indicating the corresponding frequency in the name, and inside the usual file 000.ts , containing all the channels of a given multiplex, the entire stream.
As a rule, this can be useful when the cable operator broadcasts with some special features. Well, finally, let's move on to the most interesting thing, which fundamentally distinguishes this set-top box from all others - additional Applications that use the Internet :
YouTube app :
A short video:
— subscription and reading news:
There is also (names must be entered in English letters, data is taken from Yahoo! Weather).
There is also.
— standard application for Galaxy Innovations satellite receivers on the Fulan platform:
Moreover, it can be launched immediately by simply pressing the blue button on the remote control.
Let’s immediately define the terms: Web TV is when the broadcast source is located somewhere on the Internet (World Wide Web). A is Internet provider television broadcast on the internal network. And of course, here we are not considering watching paid closed IPTV television from Rostelecom, Beeline and the like.
The Web TV application can work with both types of broadcasting, external and internal (and simultaneously), although of course, based on the name, it is designed primarily for broadcasting from the Internet.
By default, the playlist contains several channels to test functionality and assumes that you will find and download the desired playlist yourself. On various sites, for example, But before you upload a regular .m3u playlist, you need it in WebTV List.txt using .
Well, for those who don’t want to look for anything, a ready-made option is offered - the LITE IPTV application, about which a little later.
Web TV only accepts a playlist with the exact name and extension WebTV List.txt and no other. After a one-time download, the flash drive is no longer needed; the channels will remain in the set-top box until you download a new playlist again.
WebTV List.txt file is very simple - the name of the channel and its address, for example:
Channel name: LiFE News(360p) URL: https://tv.life.ru/lifetv/360p/index.m3u8
In the test firmware, it became possible to directly download a playlist in a regular format - and then the file should be named exactly as it is written - WebTV List.m3u. At the same time, the web_tv folder should not contain a copy of WebTV List.m3u previously saved in it
Receivers on the Fulan platform do not support the reception used by IPTV providers, so a playlist with addresses starting with udp:// will not work directly.
But if you have a ZyXEL, ASUS, or the latest D-Link router (and on other routers using alternative firmware), then you can enable the function (), which converts the UDP protocol to regular HTTP. Or you can simply install a separate program on your computer - it will convert your provider’s UDP playlist for use with UDP Proxy. By the way, enabling and configuring UDP Proxy will in any case be useful for users of an IPTV provider, even without World Vision Premium.
An example of broadcasting an internal IPTV of an Internet provider with a pre-converted playlist and UDP Proxy enabled on the router:
Well, accordingly, regular streams starting with https:// or rtmp:// will open (of course, if the source is broadcasting).
The advantages of internal IPTV broadcasting are broadcast sources guaranteed by your provider and speed within the network. The advantages of external Web TV broadcasting are independence in the choice of channels (for example, the provider will not broadcast some channels openly) and, in addition, your provider may not have IPTV at all, or it may have it, but it’s paid (and only with a branded set-top box) , i.e. with Web TV you are completely independent of what provider you currently have.
Well, let me remind you once again that you can combine both in one playlist: collect internal IPTV channels of your provider and add channel streams from external sources from the Internet.
The test firmware also added support for playlists or ts-proxy from .
The application is “lite IPTV”, i.e. simplified Web TV has been added to the test firmware for those who want to immediately start watching channels from the Internet.
For this, so-called self-updating playlists are used. And when you launch Lite IPTV the following message appears:
Download playlist!
at this moment the playlist is updated to a more current one.
At the top of the menu you can see the current download speed of the stream, and at the bottom you can change the default settings, for example, specify a different playlist, or select the desired channel category.
And, of course, World Vision has nothing to do with the sources of broadcasts, but only provides a convenient tool for viewing them.
Broadcast example:
lite_info.txt file for adding your sources: /* if need to add url, use “add_lite_name=XX;” and “add_lite_url=XXXX://XXXX:XXXX;” */ set_lite_info
add_lite_name=playlist_1; add_lite_url=https://545-tv.com/iptvUA.m3u;
add_lite_name=playlist_2; add_lite_url=https://tv-sat.pro/files/iptv_tv-sat.pro.m3u;
It is downloaded via the browser - Web Server > System > Upload TV Info
To reset, download this lite_info.txt /*total 16*/
clear_all_service
Unlike Web TV, LITE IPTV app supports http s
In general, the firmware has cipher suites for the TLS v1.2 protocol
Applications also appeared in the test firmware. These are widely known paid resources in narrow circles, and anyone who is already registered there can simply enter their details:
Well, needless to say, to view any external Web TV, a speed of at least about 10 Mbit/s is desirable. And taking into account the fact that at the same time someone at home is also watching and downloading something on the Internet, because access is common to everyone, it is advisable to have a speed reserve.
By the way, if you like to watch movies previously downloaded from the Internet, then it is not at all necessary to drag them each time from your computer to the console with a flash drive; you can download them immediately from the computer, after launching a small program on it and specifying the folder with the movies. And then create a regular .m3u playlist where you can list these movies. And then slip the prepared playlist into the Web TV or Lite IPTV application.
And the last, unique application is the ability to control the set-top box via a browser. Once you turn it on, you can continue to use the set-top box as usual, but at the same time be able to log into it from a computer/tablet/smartphone/SmartTV and watch channels (and, if necessary, remotely from the external Internet).
Open the browser and after authorization (default username/password is fulan/12345)
We get to the main menu:
As you can see, the WebServer menu is unfortunately in English, but all the items almost completely repeat the items of the console itself:
There are even settings for the Ip Config :
In the System section there is an Upload TV Info item that allows you to upload a playlist for the Web TV :
Those. The playlist can be downloaded not through a flash drive, but simply through a browser.
Direct application for viewing in the browser - WebServer-tv :
A channel list, TV guide and TV/Radio switch are available.
At the same time, this is direct control: what is switched in WebServer-tv is switched in the set-top box. And vice versa: when switching in the set-top box, it switches to the same channel in WebServer-tv.
Unfortunately, I did not find a full-screen mode, only a windowed one: 16:9 channels have a size of 625x345 pixels, and 4:3 - 504x375.
But of greatest interest is the blue VLC play list link that appeared in the test firmware and is located in the initial menu. An example of such a playlist playbyvlc.m3u is a direct link to open in (or any other IPTV application):
Moreover, switching to VLC also switches the channel on the set-top box itself. And, accordingly, vice versa.
I note that the broadcast of a particular stream can continue indefinitely, but if after some time you try to stop and start the same channel again or switch to another, the broadcast will no longer be available, because The session on the WebServer has expired.
By default, the set-top box takes the current time from the digital stream from the antenna or cable television, but if the set-top box is used only for IPTV (the antenna or cable is not connected), then there is nowhere to get the time, so in the test firmware the function of obtaining network time from the Internet via the protocol was added :
those. Now you can select the synchronization source - antenna/cable or Internet.
But first you need: like Gi satellite tuners (on ALi processors), in order to take advantage of the Internet functions you need a WiFi adapter (not included). Either branded ones or any other adapters on the corresponding chipsets:
- Ralink RT3070
- Ralink RT3370
- Ralink RT5370
- Mediatek MT7601 (Mediatek bought Ralink)
You can determine it by inserting it into the computer and looking at its VID/PID in the adapter Properties: VID = 148F (Ralink/Mediatek), and PID = chipset numbers:
- VID_148F&PID_3070
- VID_148F&PID_3370
- VID_148F&PID_5370
- VID_148F&PID_7601
For example, (V4.0 on MT7601) can be purchased at the nearest Citylink for r. or in DNS Technopoint for r. There are also proposals. I note that it also comes with a 1 m long USB extension cable, allowing you to choose the best location for the WiFi adapter.
You can read about all this on various forums about Galaxy Innovations satellite receivers or on the corresponding World Vision forum.
Well, it’s even cheaper to order on AliExpress, and it’s better to choose with an external antenna 2 dBi (shorter) or 5 dBi (longer), for example, on the Ralink RT5370 - from r.
If the WiFi adapter is supported, then when connected, the message [WiFi] will appear: Device installed:
And if such an inscription does not appear, it means that the adapter is not one of the chipsets listed above.
In passing, I would like to note that the set-top box, if necessary, also has the ability to configure a connection to a VPN server using the PPTP protocol:
And finally, let's take a look inside:
As you can see here there are two separate boards: yellow - the power supply and green - the main board.
As noted at the beginning, the ventilation holes are located just above the main board:
The boards are mounted on 5 plastic sleeves. All this contributes to optimal ventilation, without any crowding.
On the front panel there is only a board with 7 buttons.
Power supply board:
HE1 connector pins:
- GND
- +5V
- +5V
- GND
- —
- —
- —
- GND
And on the reverse side:
Technical details: PWM PN8368. Measured current consumption: from the network ~17.5 mA, and from the +5V supply - 770 mA.
The main board has the technological inscription YW-Luan03-VER1.0:
The flash drive is engraved V30B, i.e. same as on the white sticker.
The screen of the HF tuner-modulator unit is sealed, so it is difficult to find out what exactly is inside. But in some models the cover is removable:
and apparently the Rafael Micro RT500 is used as an RF modulator, exactly the same as on the Openbox T2-02M and Cadena ST-603AD set-top boxes listed above.
I note that the antenna input of the tuner block is even framed with a metallized seal, ensuring reliable contact between the block and the rear wall of the case. This is the first time I've seen this on consoles.
Technical details: Rafael Micro R836 tuner, Rafael Micro RT500 RF modulator, 16 MHz quartz, ALi M3821 processor, 27 MHz quartz, Samsung K4B1G1646G-BCK0 memory (DDR3-1600, 128 MB), Winbond 25Q64 flash (8 MB), two DC/DC converter E15W9 and linear stabilizer LD1117AG-AD, linear amplifier 3PEAK TPF605A, LED driver FD650 and the LED indicator LIN-24413YGL-W0. Two electrolytic capacitors 220x25 and two 330x6.3.
Radiator 14x14x6 mm. Measured temperature +55°C.
And the flip side:
Here you can see the T control points, two of which T1 and T2 turned out to be UART pins, Tx and Rx, respectively. And if from the front side of the board, then you can carefully solder to resistors R20 - TX and R21 - RX (and of course to ground):
By connecting to them with a console (115200 8N1) using a converter, you can see how the set-top box is loading. As noted in previous reviews, unfortunately, in set-top boxes on the ALi processor the log is very meager and uninformative, although in the case of World Vision Premium there is still a little more information. And in particular, thanks to the console you can see that the tuner inside is really a Rafael Micro R836:
test r836 tuner i2c —> 1 —>> tuner type : 836
In general, the boot and shutdown process is visible. Launch the YouTube application and watch videos. Application Read RSS and Web TV. Let me remind you that a lot of this can be seen if you select the “USB Debugging” item, but you will have to use an active USB hub to simultaneously connect both a flash drive and a WiFi adapter, because Unfortunately there is only one USB port.
As already mentioned at the beginning, the Technical Specifications state that the current for powering the antenna is 100 mA: I checked it with various resistances as a load and the current can actually reach 100 or even more mA:
| Load resistance, Ohm | Current, mA | Voltage, V |
| 150 | 31.3 | 4.8 |
| 100 | 45 | 4.68 |
| 50 | 81 | 4.34 |
| 27 | 113 | 3 |
However, as you can see, even at a current of 45 mA, the voltage is only 4.68 V, which is of course not enough to power most active antennas, and even more so if you use a long cable. But in any case, the prefix corresponds to:
| Voltage in ON state | +5.0VDC |
| Voltage tolerance | ±0.2VDC |
| Maximum load current | 30mA |
The RF modulator operates on channel 38 by default (in Western European PAL-B/G). If you have a multiplex also on the same channel, then it is still advisable, just in case, to change the channel to some other one in order to minimize possible interference from your own analogue. Moreover, the RF modulator also penetrates the adjacent lower channel (the channel boundaries are indicated in red):
And in Eastern European PAL-D/K, accordingly, it’s still a little lower:
Therefore, for the RF modulator it is best to choose the lowest 21 channel, which is also the manufacturer. In general, it can also work in the UHF range, but the software limited the choice to only UHF channels.
I also checked the operation of the RF modulator as an on-air mini-transmitter using two directional indoor passive antennas Delta K131 (D-Color DCA-115):
I connected one to the set-top box as a transmitter, and in the other room as a receiver to a regular TV, and chose a channel that was not occupied on the air by either analog or digital and got a good image and sound. Well, if you connect an RF amplifier to the output of the modulator, you can broadcast over a greater distance.
Let me remind you once again that any on-air set-top boxes can also be connected to old monitors with a VGA input. To do this you need any converter (converter) HDMI > VGA , for example, this one:
On AliExpress similar ones cost from R.
In addition, set-top boxes based on the ALi processor provide the largest range of video modes:
- By Source
- By Native TV
- 480i
- 480p
- 576i
- 576p
- 720p_50
- 720p_60
- 1080i_25
- 1080i_30
- 1080p_50
- 1080p_60
- 1080p_25
- 1080p_30
- 1080p_24
Connect to the console:
On World Vision Premium, you can switch video modes without going into the menu by pressing the P/N , selecting the most suitable one. And it’s better to start with NTSC (60 Hz), for example, 480p , because... for a monitor it is the minimum standard VGA mode 640x480.
And of course, if the monitor has a DVI input, then a regular adapter or HDMI = DVI cable will suffice. The principles for selecting a suitable video mode are the same as with VGA.
Once again I would like to draw attention to the correct choice of indoor antenna. For example, now all TV channels are advertising a certain miraculous antenna from a TV store and for as much as 2,000 rubles:
But we must clearly understand that all such ring frames with mustaches (no matter what brand and model), sold in most ordinary stores, are the simplest weakly directional antennas. Their own gain is only about 3 dBi, and the advertised “30 dB” (or even 40 or 50 dB) is only due to the amplifier.
But the signal is received - not by the amplifier, but only by the antenna design itself. And all these ring-frames cannot provide a higher Ku, no matter what amplifier is installed there and no matter how much such antennas cost. And such antennas are clearly not worth the money spent on them.
For stable reception, especially in difficult urban conditions, it is necessary to use directional antennas, for example, as mentioned above or:
or either:
and others like that. You need to set up the antenna directly at the window facing the direction of the tower - just point the mouse at your house and the arrow will show the direction.
And, of course, this applies to any set-top boxes and DVB-T2 TVs.
Well, in general, all calculations and control measurements for any type of television broadcasting are made only with external antennas installed on the roof of the house:
In conclusion, I would like to compare this over-the-air cable set-top box, which has additional Internet functions, and Android set-top boxes with tuners for receiving over-the-air and cable broadcasts.
Premium is primarily a regular terrestrial cable set-top box, but it also has the additional ability to watch IPTV. But for an Android set-top box, the digital reception functions are secondary, and the main thing in it is the Android system itself with many different applications.
For those who are looking for simple and understandable television viewing, and at a minimal price, it is better to choose Premium. And for those who primarily care about the Internet, and television somewhere in 2-3 place, choose an Android set-top box for an appropriate and considerable price.
The advantages of Premium undoubtedly include the inability to pick up viruses or simply some kind of fraudulent programs, as a result of which Android set-top boxes can work unstable, or even stop working altogether, up to the need for a complete reinstallation of the system.
Of course, Premium and Android set-top boxes are still different weight categories and you shouldn’t rely on the fact that a regular set-top box will do absolutely everything the same as multi-core Android with a gigabyte of memory, but the set-top box definitely works out in full for the money spent on Premium.
Well, I would like to note that just like with Galaxy Innovations satellite receivers, where there is an excellent forum, there is an equally active forum with World Vision receivers. Both forums will be helpful if you have any questions about the Premium Receiver Applications.
Positive: universal over-the-air cable set-top box with various IPTV applications and WebServer, RF modulator, clocks operating in standby and working modes, the ability to synchronize time via NTP, choice of fonts of various sizes, spacious metal case with many ventilation holes, 7 buttons on the front panel, 128 MB of memory and 8 MB of flash drive, availability of a paid Dolby Digital (AC-3) license, classic full-size remote control, thick HDMI cable included, low price, active discussion on the specialized forum. Negative: only one USB port and no LAN, which is understandable given the already low price.
Undoubtedly, this set-top box differs sharply from all other models in its additional functionality, while remaining within a reasonable price. Universal in every sense: even if you use only one of the main functions, if circumstances change, you won’t have to buy another one.
4.8/5 — (236 votes)
You can ask questions about digital television on the DVBpro forum
Author: Alexander Vorobyov, 22 Feb 2021 | Permanent link to the page:
Search and configure 20 digital channels on World Vision set-top boxes
When you connect any of the World Vision set-top boxes for the first time, a special welcome message should appear on the TV, in which you will be prompted to quickly set up the device. In any case, if the antenna selection was made correctly, the tuner will be able to independently configure all available channels. To do this you need:
- Go to the device menu by pressing the corresponding button on the remote control.
- Press the “Menu” button and go to the search section. Specify in the DVB-T2 range item. If the antenna has a signal amplifier, then also switch the power to “on”.
- Select “Auto search” and click “OK”.
- The set-top box will search across all available frequency ranges. The search will continue for 5-10 minutes. During this time, the device will save the entire available channel list and save the settings when finished.
The auto-search function is very convenient in cases where there is a stable signal and the antenna itself is well-tuned and is capable of receiving a digital signal without problems.
Manual search
If there are problems with the signal strength or the device cannot detect the required number of channels for no apparent reason, then you should repeat the search procedure in manual mode. The sequence of actions is as follows:
- Go to the console menu, to the search section.
- Select “Manual search” there and press “OK” on the remote control.
- After that, go to the Internet and open the interactive map of CETV. We indicate your area of residence on it and write down the parameters of the television tower closest to you. We will be interested in the channel number for RTRS 1 and RTRS 2.
- In the set-top box menu, first indicate the number of the first channel from the card. At the same time, we check that the power and quality of the signal changes from 0% to some value. In this case, it is not necessary to have 100%. In some areas of residence, 60%, 70%, etc. is enough for normal broadcasting...
- Click "OK". The search will find available TV channels and radio.
Setting up WiFi on World Vision set-top boxes
In most digital set-top boxes, the connection to the Internet occurs through special Wifi adapters. On World Vision devices this can also be done using an RG-45 connector. This is a standardized connector that is likely to be found in any PC.
Connection to WiFi is made by connecting the set-top box with a special adapter via the USB input. At the same time, you need to buy not the first one you come across in the store, but exactly the one recommended by the official manufacturer World Vision.
After connecting the set-top box to the wireless network, the owner will have access to the following functions:
- Updating and firmware of the console.
- Watching videos from the YouTube portal.
To connect to an existing wireless network, you must:
- Go to the device menu and in the “System” section select “WiFi Settings”.
- Then select the device in the menu - Wifi and click OK.
- The set-top box will search for available wireless networks. When finished, the full list will be shown. From it we need to select the one we need and enter the password for it.
After saving the settings, you will be able to freely watch YouTube directly from the console.
Firmware for World Vision tuners
A software update is necessary in the following cases:
- When the set-top box starts to work inadequately: reboot, freeze, or refuse to connect to the TV.
- When will a new, stable version of the software be released?
To update you need:
- Download the latest version of the set-top box software from the official website. The firmware format will be .bin.
- Write the file to a flash drive with the Fat32 file system.
- Insert the USB drive into the console and go to the menu.
- In the “System” section, select “Software Update”.
- Then update via USB.
- Specify the path to the file and click update.
If the software file meets the hardware requirements, then the firmware will take 10-20 minutes. When finished, the device will reboot.
World Vision set-top box does not find channels
Has the image disappeared from the screen? The reasons are as follows:
- system failure;
- technical malfunction of the device;
- internal breakdowns.
Why does the Rostelecom set-top freeze: reasons, what to do?
We recommend updating your system and downloading the new update. Also try turning on the receiver and antenna again.
Does not respond to the remote control or the button does not work
The remote control does not work if there is no charge. Press all the buttons and check that the device is working properly. No signal? Insert new batteries and try again.
No signal
The “No Signal” error is due to temporary interruptions. Wait a couple of minutes and turn on the TV again. Often, the problem goes away within a few minutes.
World Vision Errors
During the operation of the site, we have accumulated a lot of questions from subscribers regarding World Vision set-top boxes. For some topics we will try to answer and provide possible solutions to problems.
The set-top box does not search for channels / finds less than 20
- Try searching manually.
- Make sure you select the correct antenna. If the distance to the TV tower in your region is more than 10 km, then you will need an outdoor antenna with a signal amplifier.
- Check the antenna cable for integrity.
The device does not connect to the TV
- There may be problems due to old software. It needs to be updated.
- Check the cable connecting to the TV. In 30% of cases the culprit is just a wire.
The console reboots or freezes
- Update your software.
- Reset to factory settings.
How to set up a learning remote
In total, the universal remote control has 4 programmable buttons: TV Power, Vol+\-, AV. To program them, you must press the OK and 0 buttons simultaneously, the red light should light up. After this, place another remote control opposite the student and press the button on the second one that you would like to program. After that, on the original remote control, press and hold the button that you would like to transfer. It is necessary to hold it until the remote control is not trained, the diode blinks 2 times. At this point the learning process can be considered complete.
How to connect WI-FI to the World Vision Premium receiver
The premium brand receiver quickly connects to the router and home Internet. To do this, take a USB cable. You can buy it at any hardware store. Enter the modem password and go to the “network”. Use the Internet to search for movies, TV series and clips. Watch online or record to watch again.
Possible problems and their solutions
Possible problems are related to device failure or cable connectors. Try turning the tuner off and on after a few minutes. Check the antenna's functionality. Due to weather conditions the signal is poor. In addition, the receiver may break. Examine the condition of the receiver yourself. In the event of a serious breakdown, use the help of a service center.