“How to connect and configure the Orbita digital set-top box?” is a popular question among TV users, since Russia is moving from analogue to digital television. Connecting the set-top box does not take much time and is not particularly difficult. That is, each user can independently configure the device, without calling a specialist. Find out how to do this in this article.
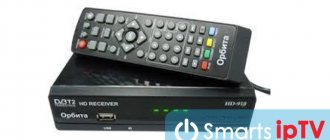
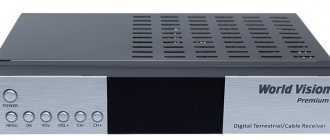
Characteristics of Orbita digital set-top box models
All Orbit models on the market do not differ from each other, and if they have differences, they are insignificant and most likely the owner simply will not notice them. The first models were made mainly on a metal body, but new ones began to be produced using plastic. This makes the device lighter and safer.
| Orbit model | DVB-T2 standard | Display | Connector | Teletext | Remote control | Wifi |
| HD910 | + | + | HDMI and RSA | + | + | + |
| HD911 | + | + | HDMI and RSA | + | + | + |
| HD914 | + | + | HDMI and RSA | + | + | + |
| HD915 | + | + | HDMI and RSA | + | + | + |
| HD917 | + | + | HDMI and RSA | + | + | + |
| HD916 | + | + | HDMI and RSA | + | + | + |
| HD918 | + | + | HDMI and RSA | + | + | + |
| HD922 | + | + | HDMI and RSA | + | + | + |
| HD923 | + | + | HDMI and RSA | + | = | + |
| HD924 | + | + | HDMI and RSA | + | + | + |
| HD925 | + | + | HDMI and RSA | + | + | + |
| HD926 | + | + | HDMI and RSA | + | + | + |
| HD927 | + | + | HDMI and RSA | + | + | + |
| HD928 | + | + | HDMI and RSA | + | + | + |
*WiFi setup is carried out with a special antenna adapter for receiving a wireless network. The table shows the connectors that can be used to connect to a TV.
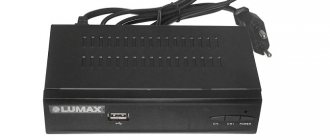
Connecting Orbit set-top boxes to a TV using the example of HD911 and HD924
To provide you with a visual diagram of connecting the Orbit set-top box to a TV, we took and summarized it using the example of 2 best-selling receiver models: HD911 and HD924 . However, we dare to assure you that everything stated below will also apply to other receivers of the company, for example, HD928, HD917, etc.
In general, the procedure for connecting receivers depends on the presence of one or another input on the TV itself. On the latter, in turn, in 90% of cases there will be:
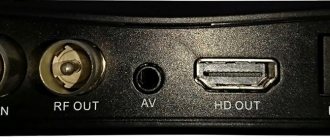
- HDMI connector. It is a single cable. Connects directly to the TV itself, to the appropriate inputs. Provides better image quality and is selected first. The Orbit set-top boxes do not include this cable, so you will have to buy it additionally. Depending on the length of the wire, the price in our stores for a high-quality brand will be around 500 rubles.
- RSA. These wires are also called tulips because of their colors. Present on most older types of TVs. In practice, there are various types of this cable (3-3, 2-2, 3-1, etc.). For set-top boxes, they connect exactly 3-3 or 3-1, depending on the equipment configuration. In any case, the connection should be made according to color, connecting each wire to its own input. Such cables usually come with the receiver.
- Adapters. On completely outdated TV models, in most cases, there will be a SCART input. In this case, it would be advisable to use a special RSA-SCART adapter. The same combination options are available for RSA-HDMI.
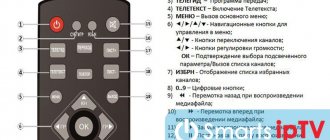
After the set-top box is connected, as in the diagram, according to the instructions, you must:
- Select the appropriate display mode setting on your TV. The choice is made depending on the selected method of connecting the receiver. So for HDMI, the TV must have HDMI mode, and for RSA - AV.
- After this, using the remote control of the Orbit set-top box, the device is turned on and the channels are configured.
The diagram also shows the connection of additional hi-fi devices via coaxial cable. Typically, this includes additional speakers or a home theater.
Instructions for setting up 20 channels on the Orbita set-top box
The main problem with correctly tuning channels on Orbit is the wrong choice of digital antenna. If it is not capable of providing the required signal level and strength, then the channels will simply be impossible to configure.
With a correctly selected antenna, the channel search procedure will be as follows:
- When you turn it on for the first time, the set-top box will give you a welcome message and ask you to specify the display language and country of residence. After this, the search for channels will begin.
- Press it and the device will automatically start searching and setting up the list. As a result, the receiver will go through all frequency ranges known to it and try to find the maximum possible number of programs.
- Upon completion, the list of these programs will be saved.
This will perform an auto search. If for some reason the set-top box fails to find channels or there are too few of them, then you need to independently find out the broadcast frequency of the transmitting TV tower in your region and perform a manual search. It requires:
- Find out the broadcasting parameters on the interactive map of CETV. We are interested in the channel number for RTRT 1 and 2.
- Go to the menu from the device's remote control.
- Find the channel search section there.
- Select “Manual Search”.
- Indicate the number of the first channel taken from the map in step 1. Make sure that the signal (Quality) at the bottom of the search window has changed.
- At the end of the search, perform the same actions, but for RTRS-2.
The set-top box in this mode will search for channels at the frequency you specify. If it is selected correctly, then with a working antenna, the maximum currently possible number of digital channels will be found.
WiFi setup
Orbit receiver models are also additionally equipped with the ability to connect to a Wifi wireless network. This is necessary primarily for timely updating of receivers and installation of fresh device firmware.
To connect to the network, you need to additionally buy yourself a special adapter that visually resembles a simple antenna. It connects to the USB connector of the set-top box. Firmware updates can also be performed from a flash device. To do this, you need to download the latest version and burn it to media. After this, you need to go to the menu, to the USB section and click “Software Update”. All that remains is to select the file you are looking for and click OK.
the D-Color brand website has been suspended. We offer a copy of the Firmware (as of January 22, 2021).
Firmware for older models can be found in D-Color Firmware.
Instructions for updating software on DVB-T2 D-COLOR set-top boxes
Please, before performing any manipulations with the software of the set-top box, read these instructions carefully!
The update is only possible on set-top boxes with a USB port. Installation of software (firmware) of your equipment is carried out only in cases where any problems arise.
Flashing devices unnecessarily is not recommended, because... During the firmware update process, there is a possibility of equipment failure.
If you are sure that installing new software is necessary, then check the name of the receiver, processor and tuner model . Use this data to download the firmware file.
The model name is indicated on the set-top box itself (box, operating instructions), for example - “DC1501HD”. The processor type can be found in the receiver menu, in the “Settings” - “Information” section.
There is also the model name and
current firmware version .
Follow these steps step by step:
1. Download the archive with the software update file to your computer. 2. Unpack the update file from the archive with the firmware into a directory convenient for you, for example, on the “desktop”. For this, WinRAR, 7-Zip, or other analogues are usually used. 3. Copy all unzipped files to the root directory of the USB Flash Drive. 4. Turn on the DVB-T2 set-top box and connect the USB Flash Drive to it. 5. Enter the “Settings” menu, select the “Software Update” submenu. Two lines will appear, one of which starts the firmware process. 6. The software update will begin, during which the TV screen will turn blue and reflect the firmware status. It is very important NOT to disconnect the set-top box from the power supply at this time! This may cause the device to malfunction. 7. When the installation is complete, reboot the set-top box by turning off the power. When reactivated, it will start with the new software. 8. If, after installing the firmware, the set-top box no longer finds TV channels, then you need to go to the “Channel Search” tab in the settings menu and in the “Antenna Power” item, switch it to the “On” state.
We wish you pleasant viewing with D-COLOR products.
BEFORE INSTALLING, PLEASE READ THE INFORMATION BELOW CAREFULLY: 1. This software is only suitable for the models listed. 2. Installing this software on set-top boxes of other models or on set-top boxes with a different processor may damage your device and subsequently void the warranty. 3. D-Color is not responsible for incorrect actions of users that lead to damage to the device.
| Model | CPU | Link |
| DC600HD | GX3235S | |
| DC610HD | GX3235S | |
| DC700HD plus | Sunplus 1509 | — |
| DC702HD | Ali3821P | |
| DC705HD | Ali3821P | |
| DC930HD | Ali3821P | |
| DC901HD | MStar 7T01 | |
| DC902HD | MStar 7T00 | |
| DC902HD | MStar 7T01 | |
| DC921HD | MStar 7T00 | |
| DC921HD | MStar 7T01 | |
| DC910HD | MStar 7T00 | |
| DC922HD | Sunplus 1509 | — |
| DC937HD | Sunplus 1509 | — |
| DC955HD | GX3235S | |
| DC961HD | GX3235S | |
| DC801HD | MStar 7T00 | |
| DC811HD | GX3235S | |
| DC802HD | Ali3821P | |
| DC820HD | GX3235S | |
| DC825HD | GX3235S | |
| DC1002mini | Sunplus 1509 | |
| DC1002mini | MStar 7T01 | |
| DC1002HD | MStar 7T00 + MXL608 | |
| DC1002HD | MStar 7T00+R836 | |
| DC1002HD | MStar 7T01 | |
| DC1301HD | MStar 7T01 | |
| DC1301HD | Sunplus 1509 | |
| DC1302HD | MStar 7T00 | |
| DC1302HD | MStar 7T01 | |
| DC1401HD | Ali3821P | |
| DC1501HD | MStar 7T00 | |
| DC1501HD | MStar 7T01 | |
| DC1502HD | MStar 7T00 | |
| DC1502HD | MStar 7T01 | |
| DC1601HD | GX3235S | |
| DC1602HD | GX3235S | |
| DC1801HD | GX3235S | |
| DC1802HD | GX3235S |
Rate this publication
You can ask questions about digital television on the DVBpro forum
Author: Alexander Vorobyov, June 26, 2021 | Permanent link to the page:
Reviews for Orbita
Like all digital set-top boxes, Orbita devices have their own disadvantages and advantages. The first users note a limited set of functions. You cannot access the Internet from the receiver to watch videos or search for IP channels. In addition, not everyone is happy with the average price. Even the very first models today cost around 1,100 rubles.
Receivers also have plenty of advantages. The main one is the build quality. In simple terms, everything is assembled according to the simplest principle, therefore it works much better and more durable than its more popular analogues.
Digital Receiver Errors
Unfortunately, no one is safe from them and these tuners are no exception. We will try to talk about the most popular situations and possible ways to solve them.
The device does not work/reboots periodically
- In the first case, check the power cord for bare spots.
- Reset the console to factory settings through the menu. If the receiver asks for a password, first try entering “000000”; if it refuses, enter “888888”.
Can't pick up any channels/can't pick up much
- Reset the settings and search manually.
- Check the antenna and select it correctly.
The remote control does not switch / does not work
- Replace the batteries and make sure that the distance to the device does not exceed the permissible operating limit of 5 m.
- If the remote control does not work within a 5m zone, then there may be a manufacturing defect.
Thus, today we tried to give you complete instructions for Orbita consoles. We hope it will help you catch all 20 free digital channels.
How to set up Wi-Fi on the Orbit receiver
To access the Internet we connect Wi-Fi. We offer you a clear guide:
- connect the USB cable;
- in the Settings menu, select System, confirm - OK button;
- then select the Network settings option and confirm;
- then select the access point by name and enter the password.
Possible problems and their solutions
Any equipment breaks down sooner or later. Therefore, do not be surprised if problems arise with the console. This does not indicate poor quality or dishonesty of the manufacturer; often the cause is natural wear and tear or viruses. If unforeseen situations occur, you can handle most of them yourself.
Orbit box does not find channels
If there is no image on the screen, you need to check the antenna connection.
Does not respond to the remote control or the button does not work
If the remote control does not respond to your actions, replace the batteries or try controlling it using your smartphone.
No signal
There is often no signal if the power switch is inactive or the device is not connected to the network. The signal also disappears in bad weather conditions or during maintenance work on the tower.