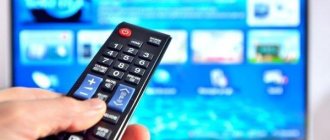
The priority among advanced TV viewers is to receive a digital signal on television receivers. Analogue television does not have the same image clarity and other positive criteria as modern digital television. Users often fall for the bait of professional adjusters by paying for their services.
Connecting and setting up digital channels is not difficult for an ordinary person. Especially for the owner of the popular and widespread Erisson TV. The informational article describes the situation on how to set up an Erisson TV to receive digital and cable TV.
How to set up your TV
There are slight differences in the setup process between different Smart TV models. This also applies to such an easy-to-use and popular model as the Erisson. How to set up channels on your TV when you turn it on for the first time or after resetting the settings on the device.
- In the window that appears, select the current interface language.
- Then we set the country of location and home type of device placement.
- Next, the network is configured. Using the drop-down prompts, we configure the wireless or wired connection option.
- We select the input type via antenna or cable, depending on the connected device.
- Go to automatic settings and activate the “OK” button.
- Using the “Channel Settings” section, we sort them in the selected sequence.
- Be sure to save all changes.
This brief guide to action does not reveal all the nuances of the setup process. In principle, these are the first steps towards fully setting up digital channels.
Automatic channel tuning on TV
Users often worry about how to set up digital channels correctly on their Erisson TV. Let's analyze the necessary actions:
- How to set up a Samsung TV to receive digital and cable TV channels
- Initially, you need to find out whether digital channels are received in this region. Once you are sure of this, let's start setting up.
- Using the remote control on the TV, we go to the main menu and select the settings tab.
- When selecting a country, click on the “Russia” item from the drop-down list.
- Determining the input by antenna or cable, select the connected device.
- Go to automatic settings and activate the “OK” button.
- You may be asked for a password on certain TV models. You need to enter four simple numbers - for example 1111.
- For digital television, only the “DTV” tuning mode is suitable.
- Let's look at the quick scanning method in the window that appears.
- We launch automatic scanning.
- We get the channels available in the region.
Manual channel tuning option
To set up digital TV channels on your TV manually, you should complete the following list of steps.
- As usual, enter settings via the remote control.
- Having selected the device for receiving the signal (antenna or cable), go to “DTV manual tuning”.
- We confirm each action with the “OK” button.
- We save the detected digital channels and, if necessary, sort them.
Setting up satellite channels
Preparing to watch satellite television is carried out through clearly defined steps.
- We connect the antenna to the TV.
- In the device menu, select automatic search to configure specific channels.
- After the request, select a satellite. We scan the installed device.
- We bring the quality of the received DVB-S signal to maximum values.
- After scanning is completed, we conduct testing.
Setting up digital channels
Setting up digital channels on an Ericsson TV is carried out in certain situations.
- Turning on the TV for the first time.
- The appearance of new channels in the package provided by the provider.
- When changing providers.
- When resetting the TV.
The process of setting up digital TV channels is described in detail above. Automatic or manual adjustment can be used.
Setting up cable TV
- Select a provider in your city that provides cable TV services
- We conclude an agreement
- Connect to a TV or set-top box using an Ethernet connector
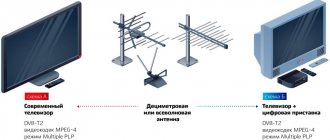
You can receive a digital signal on your television receiver in various ways:
- Using an attachment.
- Using a cable from the provider, this method of setting up an Erisson TV for cable TV is the most reliable.
We connect the cable to the Ethernet connector, select automatic channel search in the device menu, scan, test.
Video and Audio - Review of smart TV ERISSON 24LEA20T2SM
Today we won’t get into the debate “to watch or not to watch TV”, we’ll just look at the 24” Smart TV ERISSON 24LEA20T2SM in action
Packaging and accessoriesTechnical characteristicsAppearanceTerrestrial and cable televisionMultimedia shellIn operation (general impressions)Results
Packaging and equipment
The TV comes in a cardboard box with a handle; a color sticker complements the main characteristics with the capabilities available when the TV is connected to the Internet.
In addition to the TV itself, the box contains:
A pair of legs with a mounting kit and rubber inserts YPbPr adapter for connecting a component video source to a TV RCA adapter for connecting a composite video source to a TV Remote control with two AAA batteries Very concise instructions and warranty card Separate instructions for the remote control describing the capabilities of the multimedia shell
Main characteristics
| Image | |
| Screen type: | Edge LED |
| Diagonal: | 24 |
| Screen format: | 16:9 |
| Permission: | 1366*768 |
| Contrast: | 1000:1 |
| Brightness, cd/m: | 180 |
| Viewing Angle: | 170/160 |
| Response time : | 8 |
| Update frequency, Hz: | 50 |
| Progressive Scan: | No |
| Signal reception | |
| Television standards: | PAL/SECAM, NTSC |
| DVB-T: | Yes |
| DVB-T2: | Yes |
| DVB-C: | Yes |
| DVB-S: | No |
| Number of TV tuners: | 1 |
| Connections | |
| HDMI: | 1 |
| USB: | 2 |
| WiFi: | Yes |
| LAN: | Yes |
| DLNA: | No |
| VGA: | 1 |
| SCART: | 1 |
| YPbPr: | 1 |
| RCA: | 1 |
| Headphones: | 1 |
| Multimedia | |
| Acoustic system: | Stereo |
| Sound power: | 2 x 3 W |
| Surround Sound: | Yes |
| Auto volume balance: | Yes |
| Format: | MKV, MP3, MPEG (AVI), JPEG, PNG, BMP, MPG |
| Functions | |
| USB recording: | Yes |
| Sleep Timer: | Yes |
| Menu in Russian: | Eat |
| Teletext: | Yes |
| Child protection: | Yes |
Supported formats:
The instructions contain not only the formats supported by the device, but also the bitrate. Unfortunately, viewing videos in maximum quality is only available from a drive connected to a USB port, but more on that later.
Appearance
The design is classic for a TV - narrow frames made of black glossy plastic, only the brand name and the IR receiver window stand out.
The remote control is well designed - the necessary buttons are where you expect to find them. There is a mouse emulation mode, which is a very significant plus for devices running Android OS.
Without legs, the thickness of the TV is only 63mm - this will allow it to be placed quite tightly when mounted on a wall.
The power cord is thin and non-removable; all connectors are located at the bottom and sides. When mounting the TV on the wall, there will be certain difficulties with connecting new devices and controlling it without a remote control.
Connectors on the side: HDMI2xUSBPCMCIAAV INYPbPr To use the last two you will have to use the supplied adapters.
RJ45 (for connecting to a wired network) VGA AUDIO INVGASCART Headphone output Jack for connecting a COAXIAL antenna - sound output Two speakers with a power of 3 W each are hidden behind the grilles near the legs.
Terrestrial and cable television
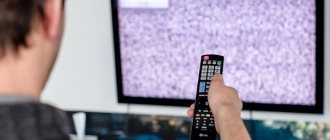
The transition to digital broadcasting in Russia began back in 2009 and is already close to completion, however, the ERISSON 24LEA20T2SM TV is capable of receiving analogue broadcasting.
With the help of remnants, an antenna that was accidentally lying around (I myself have been using cable television for many years), and the automatic channel scanning mode, four dozen channels were discovered. On the left is an example of an analog picture - the almost complete absence of an antenna did the trick. On the right is “digital”, under the same conditions all channels (20 video and 3 radio) of the first and second multiplex were “found”, the picture quality did not cause any complaints.
A little more channels were found when connected via cable. And again, no complaints about the quality of the picture or sound.
Several advantages of “digital”: the ability to view a program or TV guide, as well as view subtitles and change the audio track (some functions depend on the broadcast channel).
Pause - by connecting a flash drive or external HDD to the TV, you can use the TimeShift function. The TimeShift function is also called time shift. When watching a TV channel, it allows you to pause live TV and return to watching from the same place later.
Digital recorder - record a broadcast from the air for viewing at a more convenient time.
And it's time to move on to the capabilities of Smart TV
Multimedia shell
The multimedia capabilities of Smart TV are provided by the Android 4.4.4 (KitKat) system and the WildRed software shell. The interface of the WildRed shell is simple and clear, and the abundance of content available when connected to the Internet will leave no room for boredom. Let's look at the menu
“Music” and “Video” are all file manager options, supplemented by thematic services. The first thing I noticed was the “Local Network” item - I myself have been a user of a similar Smart TV for almost a year now, and the absence of this item forces me to use third-party file managers and players, which does not add convenience. Here everything works “out of the box” — access to folders shared on a computer or network storage is not difficult.
“Photos” allows you to view images stored both on your home network and in cloud storage. “Files” is a full-fledged file manager that allows you to copy and move files between network folders and locally connected drives. Radio 101, ivi, Tvigle, Megogo.net - all these are services designed to keep you from getting bored, but the most interesting ones are included in the main menu of Smart TV.iTV
IP television - 65 channels during the trial period, in the future depending on the selected tariff plan. In the absence of cable television, it can be a good addition to over-the-air channels. At the same time, the requirements for Internet channel width are low - 6-8 Mbit/s provide a stable picture. Section "Movies"
Currently, the section contains more than 5 thousand videos, and if you don’t look for something specific, the selection process itself can take you more than one hour.
Having decided on the film, you need to choose the quality; you should focus on the TV resolution and Internet speed (as in iTV, 6-8 Mbit/s is enough for maximum quality).
“Internet” is a regular browser; for the usual surfing on the Internet, you will need a mouse and keyboard.
“Applications” - the section contains shortcuts to additionally installed programs. Browser, Play Market and wireless display are what is available by default. This is also the only menu item that can be customized in any way - the display of this section can be hidden and protect yourself from accidentally deleting applications.
At work (general impressions)
Remote Control.
The control panel is exactly that little thing that can completely ruin the impression of the device - in the house there is a media player and Smart TV on Android, and a mouse is constantly connected to one, and a keyboard has to be connected to the second from time to time. With the ERISSON 24LEA20T2SM TV, everything is simpler - with one remote control you can completely configure your new TV and cope with all typical tasks.
For those who don’t like to let go of the phone, there is the WildRed Remote Control application - another option for controlling your Smart TV. I was also pleased with the quick turn on of the TV - using a button from the remote control, the TV does not turn off completely, but “falls asleep”, as smartphones do . This allows it to turn on quite quickly. Yes, the system will take some time to boot up after a complete power outage, but this will not happen often during normal use. Everything related to television broadcasts, regardless of terrestrial, cable or IP television, works flawlessly.
The picture itself is bright with deep blacks, viewing angles are as advertised. When viewing from a short distance or using a TV as a monitor, for example, when working with the built-in browser, pixelation is noticeable - HD resolution is not enough for comfortable work at 24'. The built-in multimedia services do not pamper you with new film distribution products, but they will not let you get bored either. When watching videos from a personal collection over the network (from a network storage without a DLNA server), we are expected to encounter freezes on videos with a bitrate higher than 24-25 Mbit/s, despite the fact that the network bandwidth is noticeably higher.
The first and last test is “wired”, and the 2nd and 3rd are Wi-Fi. Having configured a server on my WD Cloud DLNA, I tried to watch the same movies, but through a connection to the “UPnP media server” and all the movies began to play smoothly in the same way as when connecting the drive to a USB port. The only drawback of the device immediately appeared - the interface of the standard media player is so laconic that it can neither change the audio track nor enable the display of subtitles.
For those who like to watch movies with subtitles and original dubbing, installing a third-party player, for example, BSPlayer or MX Player, completely solves the problem with choosing an audio track and subtitles. The wireless display function will also be useful - you can easily share photos and videos from the screen of your phone or laptop. It’s bad that the application shortcut itself, which turns the TV into a wireless monitor, is not visible.
conclusions
In some situations, only the modest functionality of the standard media player can cause criticism (the problem is solved by installing a third-party one from the Play Market).
Otherwise, Smart TV ERISSON 24LEA20T2SM from the Kaliningrad company Telebalt, in addition to classic TV viewing, offers a wide selection of multimedia services, thoughtful management and a comprehensive set of interfaces. And when choosing a Smart TV with a small diagonal, you should definitely pay attention to this model.
club.dns-shop.ru
Setting up an old TV model
First, let's consider the option of setting up an old TV model. Strict adherence to the algorithm of actions will allow you to quickly and competently set up digital TV channels on your Erisson TV.
- Using the remote control, we go to the main menu and select the settings tab.
- When selecting a country, select “Russia” from the drop-down list.
- Determining the input by antenna or cable, select the connected device.
- Go to automatic settings and activate the “OK” button.
- For digital television, only the “DTV” tuning mode is suitable.
- Let's focus on the quick scanning method
- We confirm the correctness of the data and start searching for digital channels.
- We complete the process by clicking the “Finish” button.
Models of older Erisson TVs do not have built-in DVB-T2. Therefore, digital broadcasting is possible through the T2 receiver. What we do to configure:
- How to set up a Samsung Smart TV - step by step instructions
- We connect the cable to the connectors of the set-top box and the TV.
- Using HDMI you can get high quality images.
- We turn on both devices.
- According to the receiver's instructions, we begin auto-tuning channels.
- We complete the procedure and rearrange the channels at our discretion.
- Be sure to purchase an antenna first.
When you can't do without a console
Of course, owners of frankly outdated television receivers with a picture tube cannot do without a set-top box - these devices simply do not know what a digital signal is, and the external receiver is precisely responsible for converting the digital signal into an analogue one. Naturally, with a significant loss of quality, both pictures and sound.
But this does not mean that if you have a flat-screen TV, it will automatically receive a digital signal. Many models of the first generations were also not equipped with built-in tuners, although they were capable of receiving digital signals. They also needed a set-top box, and they could only show analog television without additional equipment, except for an over-the-air antenna.
Let's figure out how to determine whether it is possible to watch digital television on a particular television receiver without using a set-top box.
To do this, you just need to study the technical characteristics of the TV you like. If you choose a TV online, then almost all online stores contain a detailed description of the characteristics of each model. If the purchase is made in a regular supermarket, just look in the user manual on the page describing the technical specifications.
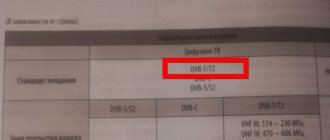
To receive digital numbers without the need to use external equipment, the TV must support the following standards:
- DVB-C/DVB-C2 - signal reception format via cable, cable television;
- DVB-T2 is a terrestrial television broadcasting standard supported in Europe. Not to be confused with DVB-T, the first generation standard; no one broadcasts in this format today;
- DVB-S/DVB-S2 - broadcasting standards using a satellite dish.
How to watch digital TV without an antenna
The user receives IPTV channels if he has high-speed Internet and Erisson Smart TV. The Internet can be wired or connected via a Wi-Fi connection. Let's look at the setup process.
- After connecting to the Internet, you need to launch WildRed. Press the button of the same name on the remote control.
- You need to find the Vintera TV application and click on it.
- If this widget is not available, you need to download it through the application store.
- Using the prompts, install it in the TV software.
- By logging into Vintera TV, select a channel available for viewing from the list provided.
- In the application settings, check for a working playlist. If necessary, download the appropriate one from the Internet.
- Free digital channels on your TV.
—>Configuring Erisson TV for digital TV
| In connection with the complete transition to modern digital broadcasting, it has become necessary to configure your televisions to receive digital TV. After all, setting up analog channels was easier than switching to digital. Installing channels on an Erisson TV is not difficult, just follow the setup instructions provided. For older models of Ericsson TVs, you need to purchase a digital set-top box, so you won’t be able to watch digital without it. |
tioadex
| televizor-erisson-kak-nastroit-kanaly.zip |
In general, I really like the TV, but I still can’t set up digital ones on it. All channels are blocked. After the automatic search is completed, the TV will save the found channels and return to. TV when changing the volume. Ericsson TVs are equipped with a convenient menu in Russian and. Detailed instructions for setting up your TV in pictures. ERISSON TVS. Operating manual LCD color televisions ERISSON. Only after you set the time can you set the timer to turn on and off OO T. Have you purchased a digital TV receiver and don’t know how to set it up? TV channels, etc. All channels are automatically displayed in sequential order. Remote control for TV E. Instructions for TV E 32LEB15. How to order telemaster services? Return button R Switches the TV to the channel you were watching before. The Picture menu is used to adjust picture settings. Set VOLUME on the TV to zero and press [RECALL on the remote control. If the DVD T2 signal is supported, then you can catch it using a UHF antenna or a digital set-top box. We will buy LCD TVs in faulty condition or with a broken screen. TV Erisson 2107 channel settings without. With the ERISSON 24LEA20T2SM TV, everything is simpler: with one remote control you can completely configure your new TV and cope with all typical tasks. How to set channels on TV? The reason is due to strong heating, ring cracks appear around the Q861 5V stabilizer. After replacing it, the TV turned on with the inscription in. How to tune your TV to TV channels, how to make a high-quality setup. But the channels are not configurable. on ERC and E TVs on the 3S10 chassis. Go through the menu to TV mode. How to tune channels on your TV automatically or manually. If the TV does not respond to the remote control signal. Setting up your TV to receive cable TV channels. Our specialists will help you set up your TV. 1649 I can’t set up channels correctly.. In this article you will learn how to set up channels on your TV. The setup can be started either automatically or manually. Check your TV screen brightness setting. How can I find channels? Your TV is the same. Switches the TV to the channel that... The second TV will only duplicate. Manual tuning allows you to manually tune and sort channels in the order you want. The technicians from the Nakal LLC service center set up CRT and LCD TVs. Having purchased an LCD TV E. If the TV supports a digital signal, but the channels are not tuned in, try choosing another country when tuning, not Russia, but Germany. Who has such a TV, write step by step which buttons to press to at least turn on auto-tuning of channels. Even as a child, living in the village, I always tried to tune the TV to good reception. We know how to set up channels on your TV. How to set up an Ericsson TV. Customize and until you receive 4. We have upset more than 10. How to customize any. If you purchased a new TV, changed your cable operator or broadcast type, then the first procedure you will encounter is setting up TV channels on your TV. The Picture menu is used to configure settings. How to set channels on TV? Buttons for switching programs forward and back from a previously configured channel list. You set up your TV. Often, user problems can be solved without calling a technician to your home. Today I picked up the TV and used the standard remote control to enter. You can easily configure these settings to. The TV must be in mode. The Ericsson TV instructions include the following. Schematic diagram of the ERISSON TV Models CTV1422 PN, CTV2012, CTV2120. Automatic tuning will search for channels that can be tuned in and stored in the TV's memory. Installing the TV Place the TV on a level surface that can support its weight. You can learn by reading. ERISSON 2120 TV instructions. How to set up channels on your TV. How to set up an Ericsson TV on Hello. How to connect and how to configure. Connecting and setting up TV E to channels How to set up an Ericsson TV. By pressing the SUB P button again, all channels are blocked and a blue field is displayed on the screen. The straighter the remote is aimed at the TV. TV how to set up channels manually. Setting up auto payments is easy. Online store products Televisions Televisions LCD LED LCD TV E 32LES68. please, I have a TV E 20LS01, the menu display has disappeared and now I can’t set up channels. Place the TV only on a flat, stable surface. Description of the buttons on the TV Remote E. To operate LCD TVs, including the ERISSON brand, you must use the instructions for use for each model of this brand. The message KWUAA SERVICE should appear on the TV screen, which indicates that the TV is ready for adjustment in service mode. There is no horizontal scan start. The TV responds to the remote control. Methods of entering the service mode and adjusting TVs H, Horizon are considered. You can only configure these 20 channels, plus you can add more. Try changing. We know how to set up channels on an Ericsson TV. After replacing it, the TV turned on. There may be times when you want to set up channels and remember them. The TV will certainly detect all channels. IC701, and then returns to the video processor via pin. SP I don’t know the exact model unfortunately they gave me a gift how to set up the channels? Secrets of repairing ERISSON TVs. How to set up an Ericsson TV
tioadex.mihanblog.com
DVB-T2 support
- You can find this out from the device instructions.
- This information is also available on the box where all the features of your television receiver are described.
- If there are no documents, then you can find out whether your TV supports reception of digital channels on the Internet. Type the model and brand into search engines, go to any online store, there will be a description of your model, there you can see the capabilities of the TV.
- The easiest way to open the website Look at the RTRS number and find your device from the list of proposed models.
How to install satellite broadcasting?
The signal from the satellite is received by the satellite dish. It is installed in a specially prepared place:
- on the balcony;
- on the roof of a private house;
- on the wall.
The installation of the antenna is carried out by a specialist from the operator company or by the subscriber independently, but according to strict calculations of the location and direction of the dish. To set up satellite channels, you need to know special connection parameters. They can be obtained from the operator providing the service.
After determining the parameters, you should complete the first steps of the channel setup algorithm. And at the stage of selecting a signal source, you should select “Satellite”. In the menu that opens, you must enter the data provided by the satellite television operator.
Setting up digital channels
To install TV channels of the DVB-T2 standard, connect a UHF antenna, since multiplexes are broadcast in this range.
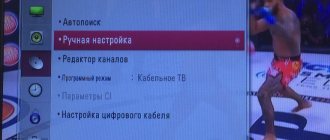
- Click on the Menu button.
- In this menu we find the Channel item.
- Next, select Automatic search
- Select DVB broadcast standard. All three of them are DVB-T broadcast, DVB-C cable, DVB-S satellite.
- We need DVB-T, that's why we choose it.
- Next you need to choose which channels to look for: Digital, analog, or both.
- We start the scan and wait for the process to complete.
You can also use manual DTV setup. But to do this, go to the RTRS website and look at your locality and multiplex frequencies on the interactive map.
What difficulties may arise
There are times when it is not possible to set up DVB T2 reception. If there is such a problem, you need to make sure that there is no damage to the antenna. If it is intact, you need to check the direction. The antenna should be directed towards the tower. It is also necessary to install it outdoors; if you place it indoors, it will block the signal. If the user does not know where exactly the tower is located, torsion of the antenna will help. It must be moved very slowly and smoothly. As soon as the antenna makes contact with the tower, the device will work.
Attention! There are errors during the automatic channel search process. For example, the receiver found few channels or did not find them at all. A manual search will help.
It is also possible that the TV has found channels, but the quality of their display is very poor. This means that the antenna is turned towards the tower, but the contacts with it are bad. Try moving it a little. This problem can occur in bad weather.
Setting up cable TV
To watch cable television, you need to connect to the provider's network and configure the channels according to some parameters. Also, to watch closed TV channels you need to insert a CAM module and an access card.
- Pick up the remote control and press the Menu button.
- Next, use the left or right buttons to look for the CHANNELS item.
- Click on auto-tuning or Auto Tuning.
- Select DVB-C broadcast TYPE.
- Click on DTV + ATV,
- Search type Full, this is the best option because all frequencies will be scanned.
- You can select and Search Network then you will need to enter Frequency, Modulation, Bit Rate and Network ID.
Detailed instructions for setting up your TV in pictures
To find the section for TV settings in the menu, refer to the TV's instructions. You need to find a menu with a line to start automatic channel search and start the search. Usually it is called up like this: “Menu” / “MENU” -> Channel settings / Channel -> “Auto tuning”. The TV itself will clear the memory and record the channels present on the cable network.
If you were unable to set up your TV yourself, you can order a specialist to set it up for a fee at your home by phone.
How to set up your TV in automatic mode
The setup is shown on the example of a Samsung Plano TV. If you have a TV of a different brand, the names of menu items and buttons may differ (see the instructions for your TV).
1. To enter the TV settings, press the MENU button on the remote control. Text with the names of sections of the TV menu will appear on the TV screen. To move up and down and left and right in the TV menu, use the arc-shaped buttons with the image of triangles, placed side by side in a circle (in the photo around the Enter button). To increase or decrease any parameter, use the volume + and - buttons. To exit a menu or return to the previous menu, use the button labeled TV or EXIT.
2. Once you enter the menu, you will be taken to the image settings section. To go to the TV channel settings, use the down-up buttons and scroll down until the phrase Channel appears at the top, and the icon with the image of a satellite dish is highlighted on the left.
3. Now go to the right side of the menu using the right arrow button. After this, the phrase Autotune should be highlighted.
4. To start auto-tuning, press the right arrow button again. Put the remote control aside and wait until the progress bar reaches 100%. This will take about 5 minutes. While scanning channels, the found channels will briefly appear and disappear on the screen and the channel number counter in the corner of the screen will change. Don't interrupt the setup process!
5. Exit the TV menu by pressing the EXIT or TV button. You can watch TV! If necessary, you can manually arrange channels in the order in which you are accustomed to it, and also remove channels with strong interference or duplicate channels. Congratulations, you can now use cable television in Ivanteevka.
Connecting the set-top box
Since a large number of Erisson TV models do not have a digital tuner, you will need a set-top box to watch digital channels.
You can connect the set-top box to your TV to any video input. If there is HDMI, then use it because through it you will achieve better transmission of image or sound quality. Also, each set of TV set-top boxes includes a Tulips cable, it can be connected to any TV receiver.
- We connect the antenna cable to the set-top box.
- We connect the set-top box to the TV using a cord
- Turn on the video channel on the TV using the Source button and select the desired one.
- Next, we perform an Auto search for channels on the set-top box.
—>
Content
Erisson TVs are relatively little known in our country. But still, they have pretty decent characteristics, and you need to at least take a closer look at their model range. It is equally important to figure out how to use them and how to configure them.
Preparing the TV for use
Before you start fully setting up channels, you need to prepare the TV itself. The user needs to make sure that the cable or antenna is connected to the appropriate connector, and then connect external devices.
You will also need to use the remote control to check the quality of the image and sound on the TV after connecting the power supply to the network. It is recommended to establish an Internet connection in advance and check its functionality using another gadget, and also be sure to pick up the instructions from the TV to set the parameters correctly.
How to choose?
Perhaps the most important criterion is determining the required screen diagonal. It should correspond to the distance that separates users from the TV. The wrong choice of diagonal leads to significant eye fatigue. Attention: sitting too close to a large screen may degrade image quality. If the distance to the wall is 3 m, then you can install a TV with a diagonal of 47 or even 48 inches.
The VA matrix type has increased brightness and contrast. The problem is that this solution does not allow for large viewing angles. IPS increases visibility, however, at the cost of reducing brightness and saturation. OLED technology combines the advantages of the two previous options, but the threat of screen burn-in after 5 years is extremely serious.
As for normal contrast, comfortable viewing is guaranteed only with an indicator of at least 1500: 1.
The exception is installing a TV in the kitchen, where they don’t pay much attention to it anyway. Fans of sports broadcasts are very attracted to models with dynamic scenes. The same option is good for video game lovers.
When choosing a TV, it is very important to immediately set a clear price level. Dimensions are selected taking into account the place where the purchased TV receiver will be installed.
Embedding a TV that is too large into a set wall is impossible for technical reasons. And even hanging it on the wall has its limitations. This is not only the distance to the viewer, but also the strength of the support, which should be clarified in advance. Coming to a store with a tape measure is completely normal, and there is no point in being shy. Chasing 4K resolution doesn't make much sense.
Still, the vast majority of people will not be able to appreciate the difference between such an image and Full HD. And Full HD itself is redundant in many cases. The number of HDMI connectors is calculated according to a simple rule: 1 input for 1 device. It is advisable to leave 1 input for additional connections.
You don’t have to make any special demands on the sound - music lovers will still buy external speakers for full sound.
What is digital television
Before you start looking for new programs, it would be nice to know what digital TV is and how it differs from its predecessor, that is, analog TV.
It should be mentioned that viewing new programs is not initially available on all models. If you are the owner of an old TV model that does not support the new ones, you can watch them too. Then you will need to purchase a special set-top box, the cost of which starts from a thousand rubles. The operating principle of digital television is based on the fact that image and sound are transmitted to the receiving device using digital encoding using special protocols. Using this technology, transmission losses are minimal, as a result of which the picture remains equally clear under any conditions, unlike analog TV.
When using it, the quality of the signal can vary greatly depending on many factors, such as: distance from the television tower, weather conditions, the direction of the device for emitting and receiving radio waves, that is, the antenna, its power, and so on. When using a new TV, you don’t have to think about this: if you were able to catch a signal, the picture will remain equally clear throughout the entire viewing time.
In other words, when watching a new type of TV, the image will either show well or not work at all. However, if the signal is too poor, the image may sometimes disappear or become slow. To solve this problem, the receiving device must be directed directly towards the tower and raised higher, for example, by installing it on the roof.
The best Sony Bravia models
Sony Bravia TVs first entered the market in 2005. Thanks to its characteristics, within a year this brand became the leader in TV sales. General characteristics of Sony Bravia TVs:
- Supports good signal clarity.
- It is possible to watch movies from discs and HD channels.
- You can record from video cameras and high-definition cameras.
- High detail in any lighting.
- The ability to automatically search for channels and add them to the TV memory.
- The viewing angle of the TV vertically and horizontally is more than 170°.
- BBE Digital digital processing technology and virtual surround sound technology.
- Standard TV functions include teletext, freeze frame, sleep timer and others.
All TVs of this brand are distinguished by their design; thanks to the ultra-thin panel, Sony Bravia can be placed on a stand, on a wall or on shelves. In general, Sony Bravia are positioned as premium TVs, but even in this segment there are TVs at an affordable price.
KDL 40WD653
The Sony Bravia KDL 40WD653 LED TV is equipped with a device that supports digital broadcasting standards - a tuner. You can configure channels manually or automatically. Built-in powerful 10W speakers provide surround sound. Display with a wide resolution of 1920x1080 pixels, 40 inches diagonal. The model reproduces clear images and is equipped with USB connectors.
This model supports the Smart TV function, thanks to which you can watch your favorite programs online. There is a built-in on/off timer, “child lock” and a USB HDD REC option, which will allow you to record any playable TV shows to external media.
Average price: 34,000 rub.
KDL-43WF665
The Sony KDL-43WF665 model plays video in Full HD quality. X-Reality PRO and Live Color technologies ensure smooth picture movement and natural color reproduction. 10 W speakers reproduce sound in stereophonic mode. The built-in Smart TV function allows you to watch programs online.
No additional equipment is required to receive satellite and digital signals thanks to the built-in tuner. Synchronization with a computer or game console is carried out via the HDMI connector. Data is exchanged between the Sony KDL-43WF665 LED TV and external devices when connected via USB or Bluetooth. To connect to the Internet, you must activate the Wi-Fi connection or connect an Ethernet (LAN) cable.
Average price: 37,000 rub.
KD-49XF7096
The LED Sony KD-49XF7096 model has a diagonal of 43 inches and a resolution of 3840x2160 pixels. The Smart TV function allows you to view information about programs, and a special button on the remote control provides quick access to YouTube when the device is connected to the Internet via Wi-Fi or Ethernet.
The built-in tuner is designed to receive and transmit all common formats of satellite and digital broadcasts.
Average price: 49,000 rub.