The Selenga company has been producing digital set-top boxes and other television equipment since 2003. During this time, the manufacturer has achieved a leading position in the market and gained good popularity among consumers, as evidenced by many positive reviews. In this article we will look at how to connect and configure the Selenga set-top box, as well as the main features of this tuner.
All instructions presented in the material are suitable for models t42d, t81d, t20d, t420, hd950d, t81d. TV set-top boxes provide users with:
- Find up to 20 digital channels.
- Take advantage of built-in features including subtitles, TV Guide, parental controls, etc.
- There is support for the Dolby Digital system.
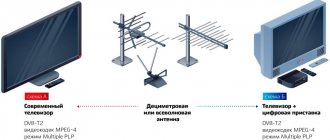
- Can be easily connected to old TVs.
How to connect the Selenga digital set-top box and configure channels
Connecting the Selenga digital set-top box to your TV is not difficult. Anyone can cope with the procedure; no experience is required, just follow simple instructions.
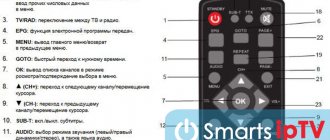
First, you should familiarize yourself with the designation of the keys on the remote control. In the future, the set-top box will be configured and controlled using it.
How to connect and set up digital TV on your Philips TV to receive channels
Connecting the device
First, let's take a look at the available connectors in Selenga set-top boxes. The manufacturer has provided:
- HDMI.
- RSA inputs.
- Antenna connector.
- Input for power supply.
Connection order:
- First of all, you need to insert the antenna cable into the appropriate connector; next to it you will notice the inscription “RF IN”.
- Connect the receiver to power.
- Then connect the last cable – HDMI. If it is not available, use RSA tulips, connecting them by color.
Initial settings
Once you have connected all the necessary cables, turn on the TV and select the connection type as “HDMI” or “VIDEO”. A menu will appear on the screen; use the buttons to specify the initial parameters:
- Choose language.
- Please indicate your country.
- In the “Search Type” tab, select “Open Channels.”
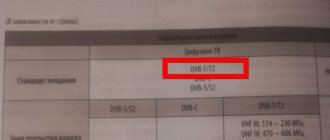
- Search range – DVB-T/T
- Then click "Automatic Search".
Panel overview
To successfully figure out the connection, let's look at what connectors the set-top box offers and what their application is.
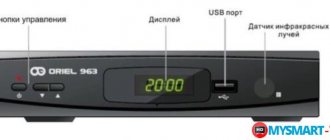
Front panel connectors and buttons:
- POWER - turns the power on and off.
- — entry and exit from the main menu
- CH/V- and CH/V+ - buttons for switching channels and changing sound volume.
- USB - connector for connecting a Wi-Fi adapter and other sources of media files.
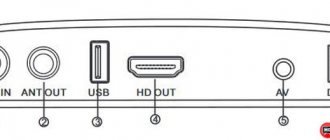
Rear Panel Connectors:
- ANT IN - input for connecting to a TV antenna.
- ANT OUT - high-frequency TV signal output.
- USB - connector that performs the same functions as on the front panel
- HD OUT - high-resolution digital video/audio connector.
- AV - video/audio input.
- DC - connection of an external 5V power supply.
Not all Selenga models have similar sets of connectors. For example, the Selenga T90 does not have sockets on the front panel.
Basic Operations
The main settings include the main tabs in the menu:
- Program Manager.
- Image.
- Search for TV channels.
- Time.
- System parameters.
- USB.
Program Manager
This section includes:
- Channel editor.
- TV guide.
- Sorting.
- Automatic numbering.
- Updating the channel list.
The channel editor includes several settings. When logging in, the system may ask for a password, then enter six zeros. The option allows you to block, skip, create a favorites list or delete TV channels. Instructions for use:
If you have any questions or complaints, please let us know
Ask a Question
- To add to your favorites list, mark the channel name with a red asterisk. Use the "OK" button. To exit a tab, press “EXIT” on the remote control.
- To remove from favorites, select a specific broadcast in the list and click “FAV”.
- To remove a channel from broadcasting, press the blue button on the remote control after selecting the broadcast you don’t want.
- To skip a TV channel, press the green button.
- The red button will allow you to move a specific channel to another position, which must be determined using the keys. After moving, click OK.
- To lock, use the yellow button. In the password field, enter six zeros.
How to set up Kodi player on Android TV Box: step by step instructions?
The TV guide is a TV program guide. Users can view information about all channels, for example, the current broadcast, as well as the upcoming broadcast schedule.
The “Sorting” tab allows you to arrange channels by:
- Name.
- Identification number.
- Network identifier – ONID.
- By logical numbering.
Image Settings
The next section is image settings. In the menu it is located as the second tab. Here you can change:
Screen format. This parameter should be selected for the TV model:
- 4:3.
- 4:3 full screen.
- 16:9.
- 16:9 Wide.
- 16:9 Panoramic.
Not sure about the right choice? Set the option to "AUTO".
- Permission. Use the arrows to select - 480i/480p for NTSC, 576i/576p for PAL or 720p/1080i/1080p, suitable for any television system.
- Volume. Adjust the volume on a specific TV channel or all.
- OSD parameter. Determines the percentage of transparency of the receiver menu.
- Set up LED display. Allows you to change the brightness, enable the visibility of the TV channel number or activate the time display when watching TV shows.
Search channels
The presented section includes:
- Auto search. Click "OK" to start.
- Manual search. To adjust the frequency, use the keys.
- Selecting your country of residence.
- Antenna power supply. When using an active antenna together with power supply to the amplifier via cable, activate the option.
Setting the time
In this section you can:
- Set the time.
- Change region.
- Specify time zone.
- Activate the device's automatic shutdown feature.
- Set a timer.
Setting options
There is no need to configure options; all built-in functions do not require additional settings. The only thing you can do is change the language settings.
System Settings
Available in system parameters:
- Parental control. To log in you will need to enter a password consisting of six zeros.
- Setting a password for installed or standard applications.
- Reset settings to factory settings.
- Information about installed software, model data.
- Software Update.
How to connect bluetooth headphones to a Samsung TV: methods, instructions
Peculiarities
Selenga's product range includes many models. The equipment allows you to capture up to 20 digital broadcasting channels. It is possible to watch a TV program several days in advance. When watching TV programs, you can turn on subtitles. This is very convenient when watching TV at night. The receiver has parental controls to protect children from unwanted viewing of some channels.
The main feature of the Selenga TV set-top box is the Dolby Digital function. The option allows you to enjoy watching your favorite programs, movies and TV series with surround sound. Another feature is the presence of a socket for connecting old television receivers. In modern set-top boxes from other manufacturers, such inputs are rare.
Some models are equipped with a mini jack 3.5 connector and a USB connector for connecting an external drive and adapters. All Selenga devices are small in size and weight. The top and bottom panels have ventilation grilles that prevent overheating of the equipment. The receivers include a power supply with a one and a half meter cable, a cable with “tulips” for connecting old equipment, a remote control, instructions and a warranty card.
TV receivers have reasonable prices. Even the most advanced set-top boxes with Wi-Fi will cost 1500-2000 rubles. More expensive models include wider functionality. Some receivers show the weather in the region and have access to various Internet and video services. It’s worth taking a closer look at the best models and their features.
- Step-by-step instructions for connecting and setting up dvb-t2 digital set-top boxes world vision
How to connect Selenga to an old TV
Anyone can connect the Selenga digital set-top box to an old model TV. The procedure is similar to those presented above. Only when connected, you will not be able to use an HDMI cable, which is due to the lack of the required input on the TV. Use the RCA tulip kit, connecting them by color.
Comparison of console models
For clarity, let’s look at how the Selenga T81D, T42D and T20D models differ.
Comparison by characteristics
Firstly, it's appearance. All consoles have a similar shape and color - black, but look slightly different.
- HD support and maximum resolution of the tuners are completely the same.
- Selenga T81D is distinguished by the presence of a delayed viewing function, while other models were not equipped with it.
- The T42D model is one of the presented ones that supports the “Parental Control” option.
- The lack of variety of options is most evident on the Selenga T20D.
Possible problems and their solutions
We have looked at how to set up the Selenga set-top box; now we should look at common errors and problems that may arise during connection or further use. Common malfunctions include:
- The set-top box cannot find channels.
- There is no response to the remote control.
- No signal.
Selenga set-top box does not find channels
The cause may be an outdated software update. To solve the problem, go to the settings and in the “System” tab, check for updates. But the malfunction may also lie in the antenna used; it probably does not support the DVB-T2 standard. You will have to purchase a new one that can receive the required type of signal.
Doesn't respond to remote control
If the set-top box stops responding to the remote control, then first check the batteries. In addition, the reasons may be:
- The remote control itself is faulty.
- Large distance to the set-top box or interference between devices.
Flaws
- Cable channels are received better than DVB-T.
- From the outside it looks presentable, but it becomes obvious that the device is assembled from cheap components of not very high quality.
- The batteries for the remote control are not of good quality
- Automatic wide format mode does not work correctly. You have to manually configure it for your TV.
- The image may have a frame that cannot be removed. In automatic mode, some channels are shown in a small window format.
- On the remote control, the channel cycling button (“forward - back”) can work slowly, you have to press and hold, which causes you to jump through the channel. Channels change slowly.
- It happens that after turning off the remote control, after a few seconds the device turns on spontaneously. When you switch subtitles and audio tracks, the video continues to play, but the audio is delayed for a few seconds.
Additionally
When you turn on the set-top box, if you do not press anything, after a few seconds the channel search automatically starts. Typically the device finds at least 20 TV and 3 radio channels. The search is going fast. Scans both meter and decimeter ranges.
Under the list of channels there are icons that make it possible to perform any manipulations with channels - find them, sort them, etc.
There are functions for viewing the program guide (“EPG”), teletext, delayed viewing, timer recording, and “parental control”.
The menu is very simple. The first section is “Programs”. When you press the “Ok” button, it shows all channels with their names. You can delete unnecessary channels or change their names. You can create separate “Favorites” channel folders or separate channels into categories. Sorting can be by logical channel number, by service, by name.
In the “Image” section there is an item “Setting the LED display” (i.e. the display on the front panel).