The Selenga company has been producing digital set-top boxes and other television equipment since 2003. During this time, the manufacturer has achieved a leading position in the market and gained good popularity among consumers, as evidenced by many positive reviews. In this article we will look at how to connect and configure the Selenga set-top box, as well as the main features of this tuner.
All instructions presented in the material are suitable for models t42d, t81d, t20d, t420, hd950d, t81d. TV set-top boxes provide users with:
- Find up to 20 digital channels.
- Take advantage of built-in features including subtitles, TV Guide, parental controls, etc.
- There is support for the Dolby Digital system.
- Can be easily connected to old TVs.
Set-top box for digital television Selenga
The Selenga lineup includes a dozen models. The bestsellers, thanks to the ideal price/quality ratio, are the t71 and t71d. The set-top box allows you to:
- capture up to 20 digital broadcasting channels;
- connect to both an old analog TV and an advanced digital matrix;
- enable subtitles;
- view the TV program several days in advance;
- sort channels;
- set parental controls;
- The Selenga t71d TV set-top box additionally supports Dolby Digital – surround digital sound.
It’s also worth mentioning what connectors the set-top box has. By understanding what inputs and outputs a device has, installation and configuration will be much easier. If we consider t71, then it has:
- HDMI connector, which is used in all new TVs today;
- familiar to everyone RSA sockets, which can be used to connect to old equipment;
- antenna input;
- connector for power supply.
Set-top box connectors (HDMI and antenna jack)
Sockets for connecting tulips.
Each model is equipped with a power supply with a one and a half meter cord, the usual “tulip” cables, a remote control, instructions for use and a warranty card.
Standard equipment
How to connect Selenga to a computer
Connecting to a PC is almost the same. Except that an HDMI cable is required here.
Instructions
- Connect the set-top box to the monitor with a cable.
- When turned on, the channel number will light up on the display if the receiver has already been connected previously.
- Then go through the guide to installing and configuring options.
- Next, scanning and searching for channels will begin. This usually takes a few minutes - the process is quite fast.
- You will see a list of found TV and radio channels.
- By going to the menu, you can familiarize yourself with the TV program settings.
- Further, you can operate functions and channels as you wish, and do not forget about the ability to connect external USB drives.
- Ready!
Often, in order for the image to appear, if this does not happen, set the standard settings to the screen resolution. The most convenient way to do this is on the TV itself.
Why is it needed?
To access the Internet from a TV with SMART TV function, you need a wireless adapter for the set-top box. The receiver equipped with the module connects to the router. The Wi-Fi adapter for DVB-T2 set-top boxes is equipped with the simplest wireless module and signal decoder, receives signals and transmits them to the TV.
What to look for when choosing:
- Receiver compatible;
- Range;
- Frequency range;
- Transmitter power;
- Data transfer protocol;
- Type of protection and encryption.
For an overview of the Selenga set-top box with the ability to connect a Wi-Fi adapter, see the following video:
Main products of SELENGA
The company's product range covers all the needs of owners of TV receivers of any level of complexity. The catalog contains the following types of products:
- smart TV set-top boxes;
- DVB T2 tuners;
- cables;
- plugs;
- connectors;
- antennas;
- signal amplifiers;
- dividers;
- power supplies.
The products are at different levels of complexity and represent a single set of equipment and accessories for reliable reception of a television signal and display of high-quality pictures on the screen. The technical level of the equipment allows you to connect TVs with image quality up to 4K.
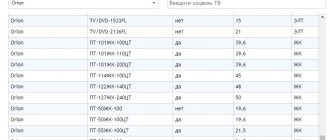
Comparison of models of DVB-T2 set-top boxes Selenga
Currently the company has 8 digital receivers. Their comparative characteristics are presented in the table below. It should be borne in mind that the list does not include functions that are present on all receiver models, for example: teletext, program guide, subtitles, etc.
| Options | T20D | T40 | T42D | T60 | T81D | HD80 | HD860 | HD950D |
| DVB-T2 support | + | + | + | + | + | + | + | + |
| Cable TV | — | — | + | — | + | — | — | + |
| USB | + | + | + | + | + | + | + | + |
| Display | — | — | — | — | + | + | + | + |
| Wi-Fi availability | + | + | + | + | + | + | + | + |
| Frame | Plastic | Plastic | Plastic | Plastic | Plastic | Plastic | Metal | Metal |
| Digital TV connectors | HDMI | HDMI and RSA | HDMI and RSA | HDMI and RSA | HDMI and RSA | HDMI and RSA | HDMI and RSA | HDMI and RSA |
| Tuner | Maxliner MXL 608 | RT836 | Maxliner MXL 608 | RT836 | Maxliner MXL 608 | RT836 | RT836 | Maxliner MXL 608 |
| power unit | External at 2A | External at 2A | External at 2A | External at 12V 1A | External 1.5A | External at 12V 1A | Built-in 220V | Built-in 220V |
*) To view programs over Wi-Fi, you will need an additional adapter. On models T42D, T81D and HD950D, you can additionally watch the Megogo portal from YouTube and IPTV.
Equipment
When ordering, you receive a set-top box in a standard box with its image and model number - in this case, Selenga HD950D.
At the back there is some information about the gadget: manufacturer, main characteristics, support, etc.
Open the box.
The package consists of:
- the receiver itself;
- RCA cable;
- two batteries for the remote control;
- the remote control itself;
- warranty card;
- instructions for use.
By the way, the remote control is very sensitive, so a high-quality signal from anywhere in the room is guaranteed.
How to connect Selenga TV set-top box
For a clear indication of the connection process. We took the 2 most popular Selenga models at the moment: T42D and T81D. For convenience, all the company’s consoles are largely identical. Differences can only be in possible options for connections to the TV and internal filling. Everything else, including the remote control and menu, looks identical. Therefore, the instructions will be suitable for any Selenga model. The general scheme for all options will look like this:
In this case, the connection can be made in 3 different ways:
- Via HDMI. It is a cable with a “flat” input and costs between 300-500 rubles. Usually it is not included with the console. However, if your TV has this input, then it should be used first. HDMI provides better image transmission and is more durable.
- Via RSA. They come in various configurations. The one presented is called 3.5 Jack / 3 RSA. The T42D model has inputs for 3RSA, not 1.
- In older TV models, there are often situations in which both connector options are missing. In this case, there is usually an input for SCART. To connect it, an adapter with 3RSA is used.
Thus, you can connect a DVB-T2 Selenga receiver in almost 90% of cases. The remaining 10% is due to various problems with the TVs themselves.
Characteristics
The receiver body is made of matte black plastic. There are many slots at the top and bottom for ventilation. The device is compact and has small dimensions - 63x125x28 mm. Weight – 330 g.
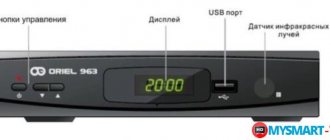
The front panel is made of translucent glossy plastic. On the left, under the model name, there are the “Power” (on), “Menu” buttons and the cyclic switch buttons - CH +/- (forward - backward). Depending on a short or long press on the CH +/- buttons, television channels are switched or the sound is reduced (increased).
Nearby is a scoreboard (four-digit LED display) that displays the standby time or digital channel number. Next to it is an indicator for receiving a signal from the remote control and a USB input. The device can be used without a remote control.
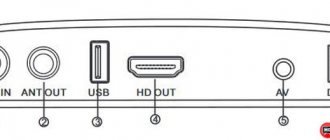
On the rear panel there are standard switching connectors:
- antenna input and through antenna output (ANT IN, ANT OUT);
- USB and HDMI connectors;
- composite audio and video output;
- USB connector.
On the back side there are all outputs for connecting to a TV, USB HDMI, RCA.
Equipment:
- receiver;
- cable for connecting to a TV - 3.5 mm jack to 3 RCA;
- external power supply;
- warranty card and instructions;
- remote control;
- batteries.
The device is small in size, so the composite connector is made in the form of a compact socket.
Processor – Maxlayer MXL608.
General characteristics
The digital receiver accepts channels of DVB-T, DVB-T2 and DVB-C cable television standards.
Supports AAC audio codec, as well as MPEG-1 Layer I&II, MPEG-2 Layer I&II, MP3.
How to set up 20 digital channels on the Selenga set-top box
The search procedure is identical for all models of Selenga receivers. If there are any small peculiarities when connecting, then the menu will be the same everywhere and will not pose any special problems when setting up channels. First we will show the automatic search procedure on the set-top box:
- Turn on the TV and go to the display mode in which the set-top box was connected. If you connected the receiver via HDMI, you should select it in the list. RSA usually uses AV mode. Scarth should be named accordingly.
- After this, from the remote control of your Selenga model, press the power button. The console should boot. Click on the menu button.
- We are looking for the channel search section there, it is depicted in the form of the World Wide Web.
- To begin with, select Autosearch. The receiver will independently select the required signal reception frequency and find available digital channels. When finished, the list will be saved.
- If unforeseen circumstances arise. For example, less than 20 TV channels will be found. The setup will have to be done manually.
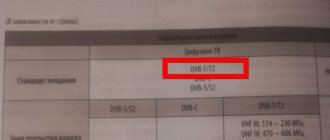
- To do this, before starting work, you should find out the reception frequency from the TV tower in your region. This can be done using the CETV card. Just enter your area on the map and look at the antenna parameters for both multiplexes. We will be particularly interested in the channel number.
- After this, we go to manual search and indicate the numbers previously found on the map. Click OK and the device will begin searching for a signal at the frequency you set for receiving digital terrestrial broadcasting.
How to connect Selenga set-top box to WiFi
All Selenga models have the ability to access the Internet using a WiFi connection. You can adapt the set-top box for such work using a special adapter connected via the USB connector. It costs differently, depending on reception capabilities and distance from the access point. The average price is around 300 – 2000 rubles.
To enter the network, on the set-top box itself you need to:
- Open the USB section in the device menu.
- Select “Internet”.
- Enter the network password, if required.
After connecting on the Selenga console you will be able to:
- Watch movies and videos from YouTube and Megogo services.
- Find out the weather.
- Use the Gmail service.
- Connect to IPTV.
- Set up an RSS news feed for any website.
In this case, the speed of a particular service will depend on the connection itself.
Basic Operations
The main settings include the main tabs in the menu:
- Program Manager.
- Image.
- Search for TV channels.
- Time.
- System parameters.
- USB.
Program Manager
This section includes:
- Channel editor.
- TV guide.
- Sorting.
- Automatic numbering.
- Updating the channel list.
The channel editor includes several settings. When logging in, the system may ask for a password, then enter six zeros. The option allows you to block, skip, create a favorites list or delete TV channels. Instructions for use:
- To add to your favorites list, mark the channel name with a red asterisk. Use the "OK" button. To exit a tab, press “EXIT” on the remote control.
- To remove from favorites, select a specific broadcast in the list and click “FAV”.
- To remove a channel from broadcasting, press the blue button on the remote control after selecting the broadcast you don’t want.
- To skip a TV channel, press the green button.
- The red button will allow you to move a specific channel to another position, which must be determined using the keys. After moving, click OK.
- To lock, use the yellow button. In the password field, enter six zeros.
The TV guide is a TV program guide. Users can view information about all channels, for example, the current broadcast, as well as the upcoming broadcast schedule.
The “Sorting” tab allows you to arrange channels by:
- Name.
- Identification number.
- Network identifier – ONID.
- By logical numbering.
Image Settings
The next section is image settings. In the menu it is located as the second tab. Here you can change:
Screen format. This parameter should be selected for the TV model:
- 4:3.
- 4:3 full screen.
- 16:9.
- 16:9 Wide.
- 16:9 Panoramic.
Not sure about the right choice? Set the option to "AUTO".
- Permission. Use the arrows to select - 480i/480p for NTSC, 576i/576p for PAL or 720p/1080i/1080p, suitable for any television system.
- Volume. Adjust the volume on a specific TV channel or all.
- OSD parameter. Determines the percentage of transparency of the receiver menu.
- Set up LED display. Allows you to change the brightness, enable the visibility of the TV channel number or activate the time display when watching TV shows.
Search channels
The presented section includes:
- Auto search. Click "OK" to start.
- Manual search. To adjust the frequency, use the keys.
- Selecting your country of residence.
- Antenna power supply. When using an active antenna together with power supply to the amplifier via cable, activate the option.
Setting the time
In this section you can:
- Set the time.
- Change region.
- Specify time zone.
- Activate the device's automatic shutdown feature.
- Set a timer.
Setting options
There is no need to configure options; all built-in functions do not require additional settings. The only thing you can do is change the language settings.
System Settings
Available in system parameters:
- Parental control. To log in you will need to enter a password consisting of six zeros.
- Setting a password for installed or standard applications.
- Reset settings to factory settings.
- Information about installed software, model data.
- Software Update.
Section overview
Now let’s take a closer look at each of the sections in the “Menu” in order to better understand where and what can be adjusted.
Section "Programs". Here you can adjust the operation of channels, sort the multiplex and use the TV guide function.
Options: channel editor, TV guide, sort, LCN auto-numbering (channel numbering), list update.
"Image" section . This category allows you to set the screen resolution, adjust the volume on one or all channels, change saturation, contrast and other things related to the picture.
Options: screen format, screen resolution, HF system (high frequency communication), speaker level change, OSD setting, LED display setting.
Section "Search". This section offers you to select a channel search range, sort by cable and antenna television broadcasts, set the search type and configure automatic.
Options: search range, search type, auto search, manual search, country, antenna power.
Section "Time". In “time” you can select a region, set a time zone or set the time yourself, as well as use the “Sleep Timer” and “Power Timer” functions.
Options: region and time, sleep timer, standby time, power timer.
Section "Settings". Responsible for setting the TV guide language, menu language and audio track.
Options: menu language, TV guide language, subtitle language, teletext language, audio track, digital audio.
Section "System" . “System” has such functions as setting parental controls and age restrictions for viewing channels. Here you can reset the settings and connect the console in a new way. There is also information about Wi-Fi connections.
"USB" section . Well, the last category contains all the settings related to viewing media files connected via USB and information about additional resources.
Options: multimedia, recorded files, recording settings, Internet.
How to connect the Selenga digital set-top box and configure channels
Connecting the Selenga digital set-top box to your TV is not difficult. Anyone can cope with the procedure; no experience is required, just follow simple instructions.
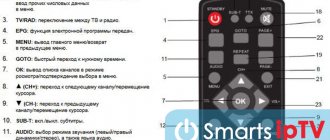
First, you should familiarize yourself with the designation of the keys on the remote control. In the future, the set-top box will be configured and controlled using it.
Why Mi Box doesn’t see WI-FI and doesn’t connect: reasons, what to do?
Connecting the device
First, let's take a look at the available connectors in Selenga set-top boxes. The manufacturer has provided:
- HDMI.
- RSA inputs.
- Antenna connector.
- Input for power supply.
Connection order:
- First of all, you need to insert the antenna cable into the appropriate connector; next to it you will notice the inscription “RF IN”.
- Connect the receiver to power.
- Then connect the last cable – HDMI. If it is not available, use RSA tulips, connecting them by color.
Initial settings
Once you have connected all the necessary cables, turn on the TV and select the connection type as “HDMI” or “VIDEO”. A menu will appear on the screen; use the buttons to specify the initial parameters:
- Choose language.
- Please indicate your country.
- In the “Search Type” tab, select “Open Channels.”
- Search range – DVB-T/T
- Then click "Automatic Search".
Flaws
- Cable channels are received better than DVB-T.
- From the outside it looks presentable, but it becomes obvious that the device is assembled from cheap components of not very high quality.
- The batteries for the remote control are not of good quality
- Automatic wide format mode does not work correctly. You have to manually configure it for your TV.
- The image may have a frame that cannot be removed. In automatic mode, some channels are shown in a small window format.
- On the remote control, the channel cycling button (“forward - back”) can work slowly, you have to press and hold, which causes you to jump through the channel. Channels change slowly.
- It happens that after turning off the remote control, after a few seconds the device turns on spontaneously. When you switch subtitles and audio tracks, the video continues to play, but the audio is delayed for a few seconds.
Possible problems and their solutions
We have looked at how to set up the Selenga set-top box; now we should look at common errors and problems that may arise during connection or further use. Common malfunctions include:
- The set-top box cannot find channels.
- There is no response to the remote control.
- No signal.
Selenga set-top box does not find channels
The cause may be an outdated software update. To solve the problem, go to the settings and in the “System” tab, check for updates. But the malfunction may also lie in the antenna used; it probably does not support the DVB-T2 standard. You will have to purchase a new one that can receive the required type of signal.
The console crashes and reboots on its own
- Reset your device to factory settings. The corresponding section can be found in the menu.
- Check for the latest firmware.
- Make sure the cable and power supply are working properly.
How to rename channels
This can be done in the “Programs” menu. There is a special option for editing TV channels.
How to connect Selenga to an old TV
Depending on the availability of certain inputs, you can connect the device via a Scart connector or an RSA adapter.
The console freezes
- If the tuner freezes when turned on, this is normal. This is how he establishes a connection.
- If freezing occurs on a regular basis, you will need to reset the receiver to factory settings and reconfigure the channels.
Doesn't respond to remote control
If the set-top box stops responding to the remote control, then first check the batteries. In addition, the reasons may be:
- The remote control itself is faulty.
- Large distance to the set-top box or interference between devices.
No signal
Often the “No Signal” error appears due to damage to the antenna or DVB-T2 cable. Technical work on the part of the provider may also be to blame.
Sources
- https://tvcifrovoe.ru/nastroyki/nastroyka-pristavki-selenga.html
- https://WiFiGid.ru/raznye-setevye-ustrojstva/adapter-wi-fi-selenga
- https://IPTV-Russia.ru/devices/pristavka-selenga/
- https://tnt-nazarovo.ru/tehnicheskie-sredstva/selenga-hd860-kak-podklyuchit.html
- https://smarts-iptv.com/kak-podklyuchit-i-nastroit-cifrovuyu-pristavku-selenga.html
- https://RuTvStar.ru/ustrojstva/kak-nastroit-selenga-t71.html
How to set up Selenga set-top box and avoid mistakes
Now smart technology TVs, set-top boxes and projectors are taking up more and more space in our lives while these projectors and set-top boxes are taking up more and more space in our homes.
Why? Because any set-top box is capable of improving the quality of television broadcasting, regardless of the TV model, plus, equipping it with additional functions and features. How to set up the Selenga prefix, and what is it? Selenga is one of the leading brands of digital DVB set-top boxes for TV. Its set-top boxes are famous for supporting almost all video and photo formats (JPEG, PNG, BMP, GIF, MPEG2, etc.) and the availability of additional Internet services (Youtube, Planer TV, Megogo, etc.). In this article we will figure out how to connect a smart set-top box and configure its operation - read on.