The transition to digital television has become widespread; now the TV in every family needs to be switched to a new signal reception format. The device can only be connected to DVB T2 by following the correct steps.
- What is digital television
- Procedure for setting up broadcast channels
- Manual setup of digital television
- How to set up TVs by manufacturer
- How to add local analogue channels
- How to set up digital channels on an old TV
- Problems and solutions
What is digital television
After the emergence of the new broadcasting standard, there was a lot of talk around it. The signal quality of this TV is much better, and you can connect to it from any device. Each viewer in the Russian Federation received access to the broadcast of 20 main channels.
Features of digital broadcasting
The new TV standard implies that the broadcast image and sound are transmitted to a special device using digitally encoded audio and video signals through certain channels.
The audio is supplied in MPEG-2 format, and the video is in MPEG-4. The formats are quite voluminous, which is why the DVB-T2 system is used to compress information.
Encoding the signal according to the new standard allows it to be transmitted with minimal losses, while delivering much better quality than the analog version, which was confused under the influence of external factors.
Limitations and search method
You can find publicly accessible digital channels using any connection option:
- via antenna;
- using a tuner;
- through an installed fiber optic cable;
- thanks to the Smart TV menu;
- via a satellite dish.
There are also difficulties. The TV channel either works well or is not received at all. This broadcast format does not suffer from interference, and the average distance is also not provided. If the signal is bad, any channel will simply start to slow down or turn off, and will not lose quality. To fix the problems, you need to turn the antenna connected to the receiver or to the TV itself in the correct direction. Perhaps it just needs to be raised higher, and replacement is required much less often.
Citizens with IPTV, satellite or Internet television do not need to carry out any manipulations. All channels in high quality will be available automatically. The rest will have to search and save free programs.
Questions and answers
During the process of installing equipment and setting up digital television, various questions may arise that are not covered in the instructions or subscriber’s memo.
How many digital channels will be available?
It all depends on the package and country of connection. There are 2 multiplexes available in Russia - 20 basic channels. In Ukraine there are 32 channels. If you connect through a provider, package channels will be available - from 50 or more, but a monthly subscription fee will be required.
Why did the message “no signal” appear on the screen?
If everything worked before, there could be two reasons - a broken cable plug or a bad signal due to maintenance work at the television station.
Why are not all channels displayed?
The standard terrestrial digital television package includes a limited number of channels. If a channel that is part of the connected multiplexes is not displayed, you need to check the signal level - there may be problems with the antenna.
Can I receive cable and digital channels at the same time?
Yes, this is possible, but this will require the additional use of a television signal adder. Such adders are usually sold in television equipment stores.
Why do channels freeze?
If during viewing the image on the screen begins to freeze or decompose into pixels, there is only one reason - signal deterioration due to a malfunction of the antenna or bad weather conditions. If you purchase a satellite dish, you don't have to depend on the weather.
Knowing the basic information on connecting and setting up digital television reception, you can independently make the transition to it from analogue technologies. If for some reason you cannot install the software or configure channels, it is better to contact a service center and entrust the task of switching to digital television to professionals.
5 / 5 ( 4 voices)
Procedure for setting up broadcast channels
First you need to make sure that the model really supports the DVB T2 standard. If the device does not support this type of signal, no problem.
You don't need to immediately buy a new TV to watch channels in the new quality standard. You can buy an additional receiver to watch high-quality TV on your existing old model.
The easiest way is to auto-tune.
The procedure will be the same for all brands of equipment:
- We connect the TV to the antenna. It must be clearly directed towards the nearest repeater, since, unlike VHF antennas, DVMs are extremely sensitive to the direction from which the signal is coming.
- Open the menu on the remote control.
- We are looking for the “Options” / “Settings” section.
- Find the item “TV” or “Reception”.
- We set the type of signal source - antenna (needed to find on-air programs) or cable. Select the source to which the TV is connected.
- Click to start auto-search (for cable and satellite TV, the frequencies used by providers are indicated; terrestrial ones can be found without manual tuning). Select the “Digital” option and click on “Start”.
- The TV will begin searching and then display a list of channels found. Click on “Ok”, after which the device will save all programs.
Almost all TVs older than 2013 will be able to receive DVB-T2 without a receiver. In other cases, additional equipment will still have to be purchased.
Checking for digital TV support on DEXP
Before proceeding directly to the setup, let’s make sure that your equipment supports digital terrestrial TV reception. This function is only available on models that support the DVB-T2 broadcast standard.
To check for DTV support, enter your TV model number in the Search box in the table below. If it is found, feel free to start setting it up - your receiver can pick up “digital” without additional attachments.
| Model | Diagonal | DVB-T2 support |
| 22A7100 | 22 | + |
| 22A7200 | 22 | + |
| 24A7100 | 24 | + |
| 28A3000 | 28 | + |
| 32A3000 | 32 | + |
| 32A3100 | 32 | + |
| 32A3200 | 32 | + |
| 32A7000 | 32 | + |
| 40A7000 | 40 | + |
| 40A7100 | 40 | + |
| 42A7000 | 42 | + |
| 42A8000 | 42 | + |
| 42A8100 | 42 | + |
| 42A8200 | 42 | + |
| 42A9000 | 42 | + |
| 46A7000 | 46 | + |
| 49A8200 | 49 | + |
| 50A7000 | 50 | + |
| 50A7100 | 50 | + |
| 50A8000 | 50 | + |
| 55A8000 | 55 | + |
| F22B7000C | 22 | + |
| F22B7000E/B | 22 | + |
| F22B7000E/W | 22 | + |
| F22B7100EE | 22 | + |
| F22B7200C | 22 | + |
| F22D7100E | 21.5 | + |
| F24B7000C | 24 | + |
| F24B7000E | 24 | + |
| F24B7100EE | 24 | + |
| F24B7100K | 24 | + |
| F24B7200C | 24 | + |
| F24B7200VE | 24 | + |
| F24D7100E | 23.6 | + |
| F24D7200C | 23.6 | + |
| F32C7000B | 32 | + |
| F32C7100B | 32 | + |
| F32C7100B/W | 32 | + |
| F32D7000B | 32 | + |
| F32D7000C | 32 | + |
| F32D7000C/W | 32 | + |
| F39B7000VD | 39 | + |
| F39B7100E | 39 | + |
| F40B7000C | 40 | + |
| F40B7000E | 40 | + |
| F40B7000H | 40 | + |
| F40B7000K | 40 | + |
| F40B7100K | 40 | + |
| F40B7200C | 40 | + |
| F40B8300K | 40 | + |
| F40C7100C | 40 | + |
| F40C7100K | 40 | + |
| F40C8000H | 40 | + |
| F40D7100C | 39.6 | + |
| F40D7200C | 40 | + |
| F40D7200C/W | 40 | + |
| F42B7000ED | 42 | + |
| F42B7000M | 42 | + |
| F42B7000T | 42 | + |
| F42B8000H | 42 | + |
| F42B8100K | 42 | + |
| F42C7000E | 42 | + |
| F43B7200С | 43 | + |
| F43B7200S | 43 | + |
| F43B8000H | 43 | + |
| F43B8000K | 43 | + |
| F43C7000C | 43 | + |
| F43C7100K | 43 | + |
| F43C8000H | 43 | + |
| F43D7000K | 43 | + |
| F43D8000K | 42.5 | + |
| F43D8100H | 43 | + |
| F46B7000MD | 46 | + |
| F48B7000M | 48 | + |
| F48B7000V | 48 | + |
| F48C7200K | 48 | + |
| F48D7000K | 48 | + |
| F48D8000K | 47.6 | + |
| F49B7000T | 49 | + |
| F49B7200C | 49 | + |
| F49B8000K | 49 | + |
| F49B8100K | 49 | + |
| F49B8200K | 49 | + |
| F49C7000C | 49 | + |
| F49C8000H | 49 | + |
| F49D8100H | 48.5 | + |
| F50B8000H | 50 | + |
| F55B7000T | 55 | + |
| F55B7200C | 55 | + |
| F55B8000H | 55 | + |
| F55B8000K | 55 | + |
| F55B8100K | 55 | + |
| F55B8200K | 55 | + |
| F55C7000C | 55 | + |
| F55C8000H | 55 | + |
| F55D7000E | 54.6 | + |
| F55D7000K | 54.6 | + |
| F55D8000K | 54.6 | + |
| h29B7000С | 19 | + |
| h29B7000E | 19 | + |
| h29D7100E | 19 | + |
| H20B7200C | 20 | + |
| H20C7200C | 20 | + |
| H20C7200C/W | 20 | + |
| H20D7000E | 19.5 | + |
| H24B3000EE | 24 | + |
| H24B7000E | 24 | + |
| H24B7100 | 24 | + |
| H24C3000E | 24 | + |
| H24C7200C | 24 | + |
| H24D7000E | 23.6 | + |
| H28B7100C | 28 | + |
| H28B7100E | 28 | + |
| H28C7100C | 28 | + |
| H28D7200K | 28 | + |
| H28D7300K | 28 | + |
| H32С8000H | 32 | + |
| H32B3200CD | 32 | + |
| H32B3400ED/A | 32 | + |
| H32B7000C | 32 | + |
| H32B7100K | 32 | + |
| H32B7200C | 32 | + |
| H32B7200T | 32 | + |
| H32B7300C | 32 | + |
| H32B7400C | 32 | + |
| H32B8200K | 32 | + |
| H32C7100C | 32 | + |
| H32C7200K | 32 | + |
| H32C7300K | 32 | + |
| H32D7000E | 32 | + |
| H32D7000M | 31.5 | + |
| H32D7000Q | 31.5 | + |
| H32D7100C | 32 | + |
| H32D7100K/W | 32 | + |
| H32D8000Q | 31.5 | + |
| H32D8100H | 32 | + |
| H39D7000E | 39 | + |
| H39D7000Q | 38.5 | + |
| H39D7100E | 39 | + |
| H39D8000Q | 39 | + |
| U40B9000H | 40 | + |
| U42B9000K | 42 | + |
| U43D9100H | 42.5 | + |
| U43D9100K | 42.5 | + |
| U49B9000K | 49 | + |
| U49D9000K | 48.5 | + |
| U50B9000H | 50 | + |
| U55B9000H | 55 | + |
| U55B9000K | 55 | + |
| U55B9100K | 55 | + |
| U55D7100E | 54.6 | + |
| U55D9000K | 54.6 | + |
| U58B9900H | 58 | + |
| U65D9000K | 64.5 | + |
Manual setup of digital television
Connecting digital broadcasting to a model equipped with a receiver is carried out in almost the same order. There is no need to pay for the services of a specialist to connect to a new type of broadcasting. You can do it yourself.
General manual setup procedure
The models differ only in the sequence of steps and the names of the necessary items and sections. But to set it up yourself, you will need to know the local digital broadcast frequencies.
The procedure will be different:
- First, using the RTRS online service, we determine our location and click on it. Then the form that appears will indicate the digital broadcast frequencies for 2 towers located nearby. The specified values will need to be entered into the TV.
- Open the menu and look for “Settings”.
- Click on “TV”, but instead of the auto search section, select the item.
- We install an antenna as a signal source.
- Enter the frequency values (in MHz) and channel numbers (TVK) from the 1st multiplex into the empty lines.
- Let's start searching for programs. After its completion, the found channels must be saved in memory.
- We repeat all the steps, but now enter the data of the 2nd multiplex.
This completes the setup and you can start viewing.
It is necessary to find out and enter the data of both multiplexes, since each of them is responsible for broadcasting different digital channels.
RTRS service to help
To make it easier for citizens to set up programs on their own, the rtrs.rf service was created.
The portal presents an interactive map of digital television broadcasting, thanks to which you can find out:
- current status of the tower operating on the DVB-T2 standard (repeater is active, under construction);
- distance from the nearest TV towers, as well as direction relative to the apartment;
- names of channels and frequencies of broadcast packages in the 1st and 2nd multiplexes;
- information about the company servicing the transmitter in your area of residence;
- addresses of points where equipment for connecting to television is sold.
The site provides up-to-date information at any time, presented on an interactive map for convenience. You can find out the direction leading to the repeater using the compass arrow icon.
Setting up TV DNS
TV DNS instructions
DNS TV model DNS M32DM8, according to the operating instructions, has the following technical characteristics: Color system - Pal, Secam, NTSC Digital tuner - DVB-T/T2, DVB-C Maximum image resolution - 1366x768 Static contrast - 1000:1 Response time - 6.5 ms Power consumption - 65 W Supply voltage - 110-240V 50/60Hz Connectors - Component video input, composite video input, SCART video input, PC audio input, PC video input, 3 HDMI inputs, antenna input, digital audio output Information interface - USB 2.0, CI input Supported file systems - NTFS, FAT16, FAT32 Remote control - Range 7m, angle 30 degrees, infrared
TV remote control DNS
The DNS TV remote control with the designation of control buttons in various modes is shown in the figure:
STANDBY: Turn on the TV DNS / Go to standby mode MUTE: Instant mute / unmute button SOURCE: Select the signal source P.MODE: Select preset picture modes S.MODE: Select preset sound modes AUDIO: Select the audio language P.SIZE: Change screen format 0-9: Numeric buttons for entering the TV channel number FAV: Displaying a list of favorite channels SLEEP: Turning on the sleep timer RET: Button to return to the last watched channel MENU: Calling up the on-screen menu INFO: Displaying information about the current channel EXIT: Exiting the Menu UP: Cursor Up button OK: Confirm selection LEFT: Left cursor button RIGHT: Right cursor button DOWN: Down cursor button V+: Volume up V-: Volume down P+: Go to next channel P-: Return to previous channel TEXT: Turn teletext mode on/off HOLD: Turn on/off the hold mode of the current page TV/RADIO: Switch TV/Radio modes SUBTITLE: Turn on subtitles SIZE: Resize the teletext window SUBPAGE: Jump to teletext subpages REC: Start recording in digital TV mode EPG: Electronic program guide in mode digital TV Play: Play/Pause Stop: Stop playback Rev: Fast forward Fwd: Fast reverse Back: Previous file Go: Next file Color: Colored buttons provide quick access to the correspondingly colored objects at the bottom of the screen.
On our website you can download the TV remote control, location and designation of remote control buttons, as well as instructions and User Guide
How to set up TV DNS
How to set up DNS TV - for the first time. Connect the antenna cable to the RF-in connector. To set the menu language and system messages, press the left and right buttons in the corresponding item. Configuring the TV DNS to select the country of residence is necessary to install the regionally accepted color system and intermediate frequency audio parameters. Next, you need to configure the tuner to receive terrestrial DVB-T or cable DVB- From channels The next item - Autosearch - will allow you to configure DNS for digital, analogue or both digital and analogue television channels.
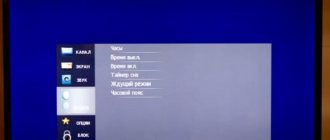
Main menu functions
The main menu of the DNS TV consists of several submenus: Picture menu: allows you to adjust the parameters of brightness, contrast, saturation, sharpness and color tone; image color temperature; aspect ratio of the picture; noise reduction and dynamic contrast. Sound settings menu: select a preset sound mode; adjusting the frequency response and sound balance; turning on panoramic sound, equalizer settings; turning on automatic volume level; turning on digital audio output Channel settings menu: allows you to select the type of incoming signal from an terrestrial or cable antenna; auto search for television channels; selection of country of presence and signal type (digital, analogue); scanning type - quick, full, additional; manual search for television channels individually Editing channels: here you can remove interference channels, sort television programs in the desired sequence Menu for blocking the TV system CSN: blocking individual channels, parental control, blocking buttons on the body, changing the password Settings menu: menu language can be configured; audio language; subtitles; mode for the hearing impaired; teletext settings; time settings; sleep timer and auto shutdown PC settings menu: automatic adjustment of image quality and its position on the screen;
How to set up TVs by manufacturer
Since device interfaces differ, each TV is configured according to separate instructions. Below are algorithms of actions for equipment from popular companies.
Important! Even TVs of the same brand may differ in interface, so it is best to open the instructions for the device. If the paper version has not been preserved, you can find the document on the Internet by the name of the model.
LG
Instructions will be slightly different for newer and older TV versions. For older models, you will need to purchase a special device for receiving a digital signal, but the sequence of steps will still remain almost the same.
The general procedure is as follows:
- Click on the “Settings” button on the remote control, or on the gear button.
- Select the “Channels” option in the settings menu (usually this item has an image in the form of a satellite dish).
- In the new subsection, click on “Autosearch”. You can also find the necessary channels manually, but this will take more time.
- In the next window, click on the “Cable TV” item, and uncheck the boxes next to the other lines.
- The device will ask you to select the operator you are looking for. We stop at the “Other operators” option, then click on the “Ok” button on the remote control.
- A window for setting up the digital cable will appear. You need to select the option “Full”/“Full” - this is how the search mode is indicated.
- Put a checkmark next to the item “Skipping encrypted programs” (another name is “Skipping encrypted channels”) and click on “Ok”. If you don't do this, the TV will start searching for a bunch of channels, not all of which will be available after the search is completed.
- In the next window, check the box next to the “Digital only” (or “Cable TV”) option.
- Click on the “Run” button, then on “Ok”. The device will begin searching for channels, the process may take a couple of minutes.
After completion, you need to exit the settings and open the TV. The TV will find high quality channels and, possibly, several radio stations.
New models from LG are equipped with an auto-update function, thanks to which the TV periodically resets previously found channels and starts searching again.
The function can be disabled at any time by opening the “Digital cable settings” section and unchecking the box next to auto update.
Samsung
To connect publicly available 20 free channels on Samsung devices with a built-in receiver, you need to proceed as follows:
- Activate the antenna.
- Open the menu by pressing the “Home” button on the remote control.
- Go to the “Channel” section (marked with an icon in the form of a satellite dish).
- In the list of tabs on the side you need to find “Antenna”, then specify “Cable” as the connection.
- Open the “Country” tab, after clicking on it, select the “Other” option.
- The TV will ask for a PIN code. Enter "0000".
- A window will appear where you need to specify “Cable” as the signal source in the auto-tuning menu.
- Click on the quick search mode line, then look for an option with automatic network selection, then click on “Search”.
Now the device itself will find and start showing 20 standard channels.
Samsung sells many different series of TVs, so the names of the buttons and the sequence of actions can vary greatly from model to model. The model range consists of M, Q, K, J, LS, H. You need to open the instructions for the existing model.
Sony
The procedure for connecting channels according to the new standard on Sony devices is as follows:
- Open the menu.
- Click on “Settings”.
- In the new window, click on “Digital Configuration”, then on “Ok”.
- Select the “Digital Setup” item.
- Click on “Auto search for digital stations”.
- Near the line that appears “Do you want to start automatically searching for stations?” Click “Ok”.
- Select “cable” as a connection option, then set “quick scan”, then indicate the search method – “Manual”.
- We indicate the appropriate broadcast frequency.
- We leave the “Auto” option as the access code, then enter “7000” in the “Symbol speed” line.
- Click on “Start” and wait until the search and selection of channels is completed.
To configure Sony Bravia series models, you need to proceed in a different order:
- Open “Settings”.
- Go to “Options”, then activate the “Auto Configuration” mode.
- We select the appropriate signal type, namely “Digital TV”.
- We indicate the signal source and begin scanning.
Philips
The setup algorithm for finding 20 digital broadcast programs on TV from Philips differs little from the general instructions. First, you still need to activate the antenna, then open the device menu.
The further procedure is as follows:
- Find the “Configuration” section in the menu.
- Select the “Install” option.
- In the additional window that appears, activate the “Channel Settings” option.
- Another submenu will open where you need to click on the “Automatic installation” tab. Before moving to a new subsection, a notification will appear indicating that the list of available channels will be updated.
- Click on “Start”, then select the “Reinstall channels” tab.
- Click on the “Country” item, indicate Germany/Finland.
- The device will ask for a suitable connection method. You need to select the “Cable” option.
- There are still a few changes left to make. Click on the “Settings” button, then on “Baud rate”, after which we indicate “314.00”.
At the end, you need to click on “Start”, after which the TV itself will find and configure 20 over-the-air channels.
Other brands
Toshiba TVs, equipped with a built-in reception device, easily find digital channels. After activating the antenna, you need to open the device menu using the remote control, setting the language to Russian, if this has not been done previously.
Next in the settings you will need to click on “DTV Manual setup”. Then you will need to enter the necessary data in the empty lines and click on “Ok”. Having finished connecting, the TV itself will find and debug the display of all 20 publicly available programs.
Deleting and sorting channels
After all TV channels have been found, some of them can be deleted or sorted (assign a number on the remote control):
- Use the “Up” and “Down” buttons to select the desired program from the list of previously found ones.
- To delete a channel, press the red button on the remote control. After this, its broadcast frequency will no longer be monitored by the TV.
- To rename (in ATV mode), use the green button. After clicking it, you can change the name of the element selected from the list.
- To move the channel you will need the yellow button on the remote control. The selected item from the list becomes active. Using the “Up” and “Down” buttons you can move it to the desired position.
How to add local analogue channels
Terrestrial TV was transferred to the new standard in January 2021, but local channels continued to broadcast. In addition to the operation of 2 federal multiplexes, the regions show their analogue TV channels. They can also be included in the list of channels to watch.
The procedure is as follows:
- We point the antenna towards the repeater, then turn on the search mode for analog channels.
- The further choice of actions is chosen based on the brand of the device. On Samsung TV, you need to manually indicate that it is necessary to search for analogue broadcast programs, and not digital ones. On other TVs, you need to specify the “Analogue TV” option to clarify the search mode.
- When all TV channels have been found, they need to be saved in the set-top box’s memory.
Why doesn't automatic tuning of TV channels work?
Modern models of television receivers support both manual and automatic channel tuning. Most TV viewers use automatic search, which copes with the assigned tasks perfectly; the user can only remove unnecessary channels from the presented list.
However, for various reasons, sensitive equipment may not be able to recognize the scan range or signal source. In this case, the procedure must be carried out manually.
As practice shows, there are no particular advantages in choosing one or another method of setting up channels. And if the automatic mode can save the user’s time and is suitable even for inexperienced TV viewers, then the second option will require more time and special knowledge, but at the same time provides more detailed channel settings even with poor reception quality.
In particularly difficult cases, you should use the services of a professional teleworker. The cost of his services will depend on the region of residence, distance from the workshop and the company’s pricing policy. In addition, today there are a number of volunteer organizations that help everyone switch to the new broadcast format free of charge.
How to set up digital channels on an old TV
Devices older than 2013 did not have the required decoder installed, so to connect digital channels you first need to purchase a set-top box and connect it to the TV. Next, the connection is configured in the menu of the set-top box itself.
Set-top boxes not only allow you to catch a signal in the new standard, but also have a number of other advantages:
- HDTV support;
- child control function;
- the ability to record programs on USB;
- connecting a Wi-Fi adapter;
- activate delayed viewing.
You can watch not only TV channels from the set-top box, but also videos from the Internet. The device can be connected to the TV itself via RCA and HDMI outputs.
What if the TV does not support digital TV?
If your TV model still does not have its own internal factory tuner, but you are not ready to purchase a new TV, buy a special set-top box for broadcasting television for free.
It is better if you purchase a set-top box specifically for the DEXP TV. Prices vary from approximately 1000 to 1500 rubles.
The manufacturer offers quite a few options, from those that have the standard you need, for example:
After purchase, the set-top box will need to be connected and configured. The set-top box always comes with detailed instructions and step-by-step diagrams, with the help of which its purpose can be realized without unnecessary problems.
How to switch manually?
- Before setting up manually, you should find out the parameters of the digital channel:
- frequency;
symbol rate;
- modulation.
- Then you should repeat the steps for setting up channels, but instead of “Auto search”, select “Manual tuning”.
- In the window that opens, enter the parameters from the television company’s website and start the search.
This data can be found on the website of the company providing digital broadcasting in your region.
This method allows you to configure channels faster than with auto search, because the device searches in a certain range.
The final stage of setup is working with image quality
Quite often there are situations when, after completing the search and settings of the program, they are broadcast in poor quality. In order to improve picture clarity and eliminate other defects, you can perform the following steps:
- enable the HD option in the settings;
- select the picture broadcast mode, for example, for Samsung and LG TVs, the “Cinema” mode is considered the best option;
- manually set the contrast, brightness and colors of the image.
As practice shows, you only need to spend time and effort once to understand the TV settings and compile a list of saved TV channels, in order to subsequently comfortably watch any films and programs, without being distracted by annoying little things and problems that can ruin anyone’s mood.
Source
What is needed for successful setup
You can configure your TV to receive 20 channels of digital terrestrial television if a number of conditions are met.
- Correct antenna. If you previously watched analogue channels and did not buy a new antenna for digital ones, then the setup will not work. The antenna will not receive a signal from the digital broadcast repeater. An analog signal is transmitted in meter-long waves. A digital signal is broadcast in decimeter waves. In each case, the antenna design is different. The length of the receiving element (vibrator) is made to match the wavelength. This means that for analogue broadcasting you need a “meter” antenna, and for digital broadcasting – a “decimeter” antenna. In addition to factory ones, you can make an antenna yourself. The homemade design is only suitable for receiving a strong signal. The TV tower should be located at a distance of no more than 15 km.
- The correct location for installing the antenna and its direction. It is better to place the antenna outside so that there are no barriers to the signal in the form of walls. The higher the antenna is, the less likely it is that there will be obstacles in the signal path, for example, tall buildings, hills, etc. Directivity also affects the quality of the signal. It is better to find out the location of the tower and point the antenna towards the broadcaster with an accuracy of a degree.
- Coaxial cable that connects the antenna to the television receiver. One end of the cable is connected to the antenna. The second has a connector that is inserted into the antenna connector of a TV receiver or T2 tuner.
- The TV allows you to configure digital channels. This means that the equipment must have a built-in DVB-T2 tuner. All modern TVs, especially those with Smart TV, have a built-in digital receiver. On your old TV you need to make sure it supports DVB-T2. You can verify support for the digital standard from the documentation for your TV. Additionally, you can enter the model code in the search, go to any website and look at the characteristics. The line “DVB-T2” should contain “+” or “Yes”. There may be other line names. For example, the line “Built-in tuners”, which lists all supported television standards. You can check the presence of a “digit” experimentally. Go to TV settings or TV channel search mode. If there is no choice of broadcast type (analog or digital), then DVB-T2 channels cannot be configured. You'll have to buy a new TV or use an external digital tuner.
When all conditions are met, you can set up digital television.
Why might problems arise and how to solve them?
Some problems may arise when setting up digital broadcasting . But they are all solvable.
No image
This problem occurs when connecting via a set-top box.
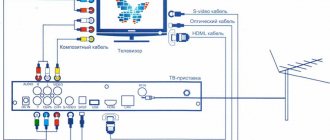
If there is no image on the screen, it may mean that it is not connected correctly. The receiver is connected to the TV using an HDMI cable or RCA-RCA. The antenna is connected to the receiver.
Even if the antenna does not work, there should be an image of the set-top box menu on the TV screen. If it is not there, the problem may be one of the following :
- incorrect connection (wrong video input);
- problems with the cable or connectors;
- Set-top box not included.
The first step is to check the receiver . When the device is turned on, there is a green or red light indication. If the set-top box is connected, but there is still no image, you should make sure that the connection is correct.
- Most often, the receiver is connected using an RCA cable with three tulip connectors of different colors: white, red, yellow. If you use an RCA cable, you need to make sure that it is connected not to the output, but to the input of the TV. The input is indicated by the INPUT (I) indicator. output – OUTPUT (O).
- Older TVs may not have a port for the red tulip, in which case it is simply not used. On TVs with a universal input, a green-yellow connector may be used instead of a yellow connector. This input can also be used.
- Some TVs have a built-in comb input instead of an RCA input. Typically, digital receivers are not equipped with a cable for connecting to such an input. In such cases, you should purchase an RCA - SCART adapter. More modern TVs can be connected to the set-top box using an HDMI cable. The image with it will be clearer and the sound clearer.
If the TV and set-top box are connected correctly, but the receiver menu still does not appear on the screen, you should make sure that the correct video input is connected. Switching is done by pressing a button on the TV remote control, which in different models may be called:
- AV/TV;
- AV;
- INPUT/OUTPUT;
- graphic image of a circle with an arrow.
To select the appropriate video input, press the button until the set-top box menu appears on the screen.
Can’t tune in, channels are missing or lost
If your TV does not find all the channels available in your region, you should:
- make sure that the antenna is connected to the set-top box and not to the TV;
- check whether the contact in the antenna connector is good;
- clarify the number of channels available for a given locality;
- move the antenna higher, change its direction or replace it with a more powerful one.
Where to go for help?
In conclusion, let’s talk about what to do if, despite all efforts, the channels are still not configured. If problems arise with the setup that the subscriber cannot solve on his own, you can ask for help:
- To the official LG website. In the "Support" section there are video instructions for reconfiguring TVs.
- To the technical support service of the company broadcasting in the region.
- To the official website of the Russian television network rtrs.rf (watch digital.rf).
Currently, there are companies that charge a fee to reconfigure televisions to receive digital channels. But many subscribers can do this on their own using the instructions from this article.
Connecting two or more TVs to one set-top box
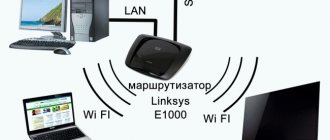
The ideal option is to connect one TV to one set-top box. Therefore, the optimal solution would be to purchase separate receivers for TV devices. Naturally, this will not be the most budget-friendly way to solve the problem. The user connects the cable to the splitter, and then from each input it goes to separate receivers. The connection diagram is as simple and clear as possible.
If you wish, you can connect a second TV to one set-top box; to do this, you just need to use all available interfaces. For example, we connect the first device via HDMI, and the second using “tulips”.
Connecting digital TV using this principle is not the best option, since both TVs will receive an identical signal. In other words, the picture is synchronized, you cannot watch different TV channels at the same time.
An additional solution to the problem is to purchase an RF modulator that will supply separate decoded signals to TVs. However, the cost of such a device is significantly higher than the price of a conventional receiver.