To connect the receiving equipment to the Internet, it is recommended to use an Ethernet cable.
To access the Internet via cable (wired connection), an Ethernet cable is connected directly to the receiver. When connecting receiving equipment wirelessly to the global network, the Ethernet cable is connected to the corresponding socket of your router.
After that, go to the “Internet” subsection (Settings section) and select the required connection type – via cable or Wi-Fi.
Connecting the Tricolor receiver via Wi-Fi
To establish a connection between the receiver and the equipment necessary for the operation of a computer network via a router (Wi-Fi), initially make sure that your router supports the DHCP protocol and this function is active. It is recommended that the data transfer speed be at least 5 Mbit/s.
If you are using a wireless connection, you can establish and/or change the connection parameters between the equipment necessary for the computer network and the receiver as follows:
4. If the connection is successful, a corresponding notification will appear on the screen.
If you have already connected to the selected Wi-Fi network before, you can reconnect like this: click the “Connect” button on the screen and then follow the steps indicated in the last two paragraphs.
If you have an invisible Wi-Fi network, to add it yourself, do the following: select “Add network” (it is last in the list of networks) and press “OK” on the receiver’s remote control. Using the virtual keyboard, write the name of the network, then you will need to select the encryption type and, if necessary, enter a password. Press the “Connect” button, you should also confirm the command by pressing the “OK” button on the remote control of the receiving equipment.
Prices and tariffs
The price of Tricolor via the Internet without a dish depends on the type of connection chosen: Online or Unlimited Internet. Satellite connection package for PC is: from 816 rub. per month. To work without an antenna via Online – 2000 rubles per year.
The price for set-top boxes and interactive Internet receivers ranges from 2,000 rubles to 10,000. The price depends on technical features and the possibility of fast data transfer. Improved and new models are eligible for the Buy Now promotion.
In 2021, discounts were offered: if a user took out a loan and received a credit card from Pochta Bank, he could watch a year of Tricolor for one ruble. To do this, you had to deposit the specified amount into your account and also check your ID on the promotion page. Subscribers with outdated receiving equipment could not take part in the draw.
Using the above tips and instructions, you can choose any of the ways to connect Tricolor without a dish via the Internet.
Wired connection of the Tricolor receiver to the Internet
When you select a wired connection, the receiver tries to connect to the network automatically. If the connection is successful, a notification will be displayed on the monitor.
If you encounter problems connecting to the global network in automatic mode, setting up network settings yourself will help correct the situation:
- How to connect Tricolor to the Internet and TV yourself
- Press the “Change settings” and “OK” buttons on the receiver’s remote control.
- Uncheck the box next to the “Detect settings automatically” option and press the “OK” button.
- After selecting “Change”, click “OK” again.
- Using the virtual keyboard, configure the required network settings.
If you do not know the network parameters, you should seek help from the specialist who set up the router. This information can also be obtained from the support staff of your Ethernet operator.
Correctly setting up the Tricolor receiver will give you the opportunity to quickly gain access to watching your favorite TV shows. To avoid connection problems, you should follow all instructions provided by the equipment manufacturer.
Setting up the Wi-Fi radio module of the router
If you are using a device with a Wi-Fi access module that needs to be connected to the Internet, then you must additionally configure the wireless connection settings in the router.
To do this, open the “Setup” tab, select “Wireless Setup” in it and press the “Manual Wireless Connection Setup” button.
“Wi-Fi Protected Setup (Also called WCN 2.0 in Windows Vista)” - used to automatically configure devices that support this standard. It is mainly supported by the Windows Vista and Windows 7 operating systems. If your device does not support this standard, then it must be disabled by removing o.
In “Wireless Network Settings” you can configure the basic Wi-Fi parameters: “Enable Wireless” - when this item is checked, the Wi-Fi module of the router is activated, otherwise it will turn off; “Wireless Network Name” - this field specifies the name of the router that will be displayed to other wireless devices; “Enable Auto Channel Selection” - when this item is checked, the router itself will select the working channel, otherwise in “Wireless Channel” you will need to select the channel number on which the router’s radio module will operate; “Transmission Rate” - allows you to set the data transmission rate of the radio module, mainly set in automatic mode - “Best (automatic)”; “WMM Enable” - when this item is checked, priority is given to multimedia traffic; “Enable Hidden Wireless” - when this item is checked, it allows you to hide the router’s Wi-Fi module on the air, but it significantly complicates the configuration of connected devices.
In “Wireless Security Mode” you can select encryption of transmitted data, if it is supported by your device connecting to the router. DIR-320 supports encryption protocols: WEP, WPA and WPA2. Otherwise, “Disable Wireless Security” is indicated.
After completing the Wi-Fi settings, click the “Save Settings” button to save the selected parameters.
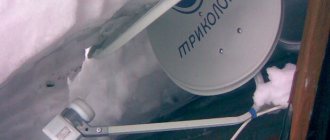
Finding the antenna installation location
The correct choice of antenna localization point allows you to receive a high-quality television signal from the satellite. The equipment is mounted near an apartment window or on the roof of a residential building, depending on its location. Antennas are not installed on loggias or inside apartments. The main requirement for correct installation is a continuous path of the beam from the outgoing to the incoming point; during its passage there should be no extraneous interference in the form of trees, houses, etc.
Satellite dish assembly
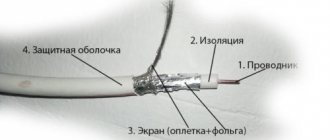
Installation yourself is carried out strictly according to the instructions supplied with the plate, which explain the nuances of assembly; at the end of the procedure it should be secured as much as possible. A television cable is connected to the receiver, which is secured with ties to the bracket, and the F-connector is attached to it - after stripping the wire 1.5 cm from the insulation. The next step is to connect the receiver to the antenna convector and then configure it.
Adjust the antenna
The antenna angle and azimuth are set according to the table:
- Tricolor TV does not show - no signal, channels are not shown
If other antennas are installed nearby, you can navigate by their parameters.
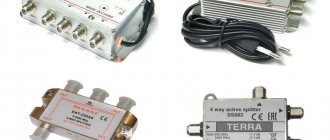
Connecting the receiver
This is done in several ways:
Leave your review or complaint - Ask a question
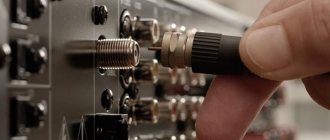
- antenna cable - for high-frequency connection;
- a regular cable - for a low-frequency connection, at the ends of the wire there is a “bell” or “skart” tip.
After selecting the current connection, the television socket is connected to the output in the receiver - “RF Out”. The receiver is connected to the mains, and the power button is pressed. If everything is done correctly, “BOOT” and the TV channel number will appear on the screen. An automatic channel search starts until a message about a missing signal is detected. This phrase indicates the correct connection of the equipment.
With a low-frequency connection, it is necessary to set the “audio-video” mode on the TV remote control, after the “BOOT” appears, the TV channel number. A missing signal message indicates that all procedures were carried out correctly.
Setting up the Tricolor TV receiver yourself
After all the steps, the reception of the satellite channel is checked - any TV channel is displayed on the TV screen. The screen displays the date and time, the name of the TV program, serial numbering - what the satellite is broadcasting at a given time. Lack of precise settings results in a blue monitor color.
How to set up the Tricolor TV receiver at home yourself:
- Personal account "TRICOLOR TV": login, registration, receiving and recovering password
- pressing the “i” button – two types of detection of the incoming signal will appear on the monitor;
- if the indicators are less than 70%, you should check the connection of all wires;
- reconfigure the antenna a second time - move slowly until the scale is filled to 70%.
After obtaining the required quality of the TV signal, you should tighten the antenna adjustment nuts tightly - otherwise, it will move a little during strong wind gusts and will require additional installation.
The lack of television broadcasting and the impossibility of installing equipment yourself can be solved by calling a dealer. The technician will install the equipment himself, connect the receiver and debug the channels. If necessary, it will help you reconfigure the receiver.
Technical support specialists remind you that the level of the incoming signal directly depends on weather conditions. Cloudiness, rain, and wet snow worsen the performance, until the image disappears from the monitor.
Setting features include signal reception clarity scale indicators. Individual receivers may operate under other parameters and require a step-by-step and detailed connection diagram: gs 8304, gs 8302, gs 8300n, gsu510, gsb533m, gs b210, gs 8306, gs b211. The necessary information is provided by the Tricolor company on its official page.
How to connect Tricolor without a dish via the Internet
The ability to watch high-quality satellite television without a dish has become possible with the introduction of a new generation of functional set-top boxes. Now, to exchange data with a satellite, you just need to connect the receiver to the Internet via a standard Ethernet cable.
The functionality of such devices may include:
- access to channels included in the package of services;
- additional services for online viewing of films and TV series;
- the ability to pause the broadcast and rewind it;
- recording and storing your favorite fragments in the cloud;
- synchronization of one receiver with several TVs;
- other software features that depend on the specific model used.
Such devices are compact and do not require extensive wiring. Weather conditions will also no longer interfere with comfortable viewing, which is important for some regions of residence.
Ways to troubleshoot possible setup problems
In order to accurately configure the Tricolor TV receiver when there is no signal, you need to check the power supply, connection to the TV, reliability of fastening in the connector, and absence of damage to the cables.
- When using a low-frequency connection, press the “audio-video” key on the TV remote several times – the operator has provided several inputs.
- If the Tricolor menu appears on the monitor and there is a message about a missing signal, the question is about urgent communication with the satellite. After reconfiguring the antenna, it should resume. In other cases, the inscription informs about the preventive work of the provider.
- The inscription about the encrypted channel suggests the absence of payment for operator services or an unregistered receiver. Such TV channels require paid decoding - they are broadcast separately or included in the overall package. Help in resolving the issue can be obtained from the provider operator.
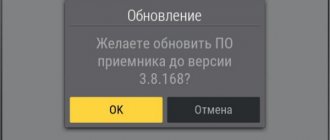
Once the settings are complete, you will be prompted to update the software with a complete list of all available TV channels. Newly purchased equipment must be registered with Tricolor.
Other connection methods
In addition to receiving a signal from a satellite dish or via Wi-Fi, the receiver can operate from an Ethernet cable and a 3G\4G modem. To configure a receiver with such connections, you just need to select the appropriate type of “connection” and wait for all settings to be automatically applied. In rare cases, mainly due to software errors, you may need to enter data manually.
All data can be taken from the agreement with the provider. If necessary, call your Internet operator.
We’re done with the topic of television for today. If you have any questions or suggestions, I’ll be happy to chat! Don't lose, always stay in touch!
Registration of receiving equipment
Having completed the installation and configuration of the equipment, exit the “menu” mode by double pressing the “exit” button. To register the receiver, the following documentation is required:
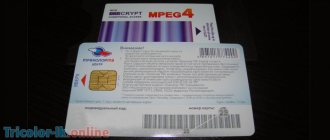
- individual Tricolor smart card number;
- receiver serial number;
- code indicated on the card;
- owner’s personal documents – passport;
- exact address of the installed equipment.
The simplest registration is done through the official Tricolor page. There is a special form on the website, after filling which the card is activated. The confirmed contract is downloaded and printed from the page, it must be certified with a signature and sent by mail to the company’s address. The document will be returned endorsed by the person responsible for registration.
The second option for registering a set of equipment is through an operator, by telephone call. The number is listed on the Tricolor website.
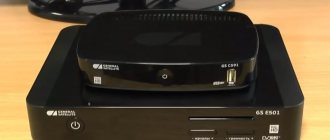
Internet connection on TV-Box
The TV-Box receiver is the latest model equipment that supports wired and wireless connections. This includes GS AC790 and GS C593.
Wi-Fi connection
To set up the Internet without unnecessary wires, you need to connect the cable to the Ethernet port on the router and to the antenna. Next, you need to check whether the device is capable of supporting data transfer to the receiver. To do this, you need to see if it has a DHCP protocol and if it is connected. The minimum connection speed is 12 Mbit/sec.
How to connect the Tricolor receiver to the Internet:
- Turn on the menu and select “Internet”. Connection – “Wireless network”.
- In the list of all open networks, you must select your Wi-Fi. If it is protected by a password, you must enter it and press “OK” on the remote control.
- If the connection was successful, the system will notify you about it.
If the TV has previously connected to this Wi-Fi network, the connection will be several times easier. You need to click on “Connect”, select a network and confirm the connection again. If desired, you can set the function that the receiver will independently connect to Wi-Fi.
If your Wi-Fi is hidden, then the network can be configured manually.
- Enable settings and click on the “Internet” tab. Connection – “Wireless network”.
- Below the list of open Wi-Fi networks there is a special “Add network” button. You need to click on it.
- A special field is displayed on the screen where you need to enter all the data from the Wi-Fi network. You can do this using the on-screen keyboard, which will appear automatically.
- Enter your name and password, select the connection type and confirm all actions. If you enter the data correctly, Wi-Fi will be connected.
Connection via Ethernet cable
To connect to the Internet via wires, you need to connect the antenna, router and receiver using an Ethernet cable.
The connection is always carried out independently. If it was successful, a message will appear on the screen in the settings, in the “Internet” tab. If an error occurs, it can be easily resolved.
- Click on “Change network settings” and confirm the actions.
- Cancel automatic connection by unchecking the first item in the settings.
- Click “Change” and confirm your actions.
- Set all parameters using the keys displayed on the screen and the remote control.
- Save all data and confirm connection.
If you do not know the parameters for setting up your network, then you need to ask the technician who installed the router or a consultant at the support service.
Setting up a router to work with a USB modem
To do this, you need to go to the router’s web interface through a browser, select the “SETUP” tab, “Internet Setup” in it and click the “Manual Internet Connection Setup” button.
In the window that opens, you need to make settings. If “Access Point Mode” is activated, the router will operate in Wi-Fi access point mode only, so if you need to use it as a router, you do not need to activate this function.
In the “My Internet Connection is:” list, you must select the connection type - “PPP over USB (Username/Password)”.
Next, in the “PPP over USB” settings, specify the use of a dynamic IP address - “Dynamic PPP over USB”. If your mobile operator has given you a static IP address, then you must specify “Static PPP over USB” and enter its value in the settings below.
In the lines “User Name”, “Password” and “Retype Password” you must enter: user name, password and re-confirm the password. This information can be obtained from your mobile operator.
The data specified in the lines “Host for PING test (1)” and “Host for PING test (2)” are used to test the Internet connection, so it is recommended to leave their values as they are, i.e. - "dns".
The “IP Address” field is used only to enter a static IP address; in our case, we do not change anything in it.
In the line - “Phone Number” we indicate the dial-up number, if the number is *99#, then it must be entered in this format - D*99#, i.e. add the letter D at the beginning. The dial-up number can be obtained from your mobile operator.
If the modem uses the initialization command, then it is written in the “Modem InitString” field. If the command has the form – AT+CGDCONT=1,”IP”,”vmi.velcom.by”, then it must be written without the AT prefix: +CGDCONT=1,”IP”,”vmi.velcom.by”. The modem initialization command can be obtained from your cellular operator.
If you need to enter DNS server addresses manually, then in the “Primary DNS Address” and “Secondary DNS Address” fields, enter the DNS server addresses, which can be obtained from your cellular operator. In most cases, it will be enough to select “Receive DNS from ISP” - to receive DNS addresses automatically from the operator.
In the “MTU” field, the value used is changed only if you have an unstable Internet connection or your provider requires it.
Finally, in “Connect mode select” we select the connection type – “Always”, which allows you to immediately connect to the Internet after power is supplied to the router or restore the connection after a break and press the “Save Settings” button to save the entered parameters. If you select “Manual”, the router will connect to the Internet only after clicking the “Connect” button in “Status/Device Info/Internet/Connection”. If you select “Connect-on demand”, the router will connect to the Internet only if there is a corresponding request; also in this mode, the “Maximum Idle Time” field is activated, which indicates in minutes after what time, in case of downtime, the connection will be disconnected with the Internet.
After that, through the web interface, open the “Status” tab and select “Device Info”. The “Internet” window will display the current state of the Internet connection – “Connected”. If your status is “Disconnected,” you need to check the settings of your router and modem again, and also make sure that your modem is supported by the D-Link DIR-320 router.
In the case of using a cell phone as a modem, the same settings apply, depending on the cellular operator used. In practice, work with the Nokia 6300 phone using the EDGE protocol was tested. The phone is connected to the router using a USB cable and the “Nokia mode” must be activated in it.
Connecting other Tricolor receivers
Connection for other conductors is only available wired, using an Ethernet cable. It connects to the router, receiver and antenna. The connection should happen automatically, but if this does not happen, you must follow the instructions.
- Go to “Menu”, then “Settings” and “Network”.
- Click "Auto" in the network settings.
- If the receiver is connected to a router that does not have the DHCP protocol, then you need to configure the local network. To do this, click “Manual” in the settings and enter all the data.
- If the connection is successful, the text “Connected” will appear next to “Obtain an IP address.”
- If a device connects to the Internet for the first time, it must undergo ID registration. If the connection is successful, the system will notify you about it.
If the network data is unknown or an error occurred with the registration ID, then you need to contact Tricolor support service.
IRINA2020-03-03 Sources used:
- https://tricolortv.tv/help-tricolor/kak-podkljuchit-resiver-trikolor-k-internetu/
- https://tricolor-gid.ru/nastrojka-resivera-trikolor.html
- https://antena-shop.ru/recommendations/tricolor4/statiya-2
List of channels for viewing via the Internet
The list of channels with online access includes more than 140 pieces. Among them: news, sports, entertainment, children's, radio, erotic, information, music and others. The number of channels depends on the connected package. For example, on the standard “Unified”, the quantity is no more than 100.
With satellite, 220 channels, selections of popular TV programs, and cinemas are available.
Without an antenna or satellite, the subscriber receives a limited number of channels, where the following are available:
- children's - 15 pieces;
- all-Russian - 20;
- one information channel;
- entertainment – 17;
- cognitive – 14;
- movies and TV series – 19;
- sports – 6;
- musical -18;
- informational – 6;
- four erotic;
- six TV stores;
- 7 regional.
Some channels are duplicated. For example, entertaining, informational and educational have been added to the “All-Russian” category.
Radio stations are also available, in the amount of 48 pieces. By connecting to the online service, the user can switch from television broadcasting to radio.
List of receivers on which you can watch Tricolor via the Internet:
GS B521, GS B521H, GS B521HL, GS E521L, GS B531M, GS B531N, GS B532M, GS B533M, GS B534M, GS B5310, GS B5311. Access to the Internet connection is blocked on older models that support MPEG-2 and MPEG-4 image transmission. The GS A230 model supports online viewing only and is a Smart set-top box.