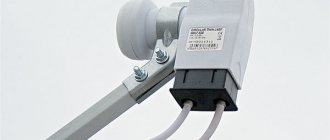
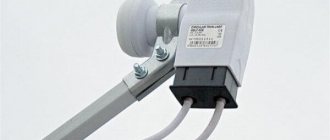
A converter is a receiving device (or, as it is also called, a “head”), which, using a low-noise amplifier (LNA) and a down-converter, processes and transmits the signal from the repeater (transponder) to the cable. The converter (LNB, Low Noise Block) is installed on the satellite antenna feed and connected to the receiving equipment with a coaxial cable; the same cable powers the converter and, if required, transmits control signals.
An LNA amplifier is required to provide sufficient signal level at the input of the receiving device. The longer the cable run to the converter, the more amplification is required. Frequency conversion is necessary to be able to remove the receiving equipment to a considerable distance (tens of meters) from the satellite converter without much signal attenuation.
What is a converter for a satellite dish?
In order for satellite television to work, you need special equipment that receives the signal from the satellite, processes it and broadcasts it to the TV. The required kit consists of: a TV receiver (receiver), a coaxial cable, a converter and a satellite dish. One of the important components of a satellite antenna is the converter, in common parlance - the head (sometimes also called the emitter). This receiving device is mounted on a holder in front of the antenna and serves to collect signals reflected from the dish, convert them into the radio frequency range for transmission via a coaxial cable to the receiver, and from there to the TV. The converter can also be described as a low-noise amplifier that receives high frequencies from a satellite, converts them to lower ones and amplifies them for transmission over a distance over a cable.
Device setup
Setting up the converter always begins with the correct installation of the plate itself. Understanding how to do this is not difficult. Another thing is to do all this in practice:
When you achieve an acceptable antenna angle, you can proceed to adjusting the satellite TV converter itself to strengthen the incoming signal:
- if you rotate the satellite converter in one direction or another, you can strengthen the incoming signal;
- It is not recommended to move the device to the mirror, since changing the angle of adjustment will have to be done first.
When you receive the highest quality satellite signal, secure the dish and satellite antenna converter more firmly and begin checking the quality of television broadcasting. The next step is software configuration, which will be discussed later.
Signs of a malfunction of the Tricolor satellite converter.
A malfunction of the Tricolor TV converter can be determined by several signs.
External signs.
The main external sign of a malfunction in the converter is the presence of damage: oxidized or broken contacts at the junction with the cable, dents, chips, breaks.
Internal (software) features.
The converter does not require any software. Therefore, internal signs of a malfunction include the absence of a signal or its sudden loss. That is, the inability to reproduce the signal due to a change in the location of the dish, the difference in receiving and transmitting frequencies between the converter and the receiver. This also includes overvoltage, moisture, and short circuit.
GI-211
Included in a large set of MTS satellite TV with one output. It has one full-range output, a moisture-proof housing and a low (0.2 dB) noise level. Used for offset antennas.
Provides maximum signal quality and excellent picture of digital satellite TV from MTS. Has low noise level, good gain.
It has a reduced noise level and has a seal that prevents moisture from entering under the F-connector. Recommended for installation on antennas 0.6 - 1.1 m. Manufacturer: Galaxy Innovations
How to check the Tricolor converter at home?
Based on all the visible signs, you can create an approximate algorithm on how to check the Tricolor TV satellite antenna converter at home for faults. 1. First, you need to visually check the cable that goes from the receiver to the antenna for breaks, kinks, twists, knots, pinched places, and damage to the integrity of the braid. If you have a special device at home called a multimeter, you can use it to “ring” the cable and determine its functionality. 2. So, you have found out that the cable is intact. The next step is to check the satellite dish head for visible damage, the absence of dirt, ice, and snow. You also need to make sure that it is installed as required by the instructions, does not dangle, and is firmly secured. 3. It would be useful to check the contacts at the junctions of the cable, converter and satellite dish. 4. There is a simpler option: if you have a spare working head, you just need to change it and check if the signal appears. Thus, you can understand whether the cause of this problem lies in a faulty converter or in something else.
How to connect a Tricolor TV receiver – Details
The main criterion for connecting the receiver is a correctly installed and high-quality configured Tricolor TV dish. If your satellite dish is configured correctly, connecting the receiver will take you no more than 10-15 minutes.
In this article we will analyze possible schemes for connecting the Tricolor TV receiver to both a dish and a TV using examples of certain models of receivers. Receivers may differ in technical components from your receiver, but the essence of the connection always remains the same.
If you did everything according to the instructions, but there are no results, you can read the article - What to do if there is no Tricolor signal.
How to connect the receiver to the dish.
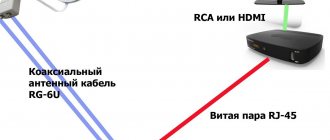
To connect the Tricolor TV receiver to a satellite dish you will need:
- 2 F connectors
- RG-6 coaxial cable
The first thing we need to do is lay the RG-6 cable from the satellite dish to the installation location of the receiver. The next step is to screw the F connectors on both ends of the cable. Let's look at a diagram of how to do this.
- Using ordinary wire cutters, we bite off the end of the cable so that it is perpendicular.
- We make a cut in the insulation 10-12 mm from the end of the cable and remove it.
- We straighten the braid and foil along the cable.
- We retreat 2-3 mm from the cable braid and remove the insulation of the central core.
- We check that the braid and pieces of foil do not touch the central core of the cable and screw the F connector until it stops.
The next step is to screw one end of the cable to the receiver in LBN in and the other end to the converter on the satellite dish. Carefully, without knocking down the plate, secure the cable to the antenna with ordinary construction ties or electrical tape.
How to connect the receiver to the TV.
The method of connecting the Tricolor TV receiver directly depends on your TV. There are 3 main types of connecting the receiver to the TV, let's look at them.
- The first is connection via the built-in RF modulator (for older models of receivers). The essence of this connection is that your receiver converts the video signal to analog and is transmitted to the TV via a regular coaxial cable. For this connection, your receiver must have an RF OUT output.
In practice, such a connection is used in public places, such as shopping centers, cafes, where you need to connect many televisions with the ability to watch one channel selected on the satellite receiver.For example, if the Russia24 channel is selected on the receiver, then the Russia24 channel will be shown on all TVs.
To connect in this way, you just need a regular TV cable. You insert one end of the cable into the receiver (RF OUT), insert the other end into the TV (ANT in), and then start auto-tuning channels on your TV. Your TV will find one analog channel, where your video signal from the Tricolor receiver will be located.
The main thing is to remember the channel number on a TV with a Tricolor signal and no longer switch programs from the TV remote control; now you will control your channels from the remote control from your receiver.
If you do not have a built-in RF modulator in the Tricolor TV receiver and you are comfortable watching the same channel on all TVs at the same time, then you can purchase an RF modulator and split the signal using a splitter with a number of outputs corresponding to the number of your TVs.
- Connecting the Tricolor TV receiver to a 3RCA or SCART TV. This type of connection is mainly used for older TVs that do not have an HDMI input.
- Connecting the Tricolor TV receiver using an HDMI cable. With this connection you will achieve high quality on your TV, this applies not only to the picture, but also to the sound. All modern TVs are equipped with HDMI inputs.
How to connect the receiver to 1 TV
Using the example of the GS E521 L receiver with the ability to connect a second receiver
We screw the cable coming from the satellite dish to the LBN in 1 connector.
We connect the receiver to the TV using an HDMI or 3RCA cable, depending on the availability of the corresponding connectors (to achieve the best quality, it is worth connecting with an HDMI cable).
Having connected them together, select the appropriate input to which you connected your TV (you can find out by looking behind the TV, all connectors are labeled and numbered. Example: HDMI 1, HDMI 2 or AV 1) using the television remote control.
On the screen you will see the initial setup of the receiver; after completing it and saving the found channels, you can start watching satellite television.
After setting up, you may need to register; you can do it yourself on the website www.tricolor.tv in the “subscriber registration” column.
How to connect two TVs to Tricolor TV.
Using the example of the GS E521L/GS C5911 receiver
Method No. 1 (using a UTP network cable)
We connect two cables coming from the Tricolor satellite dish to LBN in 1 and LBN in 2.
If it is not possible to extend two cables from the antenna to the E521L server, then you can use a jumper between the LBN 1 out and LBN 2 in contacts (with such a connection, there will be slight losses in the number of channels on the second C5911 receiver).
You can make a jumper from a piece of regular RG-6 coaxial cable by screwing F connectors on both sides. We connect the receiver using an HDMI or 3RCA cable (if the TV has both inputs, then the HDMI connection is preferred).
We select the video input we need on the TV, for example HDMI 1, after which you will see the initial settings on your screen. You can find how to make the initial settings in the “user manual” book included in the kit.
The next step is to connect the E 521L server and the additional C 5911 set-top box; for this we will need a crimped UTP network cable. Using a UTP cable, we connect the receivers to each other by inserting the ends of the cable into the ETHERNET connectors. We connect the additional C 5911 set-top box to the TV using HDMI or 3RCA. As on the first TV, select the appropriate video input and perform the initial settings.
To connect to the server, in the “network settings” item you need to select the server, if the connection is correct, it will appear automatically in the 2nd column, select it and click “search”. In some cases, after the receivers are fully connected, you will need to update the receivers' software. The update should be carried out from the additional set-top box C 5911, setting channel No. 333 “telemaster” and wait 5-10 minutes. During this time, a column with a request to update the software will appear on the screen, press the “OK” button and wait for the update to complete. It is very important not to turn off the power during the update!
Method No. 2 (using a Wi-Fi router)
The difference between the connection in scheme No. 2 and scheme No. 1 is the ability to watch your favorite channels on a tablet or mobile device. To do this, we connect the receivers through a router by setting the appropriate parameters in the initial settings of the receivers in the “network setup” item. To watch Tricolor TV on a tablet or mobile device, you need to download the “Play.Tricolor” application. Connect to the Wi-Fi network of your router and set the appropriate settings on your device in the “Play.Tricolor” application.
Variants of faults and methods for their elimination.
After you have checked the Tricolor TV converter, you will be able to identify some basic faults: • Dirt or snow has accumulated on the converter, as a result of which it is not possible to receive a signal. It is enough to clean the satellite dish and the converter itself from this interference. • The converter is not secured correctly or is loose. In this case, you need to install the head in the correct position in accordance with the instructions that came with it. • The cable or cable connection to the converter is damaged. Then you need to replace the cable or damaged connector. • If there is visible damage to the converter, or if water has entered it, a new one should be installed. The list of models is available in the section Components for Tricolor TV. • It may also happen that during unfavorable weather conditions (hurricanes, strong gusts of wind, hail) or during repair work the location of the satellite dish or converter has changed, then you just need to return them to their original location. If you are unable to identify the problem yourself, you can always contact our specialists for advice by calling (812) 940-77-55, calling a technician to your home, or leaving a request on our website in the form below.
What is a converter for a satellite dish?
In order for satellite television to work, you need special equipment that receives the signal from the satellite, processes it and broadcasts it to the TV. The required kit consists of: a TV receiver (receiver), a coaxial cable, a converter and a satellite dish. One of the important components of a satellite antenna is the converter, in common parlance - the head (sometimes also called the emitter). This receiving device is mounted on a holder in front of the antenna and serves to collect signals reflected from the dish, convert them into the radio frequency range for transmission via a coaxial cable to the receiver, and from there to the TV. The converter can also be described as a low-noise amplifier that receives high frequencies from a satellite, converts them to lower ones and amplifies them for transmission over a distance over a cable.
Signs of a malfunction of the Tricolor satellite converter.
A malfunction of the Tricolor TV converter can be determined by several signs.
External signs.
The main external sign of a malfunction in the converter is the presence of damage: oxidized or broken contacts at the junction with the cable, dents, chips, breaks.
Internal (software) features.
The converter does not require any software. Therefore, internal signs of a malfunction include the absence of a signal or its sudden loss. That is, the inability to reproduce the signal due to a change in the location of the dish, the difference in receiving and transmitting frequencies between the converter and the receiver. This also includes overvoltage, moisture, and short circuit.
How to check the Tricolor converter at home?
Based on all the visible signs, you can create an approximate algorithm on how to check the Tricolor TV satellite antenna converter at home for faults. 1. First, you need to visually check the cable that goes from the receiver to the antenna for breaks, kinks, twists, knots, pinched places, and damage to the integrity of the braid. If you have a special device at home called a multimeter, you can use it to “ring” the cable and determine its functionality. 2. So, you have found out that the cable is intact. The next step is to check the satellite dish head for visible damage, the absence of dirt, ice, and snow. You also need to make sure that it is installed as required by the instructions, does not dangle, and is firmly secured. 3. It would be useful to check the contacts at the junctions of the cable, converter and satellite dish. 4. There is a simpler option: if you have a spare working head, you just need to change it and check if the signal appears. Thus, you can understand whether the cause of this problem lies in a faulty converter or in something else.
What to look for when choosing?
When choosing a converter for Tricolor, and deciding which is better, future satellite TV subscribers pay attention to two things:
- specifications;
- cost of equipment.
But there are still a couple of little things that should not be discounted.
Case quality
The satellite signal receiver workstation is on the street. During use, it is constantly exposed to temperature influences, ultraviolet radiation and other weather hazards. Therefore, it is important that the plastic from which the device body is made is of the highest quality possible.
A regular Tricolor converter with 2 outputs is most often made in the form of a monoblock. But on models with a large number of connectors, there is sometimes a removable cover. It is important that the material of this cover is UV resistant. Very often on forums there are user complaints about the destruction of the lid from sunlight.
Important! Any violation of the integrity of the housing entails the entry of atmospheric moisture into the device. And this, in turn, leads to its breakdown.
Case color
Before purchasing, we advise you to pay attention not only to how much the converter to Tricolor costs, but also in what color scheme it is made. This characteristic seems to be the most insignificant. But in fact, the brighter the external elements, the more attention they attract from birds. There are often situations when birds peck at bright plastic, and then the insides of the device. Therefore, we advise you to pay attention to models in light, gray or beige housing.
Variants of faults and methods for their elimination.
After you have checked the Tricolor TV converter, you will be able to identify some basic faults: • Dirt or snow has accumulated on the converter, as a result of which it is not possible to receive a signal. It is enough to clean the satellite dish and the converter itself from this interference. • The converter is not secured correctly or is loose. In this case, you need to install the head in the correct position in accordance with the instructions that came with it. • The cable or cable connection to the converter is damaged. Then you need to replace the cable or damaged connector. • If there is visible damage to the converter, or if water has entered it, a new one should be installed. The list of models is available in the section Components for Tricolor TV. • It may also happen that during unfavorable weather conditions (hurricanes, strong gusts of wind, hail) or during repair work the location of the satellite dish or converter has changed, then you just need to return them to their original location. If you are unable to identify the problem yourself, you can always contact our specialists for advice by calling (812) 940-77-55, calling a technician to your home, or leaving a request on our website in the form below.
In this article we will look at the most common causes of malfunctions in the operation of a satellite dish and how to eliminate them.
How to test a coaxial cable
Often, after repairs, problems arise with the cable. The antenna cable, through which the “head” of the satellite dish is connected to the receiver, can simply be broken or short-circuited after the next repair. It is also possible that the coaxial cable breaks along the central core. To accurately determine the cause of satellite television reception failure, first, check the condition of the cable. Often, a visual inspection is enough to identify obvious violations of the braid insulation, fractures and cable kinks.
You can more accurately determine the condition of the cable using a special device - a digital multimeter. If you don’t have such a device at home, then a low-voltage incandescent light bulb from a flashlight and a mobile phone battery will suffice. Such a simple folk device for checking electrical circuits is popularly nicknamed “arkashka”. To check using a “hook”, you need to connect the core being tested into a break in a simple electrical circuit with a battery and a light bulb. If the light comes on, the conductor is intact, but if not, there is a break. Checking a coaxial cable, both using a digital device and using a folk idea like the “arcashka”, is simple: we check the central copper core and the braid one by one.
A working cable should communicate normally between the beginnings and ends of like-named conductors, but not between opposite conductors. Simply put, the central core at the beginning and end of the wire should ring normally with the device (the “arc light” will light up), as well as the beginnings and ends of the braids. It is important to take into account that between the braid and the core the device should not ring (the light will not light up). The resistance between these elements should be high - several mOhms. Low resistance between the aluminum braid and the copper core of the coaxial cable indicates a short circuit.
There are also situations where it is not possible to check the integrity of the cable conductors in this way due to the remote location of the dish and receiver. It is for this case that we can recommend using the following diagnostic technique: firstly, we check whether there is a short circuit between the central core and the screen, and secondly, we deliberately short-circuit the core with the shielding braid on one side, and check it with a device on the other. If the device beeps or the “arc” lights up, this means that both the braid line and the core line are completely intact.
Why does a short circuit occur?
The most common scenario for a short circuit in a cable is incorrect cable termination and incorrect connection of f-connectors. It's no secret that novice satellite dish installers strive to install this same dish as quickly as possible, not caring about reliability and quality. Their main goal is to quickly get the coveted 500 rubles.
To prevent a short circuit, which can cause failure of both the receiver and the LNB, it is necessary to carefully check the cable termination. There is no special trick in this process: you need to carefully strip the top insulation by 1.5-2 cm, remove the silver screen back, strip the central gold vein and screw on the f-connector. Then all that remains is to trim the central copper core so that it protrudes no more than 2-3 mm from the f-connector.
The main mistake that beginners make is that they do not pull the hairs of the aluminum braided screen back well enough. These same hairs can eventually come into contact with the central copper core and damage expensive equipment. Essentially, there will be a short circuit, which in the worst case scenario will “kill” the receiver. It is also a mistake to cut off the aluminum foil. It’s better to simply move it back so that the f-connector connects better and stays on the coaxial cable. In any case, it is necessary to carefully check whether there is a short circuit between the shielding braid. Once voltage is applied to the receiver, it will be simply impossible to fix anything.
Failure of LNB “heads”
Failures of LNB “heads” are also very common. Precipitation, short circuit, and overvoltage are the main causes of failure of satellite dish converters. To check the failure of a specific LNB, simply disconnect the drive (if you have several converters, of course) and connect the heads directly to the receiver one by one. In this simple way, you can quite accurately determine the faulty converter.
If you are convinced that your satellite dish is configured correctly, and some television channels do not work, then this is one of the signs that your head (convector) has burned out, or the disk (switch) on the satellite dish has failed.
How to find out that your satellite dish is configured correctly - read the article “?”, or watch videos. Find out which television channels do not work on your satellite dish and use the section “Frequencies and keys” to find out whether they should work at the moment. Also, using this page you will find out which satellite broadcasts these television channels. The article "" and videos will help you find out which head (converter) works on this satellite. Also, the above symptoms are also characteristic of a faulty drive (switch). Therefore, before replacing the head (convector), remove the disc from the circuit. That is, the antenna cable that connects the disik (commutator) and the tuner (receiver) must be disconnected from the disik and connected to the head (commutator) that is supposedly out of order. If after this action previously non-working channels begin to work, then your disk is faulty and you need to replace it with a working one. Our Youtybe channel and our article below, “How to identify a faulty disk (switch) and replace it?” will help you replace the drive. Before replacing the head (convector), make sure that the disk ports in your tuner (receiver) are correctly set, this can be done using the article on this page “How to set the disk ports”, or our channel in Youtybe If you have done all of the above, then you can proceed with the replacement heads (convector) To do this you need to have: access to a satellite dish, two 10mm open-end wrenches, a cross-shaped screwdriver and pliers. Using pliers, we disconnect the antenna cable from the faulty head, using 10mm open-end wrenches. unscrew the nut and pull out the bolt closest to the head. We remove the head together with the (mount) cartoon. Using a cross-shaped screwdriver, remove the izmult head. We install the new head in the reverse order. In this case, all work must be done this way. so that the new head is in the same place as the old one relative to the satellite dish. If you have any difficulties, our specialists in Poltava will always be happy to give you advice, tel. 0500566818, 0980049051. (Our youtube channel https://www.youtube.com/channel/UCSr59O512uDka0Oj0Sc5GGg. We also advise you to visit the website -
Why does a short circuit occur?
The most common scenario for a short circuit in a cable is incorrect termination of cables and incorrect connection of f-connectors. It's no secret that novice satellite dish installers strive to install this same dish as quickly as possible, not caring about reliability and quality. Their main goal is to quickly get the coveted 500 rubles.
To prevent a short circuit, which can cause failure of both the receiver and the LNB, it is necessary to carefully check the cable termination. There is no special trick in this process: you need to carefully strip the top insulation by 1.5-2 cm, remove the silver screen back, strip the central gold vein and screw on the f-connector. Then all that remains is to trim the central copper core so that it protrudes no more than 2-3 mm from the f-connector.
The main mistake that beginners make is that they do not pull the hairs of the aluminum braided screen back well enough. These same hairs can eventually come into contact with the central copper core and damage expensive equipment. Essentially, there will be a short circuit, which in the worst case scenario will “kill” the receiver. It is also a mistake to cut off the aluminum foil. It’s better to simply move it back so that the f-connector connects better and stays on the coaxial cable. In any case, it is necessary to carefully check whether there is a short circuit between the shielding braid. Once voltage is applied to the receiver, it will be simply impossible to fix anything.
What is a converter for a satellite dish?
In order for satellite television to work, you need special equipment that receives the signal from the satellite, processes it and broadcasts it to the TV. The required kit consists of: a TV receiver (receiver), a coaxial cable, a converter and a satellite dish. One of the important components of a satellite antenna is the converter, in common parlance - the head (sometimes also called the emitter). This receiving device is mounted on a holder in front of the antenna and serves to collect signals reflected from the dish, convert them into the radio frequency range for transmission via a coaxial cable to the receiver, and from there to the TV. The converter can also be described as a low-noise amplifier that receives high frequencies from a satellite, converts them to lower ones and amplifies them for transmission over a distance over a cable.
Signs of a malfunction of the Tricolor satellite converter.
A malfunction of the Tricolor TV converter can be determined by several signs.
External signs.
The main external sign of a malfunction in the converter is the presence of damage: oxidized or broken contacts at the junction with the cable, dents, chips, breaks.
Internal (software) features.
The converter does not require any software. Therefore, internal signs of a malfunction include the absence of a signal or its sudden loss. That is, the inability to reproduce the signal due to a change in the location of the dish, the difference in receiving and transmitting frequencies between the converter and the receiver. This also includes overvoltage, moisture, and short circuit.
How to check the Tricolor converter at home?
Based on all the visible signs, you can create an approximate algorithm on how to check the Tricolor TV satellite antenna converter at home for faults. 1. First, you need to visually check the cable that goes from the receiver to the antenna for breaks, kinks, twists, knots, pinched places, and damage to the integrity of the braid. If you have a special device at home called a multimeter, you can use it to “ring” the cable and determine its functionality. 2. So, you have found out that the cable is intact. The next step is to check the satellite dish head for visible damage, the absence of dirt, ice, and snow. You also need to make sure that it is installed as required by the instructions, does not dangle, and is firmly secured. 3. It would be useful to check the contacts at the junctions of the cable, converter and satellite dish. 4. There is a simpler option: if you have a spare working head, you just need to change it and check if the signal appears. Thus, you can understand whether the cause of this problem lies in a faulty converter or in something else.
Failure of LNB “heads”
Failures of LNB “heads” are also very common. Precipitation, short circuit, and overvoltage are the main causes of failure of satellite dish converters. To check the failure of a specific LNB, simply disconnect the drive (if you have several converters, of course) and connect the heads directly to the receiver one by one. In this simple way, you can quite accurately determine the faulty converter.
One of the mandatory elements of a set of equipment for satellite television is a converter. This device reads the satellite signal arriving at the dish and transmits it to the receiver. Naturally, the final quality of broadcasting directly depends on the quality of operation of this device. We'll tell you how to choose a converter for Tricolor, what to look for before buying, and how to test a new device yourself.
Variants of faults and methods for their elimination.
As you probably know, on the dish (satellite dish) there is a satellite converter or converters for different purposes.
No, it’s me, there’s only one goal!
Catch a signal from a satellite and process this signal beautifully. In order for a beautiful picture to appear on the TV.
The LNB or satellite head is installed on the receiving satellite antenna. If you want to watch movies from many satellites, then there will be not one but several satellite converters.
And so we have clarity that converters are designed to convert received signals, namely, to lower the frequency spectrum, linearly transfer it to a lower frequency region.
Why such transformations?
The need for such a conversion arises because the frequencies at which satellites operate are too high to transmit via cable.
The decoding of the abbreviation LNB ambiguously hints at the main characteristic of the converters and this is the noise level, you probably guessed, the lower the noise, the better.
The noise level of modern converters does not play a big role, since it usually ranges from 0.1 to 0.5 decibels and has virtually no effect on the signal quality.
This LNB device or satellite converter is mounted on a special holder called a remote bracket (included in the satellite dish kit) so that the head is in the focus of the antenna mirror.
Satellite converters can be divided into groups according to several criteria.
For broadcasting TV programs from satellite, 2 bands are used. C-band is a frequency band from 3.4 to 4.2 GHz. Ku-band is a frequency band from 10.7 to 12.75 GHz. The Ku-band is too wide, so it is divided into 2 sub-bands: lower (10.7-11.7 GHz) and upper (11.7-12.75 GHz).
The Ku-band converter includes two local oscillators to work with both sub-bands. As a rule, a local oscillator with a frequency of 10.6 GHz is used for the upper subband, and 9.75 GHz for the lower subband.
LNBs come in circular (Circle) and linear (Universal) polarization. There are two types of satellite signal polarization: left-right (circular) and vertical-horizontal (linear).
Different satellite TV operators operate with different polarizations. The most common ones are presented below:
Tricolor TV -CIRCULAR NTV Plus -CIRCULAR Telecard - UNIVERSAL Continent TV -UNIVERSAL Rainbow TV -UNIVERSAL
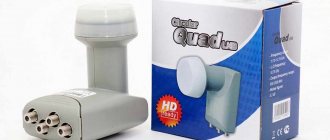
LNBs differ in the number of independent outputs. There are converters with one (SINGLE), two (TWIN), four (QUAD) and eight (OCTO) outputs. If you buy a converter to watch satellite TV on only one TV, then you need a converter with one output.
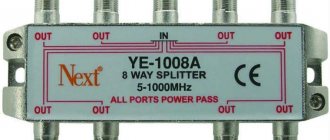
If you intend to install the kit on 2 TVs, then the converter, accordingly, should have two outputs. Sometimes, in order not to run a lot of wires into the apartment, instead of installing, for example, a converter with four outputs, they use a satellite signal divider.
Outwardly, this really looks more aesthetically pleasing and in some cases much more convenient, but we should not forget that when using a divider you get about 5 decibels of noise into the load, which will negatively affect the quality of the signal.
But in some cases, you can’t do without a divider when the house has already been finished and wired for on-air television. In this case, it is impossible to do without a divisor.
Remember!
The average converter can last from one to five years, depending on environmental factors, mainly the amount of precipitation and humidity.
There are also cases when, due to a manufacturing defect, the converter fails within a couple of weeks from the moment of installation.
But even in this case, there is no point in searching for the truth, since it is unrealistic to prove that the cause of the breakdown is the quality of the converter’s assembly, and the warranty, as a rule, does not apply to them.
There is an opinion that it is easier to buy a new one than to repair it. But this is also not a panacea for everyone. Since we are already talking about a new converter, we would like to bring to your attention a new product for reliable 4K reception.
Universal converter with linear polarization (2 outputs).
The Inverto Essential converter is the ideal solution for satellite broadcast reception throughout Europe, allowing you to get the most out of your antenna.
The developers of Inverto Essential took care of the 4G/LTE signal filter, so that new generation mobile networks do not interfere with the excellent reception of this converter!
What is relevant is low noise figure, low phase noise, DVB-S2 (HDTV) and 4K Ultra HD compatible, low power consumption, high Cross-Pole performance.
Main characteristics:
Low phase noise, DVB-S2 (HDTV) compatible Ultra Low Noise ULN+ technology Low power consumption High cross-polarization characteristics High frequency stability Noise figure: 0.3 dB (ULN+) Typ. (0.7dB Max.) Input Low range: 10.70-11.70 GHz Input High range: 11.7-12.75 GHz Output Low range: 950-1950 MHz Output High range: 1100-2150 MHz Low LO frequency: 9.75 GHz High local oscillator frequency: 10.60 GHz Waterproof housing Number of outputs: 2
How to determine if the converter is faulty?
There are not many disease syndromes of satellite converters.
And so, during a manual search, the receiver shows that the signal strength is more than 50 percent, but the quality is 0 percent. But often the same indicators occur when you mistakenly tuned in to another satellite.
Or even like this... sometimes converters “lose polarization”, or only some of the frequencies. However, some channels are not shown. The receiver displays the message “No signal” on them.
As a rule, the effective treatment under any circumstances is to replace the faulty converter with a new one. It must be remembered that the new converter must be of the same polarization as the previously failed one.
When installing a satellite converter yourself, be careful, try not to change the antenna direction angle, this will save you from having to re-adjust the antenna to the satellite.
Let's sum it up
Converter for converting microwave frequencies to a lower frequency, called intermediate (900–2150 MHz). The signal at this frequency is transmitted through the cable to the receiver and fed to its antenna input.
To reduce the received frequency spectrum, one or two local oscillators are built into the converter - stabilized high-frequency sources. The input frequency is reduced by subtracting the local oscillator frequency from it.
Converter for amplification of the received signal. After all, the signal from the satellite is received with very low power, which is completely unacceptable in the paths of receiving equipment. Therefore, the second, no less important, function of the converter is amplification.
The 13/18 V signal is used in modern universal converters only to switch polarization.
Universal converters differ from other full-range Ku-band converters in the versatility of the signals that control band switching and polarization, and also in the fact that these signals are transmitted over a single cable with an intermediate frequency.
Selecting a convector
Externally, the converter is a small device in a metal casing. It, in turn, is embedded in an L-shaped plastic case. Although all devices appear similar in appearance, they have differences.
When choosing a suitable convector, you need to pay special attention to the following points:
- Noise background. It should usually be within 0.3-0.5 dB. Most devices on the market meet this parameter.
- Polarization. It can be linear (designation – Universal) or circular (Circular). Tricolor polarization is circular and it makes no sense for subscribers to purchase devices labeled Universal.
- Number of connectors. Typically, devices with 2 outputs are used for Tricolor. But there are also convectors with 1, 4, 8 connectors. Their number determines how many receivers can be connected. Theoretically, you can split the signal already in the house using a splitter, but in this case its quality will decrease, problems will arise with the image quality on HD channels, and some TV channels may even refuse to show.
The company advises purchasing equipment exclusively from official dealers or branded stores. This will eliminate quality issues and also ensure that you are purchasing a compatible device.