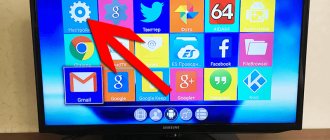
How to reset LG
To restart LG Smart Panels, you will need to navigate through menu items similar to the above.
If the TV is running Netcast OS (produced 2010 - 2014), you need to use the “Settings” remote control button to open the “Settings” menu, go to the “Settings” item, and in the list of actions that opens, initiate the “Factory settings” item.
On more advanced modern models running WebOS, the transition is as follows: “Settings” → “Advanced” → “General” → “Reset settings”.
Important! If the “security” option is activated on the TV, the system will ask you to enter the PIN code previously set by the user.
How to reset Sony
On Sony Bravia TVs with Android TV OS, rebooting the system involves the following steps.
- Make sure that no external USB storage devices are connected to the TV receiver. If there is a connected flash drive, disconnect the device.
- With the TV turned on, wait for the “Power off” message by pressing the “POWER” button for 4-5 seconds.
- After a minute, the TV should turn on automatically.
This system reset eliminates most software glitches without losing any user settings.
For Android models Philips, Sony, Dexp, Hayer and others, it is possible to reset the settings to factory values. The process takes some time and consists of going to the appropriate menu items “Settings” → “System settings” → “Customer support” → “Factory settings”. The procedure for resetting the system to its initial values is initiated by clicking on the “OK” button.
How to reset Samsung TV
For Samsung brand models, it is important to know the device series. The sequence of actions for calling the system reset mode on devices of different series differs in detail.
On D series models, the “Restore default values for all settings” mode is called up by pressing the “Exit” button on the remote control. After pressing the “OK” button on the remote control, the system reboots.
The sequence of manipulations on TVs of other series E, H, F, J, K, M, Q or LS consists of the following transitions: Menu→Support→Self-diagnosis→Reset. The main menu button on different remote controls may be called “Menu”, “Home” or “More”.
To restart, the system will ask you to enter a PIN code - this is the default value “0000”, or a custom combination of numbers, if set previously. After entering the code, click the “OK” button to start the system restart process.
Important! Once the process is complete, the TV will turn off and on on its own. Thus, the factory settings will take effect.
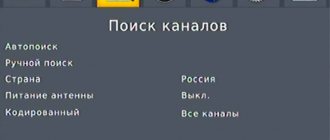
Automatic channel search
There are two ways to set up TV channels, let's start with automatic search. Take the remote control and open the main menu. Select the "Automatic channel search" command. In a few minutes, the TV will independently find and save available TV channels.
The Sony TV screen will constantly change as you search. Interference will appear periodically. After completing the setup, the device will begin to operate in standard mode.
To adjust all channels on your Sony Bravia TV or find new ones, use the manual search function. It can also be turned on through the main menu.
Possibilities
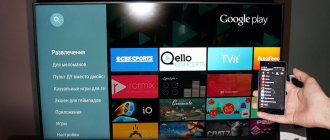
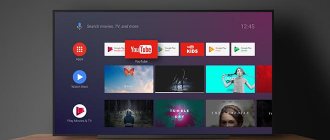
This program has the same operating scheme as Opera mini. It was created for J2ME smartphones that do not have a standard browser enabled. ForkPlayer for Sony Smart TV takes all media content from a variety of software. Then it processes them and converts them into its own format.
New Sony Smart TV devices have Internet browsers. However, they are considered incomplete. In addition, many sites and web pages do not support it. ForkPlayer is a reliable option that allows you to watch clips and listen to music tracks without worrying about it. Also, the utility has a list of top pages and movie platforms.
Updates and Troubleshooting
Outside of the reset process, your TV will require periodic updates. The Sony Bravia TV 2021 update was a big one for the launch. Not staying up to date with updates can lead to problems. Also, troubleshoot problems with individual apps before assuming the TV has a problem. In some cases, uninstalling and reinstalling the application responsible for freezing or other crashes will solve the problem.
There are several ways to do a Sony reset, and this post will go through each method. So that you can find the one you like best with. You probably purchased your Sony at a significant discount, but are now stuck with the same network for several years.
You love your device, but your network provider doesn't have plans that exactly match your needs. To free your device from your network's clutches, you need to unlock your phone. How to find out Sony imei number, all methods for any phone
Benefits of an unlocked Sony
If you now know how to unlock Sony but weren't aware of its benefits until now, we're here to help.
As stated in the introduction, unlocked phone users are free to choose the plans they want to sign up for - on any carriers in any country. Therefore, if you frequently travel around the world, it would be beneficial to unlock the Sony. Using a local SIM card is much cheaper than paying exorbitant roaming charges.
(Sony reset)
You can also go for an unlocked Sony if you are the kind of person who likes to take advantage of the current offers provided by your local operators. Prepaid payments are always changing in terms of supply. So the flexibility of changing carriers and prepaid plans can help you save money in the long run.
Tips for setting up your Sony TV
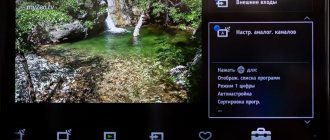
Every user can set up the TV correctly. Just follow the recommendations from the professionals. Setting the sound (volume, volume) is easier. Go to the corresponding tab of the main menu and select the optimal parameters.
Adjusting the image will take more time. In order for a clear and rich picture to appear on the screen, you need to adjust a lot of parameters. Now let's look at the basic subtleties of setting up a Sony TV.
Preparatory work
Save the image calibration chart below to a flash drive or external hard drive. Connect the memory drive to the TV via a USB connector. Open the picture for customization through the media player.
On new models running on the Android TV platform, calibration files are played from a DVD or Blu-Ray player. Because it is impossible to change settings through the Album application.
First, we set up the main indicators. To do this, you need to disable advanced options. Open the main menu and go to “Settings”, and then to the “System Settings” tab and the “Eco” subsection, here disable the light sensor.
Return to the main menu and go to “Settings” again, and then to the “Image” tab to deactivate the following functions: reality creation, smooth transition, noise reduction.
For highlighting, set the value to 7 or 8 points. For Picture Mode, select Standard. Once these changes are made, switch to the Advanced tab to deactivate all features.
Access the settings menu only through the HOME button. If you edit settings using the Options button, the settings will be applied to one signal source, and not to the TV as a whole.
Calibration
Start by checking that the image size settings are correct. The default settings enlarge the image. As a result, sharpness decreases. This manifests itself as moire, which can be seen in the outlines of the resolution bands.
To adjust the picture size, open “Settings” and go to the “Screen Control” tab to disable “Automatic Display Area”. Also disable the “Maximum Resolution” function. Now arrows are visible in all corners. The moire effect has disappeared.
Brightness
Calculate the darkest part of the grayscale band in the pre-downloaded chart. Adjust the brightness so that the black area (located on the left) is as dark as possible. Are there any differences between the left and right sides of the screen? Brightness is set correctly.
Contrast
Find the lightest part of the diagram. Adjust the contrast until the right side of the screen is as light as possible. The difference between the left and right sides of the diagram should be noticeable.
Sharpness
Oversharpening is the cause of an unnatural image. To avoid this, adjust the sharpness. There should be no light outline along intersecting lines on the calibration diagram. Reduce the sharpness until the contour disappears completely.
Saturation of the color palette
Colors will be saturated when all transitions are viewed on the calibration chart. Look at the center of the scale to achieve a natural rendition of shades.
Sound settings
Select the sound mode - internal speakers or external speakers. There are no additional options. Just adjust the volume.
Extra options
Connect the antenna cable to the appropriate connector. Select the signal source "Antenna". Disable additional devices. Now the TV is ready to search for TV channels.
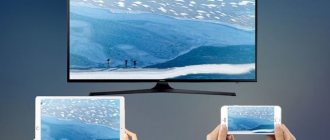
How to connect a TV to a router? This option is only available to owners of TVs that support Smart TV. Synchronization is carried out via a Wi-Fi router or by connecting a cable to the LAN connector.
Troubleshooting on Sony Bravia TVs
Smart TVs from the Sony Bravia line, like any other household appliance, break down. This does not happen very often, but since we are talking about a high-tech product, breakdowns of these devices have their own characteristics. In particular, many of the problems are similar to computer ones. This means that the technician who will have to repair the Sony KLV 32s550a TV must have a good understanding of the software.
This TV may have some problems
One of the main reasons for problems with smart TV is its integration with Internet networks, both wireless Wi-Fi and wired Internet. This integration creates a risk of virus infection. The latter can cause:
- lack of response to the remote control;
- lack of image;
- lack of sound;
- inability to find the antenna;
- unexpected shutdown.
But the impact of viruses on the operation of software is not the only problem that owners of such TVs have to face. Mechanical damage is an equally common cause. The most common breakdowns due to impacts, falls and exposure to water:
- TV not turning on with blinking indicator;
- not working buttons;
- the picture becomes monochromatic;
- strong snow-like noise;
- the screen turns black or white;
- TV turns on or stops working after turning on for no reason;
- no decimeter channels;
- violation of synchronization between picture and sound;
- problems with image scaling relative to screen size;
- linearity violations;
- clear signs of physical damage on the case.
In this video you will learn more about repairing such a TV:
Each time, to find out the cause of a breakdown, correct, professional diagnostics is necessary. For it, a number of methods and special equipment are used, available only to masters who deal with such equipment. We're talking about:
Quick setup of Sony Bravia TV to digital TV
- microscopes of binocular models;
- vacuum grippers;
- oscilloscopes;
- multimeters.
In addition to these tools, software specialists conduct software testing.
There are breakdowns that cannot be corrected by other methods other than replacing the broken part. This is the case, in particular, with matrix failure. Any damage cannot be repaired. Be it chips on the glass, cracks or internal damage to the display unit.
In addition to the matrix, the X1 Extreme processor, which is responsible for exactly how the image is displayed, also breaks down. It is on this that the increase in resolution to 4K HDR (that is, 3840 by 2160 pixels) depends. Without 14-bit signal processing, colors would be segmented and gradients would not be smooth enough. Thanks to the processor, even with an 8-bit source, you can watch videos with maximum quality. Replacing a processor can be quite expensive.
In addition to the processor, the following are subject to replacement:
- power circuits;
- backlight lamps;
- kinescope modulators.
Disadvantage of an unlocked Sony
You're thinking, "Well, why can't I just buy an unlocked Sony in the first place?" Right now? Well, you can think about the amount of money it will cost you.
For example, in Australia, an unlocked Sony XA will cost around $499 from any Sony outlet. But $0 for the device when you pair it with a 24-month postpaid plan. While it may look attractive now, you may end up paying more for a locked Sony in the long run.
(Sony reset)
Now that you know the three ways to unlock Sony, all you have to do is find the one that suits you best. Don't forget to check everything carefully. Most importantly, if you have a locked device, always seek advice from your carrier to see if this is possible.
Best Sony SIM Unlock Code Generator
To unlock your Sony sim safely and successfully, it is important to find reliable SIM unlocking software. Here I am going to introduce you to dr.fone – SIM Unlock Service. This is definitely one of the best SIM unlock code generators on the market.
It helps you to permanently unlock your phone so that you can use it on any providers you want in the world. Download the best apps for kids on iOS or Android for free.
How to use dr.fone – SIM Unlock Service
Step 1: Visit the official website of dr.fone – SIM Unlock Service, click on the “Select your phone” button and then select Sony from all phone brands. Red, black, blue, white wallpapers download to your phone.
Factory settings
If the problem persists after rebooting, perform a factory reset.
Note.
Performing a factory reset will erase all data and settings on the TV (for example: Wi-Fi and wired network settings information, Google account and other login information, Google Play and other installed applications).
The Sony Bravia is relatively easy to reset using the power off or factory reset method, which returns the TV to its original default settings. Reset your Sony Bravia to default settings when you resell the TV or give it to someone else. A hard reset removes saved passwords and also removes apps and other add-ons. Power Cycle is better for small fixes such as freezing, slow performance due to too many apps open, or anything else that is getting stuck on the system. If your Sony TV won't turn on properly or there's a serious problem, a factory reset can give you a clean slate to fix the problem.
The BRAVIA TV cannot be turned on or the power turns on and then turns off on its own
Because each of these steps represents a possible solution to the problem, check after each step to see if the problem is resolved.
When the LED is on or flashing Refer to BRAVIA TV is on but the screen is blank and the LED is on or flashing.
A. Check that the power cable is connected correctly.
- Make sure the power cord is properly connected to the socket on your BRAVIA TV.
- If your TV comes with an AC adapter, also check the connection between the adapter and the power cord.
- Make sure the power cord is properly connected to the electrical outlet.
NOTE: Do not use any extension cords or power strips, and connect the power cord directly to an electrical outlet. A: AC power adapter B: Power cord
B. Make sure your BRAVIA TV is turned on by pressing the power button on it (not the button on the remote control).
The TV does not see the flash drive
C. To ensure that there is no interference from external devices connected to your BRAVIA TV, disconnect all cables (USB, wired LAN, HDMI, antenna) except the power cable, then check if the problem persists.
- TV connectors
- Disconnect the cables
- External Devices Router
- Network devices
- USB hard drive
- USB Wireless LAN Adapter (UWA-BR100)
- Video playback equipment
- Antenna equipment, e.g. antenna amplifier
D. Check if the situation improves by setting the parameter to . If Idle TV Standby is enabled, the BRAVIA TV will turn off automatically when it has not been in use. If any setting other than OFF (for example, 1 hour (1h)) is selected in Settings* ? System Settings ? Eco? To switch to standby mode when not using the TV (Idle TV Standby), change the setting to OFF.
E. Check if the situation improves by setting the parameter or setting to . If the On Timer or Sleep Timer function is activated, the BRAVIA TV will turn off automatically after a preset time. Check these settings in Settings*? System Settings ? Clock/Timers.
- Set On Timer to OFF. When set to ON, the BRAVIA TV turns on automatically at a preset time, and then turns off automatically after the time set in Duration has elapsed.
- Set the Sleep Timer to OFF. If any setting other than OFF is selected, the BRAVIA TV will turn off automatically after a preset time.
F. Check whether this symptom occurs if the remote control sensor is covered. To check if the problem is caused by a remote control other than the BRAVIA TV, check if this symptom occurs by blocking the light from the BRAVIA TV's remote control sensor with your hand.
NOTE: On BRAVIA TVs manufactured before 2012, the remote control sensor is located next to the IR symbol on the bottom of the BRAVIA TV. If you cannot find the sensor location, press the ? on the remote control and refer to the built-in instruction manual.
G. Check if the TV turns off immediately after turning on by hiding the remote control sensor. The BRAVIA TV's built-in processor may become slow or malfunction due to network/data/external device problems. If these symptoms are caused by external factors, the situation may improve if you disconnect and reconnect the power cord; After this, your BRAVIA TV can start working correctly.
- Turn off your BRAVIA TV.
- Unplug the power cord from the electrical outlet.
- Wait two minutes and plug the power cord back into the electrical outlet.
- Turn on your BRAVIA TV.
If the above measures do not help, please contact us.
NOTE: On Android Oreo (OSV-O), the Settings icon is located in the top right corner.
Sony Decoupling from the Operator
If your Sony is locked, this is the best choice to unlock your device. In fact, this is the safest method among all three:
- Get a new SIM card from a new operator.
- Call your carrier's support line and ask what the requirements are for you to unlock your Sony. If you have fulfilled your contract, there should be no problem. However, if you have any additional requirements, please contact your carrier. Please note that fees may apply.
- Once your customer service representative determines whether you have met all of your requirements. They should provide you with a Sony PIN unlock SIM card. Again, depending on your carrier, they may either give you the code over the phone, via email, or via SMS. If you have a choice, always choose email or SMS so you can record the correct number.
- Once you have received the code, insert a new SIM card (from your new operator). You will be prompted to enter a code. Make sure you enter the correct code - entering the wrong code will lock your phone (possibly permanently).
Sony Bravia KDL-43W755C restarts itself, does not reset settings
- Mark as new
- Bookmark
- Subscribe
- Disable
- Subscribe to RSS feed
- Select
- Seal
- Email a friend
- Report inappropriate content
I bought this device at the beginning of 1917, it worked fine for half a year, then it stopped starting up altogether. They sent it to the service center under warranty, they did it, but I didn’t immediately notice that my screen was bent. I closed my eyes to the defect, fortunately the TV was working. one and half year.
Now there is a new problem: a few days ago the TV started up on its own and began playing a trailer from Google Movies. The remote control responds very poorly. I barely went into the settings, tried to reset the settings, but it didn’t work. After 2 minutes it cuts off, starts again, plays the trailer again. So ad infinitum. I tried to perform a forced reset by holding down the power and volume buttons on the TV. The green indicator lights up, suddenly goes out, and the settings are not reset. It restarts and plays the same trailer. Who had such problems? What can I do other than take it to a service center? To be honest, I am very disappointed in the purchase of this device.
- Author: Maria Sukhorukikh
Rate this article:
- 5
- 4
- 3
- 2
- 1
(0 votes, average: 0 out of 5)
Share with your friends!
The power light is on, but the TV does not turn on
Typically, an active power indicator indicates that the TV is operating in normal or standby mode. If the screen is not active, this may indicate that the TV just needs to be turned on. You can do this in two ways:
- By pressing the power button on the TV.
- From the remote control.
What to do if the TV does not turn on with the remote control? As a rule, solving this problem does not cause much difficulty. Try the following:
- Replace the batteries (located under the cover in a special compartment on the remote control).
- Check if the contacts are oxidized. If the batteries have not been changed for a long time, this may lead to oxidation of the contacts inside the remote control. Using a cotton swab and alcohol, clean the contacts to their original shine.
- Clean the buttons. Over time (especially if the remote control is not used in a special case), a lot of dust and dirt accumulates inside the remote control, which can interfere with the normal operation of the keys. To clean, unscrew the mounting screws and open the remote control. Remove the rubber platform with the buttons, then wipe it with alcohol. Also remove plaque or oxidation from the microcircuit.
- Clean the chip from any remaining liquid. If the remote control has been spilled with any liquid, you need to clean it with a dry cloth, then alcohol and cotton wool. Carefully remove any remaining liquid.
- Replace the remote control with a new one. If the chip is faulty, you will have to purchase a new remote control.
If the buttons on the TV panel do not respond to pressing (the power indicator is on or blinking), check the following factors:
- Eliminate power outages. Sony TVs are designed to operate in networks with a nominal voltage of 220V. If the voltage is unstable, the built-in protection may be triggered. In this case, even if the voltage is completely restored, the TV will still not work. Before turning on the TV, unplug it for 15-20 minutes. If the problem recurs periodically, you will have to additionally purchase a voltage stabilizer. In any case, the cost of the stabilizer is lower than the cost of TV repair and maintenance.
- Control board performance. If the microcircuit fails, it is best to contact a specialized Sony service center to diagnose and repair it. It is worth considering, however, that the cost of repairs is often equal to the cost of a new microcircuit, which makes repairs unprofitable.
Sony reset SIM unlock code
This is perhaps the easiest, no-holds-barred sim method to unlock Sony. Follow the steps below to successfully unlock your Sony code. Introduced the new Asus ZenFone AR.
Please note that this process may not work with your carrier. So always check if this is the correct way to get the required code:
- Check your SIM lock status - you can do this by dialing *#*#7378423#*#*.
- Click Tools, then Sim.
(Sony reset) The number next to the network indicates how many attempts you have to unlock the phone. If it says "7" that means you have seven tries; '0' simply means that it is locked and cannot be unlocked using this method.
(Sony reset)
(Sony reset)
If you followed these tee steps, you should have unlocked your device. If you had to give up the second step, consider the other two methods below. Huawei Mate 10 will most likely become the most powerful and expensive smartphone in the world.