Checking DVB-T support
All new TV models are equipped with a built-in tuner for displaying digital channels. If your TV is old or you doubt whether it supports the DVB-T2 standard, you can verify this yourself.
- Study the documentation for the equipment. The instructions always indicate a list of available functions. It should also say what types of signals the TV can receive.
- Enter the model code into the Yandex or Google search. How to find out the model is written in the next section of the article. Go to any online store and look at the characteristics of the TV receiver. It is better to go directly to the official website. In my case it's LG.COM.
Opposite the item “DVB-T2” it will be written “is” or there will be “+” if the TV can show digital. Or the standard will be listed in the general broadcast characteristics. - For TVs released in 2021 for the countries of the former CIS, the marking contains the Latin letter “L”. Indicates the type of digital tuner built into the equipment.
Where to find the serial number
- The marking is always written on the TV box. It is an alphanumeric set. It is usually written in large characters.
- Some of the characteristics of the TV, including the model, are written on a label glued to the back wall of the case.
- View information about your TV in Settings. Open the settings by clicking the “Settings” button. Depending on the type of remote control, it may be located in a different place and is indicated by a gear icon.
Next, go to the desired section. For example, on 2020 LG Smart TV models, you need to open the “All Settings” item. Then go through the chain “General” - “Information about the TV”. The serial number, model, operating system version and other system data will be written inside. - Additionally, you can view the receipt and warranty card.
- Even the bags in which instructions for the TV are placed can be labeled with the model designation.
By the way, if, when setting up an LG TV to receive digital television, you can select the “DVB-T2” mode, then there will be no problems with showing 20 publicly available channels in the Russian Federation. Of course, if all factors are met in order to receive the signal normally.
How to set up the set-top box
If you managed to connect the equipment to the TV, you can move on to the next step - setting up the Dom ru TV set-top box. When you turn it on for the first time or after resetting the settings after turning it on, select the time zone and city from the list provided. When you move to the next step, the equipment will automatically search for programs. Once this process is completed, you can watch all TV channels that are provided by Dom ru.
There are unlikely to be any difficulties with the question of how to set up the Dom ru set-top box for your TV. The entire process takes place automatically. The main thing is to remember to insert your access card and set up the Internet so that all data is entered automatically.
Sometimes it is not possible to connect the device the first time, and then additional setup of the Dom ru set-top box to the TV and troubleshooting may be required. Let's highlight the main points:
- Doesn't show one channel. Make sure that this TV channel is included in your subscription and try restarting the Domru equipment. Try disconnecting and connecting the CAM module and re-tuning the channels on the Dom ru set-top box on the TV. First do it automatically, and then manually.
- No sound. If there is no sound on all channels, increase the volume or change the sound scheme. For example, you can connect an RCA cable instead of HDMI. Try resetting the data and re-entering the information.
- The TV portal does not open. If the image is “snowy” or is constantly loading, disconnect the router and the Dom ru set-top box from the network. After some time, you need to connect them again and check the operation. Alternatively, reset the settings to factory settings.
- Guide TV program does not work. In this case, also try turning off the equipment for a while and turning it on after a short pause. If all else fails, you can contact support.
- The device turns off periodically. Enter settings and go to Power Management section. Perhaps the tuner is set to automatically turn off.
- The error appears: No signal. Perhaps you haven’t figured out how to connect the Dom ru digital set-top box to your TV. Check the quality of the contact connections again, restart the equipment and set the automatic search.
The recommendations discussed above should help with the question of how to set up the Dom ru TV set-top box, and what to do if malfunctions occur.
Conditions for displaying digital channels
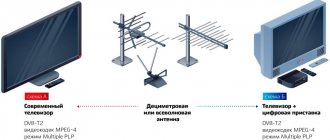
- The ability of the TV to catch a digital DVB-T2 signal. The verification methods are described above. Both built-in TV tuners and external devices (T2 set-top boxes, receivers) are suitable.
- Availability of a suitable antenna. Broadcasting occurs on shorter high frequency waves than analogue. Therefore, a decimeter antenna is needed. The meter antenna previously used to receive an analog signal will not work at all. You can purchase a UHF antenna or make it yourself. But homemade antennas, if we talk about simple options, will not be able to catch a weak signal or one that is too distant. Therefore, it is better to choose factory antenna receivers.
Coding systems
Typically, a CAM module can only support one content encoding system (for example, Irdeto, Conax, NDS, Viacness, Safeview, V >
What is the advantage of such systems and what is it?
Most modern TVs support the use of CAM modules. To understand whether a person can use this module, it is necessary to check whether a DVB-C tuner is installed in the TV. If yes, then there is a Cl slot too. Also, the Conditional Access Module, as well as the conditional access module, is a technical device used as an adapter of a specific coding system to an interface (CI, common interface). It, together with a decoding access card, guarantees the client's access to encrypted digital television lines. It should be remembered that using the Dom.ru cam module to connect pay television eliminates the need for many remote controls - one television remote control is enough for you.
Also, the cam module is an excellent solution also because there is no need to purchase a receiver - the signal is decrypted using an access card. True, to use the CAM module you need to have a built-in DVB-C tuner, as well as a CI slot, but most modern plasma LCD TVs fully meet these requirements.
The TV does not support digital TV
The easiest way is to connect a digital set-top box to your TV. The device will receive a digital signal from the antenna, convert it to analog and send it to the TV. The cost of a mid-level set-top box is approximately 1 thousand rubles. There are cheaper or more expensive options. The latter may contain additional functions, such as Wi-Fi. Then you can add functionality to the TV, which is found on most Smart TV models.
If you get a Smart TV set-top box, you can watch any channels via the Internet for free (IPTV).
The second way out of the situation is to buy a new TV. The purchase price starts from several thousand rubles. If the old TV suits you in all respects, except for the lack of digital support, then buying a new one makes no sense. Waste of money. It's easier to connect an external DVB-T2 receiver.
The advantage of a tuner built into television equipment is that control is performed with one remote control. And the image quality will be better than with an additional device.
Dom.ru as an operator
Dom.ru is a Russian telecommunications operator from the company ER-Telecom. In 2021, it launched a smart TV app for Samsung and LG TVs.
In addition to watching television channels in high quality, you can use the following services:
- viewing programs within 3 days after broadcast;
- pause programs and use rewind mode;
- view the program schedule, etc.
Now the operator operates in more than 50 Russian cities. The coverage area is constantly expanding. In addition, there is an application for mobile devices based on iOS and Android.
Making basic settings
Before setting up digital television on LG TV, you need to set a number of parameters:
- language;
- date and time;
- location.
The listed list of parameters, as a rule, must be configured after turning on the TV for the first time. But changes also need to be made if the parameters are set differently. By the way, if the TV is immediately connected to the network, then all parameters should be automatically detected.
All three parameters are set through the settings menu. Press “Settings” or the gear button on your remote control.
On new TVs with built-in Smart TV, the time, language and region settings are in the general settings. Lower the selection to the “General” item. Inside are all the necessary basic settings. Go to each item and set the desired language, country, and set the date.
For older models without Smart TV, the “Clock” item corresponds to the time, and the language parameters with the country are located inside the “Settings” item.
Setting up channels
Of course, all newly joined and existing users are interested in setting up channels from Dom ru. This is not difficult to do yourself if you follow the instructions below step by step.
The above-mentioned provider gives its clients the opportunity to connect to both cable and digital channels. Setting up cable TV channels Dom ru is quite simple and is given to everyone almost on an intuitive level. With digital channels, things are a little more complicated.
To set up cable TV channels, a simple automatic frequency scan is sufficient. You need to know how they (the channels) are located. From 1 to 20 there are regular ones for general access. Further up to 32 - artistic direction. Then, starting from 300, there are entertainment topics - comedy films, cooking shows, news from the fashion world. After 400, you can watch various educational programs. These are programs dedicated to science and development in other areas of life. After 500 - sports topics. From 600, channels for children begin.
Digital channels are configured using the CAM module, taking into account the TV manufacturer. First of all, you need to install the module and card. The card is inserted directly into the module that needs to be connected to the TV. Parameters for auto search: frequency 258000 kHz, symbol rate 6875, modulation 256 QAM.
Automatic channel search on LG Smart TVs
Auto channel search is the fastest way to tune channels. You just need to step by step select a number of parameters that the TV receiver offers, start the search, wait until the equipment scans the frequency range and detects the channels.
The procedure is the same for digital and analog television. You just need to connect the antenna and set the desired signal type in the search settings. For cable television there are a little more settings, but everything is also easy.
With automatic tuning, there is no need to determine and set frequencies in the settings. The TV will do all the actions itself, which cannot be said about setting it up manually.
Unlike broadcasting, cable broadcasting is paid. You need to enter into an agreement with the provider and make the appropriate settings in the TV menu.
The purpose of the article is to find broadcasting channels via an antenna. Below are step-by-step instructions for different types of television receivers, with and without Smart TV.
Auto search on LG Smart TV
To set up digital channels on your LG TV, follow the instructions below:
- Open the settings menu. Depending on the remote control, you need to press a button with a gear image or the caption “Settings”. Can be located on the top or left along class=”aligncenter” width=”730″ height=”480″[/img]On a number of models, you must first press the “Home” key on the remote control (house icon). Next, click on the gear at the top of the screen.
- A vertical menu will open on the left edge of the TV screen. If the menu does not open completely, but small icons are displayed, then open the full menu at the very bottom. Click on the gear at the very bottom.
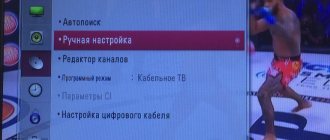
- Use the down arrow to scroll down to Channels. Next, go to the “Search for channels and settings” subsection.
- Make sure that in the “Reception mode” line the “Terrestrial TV (DVB-T/T2 and Analog)” parameter is set. Go to "Autosearch".
- Re-set the desired search mode and continue setting.
- The next page will offer only one search option, “Digital Only.” If it is not activated, the analog signal will also be taken into account when scanning. Click “Next” and the independent search begins. If the antenna is all-wave and can simultaneously receive both types of waves (MV and UHF), then you don’t have to tick the box. In the latter case, available analog and digital programs will be detected.
- The process will be accompanied by a progress bar. There is information about the number of channels found. Once the search is complete, two buttons will appear at the bottom - “Repeat” and “Done”. Press the second button to start browsing channels.
On the scan method selection page (auto or manual), after completing the setup, the “Signal Test” option will be available. The TV will scan the multiplexes and show the signal strength for each. Select the channel with the weakest reception level and go to it by pressing the central confirmation key. Based on the scale readings, you make adjustments to increase the level and quality of the signal. The main methods are changing the location and direction of the antenna.
Setting up cable digital TV is done the same way. The only difference is that instead of an antenna, you need to select “Cable” when setting up. Additionally, in some steps you will need to select your television provider with whom you have an agreement. In the list, you can click “Others”, search type “Full” and check only the search for digital broadcasts. Then the TV will scan all frequencies, the search will take longer. If you select the “Fast” mode, then you need to specify the exact broadcast frequencies.
Auto-tuning on a TV without Smart TV
- Open the Control Panel by pressing the Settings key.
- Select the “Channels” section, which is indicated by a satellite dish.
- Go to the “Autosearch” subsection.
- Select your connection. In the current case it is "Antenna".
- To have the TV scan only digital frequencies, check the box next to the corresponding item. Click on “Run” and the channel setup will begin.
- At the end of the process, a notification “Auto search completed” will appear. Additionally, the number of channels will be displayed.
If you are configuring cable or satellite television, you will need to enter the provider frequencies. You can find out the exact data in technical support.
TVs Phillips (Philips)
After installing the module, in the menu in the “Configuration” line on the “Installation” tab, select “Channel setup”, then “Automatic channel setup” and “Start”. We indicate our country. Connection type: cable.
Analogue or digital channels may be offered - choose digital or select both and click “ok”.
In Settings, enter the parameters, select the manual transmission speed type, and in the frequency mode line - manual. Then we start scanning.
If suddenly, while using Phillips, you are faced with the message “no programs available,” this means that there was a failure in setting up the channels. Way out of the situation: call Dom ru and find out how you can improve the signal quality. Or we reinstall the software. Or we contact the specialists directly at the Philips service center and leave the issue in the hands of a professional.
Manual setting
In most cases, auto-tuning allows you to find two multiplexes of 10 channels each. But, if the automatic mode does not give results, you can try the manual setting mode.
The manual method requires the presence of frequencies on which broadcasting occurs. For satellite and cable, the numbers will be provided by the TV provider. For free-to-air broadcasting, the data can be easily viewed on a digital terrestrial television (DTTV) card.
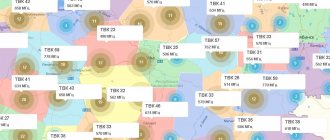
- Go to the service via the link https://map.rtrs.rf/. The location should be determined automatically. In another situation, enter your region, city and home in the search bar.
- Pinpoint your house on the map and left-click on it.
- A table will appear with the characteristics of the two closest repeaters.
- First of all, the TVC number and frequency values for each multiplex are of interest.
- Additionally, look at the distance to the tower. The closer the repeater is located, the stronger and better the signal will be. The diamond-shaped arrow indicates the direction to the tower. By taking the compass in your hands and pointing the antenna exactly at the TV tower, you can catch the signal without any errors.
When the frequencies are known, in the already familiar “Channels” menu, open “Manual search/tuning”.
Select the broadcast type (in our case, digital).
Then, in the “Frequency” item, enter the found values for the selected TV tower.
In the table on the CETV card, the value is written in MHz, but in the settings you need to indicate it in kHz, that is, add three zeros to the original number.
The frequency itself may not be specified. Just enter the channel number of your repeater. The frequency will be automatically set to the one that corresponds to the TV channel number.
Then click on “Add/Create” on the right edge and the TV will begin manually scanning the first multiplex.
The same must be done for the second multiplex in order to find a total of two dozen channels.
It would be useful to look at the signal level scale. Based on the TV readings, you can adjust the antenna for the best reception. Try changing the location of the antenna, directing the axis of the structure at a different angle to catch a stronger signal. If the level is weak, channels may also be found. But in the future, the picture will freeze regularly and squares will appear.
Instructions - Setting up a universal remote control 5304-ERT Dom.ru in Kirov
Appearance of the remote control
A universal remote control (RC) is a universal device that can replace two remote controls, namely, with the help of this remote control you can control a set-top box (STB) and a television (TV).
Important information about the remote control
Initially, the remote control is configured to control a set-top box (STB), and when batteries are installed, it starts working in HUMAX HD7000 mode (code 2222).
Switching to TV mode is done by pressing the TV button. When switching to TV mode, the red indicator will blink 1 time. In TV mode, the on/off button, number buttons, volume control buttons, channel switching buttons, menu buttons, navigation buttons, as well as the signal source selection button (SOURCE) work. The default mode is Samsung TV. In Table 1 you can find codes for setting up compatibility of other brands of TV manufacturers.
Switching back to STB mode is done by pressing the STB button. When switching to STB mode, the green indicator will blink 1 time.
How to set up the remote control to work with a TV set-top box
1.Press and hold the STB button until the indicator turns green.
2.Enter the four-digit code of the TV set-top box from the corresponding table.
3.Make sure the indicator flashes green 2 times briefly. If there is an error, the indicator will flash green once long.
How to set up the remote control to work with your TV
1.Press and hold the TV button until the indicator turns red.
2.Enter the four-digit digital code of the TV.
3.Make sure the indicator flashes red 2 times briefly. If there is an error, the indicator will flash red once long.
Table 1. List of popular TV manufacturers and corresponding codes for remote control
Codes for selecting a TV set-top box
The list of supported models of TV set-top boxes and setup codes for them are given in Table 2.
Table 2. List of supported models of TV set-top boxes with remote control setup codes
Features of the remote control with TV set-top boxes
Some models of set-top boxes have limited support for functionality, so when you press certain buttons on the remote control, the set-top boxes will either not perform any action or will duplicate the actions caused by other buttons on the remote control. A complete list of functions of the remote control buttons, depending on the model of the TV set-top box, is given in Table 3.
Table 3. List of functional assignments of remote control buttons in set-top box mode
Was the article helpful?
How to add local analogue TV channels
In addition to federal channels in digital format, local television can be broadcast in each region. If the transmission is analog, then in order to receive both types of waves you will have to connect an all-wave antenna.
The setup is performed using the same algorithm. Only instead of the items that are responsible for “digital”, “analogue” is selected. Often the item is called "SECAM L". If the system allows, mark both signals at once. Then there will be setup for both types of broadcasting and there will be no need for additional setup.
Buying a TV set-top box
Due to its low cost, a set-top box is available to almost every Dom ru subscriber. Its price is about 4,000 rubles, but, as a rule, the provider makes it possible to rent the device.
The final cost may depend on various factors. First of all, you need to take into account the number of additional functions: for example, a “multiscreen” for 2 devices will cost you 250 rubles. If you need to connect a third smartphone, you will need to pay an additional 50 rubles for it. Much depends on the chosen tariff; The more channels you need, the higher the subscription fee will be.
However, all of the above does not negate the simple fact: you will only have to spend money on purchasing a set-top box once, while the convenience of using it will quickly pay for all expenses.
Editing channels
The following actions are available:
- deleting channels;
- lock/unlock;
- change of number;
- moving through the list.
You can get to the editor through the general “Channels” section.
Next, select the channel, press the desired button and confirm the change made, if necessary.
Sorting
- The list of channels opens on the screen by pressing the “LIST” button on the remote control.
- At the bottom of the remote there is a red button with one white dot in the center. After pressing the arrows on the remote control, you select the type of television whose channels need to be rearranged.
- The channel(s) required for rearrangement are selected. A check mark should appear next to the channel name inside the circle.
- Click the yellow button with a triangular ellipsis or the button with a yellow underline (move) in the upper right corner of the screen.
- The channels will become active for movement. The checkmarks will stand out more prominently.
- The remote control performs dragging. Using arrows, moving the channel up, down, right or left, the final location is determined. Before confirming the move, you need to place selections on the channel in front of which you want to place the dragged one.
- Sorting is confirmed with the “OK” button (central between the arrows).
- As a result, the channels will be in a new location.
Removal
Through “Editing channels”, the channel to be deleted is selected (checked). The red button with one dot is pressed.
Or, on the top panel on the right, select the “Block/Unblock” option.
The channel will no longer be displayed if you switch using arrows.
The channel will not disappear completely. You can view it if you know the serial number and enter it using the remote control using numbers.
Digital television: set-top box capabilities
The device, developed by Er-Telecom specifically for Dom ru, is a multifunctional receiver. It not only makes it easier to search and watch channels, but also gives the viewer a lot of other opportunities:
- “Smart” multi-level search, making it easier to navigate through channels and services;
- ability to enable or disable subtitles;
- selection of broadcast language, provided that there is more than one audio track on the channel;
- interactive TV program for the week ahead;
- parental controls that allow children to block access to channels that do not meet age restrictions;
- watching movies online through Internet resources.
- the ability to group channels into their own lists according to the selected criteria.
Despite the fact that digital television is mainly broadcast without any additional equipment, only using a set-top box can you access all HD channels without exception. Currently, their number reaches 56, while the total number exceeds 160 items. Many other functions also cannot be connected without the Dom ru receiver, since they only work on the software of this provider.
Possible problems and solutions
The TV does not find channels.
- Make sure all steps are correct. The wrong search mode may be selected.
- The antenna for digital can only be UHF. Meter receivers for analogue waves will not work.
- Check the antenna cable. Is there a break in the cable and is the plug inserted into the antenna connector on the TV?
- If you are using an external receiver (set-top box, T2 tuner), then double-check the connection diagram so that each cable is inserted into the correct connectors.
No signal.
Try retuning the channels again, but first change the antenna location. Select one of the countries: Germany, Sweden, Finland. Broadcasting in these states uses the same technology as in the Russian Federation.
Check to see if the antenna is positioned out of alignment. Inspect the cable for damage or severe bends. If you have experience, test the cable with a device to be sure of the integrity of the conductors. Check the antenna contact points where it connects to the cable. Renew contact if necessary. It is advisable to protect the joint and varnish it.
Channels get lost and disappear.
- It is possible that another software update caused the loss of channels. If you know for sure that the update was installed and then the channels disappeared, then you need to reset the TV. Open the settings panel, get to the “General” section. Inside, click on “Factory reset” and agree to the warning. All settings will be reset to the state in which the TV left the factory. That is, the equipment will have to be configured again, all applications installed, etc.
- Some models have an option that, when turned on, automatically updates channels. On the remote control, click on the “Home” button. Go to “Digital cable settings” and in the “Auto update” item set it to “Off”.
What to consider?
To make the most of all the advantages of Dom.ru, it is advisable to enter into an agreement with the operator, but a number of nuances should be taken into account. Be sure to carefully read all the terms of the contract.
If the connection to the services was carried out as part of a marketing campaign, upon termination of the contract, at the request of the subscriber, he must pay a fine. No fine will be charged if the subscriber refuses services due to moving to another place of residence.
The cost of the subscription fee includes payment for the tariff line. If a subscriber stops using tariffs, he must still pay this fee. To avoid unnecessary expenses, you need to sign an agreement to suspend the use of the operator’s services if the user does not plan to use them for some time.
What about IPTV
IPTV – Internet television. To display many channels for free viewing, you need to install a special application on your TV and configure it together with the IPTV service.
- Open the LG Content Store. Available in the list of applications on the Quick Access panel.
- Go to "Applications".
- Through the search, start typing the application name “SSIPTV”. Select the appropriate one from the proposed options.
- Go to the application page.
- Complete installation and launch.
- If the application asks you to select a country or city, you can skip all the steps at once through the button in the right corner of the screen. We will not watch TV through a specific provider, but will start using publicly available playlists for viewing. Therefore all settings are skipped.
- Through the gear icon at the top right, open the application settings.
- In the “Connection code” section, click on “Get code”.
- From another device (computer or phone), go to the application website using the link https://ss-iptv.com/ru/users/playlist.
- You need to enter the received code into the free field and click “Add device”. The service will automatically detect the name of the TV.
- We find an IPTV playlist with channels that are interesting to you. You can download playlists from our website or from any other website on the Internet. On the SS-IPTV service, click “Open”, select the downloaded playlist file in the “.m3u” format. All channels contained in the playlist should be loaded. Be sure to save your settings.
- Exit the SSIPTV settings on your TV and refresh the page (circular arrow icon). The playlist will appear in the application work area.
- Go inside to view the list of channels. Listing is done by moving the cursor to the right or using the corresponding buttons below the list. The number of TV shows depends on the specific playlist.
- To turn on a specific channel, you can enter part of its name in the search.
IPTV works exclusively over an Internet connection.
For high-quality display without freezes, the connection must be at least 50 Mbit/s. It is a priority to connect the Internet via a LAN cable rather than over the air (Wi-Fi).
How to connect the set-top box to the TV
The first thing you need to figure out is how to turn on the Dom ru prefix and create a home network to use the device. The general algorithm of actions looks like this:
- Connect the antenna cable to the Cable IN jack of the device.
- Install an access card to Dom ru. Without it, you won't be able to connect your TV.
- Connect your device to your TV. Here a lot depends on the type of available connectors on the TV. If HDMI is available, it is recommended to use an HDMI cable. If you only have DVI, use an HDMI-DVI adapter for video and RCA for audio. Alternatively, you can use "tulips" or SCART.
- Plug the adapter into a power outlet using the included power supply.
- Connect one end of the Ethernet cable to the set-top box and the other to the router. Next, decide how to connect the Dom ru set-top box to the Internet. To do this, connect the Wi-Fi adapter to the tuner's USB port, go to Settings and Internet Settings, and then select Network and enter the password.
The connection diagram for the Dom ru set-top box to the TV is simple and is unlikely to cause any difficulties. The main thing is to immediately decide on the connectors and buy a cable with which you can connect the tuner to the TV. In most cases, an HDMI cable is used for these purposes.
By the way, for those who spend a lot of time on the road, the provider has come up with a special option to watch Dom ru digital TV without a set-top box.