Modern Sony Bravia TVs, not only with the Smart TV function, can experience the benefits of digital TV without purchasing additional equipment. The search for available programs is carried out through the built-in receiver. Exclusively for users who have not previously encountered equipment from a Japanese manufacturer, instructions for use have been created to help set up the image, sound, and other parameters.
Features of Sony Bravia TVs
Before connecting digital television and setting up the panel, check whether the model has a digital tuner. If the model was released after 2015 for the Russian market, this option is 100% available. For older TVs, you can use the manufacturer’s official website, where you just need to enter the TV modification in the search bar. If your Sony Bravia TV does not have a built-in T2 tuner:
- buy an external TV set-top box that allows you to receive and decode a digital signal;
- update your TV. The old model is not always able to produce a high-quality signal and provide access to all functions.
Recommendations for setting up your TV before using it
If you are setting up channels on a Sony Bravia TV for the first time, you should perform a few simple procedures in advance that will make life much easier in the future.
- When you first start, select the language. If it was not installed during the initial setup, we can do this in the “Settings” menu on the “Language” page.
- Setting the location. In order for the TV to process the signal correctly, display TV programs, and display the correct time, we recommend setting a real geolocation. In some cases, you need to switch to another region, for example, some devices do not have access to the high-frequency Wi-Fi range in Russia, but after switching to America, everything works fine.
- Set a password. We can do this in the settings. This configuration of the Sony Bravia Smart TV will allow you to block channels with content not intended for children.
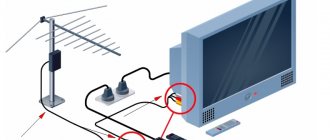
- We check that the antenna, HDMI cable, power supply and other cables are connected correctly.
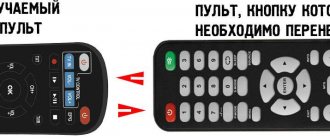
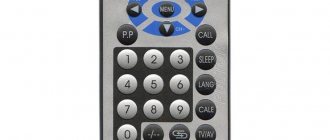
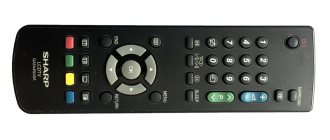
- Insert batteries into the remote control. It will make navigation easier and faster.
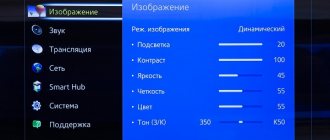
There are many more parameters that are useful to configure on the Sony Bravia Smart TV, these include brightness, contrast, sharpness, calibration, sound, but they all follow a similar principle. Some are located in the TV settings, the other can be adjusted directly on the remote control.
TV setup
To set up your TV correctly, you don’t have to call a TV technician; you can do it yourself. It is enough to follow the instructions in order.
Before starting the procedure, you need to download a calibration diagram to a flash drive or hard drive and open it through the built-in multimedia player of the TV panel. But for models with Smart TV support, calibration files can be retrieved directly from the Internet.
Many Sony Bravia TVs support Smart TV.
Calibration
You should start calibrating by checking the image size settings. The default settings visually enlarge the image, which reduces sharpness. As a result, moire may appear on the contours of the resolution bands. For change:
- go to “Settings” – “Screen Control”;
- disable the “Automatic display area” item;
- also uncheck “Maximum resolution.
As a result, arrows should be visible in each corner of the panel, which indicates correct calibration of the panel.
Brightness
Using the tuning diagram, determine the darkest area in the gray stripe. Using the remote control, change the value so that the black area located on the left side of the picture becomes extremely dark. If there are visible differences between the right and left sides, the brightness setting is correct.
Contrast
To set the contrast, use the lightest part of the adjustment table. Change the level until the right side of the screen becomes extremely light. With the correct values, the difference between the right and left zones will be significant.
You can adjust the contrast on your TV.
Sharpness
With increased sharpness, the image will look unnatural and hurt your eyes. To troubleshoot the problem, use the intersecting lines located on the diagram. Lower the sharpening value until there is no light outline along the lines.
Saturation of the color palette
To make the image natural and saturated, change the dynamics of the palette until all the transitions on the central gradient become clearly visible.
Sound settings
The user can select internal speakers or external acoustics as the main sound source. Next, just turn on the channel and adjust the volume to an acceptable level.
Extra options
To prepare your TV for digital television, connect the antenna cable to the provided input and select the “Antenna” signal source in the settings. Make sure all additional devices are disabled.
How to set up a Sony TV yourself?
The instructions on how to set up a Sony TV are universal and suitable for almost all models. The menu interface is similar, so there are no significant differences.
Experts note that the menu of Sony brand plasmas is more complicated than that of TVs of other brands. It is sometimes difficult for the user to understand the incomprehensible symbols and additional functions with which the panel is equipped.
Standard recommendations
Before connecting the device to the network, you need to check that all cords are connected correctly and that they are securely fastened. After turning on the TV, you need to wait a while so that the installation of the system is completely completed, only after that you can proceed to the basic settings of the Sony TV.
All actions are performed using the control panel. Parameters such as sound, image, Internet connection and speaker system must be configured in the “HOME” menu. This is the main tab; all the necessary settings for the Sony TV are performed in it.
Automatic channel search
Setting up a Sony TV begins with searching for TV channels. On new models it is performed automatically. To start the operation, you need to hold down the “MENU” button for a few seconds; standard settings for searching for TV channels will appear on the TV screen.
During the procedure, interference and channels found by the device will be displayed on the TV screen. When the search operation is completed and the channels are in the correct order, the screen will function normally.
Search for digital TV channels
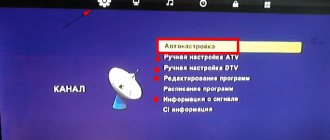
Digital channels are configured according to the following scheme:
- Go to the “Main Menu” tab by pressing the Home button on the control panel.
- Select the “Digital Configuration” section; if there is no such section, then select “Autostart” and immediately go to step No. 5.
- “Digital tuning” tab – “Automatic search for digital stations”.
- Select cable type connection.
- You must enter the parameters required for the search.
- If all actions are performed correctly, the device will find digital programs available for viewing.
- To turn on the internal clock, perform the following steps: “installation” - “digital configuration” - “technical configuration”.
- In the tab that appears, select the GMT time zone.
This is the main way to set up digital channels on a Sony TV.
Sony Trinitron
In order to install channels on Trinitron models, you must adhere to the following rules:
- Press two keys on the remote control at the same time (up arrow and right arrow).
- Using the PROG button, select the channel number that should be infused.
- Press the button (up arrow) and the keys next to it.
- In order for sound to appear, hold down the key (up arrow), as well as the key with an asterisk.
- Remember the desired channel and press two keys on the remote control (up and right arrow).
- The operation is completed.
- If you cannot find the TV in this way, this means that the device has problems with the memory unit, repairs are required, it is recommended to contact a technical center.
The best option for setting up channels on a Sony Trinitron TV.
Detailed information can be found in the instructions supplied with the device by the manufacturer .
If there is no paper copy, it is recommended to find its virtual version on the company’s website. The user needs to thoroughly study the instructions for his model to avoid problems when connecting the equipment. Also read how to set up Smart TV on Samsung and LG TVs yourself.
Search channels
Setting up digital terrestrial television on a Sony Bravia TV is done the first time you turn it on; you can’t do it without a remote control. On first launch:
- select Russian menu;
- determine your region of residence, which will help the TV choose a priority broadcast standard that ensures signal reception;
- select a PIN code to control access to content;
- indicate viewing location – home. If you select the store item, advertising blocks will regularly pop up on the screen telling about the advantages of the model;
- determine the installation method - on a stand, wall mount, so that the panel automatically adjusts the sound quality.
Search for channels on your Sony Bravia TV.
Setup steps may differ slightly on different models. After setup, to get into the channel search mode, go to “Menu” - “Options”, select one of the modes.
Auto
To auto-search, go to the corresponding menu item. To start your search:
- select broadcast type: digital;
- check whether the Antenna signal source is installed correctly;
- click "Search for channels".
The tuner will take a few minutes to scan the frequencies, after which a list of available channels will appear on the screen. If desired, you can edit it: remove unnecessary programs, change the number, select priority ones. After completing the search, it is recommended to restart the TV.
If channels are not detected or are added in insufficient quantities, change the direction of the external antenna. If the signal source is the provider cable:
- open “Options” – “Channel settings” – “Digital”;
- specify the connection type;
- enter additional parameters: company name, service provider, frequency, network ID.
- click "Search".
You can obtain the data necessary to set up channels from your service provider.
Manual
You can also set up digital broadcasting on Sony TV manually. To do this, using the remote control:
- go to “Menu” – “Options – “Manual search”;
- change the broadcast frequency using the + and – keys until the desired channel is found;
- Carry out the procedure for all programs.
After saving the channel, fine-tune it using the corresponding menu item. This will allow you to achieve better image quality.
Manual channel search.
What is 4K and HDR?
Description of 4k resolution
4K is the general name for a resolution with approximately 4000 horizontal pixels. The resolution of an image or TV screen is the number of pixels that make up the image. The more pixels, the more contrast and clarity the image will be. 4K resolution has approximately 8,290,000 pixels, which is 4 times that of Full High Definition (2K). Even when viewed on a large screen, it delivers high-quality images down to the smallest detail and reproduces lifelike details and textures. Another name for 4K is Ultra HD (UHD), as it has higher image quality than high definition (HD).
| 2K | 4K |
| 1920 x 1080 pixels | 3840 x 2160 pixels |
Description of HDR
HDR stands for High Dynamic Range and provides a wider range of brightness values than regular images. A higher standard of available brightness produces high-contrast images and detailed colors.
| Standard image | HDR image |
 
Tips and tricks
Sometimes the TV may not find digital channels, or they may suddenly disappear. In most cases, the reason lies in resetting the TV. To fix the problem:
- search for channels again in automatic or manual mode;
- do a full reset to factory settings, then reconfigure the TV using the instructions.
Also, the reasons for the lack of signal may be external factors:
- poor connection of the antenna plug;
- Damage to the antenna cable.
Setting up digital television on Sony Bravia is a simple procedure that does not require special knowledge or skills. Convenient, intuitive interface, quite flexible, allows you to make precise settings in a few minutes.
How to access the Internet on a Sony TV?
Before you can enjoy all the benefits of the Internet, you need to set up access to it. In the case of a cable network, everything is quite simple, just connect the wire to the corresponding port on the TV, and the network will become accessible (if you do not need to enter a password). The wireless connection is a little more complicated to set up.
How to connect Wi-Fi on Sony TV:
- Press the Home button on the remote control.
- Open “Settings”, and then the “Network” tab.
- Click on the “Network Settings” option.
- Go to the “Wireless setup” section. Here we can “Set up a network connection” if you need additional parameters for working with a cable network.
- Select the “Easy”, “Automatic” mode or press the WPS button.
- Follow the connection wizard's prompts.
If you need to specify auxiliary network settings, then in the fifth step select the “Expert” or “User” mode.