Methods for setting up NTV-plus yourself. Connection features and installation. Instructions for setting up the NTV-plus kit.
- What does the NTV-plus set consist of?
- Self-installation of the NTV-plus antenna
- Do-it-yourself NTV-plus antenna setup
- NTV-plus satellite dish: manual tuning
- Setting up NTV-plus channels
- How to set up NTV-plus Vostok channels
- Setting up Samsung and LG TVs: instructions
- Problems and solution
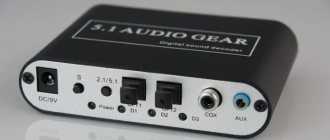
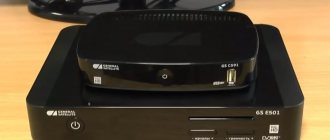
What does the NTV-plus set consist of?
The equipment in question is used to receive satellite television channels; you can connect to it in any region of the country. The kit includes:
- A receiver that provides demodulation of the satellite pulse with subsequent transmission of clear pictures and sound to the consumer’s television receiver.
- Access card. It processes information about the current tariff and activates access to the selected tariff package. The element is compatible only with modern modifications of televisions capable of reproducing all full-screen image configurations. If the receiver is purchased separately, then the smart card must be purchased accordingly.
- Antenna. The satellite dish has a diametric polarity of 0.6 m, is made of steel, and is equipped with fasteners. The device is mounted on a window or roof.
- Converter with circular polarity, documentation for connecting services.
Difficulty connecting
When a homeowner decides to install and configure a satellite dish with his own hands, he may encounter certain difficulties, such as:
- incorrect orientation of the sectoral reflector of the satellite signal;
- improper fastening of the plate;
- purchasing a receiver that does not meet NTV+ settings;
- the smart card does not match the receiving device;
- inaccurate focusing of the converter irradiator;
- the diameter of the dish does not correspond to the reception of electromagnetic flux from the satellite in this region;
- incorrectly chosen form of payment for services.
All this can be avoided if you contact the specialists of NTV Plus or an affiliated company. Professionals will deliver all the equipment using their own transport, determine the most advantageous location of the reflector, securely fasten the dish, and set up the receiver and TV.
NTV Plus subscribers have the opportunity to watch not only domestic programs, but also receive the most popular foreign TV channels on their televisions. The NTV Plus company is constantly improving the quality of satellite equipment components, replenishing it with new models of receivers, converters, etc. The constantly changing system of discounts allows the consumer to expand the range of received TV channels.
Self-installation of the NTV-plus antenna
Before installing the equipment, you must make sure that the populated area is in the signal reception area. They purchase the NTV-plus package with a choice of a suitable tariff package.
If you need to activate the service for two or more receivers, you will need several tuners. You can install the antenna yourself or with the help of a professional.
How to choose an installation location
When installing, you need to consider a number of points:
- the plate is placed out of reach of passers-by or household members, not behind the sash of a swinging window;
- the support must withstand gusts of wind, taking into account the windage of the “saucer”;
- Blocking obstacles (reinforced concrete structures, radiating repeaters, tall trees) are not allowed on the pulse supply path;
- It is not recommended to place devices that create interference near the antenna and cable.
Find out the direction of the NTV-plus satellite using a compass and a map of the area. You can also use mobile applications such as SatFinder.
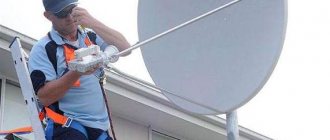
Pole mounting
When carrying out work, it is necessary to observe all safety measures, especially if the actions are carried out at height. The converter is fixed in advance, without lifting the plate. The support column is attached to the base using suitable elements (self-tapping screws with fixed washers for a metal profile, anchors for wall coverings made of brick or concrete).
Initially, the antenna is approximately oriented towards the satellite; the bracket is not tightened to the limit until fine tuning has been carried out.
Cable routing
The solution to this problem depends on the user and the design features of a particular point. In order not to spoil the interior design of the room, the wires are pulled from the outside of the room. To optimize the route, the length is calculated with minimal twists and turns. Otherwise, amplification of the received signal through intermediate inserts will be required. Internal wiring can be hidden in grooves.
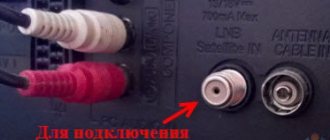
Connecting cables
The NTV-plus set-top box is connected to the TV via an antenna cable, which is plugged into special connectors found on all modern TV receivers.
You can connect equipment in several ways:
- Via "tulips" (RCA). On the receiver panel there is a composite socket with a 3.5 mm minijack. TV connectors are standard; video and audio have their own colors. The wires are connected according to shades, and the resulting picture is not of the best quality. The method is appropriate if there is no access to digital channels.
- The most common option is HDMI. With digital support, this method guarantees the highest possible image and sound quality.
- SCART. An outdated connector that can aggregate with analog and digital channels. A special adapter is required for connection.
Using an access card
The card provides access to the opening of TV channels, according to the tariff. It is installed in the corresponding slot of the CAM module. Before using the set-top box, you should study the rules of use and the capabilities of the key card.
Externally, it is a compact plastic part with an embedded chip on which information about subscriptions and payments is stored. All smart cards are assigned a unique 12-digit number. Using it, the operator identifies the subscriber in the database. In addition to this element, connecting paid NTV-plus channels requires the conclusion of an agreement and special equipment. There are several versions of the kits, assembled taking into account the specific needs of the client. The standard system includes a receiver, antenna dish, and HD set-top box. If the tuner does not have a card slot, you will need to purchase a CL module.
It is not recommended to unnecessarily remove the NTV-plus smart card from the device or insert it into switched-on equipment. To avoid malfunctions, do not get it wet or bend it.
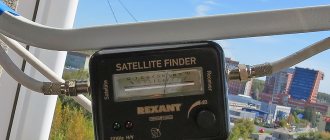
Fine tuning
The process involves setting the dish position to ensure maximum quality of satellite signal reception.
- To do this, turn on the TV and set-top box.
- Select any available channel from the list of channels.
- The antenna mirror is changed until the picture becomes of high quality. This is the initial setting; signal level information is displayed in the menu.
- The dish is adjusted to the maximum value on the channel reception scale. Finally tighten the bracket.
- It is better to adjust the antenna with an assistant; one person turns the dish, the second is responsible for analyzing the signal quality.
- When they are far apart, they use a walkie-talkie or mobile phone to communicate. After each change in the dish's position, a signal observer is notified, who compares the reception performance.
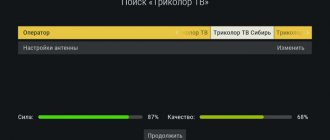
- The optimal pulse capture parameter on the menu scale is considered to be at least 70%.
Do-it-yourself NTV-plus antenna setup
The process begins with the installation of the main equipment. When installing yourself, you need to remember the following nuances:
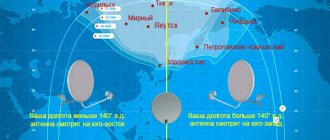
- The satellites Eutelsat 36B/36C, Eutelsat 36A “travel” over the equator, and therefore the dish is directed towards “South”. A compass will help in determining the exact coordinates. The directional angle is 17-38 degrees (depending on the operator of the television provider NTV-plus).
- To obtain a stable signal, it is necessary to take into account the overview of the territory, to exclude tall vegetation, multi-story buildings, and other interference in the broadcast path.
- The bracket is mounted in such a way that the dish does not change its course direction in the future, in order to avoid loss or deterioration of the signal quality.
- The cable must be of high quality and resistant to weather changes.
Some historical facts
NTV Plus is the digital equipment of the Russian television company NTV. She became the founder of satellite television in Russia. At first, the broadcast was analogue, but only a few years later, broadcasting began to be carried out in digital format. “Digital” made it possible to receive high-quality television pictures without interference.
Since 2000, the main video signal transmitters have been the Eutelsat W4, W7 and Bonum 1 satellites. For more than 15 years, satellite TV NTV Plus has been widely popular among television viewers in Russia and other countries. The broadcast is mainly carried out in Russian for a Russian-speaking audience not only in the Russian Federation, but also in many countries around the world.
NTV-plus satellite dish: manual tuning
The antenna mirror is rotated horizontally and vertically to capture satellite pulses. The goal is considered achieved after the first appearance of a clear image on the television screen. At the next stage, select the “received signal level” line on the TV. The higher the indicator scale, the more stable the program reception.
Manual search is more difficult and requires some experience to implement it. The procedure is performed as follows:
- Reset settings to factory settings. Step by step - “menu” / “settings” / “default” / “channels” / “antenna”.
- Using a panel with buttons on the receiver, you adjust the satellite dish. When prompted for a password, enter 0000.
- A section will then open showing several satellites. Checkmarks will appear opposite those satellites that are allowed by default. Unnecessary tags must be removed so that they do not interrupt NTV-plus. For full access you will need an access card.
- Transponder parameters – 12130 R/0/10750.
After adjusting the transmitter, enter the current parameters in the appropriate line. Further settings are carried out through “manual adjustments”; they take a lot of time, but will broadcast the channel in the quality selected by the user.
Transponders for HD
For lovers of satellite TV in HD quality. A number of special devices with HD frequencies are available:
- 12399 R: KHL TV HD, Discovery Channel Russia HD, Film Premiere HD;
- 12207 R: TLC Russia HD, Eurosport 1 HD, History Russia HD, Amedia Premium HD;
- 11930 R: Viasat Nature/History HD, Viasat Sports HD, FOX Russia HD, Viasat Sport East HD, TV 1000 Comedy HD;
- 11823 R: Match! Football 1/2/3 HD, Nickelodeon HD, MTV Live HD, Our Football
It must be said that the transponders listed above have frequencies in the range of 11800-12400 MHz. The reason is that they make it possible to maintain a high-quality HD signal without degrading the coverage area or interruptions.
Right polarization allows you to produce a clear, complete and stable signal, which, importantly, does not at all affect the channels from multiplexes No. 1 and No. 2.
Setting up NTV-plus channels
The general configuration of the adjustments is as follows:
- Reset the current state by activating the “setup”, “default”, “channels”, “antenna”, “satellite settings” windows.
- To enter the set-top box, the default code is 0000. When changing the password, indicate the updated version.
- A tab will appear in which you should uncheck the default satellites. If the process is blocked, you need to mark the icons as deleted, except for EutelsatW4 36E.
- They take out the transponder card and then configure it.
At the final stage, the identified channels are confirmed, the number of which depends on the user’s access to the selected tariff.
When automatically searching, select “Settings Wizard” in the receiver menu; available programs will be found by the device and added to the list. The manual method is relevant if the automation does not work correctly, or the work is carried out on universal equipment that serves a large number of providers.
Subscription fee
Payment for the use of NTV+ satellite television is made in several ways:
- Online
- Off-line.
Online payment
It is paid either with or without a commission - it depends on direct payment or through an intermediary. Monthly fees are accepted without commission through bank cards, from a smartphone account number or in cash at banks: Gazprombank, AKB Promsvyazbank, AKB Rosbank, URALSIB, Sberbank and VTB24. You can also pay your bill at their ATMs.
Through the online banking system, the payment will be accepted with a commission by Bank Vozrozhdenie.
Off-line
NTV+ offices will accept subscription fees without commission. They are located in official representative offices, showrooms and regional centers.
Retail chains such as Euroset, ION, MAXIMUS, Svyaznoy, Tekhnosila, ELEX and Eldorado will charge a commission fee.
How to set up NTV-plus Vostok channels
The general setup of TV compatibility with the equipment in question is performed identically to the above method. Depending on the modification of the receiver, the exact adjustment is slightly different.
To register a CL module with an access card, you will need to log in to the operator’s official website. After filling out the form correctly, you will receive a confirmation email. At this stage, the subscriber has access to the contract registration service. After its conclusion, the card will be activated automatically within 24 hours.
You can purchase the Cardsharing NTV-plus package. It contains all the necessary parameters. The consumer simply needs to connect the module to the receiver.
Setting up Samsung and LG TVs: instructions
Before making adjustments, make sure that the CAM module is present in the receiver. In addition, check that the wires are correctly connected to the appropriate connectors and that the set-top box and TV are turned on.
Step-by-step instructions for setting up NTV-plus for Samsung TV:
- Go to the menu, select the “Broadcast” section.
- From the list of proposed configurations, select EutelsatW4 36E and confirm saving.
- Open the “LBN settings” item with any transponder. Turn off DiSEqC mode. The parameters of the upper LNB are 10750, the lower ones are 9750, tone 22 is deactivated.
- Press “Return” twice on the remote control.
- Proceed to searching for channels manually.
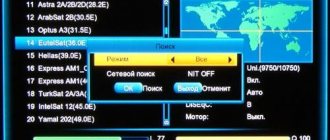
- Re-select the satellite EutelsatW4 36E, transponder No. 11900 (V/R) 27500, confirm with the “OK” button.
- Set up a network search.
- In the “Broadcast” item, click on “Change channels”, selecting the program to which you want to assign a number. The operation is performed in the “Change number” section.
- After sorting the channels into categories, the setup is considered complete. If the process was handled by a specialist, it is recommended to mark the programs that are most often viewed by the consumer.
For LG TVs, NTV-plus adjustment is done identically, only the transponder indicators are indicated as in the photo below.