A transponder is a wireless communication device that automatically receives, modulates, amplifies, and responds to incoming signals in real time. The term comes from a combination of the words transmitter and responder (transmitter and responder).
These devices can be divided into two main categories, differing in power mode: active and passive. A passive transceiver allows a computer or robot to identify an object (for example, magnetic tags on credit cards and anti-theft stickers on items in a store). It is a tiny chip and its information can be detected from a distance of up to one meter.
The simplest active transponders are used in positioning, identification and navigation systems for commercial and private aircraft. This type of device can operate over distances of thousands of kilometers.
What is a satellite transponder? This is a complex active device that is used in communications satellites and on board spacecraft. It receives incoming signals in one frequency range and simultaneously transmits them in another range. Its design is similar to the repeater used in terrestrial cellular telephone networks.
Information
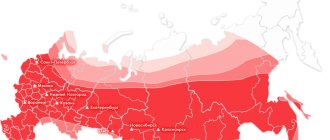
Today, there are more than a hundred satellites in the geostationary orbit of the earth, which relay thousands of digital TV channels based on DVBS.
In turn, on board each satellite there is a number of transponders that operate at different frequencies. To get the best results, FastSatfinder users are advised to update their transponder lists from time to time.
Transponder lists are text files in INI format that contain transponder information such as frequency, polarization, symbol rate, and sometimes other additional information. Lists of transponders are usually located in the Transponders folder, which in turn is located in the root folder of FastSatfinder, ProgDVB or another program. To reduce channel scanning time, you can use transponder lists downloaded from our website together with ProgDVB and some other programs for watching satellite television.
Data protection methods
Sometimes, due to various atmospheric and other phenomena, the quality of the connection between the satellite receiver and the transponder complex may be poor. This may damage certain data transmitted via transponder communication channels. The frequencies remain unchanged.
Hotbird devices (especially the 13e model) are most protected from such influences, but even they are susceptible to them to some extent. To ensure that signal losses go unnoticed by users, certain measures are taken, which are illustrated in the table.
| Measure | Description |
| Entering service information | It is introduced into the signal in order to quickly restore those fragments that were lost due to a bad signal |
| Multi-level coding | When using multi-level encoding of a satellite broadcast data stream, loss of information is prevented (although not 100%) due to the degree of information redundancy, as well as noise-resistant encoding |
Thus, if the azimuth is correct, then even in bad weather you can count on signal stability and the least likelihood of losing any data coming through the hotbird transponder communication channels from the satellite to your receiver. In this case, the list of channels, as well as their keys, does not change.
The hotbird 13e model is considered to be the most secure and the most stable today, since it has such transponder communication parameters that the signal can be detected even with interference occurring in the atmosphere.
The main task that needs to be completed in order to minimize the likelihood of signal loss is to correctly determine the azimuth in order to connect to the satellite on the most favorable terms.
Update:
- Monday,
- November 11, 2019
To update the transponder lists, simply click on the 'Download' link. Save the update in a place convenient for you (for example, on Desktop) and double-click to launch it.
✓ All-in-One transponders with auto-installation for ProgDVB
Download
Transponder in radio frequency identification systems
The first radio identification systems using a transponder were developed for the purposes of British aviation and made it possible to distinguish enemy aircraft from allied aircraft. Currently, transponders are used in aviation in collision avoidance systems and radar surveillance systems.
The commercial version of radio identification systems is the result of many research and scientific projects. The first civilian devices based on it - door locks opened with a special radio key - appeared more than 30 years ago.
Radio frequency identification, or methods of identifying objects using radio waves, has revolutionized modern logistics and control systems. The transceiver-based card is an excellent example of how new technology can change the image of the market, create new products and ultimately solve a number of problems.
It is used in electronic customer service systems and is a type of contactless card. It has a built-in chip containing a unique code. This code is assigned to a specific client when creating an account. The card is issued after creating a client account, and the client who pays a certain amount to this account receives the opportunity to receive cashless services at this institution.
The advantages of contactless cards have made it possible to use them in such areas as:
- electronic system for access control and working time recording at enterprises;
- paid access to various facilities (amusement parks, fitness rooms, passenger lifts, etc.);
- electronic payment for public transport;
- payments for car owners (for services at gas stations, payment for parking spaces, toll roads);
- anti-theft systems for cars (immobilizer, alarm, etc.);
- mini-payments.
Update:
- Monday,
- November 11, 2019
| transponders | File | |
| Full archive (without installer) | Download ZIP! | Download 7z! |
| C-Band | Download ZIP! | Download 7z! |
| Ku-Band linear | Download ZIP! | Download 7z! |
| Ku-Band Circular | Download ZIP! | Download 7z! |
You can also download lists of transponders for any individual satellite.
| transponders sorted by region | |||
| Europe | America | Asia | Atlantic |
Bent Pipe Transponders
This kind of transponder takes over the microwave spectrum signal. It reorganizes the input signal frequency into the RF frequency and then increases it.
Such a device is suitable for relaying both analog and digital signals.
The signal is transmitted from the satellite through several transponders
Selecting a location for installing a satellite dish.
Try to find a place to install the antenna so that it is easily accessible. The most optimal is your balcony, or the wall under the window, since it is always possible to retune to another satellite or add a few more, and servicing the dish is easier.
When you attach the wall mount, I recommend making markings using a “level”; the more level the bracket is installed, the fewer problems and questions there will be about adjusting the plate. The figure shows the places where you need to apply a “level” when marking the holes for the bracket.
Use only a metal anchor bolt on concrete and brick surfaces. The antenna should not dangle, since any deviation even by 3-5 mm is fraught with loss of signal, and with a strong gust of wind the bracket can be torn out of the wall. Do you need these problems?
When purchasing a set of equipment, be sure to ask the seller to demonstrate the operation of your
receiver. Additionally, you will have to purchase a coaxial cable, the length of which you first measure at home, special connectors called F-connectors (two pieces), and anchor bolts for attaching the bracket, since all this is not included in the equipment delivery.
Types of car transponders
Today there are different types of transponders. And this is logical, given the fact that the practice of using these devices came from abroad. In European countries, any car that weighs more than 3.5 tons must have a transponder. Moreover, it does not matter whether it belongs to a legal entity or an individual. Even cars that came from other countries should be equipped with it.
The following types of transponders are currently used:
The EasyGo and AutoPASS transponders cost approximately the same, and they both work in the same way, so it doesn't matter which one you choose.
Types of satellite signal polarization
In addition to the frequency spectrum (range), satellite signals differ in the type of signal polarization. Here are the main types of signal polarization you may encounter:
1) Linear horizontal - abbreviated as “ H ” (Horizontal).
2) Linear vertical - abbreviated as “ V ” (Vertical).
1) Circular right - abbreviated as “ R ” (Right).
1) Circular left - abbreviated as “ L ” (Left).
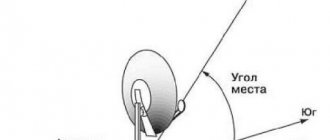
Horizontal signal (Horizontal) - goes to the satellite antenna in the horizontal plane ( Fig. 1 ).
Rice. 1 Horizontal polarization signal
vertical signal (Vertical) is in the vertical plane ( Fig. 2 ).
Rice. 2 Vertical polarization signal
In circular polarization (Circular) - the signal seems to rotate in one direction or the other at a very high speed, conventionally called right - Right ( R ), and left - Left ( L ) polarization.
Rice. 3 Circular polarization signal
In addition to frequency, the satellite radio signal has a rather complex pulse shape, or rather pulses. After all, it transmits both image and sound, sometimes even several TV channels, not to mention the data stream on the satellite Internet. All this explains the very high frequency of the satellite signal itself.
.
Where can I buy a transponder?
Now you know what it is - a transponder. But where is the best place to buy it? Don't try to buy it online. These devices are sold only at specialized sales points. These points are located at the toll collection points along the road.
The process of purchasing a device involves concluding an agreement that stipulates the specifics of providing services using a transponder. To receive this device, individuals need to write an application in a special form and attach documents to it: a passport (must be the original) or another document confirming their identity and place of registration. It is also necessary to provide contact information, submit a tax registration document, and an extract from the register of entrepreneurs or legal entities. Of course, everything is simpler for individuals.
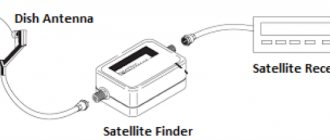
Sat-Finder satellite signal setting indicator
When installing and
configuring a satellite dish
, you often have to carry with you a rather bulky set of tuning equipment. Therefore, if we take into account that the satellite dish itself may be in a hard-to-reach place, then this setup method becomes very inconvenient. In this regard, some users use special equipment for this setup (signal indicators, analyzers, etc.), which are connected near the installed satellite dish.
Nowadays, a fairly popular way to set up a satellite dish is to set up the antenna using the Sat-Finder device.
Based on this, in this article we will talk about setting up a satellite dish yourself using one of the low-budget Sat-Finder models.
Sat Finder:
Sat (short for satellite) - satellite, Finder - Seeker. This is a device for setting up satellite dishes
on the street without a receiver or TV nearby.
Below in the photo (Photo 1), one of the Sat-Finder satellite antenna setting indicators, from the manufacturer ATLANTA, is shown.
Photo 1. Sat-Finder - ATLANTA.
This Sat-Finder is equipped with an audible signal for the presence of a satellite signal, a sensitivity regulator, an indicator of the type of polarization, and an indicator for the presence of a “22 KHz” converter band control signal. The cost of such a device, at the time of writing this page, ranged from 400 to 700 rubles.
To make it easier to understand how this device works, let's first consider the more common option for setting up satellite dishes at home, using a satellite receiver and a portable TV. This option is more popular because it usually does not involve additional costs. That is, you already have a satellite receiver, and a portable TV is often present in almost every home.
Here is the setting principle. In the very place where the satellite dish is already installed, place a small portable TV and a satellite receiver (receiver, tuner), purchased complete with the satellite dish itself. At the same time, a mains voltage of 220 volts is supplied to the installation site of the equipment to power it. After this, having set the required transponder parameters in the receiver, the satellite dish is tuned to the satellite, while simultaneously looking at the TV screen until a signal appears.
With this setup option, the satellite dish
connected to the receiver (Fig. 1), according to the same scheme as during constant operation, with only one difference. In place of the permanent cable that goes from the converter to the room itself (where the satellite receiver will be located), a specially prepared “tuning” cable is connected.
Rice.
1 Connecting tuning equipment directly at the installation site of the satellite dish. The length of such a cable is usually 1.5...2 meters, that is, it is just long enough from the converter to the receiver standing next to the antenna.
When setting up a satellite dish
with this device, place it directly behind the satellite dish mirror itself. By doing this, you will protect the Sat-Finder from the influence of electromagnetic radio waves reflected from the spherical mirror of the antenna (since radio waves reflected from the antenna can lead to chaotic readings of the device).
Unfortunately, this setup option has a number of disadvantages, and these are:
- At the site where the satellite dish is installed, you have to temporarily install a receiver and a portable TV.
- If the installation site of the satellite dish itself is in a difficult-to-reach place, then difficulties arise with the placement of tuning equipment (that is, with the placement of the receiver and portable TV).
- To power the tuning equipment, a mains voltage of 220 volts must be supplied to the location where the satellite dish is configured. In some cases, it is necessary to use an extension cord whose length can reach several tens of meters.
- In the winter season, there is a risk of failure of the tuning equipment due to hypothermia, since the receiver and portable TV are designed for operation at room temperature.
- With this setup option, it takes quite a lot of time to place all the setup equipment. This is very burdensome if you, for example, set up satellite dishes
professionally (that is, several times a day).
This fairly common option for setting up a satellite dish has advantages, and they often outweigh all the disadvantages listed above.
After setting up a satellite dish, using a receiver and a portable TV, you will be able to see the entire result of the setup at once, that is, without leaving the location where the satellite dish is installed.
With this tuning method, the mistake of tuning into the wrong satellite is also eliminated (believe me, this happens too), since by scanning this satellite, you can make sure that the package of television and radio programs belonging to it is available immediately on the screen of your portable TV.
Let's return to our device.
When using the Sat-Finder Tuning Indicator, there is NO need to install it near the satellite dish of the TV receiver. All you need is to take the device itself with you, which will easily fit in your pocket.
Next, let's look at connecting the Sat-Finder device, and look at the very principle of setting up a satellite dish using this device.
Connecting the Sat-Finder indicator is quite simple. You can leave the satellite receiver with a coaxial cable connected to it (going to the satellite dish converter) and leave everything as is. That is, leave the receiver in the place where it will constantly stand when watching TV channels.
There is no need to turn on the receiver's power yet.
Attention! Since there is some differential voltage potential between the converter and the receiver, in order to avoid failure of the receiver and converter, connect and disconnect the coaxial cable only when the receiver’s power is turned off (when the plug is touched to the connector, a discharge spark may slip through).
To connect the Sat-Finder indicator, as in the first option, we need a setup cable with connectors installed at both ends.
The length of this cable can be 0.5...1.5 meters, whatever is convenient for you (it is not advisable to make it too long).
Sat-Finder is connected between the converter and the satellite receiver directly at the site of installation and configuration of the satellite dish
. When connecting, pay attention to the inscriptions near the connectors on the device body itself. The setup cable (going to the converter) is connected to the connector marked “LNB”, and the cable that goes to the receiver is connected to the connector marked “REC”. The general connection diagram is shown in the figure below (Fig. 2).
Rice. 2 Connecting the Sat-Finder indicator to configure the satellite dish
.
The image below (Photo 2) shows the Sat-Finder already connected to an offset satellite dish, it is placed in front of the satellite dish mirror for example only, therefore, for protection from radio waves, try to hang the Sat-Finder directly from the back of the antenna, on satellite dish hanger.
Photo 2 Connected Sat-Finder indicator.
After connecting the Sat-Finder indicator, alas, you need to return to the receiver and apply power to it. If you connect Sat-Finder while the receiver is turned on, the consequences may be different. In the best case, nothing will happen, or, for example, the receiver may freeze and you will have to “re-turn it on” (turn it off and on), in the worst case, the converter or the tuner of the receiver itself may fail. In any case, I would not advise you to experiment, although... here, of course, it’s up to you to decide.
You must enter a valid transponder into the satellite receiver (or select from the list) belonging to the satellite to which the satellite dish is being configured
.
To be more confident, I would recommend entering the transponder on which several TV channels are broadcast at once (the parameters of this transponder, as a rule, change quite rarely). Now, we leave the receiver turned on, and you can return to the place where you installed and configure the satellite dish
.
Setting up a satellite dish using Sat-Finder
The principle of setting up a satellite dish
using the Sat-Finder indicator is quite simple. When the receiver's power is turned on, voltage is supplied to the converter itself (13 or 18 Volts), and the Sat-Finder device also turns on, which will be indicated by the illumination of its dial indicator, and a slight deflection of the device needle itself.
After turning on the power, use the indicator sensitivity control knob to set the instrument’s needle reading to approximately half the scale, or a little less (4..5 divisions). If at this level of sensitivity of the device, the Sat-Finder emits a squeak, then reduce the sensitivity further until the squeak disappears.
In order to avoid unnecessary waste of your nerves and energy, at this point I want to warn you that the model of the Sat-Finder indicator described here did not work quite correctly with some models of satellite receivers. Therefore, if you are going to set up
satellite dishes
professionally, you should think about choosing a more expensive Sat-Finder model, or still use a receiver and a portable TV, since professional analyzers are quite expensive.
At the next stage, you should already have some experience in setting up satellite dishes. If this is not the case, then I recommend that you read the section Installing and configuring a satellite dish.
Now, point the satellite dish towards the desired satellite. By changing the vertical position of the antenna and its tilt, achieve the deflection of the indicator needle, if possible to the maximum value. If the indicator needle goes off scale (that is, goes to the right side beyond the edge of the scale), you should reduce the sensitivity of the device. When the satellite dish
will be set according to the maximum indicator of the Sat-Finder indicator arrow, the antenna fasteners can be tightened until it stops.
Next, do not rush to disconnect the device from the satellite dish. First, you should go to the receiver and scan the selected transponder. Here, you will need to make sure that you are tuned to the correct satellite (since the parameters of some transponders may be the same for different satellites). After this check, making sure that you are configured correctly, Sat-Finder can be removed. That's basically it, setting up a satellite dish
using the Sat-Finder indicator, completed.
digital automatic device Satfinder GTP
It is much easier to search for satellites and fine-tune them using the Satfinder GTP
. The difference between a dial gauge and this one is that this gauge is fully automatic. There is no need to adjust the sensitivity of the device.
Device price : 1500-2500 rub.
Using the device is quite simple. The device must be connected between the receiver and the converter being tuned in close proximity to the antenna.
If you have a DiSEqC 1*4 switch installed and four converters are connected to it, then you need to connect the Satfinder before the DiSEqC switch.
Before searching for a satellite, you need to select the satellite you want to tune in the receiver’s antenna settings menu and turn on the LNB power. It is necessary to approximately point your satellite dish in azimuth by setting the approximate elevation angle (installation information should be supplied with your satellite dish). When the receiver's power is turned on, the supply voltage (13 Volts or 18 Volts) is supplied to the converter. The device turns on automatically, and only two segments will light up on the indicators. Slowly move the azimuth (right/left) and elevation angle (up/down) of your satellite dish until the largest number of segments on the left scale of the indicator light up. The result of measuring the signal level received by the antenna from the satellite is visually displayed on 2 LED scales and is accompanied by an audio signal. You can turn the sound signal on and off using the sound button, which is located next to the green LED. The frequency of the sound signal increases as the accuracy of the antenna alignment to the satellite improves. The green LED displays V/H (vertical/horizontal polarization). The red LED indicates the presence of the 22 kHz frequency. The right scale of the device is more sensitive and displays units of measurement, the left scale is coarser and displays tens of units of measurement. After this, tuning to the satellite is completed. Now you need to disconnect the coaxial cables from the device and connect the LNB converter to your receiver. If you have several antennas or several multi-feed converters are installed on one antenna, then you need to tune to satellite signals for each converter.
An example of indicator readings when searching for and tuning to a satellite.
In the 1st picture the antenna is not tuned to the satellite, in the 2nd the antenna is poorly tuned to the satellite, in the 3rd the antenna is tuned to the satellite at the maximum signal level.
Cable selection.
Take your cable choice seriously. In satellite television and the Internet via cable, in addition to the received signal, supply voltage is also supplied to the converter and special signals that are used to switch converter modes. Among the brands I can recommend CAVEL, SAT 703, 700, SAT 50, Bigsat.
It is not advisable to use a Chinese RG6, but if there is no other option, then try, when laying it, to reduce its length from the converter to the receiver as much as possible, since it has significant signal losses due to its low parameters and quality.
The bend radius of the cable should be 8-10 times the diameter of the cable itself, and try to find the shortest distance from the antenna to the receiver. The shorter the cable length, the better.
And so, let's summarize. You have chosen a satellite provider, purchased a set of equipment, decided on the antenna installation location, installed the bracket, assembled the antenna according to the instructions that came with the equipment, installed the converter and turned it to the value specified by the program. Now all that remains is to connect and configure the antenna. How to do this, read the continuation of the topic of setting up a satellite dish yourself in the second part. Good luck!
Transponders for travel on toll roads
One of the current applications of transponders is toll roads. Drivers generally like this idea, as they get the opportunity to drive on a perfectly flat road, rather than having to go around various potholes and slow down before a broken road. But sometimes you have to postpone your trip due to the difficulty of paying.
It is worth noting that previously the payment system was complex. But with the introduction of transponders into it, everything became much simpler. Now the payment procedure takes place electronically, and the driver is not delayed on the road at all. But what is a transponder on a toll road, and how to use it?
In this industry, a transponder is a kind of contactless fare payment device. It can withdraw money from the driver’s account as soon as he enters a toll road. In this case, the driver himself does not need to stop at all.
The device is a small box that is powered by batteries. These batteries need to be changed approximately once every seven years - this transceiver device consumes so little energy. Moreover, it does not require any maintenance at all.
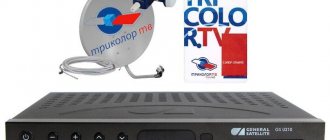
Satellite TV transponders from MTS
Frequencies and transponders of satellite TV from MTS.
Frequencies of MTS channels on the ABC-2 satellite:
| Channel name | LED | APID | VPID | Format | Sound. Track |
| 11740V Russia 53 DVD-S2 8PSK SR 45000 FEC 2/3 | |||||
| Home (+4h) | 1603 | 4899 | 4898 | MPEG-4 | Rus. |
| TV channel Zvezda (+4h) | 1604 | 4907 | 4906 | MPEG-4 | Rus. |
| Carousel (+3h) | 1605 | 4915 | 4914 | MPEG-4 | Rus. |
| Carousel (+7h) | 1606 | 4923 | 4922 | MPEG-4 | Rus. |
| HTB (+7h) | 1607 | 4931 | 4930 | MPEG-4 | Rus. |
| HTB (+2h) | 1608 | 4939 | 4938 | MPEG-4 | Rus. |
| HTB (+4h) | 1609 | 4947 | 4946 | MPEG-4 | Rus. |
| First channel(+4h) | 1610 | 4955 | 4954 | MPEG-4 | Rus. |
| First channel(+6h) | 1611 | 4963 | 4962 | MPEG-4 | Rus. |
| First channel(+2h) | 1612 | 4971 | 4970 | MPEG-4 | Rus. |
| 5 Channel (+7h) | 1614 | 4987 | 4986 | MPEG-4 | Rus. |
| 5 Channel (+4h) | 1615 | 4995 | 4994 | MPEG-4 | Rus. |
| Friday! (+4h) | 1616 | 5003 | 5002 | MPEG-4 | Rus. |
| REN TV (+4h) | 1617 | 5011 | 5010 | MPEG-4 | Rus. |
| REN TV (+7h) | 1618 | 5019 | 5018 | MPEG-4 | Rus. |
| Russia 1 (+4h) | 1619 | 5027 | 5026 | MPEG-4 | Rus. |
| Russia 1 (+6h) | 1620 | 5035 | 5034 | MPEG-4 | Rus. |
| Russia 1 (+2h) | 1621 | 5043 | 5042 | MPEG-4 | Rus. |
| STS (+2h) | 1622 | 5051 | 5050 | MPEG-4 | Rus. |
| STS (+4h) | 1623 | 5059 | 5058 | MPEG-4 | Rus. |
| STS (+7h) | 1624 | 5067 | 5066 | MPEG-4 | Rus. |
| TV 3 (+3h) | 1625 | 5075 | 5074 | MPEG-4 | Rus. |
| TV Center (+4h) | 1626 | 5083 | 5082 | MPEG-4 | Rus. |
| TV Center (+7h) | 1627 | 5091 | 5090 | MPEG-4 | Rus. |
| TNT (+4h) | 1628 | 5099 | 5098 | MPEG-4 | Rus. |
| TNT (+7h) | 1629 | 5107 | 5106 | MPEG-4 | Rus. |
| TNT (+2h) | 1631 | 5123 | 5122 | MPEG-4 | Rus. |
| Russia K (+2h) | 1632 | 5131 | 5130 | MPEG-4 | Rus. |
| Russia K (+4h) | 1633 | 5139 | 5138 | MPEG-4 | Rus. |
| Russia K (+7h) | 1634 | 5147 | 5.46 | MPEG-4 | Rus. |
| 5 Channel (+2h) | 1635 | 5155 | 5154 | MPEG-4 | Rus. |
| TV Center (+2h) | 1636 | 5163 | 5162 | MPEG-4 | Rus. |
| REN TV (+2h) | 1637 | 5171 | 5170 | MPEG-4 | Rus. |
| Home (+2h) | 1638 | 5179 | 5178 | MPEG-4 | Rus. |
| Home (+7h) | 1639 | 5187 | 5186 | MPEG-4 | Rus. |
| TV 3 (+2h) | 1640 | 5195 | 5194 | MPEG-4 | Rus. |
| TV 3 (+7h) | 1641 | 5203 | 5202 | MPEG-4 | Rus. |
| TV channel Zvezda (+2h) | 1642 | 5211 | 5210 | MPEG-4 | Rus. |
| TV channel Zvezda (+7h) | 1643 | 5219 | 5218 | MPEG-4 | Rus. |
| Peace (+2h) | 1644 | 5227 | 5226 | MPEG-4 | Rus. |
| Peace (+4h) | 1645 | 5235 | 5234 | MPEG-4 | Rus. |
| Peace (+7h) | 1646 | 5243 | 5242 | MPEG-4 | Rus. |
| Friday! (+2h) | 1647 | 5251 | 5250 | MPEG-4 | Rus. |
| Friday! (+7h) | 1648 | 5259 | 5258 | MPEG-4 | Rus. |
| 11800 V Russia 53 DVB-S2 8PSK SR 45000 FEC 2/3 | |||||
| FTV | HEVS/UHD | 1291 | 2402 | 2403 | English |
| Russian extreme | HEVS/UHD | 1292 | 2410 | 2411 Rus, 2412 Rus AC 3 | Rus. |
| Eurosport 1 | HEVS/UHD | 1293 | 2418 | 2419 Rus 2420 Eng | Russian/English |
Setting up TV channels on MTS TV can be done automatically or, if desired, the subscriber can do it manually. In the latter case, you will have to enter the frequencies yourself.
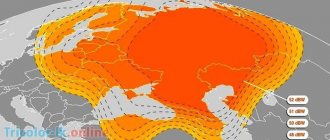
Satellite signal coverage from MTS TV
A brief summary on setting up satellite television from MTS:
- Fix the antenna included in the kit on the wall of the building so that the heads are located at the required angle to the transponder.
- Place the clamp so that the plate is at an angle of 30° to the horizontal.
- The azimuth of the “antenna” tilt must be set to the vertical by 1°.
- Place the plate at a 137° angle.
- Turn on the TV and check the signal quality.
- If the required quality is not available, you need to rotate the antenna 1 degree and check the signal quality at each step.
- If you received the “TV from MTS” set, then the TV channels should be set up automatically.
- If you need to set up television yourself, use the transponder data suggested above.
Detailed instructions on how to set up a satellite dish from MTS.