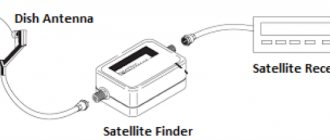
When setting up satellite television, it is important to accurately determine the direction of the antenna. Fine tuning will allow you to receive a stable and high-quality signal. To watch satellite channels, the tuning must be done with virtually no error.
In order to correctly install a satellite dish and get a high-quality, clean signal, you need to calculate several important parameters; doing this without special programs is very difficult, having an application at hand - even a beginner can do it
The use of smartphones and computers is almost ubiquitous. Special programs have become widespread that allow you to determine the azimuth, direction and elevation angle in accordance with which the satellite dish should be installed depending on the location of the subscriber.
Calculation of elevation and azimuth when installing a satellite dish
In practice, a specialist in installing and configuring satellite television uses specialized equipment for such setup. However, it is not always possible to resort to the services of appropriate specialists. A program for a smartphone or computer will allow you to configure satellite TV yourself.
Such applications will help you find the direction to the desired satellite and tell you how to make the necessary adjustments if it changes. Accuracy is affected by calculation errors and magnetic fields of instruments located in close proximity.
Using special programs, you can determine the azimuth, altitude and inclination angle of the direction of the satellite antenna to the satellite
What types of programs exist
The applications used to configure satellite equipment are designed to accurately indicate the direction to the satellite. If the antenna is installed in the right direction, then the user is guaranteed a high-quality picture.
Different types of programs provide adjustments taking into account the use of different types of antennas. Some applications work only with the most common plate designs - offset and direct focus.
However, there are programs that work with more complex types of antennas. In most cases, tuning is performed only for one signal source, but there are programs that allow simultaneous tuning for several satellites.
Programs for tuning antennas
Fine adjustments can be made using the user’s existing smartphone or from a computer or laptop. To do this, you need to download and install one of the specialized programs.
Program for setting up a satellite dish using a computer
To configure satellite equipment, you can use the Fast Satfinder program.
The program can be downloaded from the link https://www.fastsatfinder.com/download.html.
There are only minimal requirements to install and run. To operate, you will need 256 megabytes of RAM, as well as the operating system Windows XP or later.
To configure, you need to connect the satellite dish to your computer or laptop through the appropriate converter.
The program is paid, but during the first seven days the user can use it for free.
The setup is done as follows:
- Before starting work, the necessary equipment must be connected. After starting the application, a list of available devices will be shown in the corresponding section. You need to select the one you want and click.
- The program will automatically search for available satellites.
- You need to select a satellite, a transponder and everything that is necessary for work. The exact values of the corresponding parameters will appear on the screen.
The free version allows you to fully configure the equipment. In the paid version, the user can additionally get the ability to remotely control the equipment.
Satfindr - a program for setting up a satellite TV antenna for Android
One of the most famous programs of this kind is SatFinder. It allows you to accurately determine the direction and angle of the antenna to receive a high-quality signal from the satellite. When using it, you can use the following functionality:
- Here is a list of all satellites that broadcast television.
- A list of channels is available from which you can select the appropriate ones.
- During the setup process, the results obtained can be displayed numerically or shown on a map
- You can see the azimuth direction to the desired satellite.
- Good speed even on low-power gadgets.
- The height and angle of the converter setting will be specified using the data
Clark Belt - location of satellites on the Satfindr interface
To download the application, you need to perform the following steps:
- Go to Google Play.
- In the search bar, type the name of the program “SatFinder”.
- In the list of search results you need to go to the program page.
- You need to click on the “Install” button. After this, the program will be downloaded to your smartphone and installed.
You can download the program via a direct link to Google Play: https://play.google.com/store/apps/details?id=com.esys.satfinder
This program does not have a Russian translation of the interface, but the interface is simple enough to use it correctly. For it to work, you need Android version 4.0 or newer.
To use the application, your smartphone must have: Internet access, a built-in compass, a connected GPS, and a working camera. If any of the above is missing, then you will not be able to use some of the program’s functions.
SatFinder requests permission to use GPS
Dishpointer is another convenient app for setting dishes
Dishpointer – this program is similar in functionality to SatFinder. One of its advantages is the high accuracy of determining the position of satellites. When determining the necessary data, it can use not only the GPS signal, but also data from mobile operators.
Although the latter can help in some cases, the data obtained with their help will be less accurate. The general fee and relatively high cost of the program can be considered as a disadvantage.
You can download the Dishpointer program for setting up a satellite dish for free at https://apkpure.com/ru/satellite-finder-dishpointer-pro/satfinder.satellitedish.apps.satdetector.
Multifeed for setting up multifeed for offset and direct focus satellite dishes
The Multifeed application is capable of working with satellite antenna models of non-standard configurations. This feature is rarely found in such programs. The setup process is based only on the GPS data received by the gadget. To obtain information, there is no need to have a video camera on the gadget. This makes it possible to configure even on fairly old smartphones.
Using this program you can configure one antenna for several satellites. The program performs settings using special operating principles, which makes it a little unusual for users. You can download the program at https://trashbox.ru/topics/18034/multifid-2.1.
The disadvantage of the program is its rather complex and cumbersome interface. To successfully work with the application, you need to have a good understanding of its operation. The program is paid, but the price can be considered moderate.
Application for setting up satellite dishes for a smartphone:
How to set up a satellite dish using an iPhone
There is a version of the famous SatFinder program that can be used on the iPhone (https://apps.apple.com/fr/app/satfinder/id397993104).
SatFinder on iPhone
This program is available in the AppStore. You can find it using search by entering the name of the application. In terms of its functionality, it does not differ in basic respects from the version that was created for Android smartphones.
SatFinder - A little about setting up a satellite dish...
23.02.2016
- Android application SatFinder, version: 1.32, price: Free
In the era of development of all these Internets, good old TVs are fading into the background. For example, I already forgot when I watched a movie on TV - at most I remembered the name, and then went to my favorite sites (see story) and watched in normal quality and without advertising every eight minutes. But, nevertheless, sometimes you want something, but due to the lack of a normal TV service provider, I used programs for the Android TV box, which are described here and here.
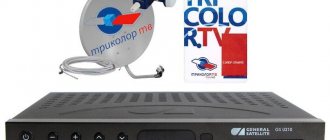
Absolutely by accident, one might say “suddenly,” I remembered that I had a completely complete “plate” hanging on my wall. True, the provider's tuner completely refuses to work without a monthly fee, but the cost of such intractability was 2,000 rubles spent on a new receiver. But then, as often happens, the time for the most interesting part came: I somehow didn’t want to pay money for setting up channels and antennas, but searching for satellites at random, focusing exclusively on neighboring “dishes,” was simply tedious. In Google, of course, there is a sea of information, I was even going to print a map diagram, but after making the association “Phone - Internet - Website - GooglePlay - Program”, I installed SatFinder .
The amateur program is for those who have the opportunity to spin the “plate” themselves and have no desire to pay for it. Its whole task is to help point the “dish” at the desired satellite.
It turns out that all these space objects do not fly at random and wherever they please, but are in their own constant (geostationary) orbit and, moreover, all these orbits are known and quite understandable even without the knowledge of Copernicus and Giordano Bruno. The “direction” to each satellite is given (in simple terms) by the tilt of the “mirror” (precisely this round white thing) and azimuth (where you need to turn the antenna).
So, the application shows us these two parameters. And not only…
First of all, we need to select on our receiver the satellite that we want to catch. There is a lot of information on the Internet about the channels of each of them, but we still downloaded the software, so we’ll try to puzzle her with this.
So, in the settings there is an item “channels db” (you need access to the Internet).
It asks us to select a search category: providers (pay channels) or all channels (all channels).
In the first case, we will need to select the provider we are interested in from the list, and we will be shown all of its channels.
In the second, we ourselves look for things that interest us.
If we know the name, we ask (note that it is better to write in both translit and Cyrillic - different satellites broadcast the name of the same channel in different encodings).
If the name of the channel does not matter, then we can select the language (the main ones are suggested; if you need something exotic, enter the first three letters by hand, for example, “ukr”).
The type of channel, radio or TV, requires no explanation. Bottom field - encoding: FTA - open channels, encrypted - encrypted. And then we look for:
The only disadvantage of the software is in the results window - only five pieces are displayed in the window without the ability to customize, pressing “next” sooner or later gets boring. Otherwise, the information is more than complete: next to the channel name the type of encoding is indicated (which is extremely useful for understanding: we watch open channels without restrictions, closed ones - depending on the type of encoding, tuner and service provider), below is the name of the satellite from which the broadcast is being carried out, then the transmission format (the receiver must support the specified types, otherwise there will be no movie) and the broadcast language (by the way, many channels broadcast in parallel in different languages, which you can switch between from the receiver).
Of course, it’s more convenient to search on a PC, but in principle, the search is absolutely workable and convenient.
Now we know what we are looking for, at least we know the provider or satellite. Let's tune in to them.
Again, go to the menu and look for the “GPS Mode” item. If the device has a GPS receiver, there are no questions, wait for the coordinates to be determined and move on. If not (yes, this also happens) or we count for another region, then at this point we select our locality (we don’t need great accuracy to find the direction - we’re not looking for treasure, but like a normal Slav - he waved his hand - there and north). You can also register the street, but the house number is not always found.
Now is the time to turn to the settings - this is where, for some reason, you can select the search object: satellite (Satellite names list) or provider (Satellite providers list).
List from SD card is for the smart ones... You can manually write the necessary parameters into a file and drop it on the card - this will save you from unnecessary information and a clutter of data about all the satellites (but it will force you to work with your head to create this file).
I didn’t understand what “short line on map” was (judging by the fact that everything worked without changing this checkbox, it’s something unimportant).
Below are the “convenience” settings - the direction of the compass arrow, and sensitivity (I advise you not to touch them - only the author knows what adjustment algorithms there are).
Those. in fact, in the settings we only need to select what we want to search for: a satellite or a provider, everything else can be safely ignored.
That's it, let's set it up! First of all, on the receiver you need to select the desired satellite, which will be characterized by two parameters: signal and quality. We are interested in the second. So, we sit one person near the TV, who reports on the phone what is happening with the “quality”, and we ourselves launch the software, select the desired satellite using the “magnifying glass” and direct our “dish” along the arrow on the screen. For convenience, when you find the desired degree (geographical, not “Mendeleevian”), the numbers on the screen will turn green.
In addition, in addition to the direction, the screen shows the recommended tilt of the “mirror” (elevation) and the angle of the “heads” and converters (LNB tilt). Both parameters are more for reference and in real life are difficult to set by an ordinary person.
In addition, the general direction can be obtained by tapping on the map icon (you need the Internet), but what’s bad is that there is no way to move the cursor, so the direction is very, very approximate (the red line is the direction to the satellite, the green sector is us).
But selecting AR View in the menu will take us to the interactive settings screen, where, by rotating the phone, we must align the circle with the intersection of the axes - and then the “pose” of the phone will show us the recommended position of the antenna.
SatFinder shows us, of course, the approximate direction, and then, slowly rotating the “plate” in small deviations horizontally (vertically as necessary), we listen to our “watcher” of the quality - we caught it - we fix it, and to improve the signal, we can Twist the converter a little.
And the whole setup, in fact...
Opinion
Of course, this is not a professional tool, moreover, the application is not suitable for fine and quick adjustments (like “beepers” on wires), but personally the program helped me a lot - the neighbors were “tuned” to completely different satellites, and the direction found in the open spaces The network, due to my anti-geographical orientation, was very difficult to project onto real things. And here everything is the same for me - you select a satellite and look at the screen until the arrow lights up green. All! And then there’s fine tuning.
And so, I turned the antenna for two days without any effect...
Yes, the software is free, but there are banner ads, that’s me, by the way. Size - 1.5 megabytes, the Internet is required only for two things: searching for channels and displaying a map (I emphasized the text), otherwise it works without the Internet. The program does not require any unexplained permissions.
olegdn (Oleg Gordinsky)
Device used by the author: Sony ZL
How to set up a signal using the example of one popular program
Working with the SatFinder program is carried out as follows:
- Once launched, you will be asked for permission to access GPS data, to which you will need to answer in the affirmative. The signal must be strong enough for the program to accurately determine the location coordinates. In some cases, this will require you to leave the building and go outside. SatFinder requests permission to use GPS
- At the top of the screen you need to click on the icon with a magnifying glass. By typing the name of the one you need, you need to start the search.
- The program will automatically display the required azimuth and inclination angle. The direction to the satellite will be indicated on the map as a red line. The green line will indicate the direction of the equipment being configured. If they match, it means the setup is complete.
The user must check the received direction and install the antenna as required. You can also open the map by clicking on the book icon. For convenience, it can be rotated in a more convenient way.
Details about setting up equipment through the SatFindr application interface:
Satfinder dish setup
The main menu of the program has several sections that are intended for the following:
- If you go to “Show AR” , the direction to the satellite will be combined with the camera. This will help you see exactly the right direction and make sure there are no obstacles to receiving the signal.
- The “Geocoder” option makes it possible to obtain the data necessary for configuration at another point. Not where the user is currently located. To do this, you need to open Google maps and long press on the point for which you need to get information.
- “Settings” allows you to change some characteristics of the program. For example, you can make north on a map always point upward on the screen.
- This program also has a paid version. In order to go to it, you need to open the “Go Pro” .
- In Channels, the user can go to sites that provide lists of satellites that broadcast.
Since the program is supplied in English, in the “Help” section you can find a description of the program in this language.
Help section
The user can supplement the official lists of satellites with his own data. You can create your own lists as text files, in which each line consists of a code and coordinates, separated by commas.
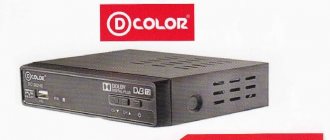
Application for setting up MTS satellite antennas:
Another popular program for installing and configuring satellite dishes is Satellite Antenna Alignment (download the latest version installation file for free from the link https://satellite-antenna-alignment.ru.uptodown.com/windows/download):
Useful software for astronomy lovers
Many astronomy enthusiasts take laptops with them into the field with applications that make it easier to search for and observe celestial objects.
The same programs can be used at home by preparing in advance and simply printing out the necessary materials. Or conduct observations directly from a window, from a balcony, from an adjacent area, if the current level of light pollution and the cleanliness of the atmosphere allows this. We have selected for you various applications that can be useful for both beginners and experienced amateur astronomers. Welcome to cat. One of the most famous “desktop” planetarium applications. It's an open source project and the focus is on visuals. Just enter your coordinates, and the application will show you the current star map. It is possible to load additional databases with stars and flexibly configure options for displaying celestial bodies. Here you can “zoom in” and examine star clusters, nebulae, planets and star systems. There are plugins on the network that add to the application the display of artificial satellites, control of the telescope, the ability to edit the database of celestial bodies, etc.
Another open source project. The program allows you to create a star map for further astronomical observations. You can very flexibly customize the display of galaxies, stars, planets, comets and asteroids, visibility conditions, etc. You can create your own databases of celestial objects or download ready-made ones.
A wonderful online project: you can download the client application or go to the web client (HTML 5), after which you will have access to data from several telescopes around the world, operating in a variety of ranges: optical, infrared, gamma, X-ray, radio. A user-friendly interface allows you to explore the incredible depths of space without leaving your chair, quickly moving to very picturesque nebulae, clusters and constellations. Also here you can study three-dimensional models of the planets of the solar system and their satellites, and view photo panoramas of Mars. Separate links present “collections” of objects studied by different telescopes: Spitzer, Chandra, Hubble, Gemini. The application allows you to create your own database of objects, even upload 3D models.
This application is more designed for fans of virtual astronomy, who just need to satisfy their craving for space with beautiful renderings on the screen. But for those who uncover their optics at night, Starry Night Enthusiast will also be useful. List of application features:
- “time travel”: a time scale of several thousand years, thanks to which you can look at the changing positions of stars in the past and future;
- database of celestial bodies: satellites, comets, asteroids, etc., with the ability to edit;
- interactive 3D tours;
- a light pollution simulator that allows you to evaluate the starry sky at different levels of stray light;
- corner parting tool;
- support for virtual reality helmets;
- calculator for eclipses, passages of celestial bodies, meteor showers, etc.;
- database of images from various telescopes, including Hubble, Chandra, Spitzer, etc.;
- constructing contours of the field of view depending on the available equipment you specified (telescopes, binoculars, Barlow lenses, digital cameras, etc.).
In more advanced versions (Starry Night Pro and Pro Plus) the following are available:
- a much more extensive database of celestial objects, including quasars, double stars, stars of variable magnitude, all kinds of star clusters, etc.;
- rich capabilities for determining the coordinates of celestial objects, including galaxies;
- ephemeris calculation;
- construction of Hertzsprung-Russell diagrams;
- filtering stars by distance and magnitude;
- the ability to online view images from other telescopes and many other functions.
- All versions of the application are available for Windows and Mac.
Like SkyNight Enthusiast, this application is the youngest in the astrosoft line from this manufacturer. However, the list of its capabilities is very extensive:
- interactive star map;
- database of celestial objects (including comets and asteroids) with search function;
- construction of Hertzsprung-Russell diagrams;
- viewing a list of objects currently available for observation, including depending on the available equipment;
- navigation through the starry sky by entering exact coordinates;
- drawing up the route of movement of celestial objects;
- solar lunar eclipse calculator;
- calculating the positions of the moons of Jupiter and Saturn;
- three-dimensional models of the solar system and a number of constellations;
- light pollution simulator.
- The more advanced TheSkyX Serious application adds the following features:
- a much more extensive catalog of celestial objects;
- native control of a telescope connected to a laptop;
- creating a list of objects to monitor;
- creating your own object database;
- night display mode so that the glowing screen does not interfere with the eyes’ adaptation to the dark;
- various projection modes (stereographic, orthographic, Mercator, rectangular, gnomonic, etc.).
- The oldest version, TheSkyX Professional, has even greater functionality:
- support for various astronomical catalogs;
- software support for Paramount ME and Paramount MX mounts;
- support for files in FITS format;
- support for scripts to automate processes;
- the Mosaic module allows you to make panoramas of the starry sky, automatically positioning the camera; You can also use Mosaic to systematically monitor certain areas, for example, to search for comets or asteroids;
- overlaying photographs from telescopes onto a diagram of the starry sky;
- export of high-resolution vector and raster star maps;
- support for all kinds of modules and extensions for controlling a camera, telescope, and even an observatory dome.
What astronomy lover isn't interested in photographing the starry sky? Unfortunately, getting a beautiful image is not easy, because light pollution, air dust, thermal turbulence, optical refraction, the rotation of the Earth and the movement of celestial objects make it very difficult to obtain photographic masterpieces. And this is where special applications for processing digital photographs come to the rescue. One of the most powerful applications of this kind, and it’s also free. Here is a partial list of possibilities:
- built-in filters to increase sharpness, reduce thermal noise, and highlight objects in certain wavelength ranges;
- Tools for selectively adjusting colors and levels to enhance detail and highlight celestial objects;
- tools for geometric transformation of images;
- built-in algorithms for automatic processing of black and white images of the starry sky;
- built-in algorithms for positioning photographs on a star map;
- removing gradients from digital photographs;
- converter from color to black and white image;
- smoothing the pixel structure of the image;
- stitching images into panoramic images;
- photometric and astrometric analysis of images of objects in photographs;
- tools for working with images of the Sun;
- correction of distortions introduced by atmospheric turbulence;
- reverse convolution;
- adding pictures (stacking);
- creating animations;
- telescope mount control and much more.
This is an application for automatic pre-processing of starry sky images. Really high-quality astro photographs are usually the result of processing a series of photographs; their processing is a boring, routine process. DeepSkyStacker is capable of doing the following:
- Automatic registration of image sets.
- Automatic recognition of stars over the entire image area.
- Automatic positioning.
- Automatic creation and use of offset frames, flat field frames (flats) and dark frames (dark frames).
- Subpixel star registration, alignment and stacking.
- Automatic background calibration for each channel, etc.
Having photographed a section of the starry sky, it is often necessary to link it to specific objects on the map. In other words, registered objects need to be recognized. This process is also largely automated, and you do not have to do the binding manually. This application allows you to accurately determine the coordinates of objects such as planets, comets, stars, double stars, and also highlight moving objects in images. In addition, there is a built-in tool for plotting light curves of variable stars with a search function for new variables. The application is able to recognize constellations and apply their graphic image to pictures. Quite a powerful application for processing astroimages and astrometry. Allows you to control the telescope, automatically pointing it at various celestial objects and accompanying their movement across the sky. It has advanced image capture functionality, including burst shooting, long exposure and special modes for searching for supernovae and asteroids. Rich capabilities for image processing include selecting sets, geometric editing, optimizing dark frames, highlighting the sky background, applying various filters to sharpen and remove noise, highlighting celestial bodies, building histograms, etc. A simple, but convenient and multifunctional program with which you can determine the exact time of occurrence of various astronomical events.
A program for visualizing solar eclipses within 13,000 years before Christ and 16,999 years after.
An application for calculating the ephemeris of the planets of the Solar System and their satellites, with visualization of their comparative sizes, positions in the ecliptic and heliocentric position.
French developer Alcyone offers several applications for astronomy enthusiasts. Almost all of them can be useful: an ephemeris calculator, a lunar calculator, an astronomical table generator, an eclipse calculator, an application for determining the visibility of planets, moons and the Sun. A program for constructing visual graphs of the visibility of various celestial objects. This set of software will be enough for many astronomy lovers. Of course, everyone has their own preferences, and if you have any interesting astronomy programs in mind, please share the information with the community. And if you are into astrophotography, show your progress in the comments!