Satellite television broadcasting has long ceased to be a luxury item; on the contrary, almost everyone has it connected. In Russia, perhaps the most reliable and well-known satellite provider is Tricolor TV.
The specifics of the work are extremely simple: information is transmitted from a specialized center via satellite to a special device that receives the signal - a receiver, installed in the user's home. The advantage is that the TV shows channels in high quality.
To avoid problems with picture and sound settings, you must connect and configure the equipment correctly. Installation is carried out by calling a specialist. As for setting up TV channels, the user can handle this himself.
Before we proceed to installing the dish and setting up the receiver, we list the tools that we will need for the job:
- set of wrenches;
- drill;
- flat and Phillips screwdrivers;
- fasteners for fixing all structural elements;
- level;
- a simple pencil;
- insulating tape.
The first stage is installation of the plate, and only then you can connect the console.
How to set up a Tricolor TV dish to a satellite yourself - detailed instructions
After purchasing equipment from a satellite provider, you need to connect it correctly.
Setting up the Tricolor antenna is not a particularly difficult undertaking, although many people call craftsmen and specialists for this. In fact, why spend extra money (the price for the service is not the lowest) if it is enough to simply act in accordance with the attached instructions. It is quite possible to independently install and configure a satellite signal, even for a person who does not have the necessary experience.
Detailed information and explanation of significant points are presented in this article.
Some information about the Tricolor TV satellite
Tricolor TV broadcasts digital television channels in the European territory of Russia from the artificial Earth satellites Eutelsat-36C and Eutelsat-36B, and in Siberia from the Express-AT1 satellite.
The article covers the issues of assembling, setting up and adjusting the Tricolor antenna with your own hands.
Having purchased a Tricolor antenna, everyone can configure it independently, subject to certain rules.
- How to independently install and configure the Tricolor TV satellite dish
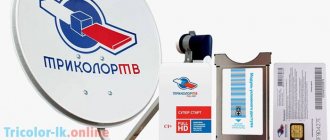
Kit for installing Tricolor satellite TV.
Tools and materials for work
To proceed to how to install the Tricolor TV dish yourself, you should read the attached instructions. This will allow you to determine what materials and devices may be required during the work. In general, the installation, connection and configuration procedure has several main stages, and it will not be difficult to handle this matter yourself. As for tools and materials, you will need for installation:
| Tools | Materials |
| drill | electrical insulating tape |
| screwdriver | silicone based sealant or heat shrink tubing |
| wrenches 8, 10 and 13 | screeds |
| open-end wrench 10 | washers 30-50 mm |
| pliers | Allen screws 13 x 6-8 cm long |
| compass | |
| knife |
It is likely that fasteners will also be needed to secure the base. This is necessary if the surface where the plate will be fixed is made of wood. It is better to use 10*100 anchor bolts.
Important! For connection, it is better to use a double-braided copper cable. You should not take more than 100 m, since this length is enough, and even if you need to extend the distance, you will need to install amplifiers.
How to assemble the Tricolor TV dish and install the main elements?
Contrary to the popular belief that assembling and installing a satellite dish yourself is difficult, and in general, almost impossible, this is not so. If you know the exact algorithm of operation and follow the instructions described below, you can cope with the task yourself without spending a lot of time.
So, are you ready to surprise your family and friends with your skills? Then let's go!
- The first step is to install the massive bracket that is included in the Tricolor TV kit. The types of fasteners and tools depend on the type of wall - it is load-bearing or permanent.
- When fixing the bracket, you need to take into account that the converter located on it must be installed downwards in order to protect the plate from falling asleep with precipitation.
- Next, you need to securely secure the converter and cable together using the F-connector. To do this, you will need to free the cable from the top insulation by no more than 10 mm. Next, you need to wrap the cable tightly with braided shielding and foil. The inner insulating layer also needs to be removed by 10 mm and the connector must be tightened as much as possible.
- You need to prepare stitches and electrical tape in advance to install the cable in the arc of the converter holder.
- Sealing is a necessary procedure and cannot be avoided. It should extend along the entire length of the cable. In some cases, silicone sealant may be needed.
- Then you need to fix the antenna to the bracket. It must be installed so that at any time it is possible to rotate the plate in different directions.
- The last stage of assembly: you will again need insulating tape and zip ties, since on the bracket, in addition to the antenna, the cable itself must be fixed. If you secure the cable with a small margin, this will subsequently facilitate installation and repair of the device, if necessary.
The most difficult stage on the path to satellite television has been overcome! We suggest moving on to installing the television connector.
Installation of a television connector
The television connector is connected to the converter in accordance with the diagram:
- Strip the top insulated layer of the cable to a length of 1.5 cm.
- Unfold the braided shielding along the wire.
- Turn the foil over the braided covering.
- Remove the insulating layer of the conductor 1 cm long.
- Install the cable into the F connector.
- Leave a protruding central conductor 2 mm long (the excess is cut off).
- Seal the F-connector along the entire length. This is done with a heat-shrinkable tube or 2 layers of electrical tape covered with silicone-based sealant.
- Fix the cable in the arc space of the converter using a layer of electrical tape or tie.
- Connect the other end of the wire to the receiving equipment.
Installation of the F-connector.
In relation to the antenna wire used, there are two ways to install the receiver to the TV:
- High-frequency antenna cable (HF) - plugs into the antenna socket on the TV and into the “RF Out” input hole of the receiver. After turning on, the combination “BOOT” and the channel number appears on the television screen. When you turn on the channel search function, a “No Signal” notification is displayed, which implies normal operation of the receiver.
- Low frequency cable with connector (LF) - similar to HF. When connected, “BOOT” appears on the television screen. Afterwards, you need to press the “A/B” button on the remote control surface of the receiver. As a result, the “No Signal” notification should light up. The appearance of other information indicates that the equipment was assembled incorrectly.
After these steps, you can start setting up channels.
Choosing a location to install the Tricolor TV antenna
The effectiveness of installing the Tricolor TV antenna largely depends on how correctly the location for the device was chosen. In the future, it is the correct choice of location for the device that will guarantee a constant signal from the satellite. When choosing where to mount the plate, you should consider the following nuances:
- there should be no obstacles in front of the device;
- no need to place the antenna near towers where there is a strong magnetic field;
- The distance from the device to the TV should be up to 100 meters.
It’s very good if the same Tricolor TV dish is located nearby, since this will make it easy to figure out which way to point the device so that the signal reception is high-quality.
Leave your review or complaint - Ask a question
Advice! If questions remain, and you can’t set up channels from Tricolor, then you should call the hotline 8-800-500-0123 or navigate by the coordinates - 36 degrees east longitude and the equator.
Important additional information. 1. We draw your special attention to the fact that viewing of Tricolor TV programs is controlled using the receiver and the remote control from the receiver. The TV remote control is only needed to turn on and off the TV itself. Switching channels, calling up information, and settings are made only on the receiver itself and only using the receiver's remote control. 2. The receiver's remote control, like other electronic equipment remotes, is infrared and operates in direct line of sight from the device at a distance of about 5 meters. To control a receiver located in another room (room), you must additionally purchase a radio remote control for satellite equipment (specifically for your satellite receiver model). The radio remote control operates at a distance of up to 100 meters. 3. The encoded signal coming from the satellite is processed by the receiver, and not by the TV. The TV serves only to display the image from the receiver on the screen. But, you can connect several TVs to one receiver, therefore: a) To watch the same channel turned on on the receiver, you can connect several television points (all TVs will show the same channel). b) To watch different channels on different TVs, you need to connect each TV to its own receiver. 4. Every weekend, updated signal decoding keys are sent from the satellite to the receivers, so it is recommended to leave the receiver running (not turn off) from Friday to Sunday. If you were unable to do this or simply did not use your receiver for a long time, then some channels (or all) may not be shown (the receiver does not have updated keys to decode them). Then the steps are completely simple: turn on the receiver on a channel that does not show (DRE encoded channel) and leave it until the picture appears. Usually the picture is determined within an hour or two, but it can take about a day. After this procedure, all channels should be identified. 5. The inscription on the TV screen “DRE Encoded Channel” means that the signal from the satellite is received by the antenna and transmitted to the receiver, but there are no decoding keys for this signal. You need to turn on the encrypted channel and wait for the picture to appear. The inscription on the TV screen “No signal” means that the signal from the antenna is not reaching the receiver. To identify the cause and then eliminate it, you need to check the cable connecting the antenna and the receiver and check the position of the satellite antenna itself (whether it is physically shifted even a centimeter or two from the direction of the satellite). 6. Registration of the receiver and activation of the “Start” card of additional channels of the “Optimum” package is necessary for decoding channels, i.e. so that the channels start showing. The search for a signal from the satellite is carried out on the equipment itself, which will receive it regardless of registration. Therefore, we recommend that you first catch the signal and only then register. 7. We ask you to periodically carefully monitor the messages on the Tricolor TV information channel and in the “News” section on the official website of the Tricolor TV company (messages about the possible absence of broadcasting due to equipment maintenance, innovations in channels and services, etc. ).
1. Connecting the satellite receiver to the TV. a) By high frequency (HF), using an antenna cable. We connect the receiver to the TV via an antenna cable through the antenna jack on the TV and the “RF Out” connector on the receiver. We connect the receiver's power cable to a 220V electrical network and turn on the power switch on the rear panel of the receiver. The word “BOOT” lights up on the receiver’s display and after a few seconds the channel number lights up. If the receiver is in standby mode (turned off), then the time on the receiver display lights up (for example, “13-40” or any other). Then press the “Power” button on the receiver’s remote control. The channel number lights up on the receiver display (for example, “0001”, since all our receivers are already configured, the channels are programmed and the equipment is ready for use). Press the “0” button on the TV remote control (or any other one - this will be the channel on which your Tricolor TV television works) and start searching for channels (setting up channels, scanning frequencies - the description is in the instructions for your TV). Scanning will automatically stop at the receiver's operating frequency. You will see a picture on the TV screen:
The message “No Signal” on the TV screen means that the receiver is connected to the TV correctly. Please note that the inscription should look exactly like this, because this is exactly the picture the satellite receiver produces when there is no signal from the antenna. To be sure, you can press the “MENU” button on the receiver’s remote control; a dotted rectangle will light up on the receiver’s display, and the receiver’s menu will appear on the TV. Press the “EXIT” button on the receiver’s remote control and the menu disappears. b) At low frequency (LF), using a cable with a Scart connector or a “bells” (“tulips”) connector. We connect the receiver to the TV with the appropriate cable. We connect the receiver's power cable to a 220V electrical network and turn on the power switch on the rear panel of the receiver. The word “BOOT” lights up on the receiver’s display and after a few seconds the channel number lights up. If the receiver is in standby mode (turned off), then the time on the receiver display lights up (for example, “13-40” or any other). Then press the “Power” button on the receiver’s remote control. The channel number lights up on the receiver display (for example, “0001”, since all our receivers are already configured, the channels are programmed and the equipment is ready for use). Press the “A/V” button on the TV remote control to switch to video mode or select the appropriate connector for connecting additional equipment in the TV menu (the description is in the instructions for your TV). You will see a picture on the TV screen:
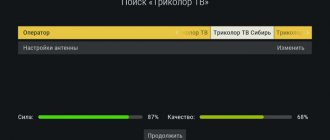
The message “No Signal” on the TV screen means that the receiver is connected to the TV correctly. Please note that the inscription should look exactly like this, because this is exactly the picture the satellite receiver produces when there is no signal from the antenna. To be sure, you can press the “MENU” button on the receiver’s remote control; a dotted rectangle will light up on the receiver’s display, and the receiver’s menu will appear on the TV. Press the “EXIT” button on the receiver’s remote control and the menu disappears. 2. If the inscription looks different, it means that the TV does not see the signal from the satellite receiver, i.e. You connected something wrong. 3. Press channel 01 on the receiver’s remote control (buttons “0” and “1”). With this action we turn on the open (FTA) information channel of Tricolor TV, which will immediately begin showing the picture as soon as you receive a signal from the satellite. Information about the enabled channel (channel name, channel number in the general list, current program, broadcast time) is automatically displayed at the bottom of the TV screen in a blue field. 4. Press the red “i” button on the receiver’s remote control twice, we see two scales “Signal Strength” and “Signal Quality”. Initially, the scales are empty, showing 0%, because There is no signal at the moment. Using these adjustment scales, when searching for a signal from a satellite, we will focus on the quality of the received signal. A picture is visible on the TV screen: the block at the top displays information about the current program and the tuning scales that interest us, the block at the bottom displays information about the name of the included channel:
2. Selecting a location for installing the antenna.
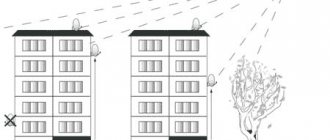
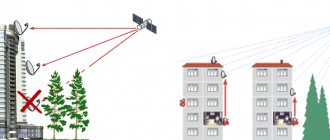
The main criterion for choosing a location for installing a satellite dish is a clear view in the direction of the Eutelsat W4 satellite (36.0E), i.e. South. Clear view means the absence of obstacles (trees, buildings, etc.) on the imaginary line connecting the satellite and the antenna. Approximate data on the length to the obstacle and the height of the obstacle are shown in the figure:
Installing the antenna near the TV location and being accessible to the user simplifies the process of installation, configuration and possible subsequent maintenance. Usually the antenna is installed on a wall next to a window, balcony or loggia, on the roof of a house. You can even install an antenna on the ground. Installation indoors, under a roof, behind glass is excluded, because no signal will be received. If you use a high-quality cable with a thick copper core and double braid, which has minimal signal attenuation and sufficiently high protection from external influences, then the cable length from the antenna to the TV should not exceed 100 m. For longer lengths, it is recommended to install signal amplifiers.
3. Antenna assembly. We assemble the antenna according to the assembly instructions. The converter must be placed in the holder with the connector facing down, so that precipitation does not get inside. The holder coupling is attached closer to the working part (“head”) of the converter. We tighten all the adjusting bolts on the antenna, but so that the position of the antenna can be changed within small limits.
4. Mounting the antenna to the wall. Take into account the fact that when tuning, the antenna will have to be rotated in the vertical and horizontal planes, and surrounding objects (house wall, balcony railing) should not interfere with this movement. 1. We make markings on the surface for attaching the antenna bracket. We drill holes using a hammer drill. Screw the bracket to the wall. You can choose fastening elements yourself depending on the wall material, antenna size, and wind load. 2. Install the assembled satellite antenna on the bracket. 3. Prepare the cable (both ends).
a) We strip 15mm of the top insulating PVC layer from the edge of the cable without damaging the shielding braid. b) The shielded braid together with the foil is tucked in the opposite direction. c) The internal insulation is cut off by approximately 10mm. d) Screw the F-connector onto the cable until it stops. e) Cut the central core (conductor) so that it protrudes beyond the edge of the connector by 2mm. 4. Screw the prepared cable to the converter. You can additionally insulate the connection from moisture using electrical tape and silicone sealant. 5. Additionally, to prevent the cable from dangling, you can attach it to the bracket with plastic ties or the same electrical tape. 6. Screw the other end of the cable to the “LNB IN” connector of the receiver.
5. Setting up the antenna for the satellite. Attention ! The search for the Tricolor TV signal from the Eutelsat W4 (36.0E) satellite is carried out using equipment (antenna, converter and receiver) and is in no way related to the registration of this satellite equipment. Registration of a satellite receiver and activation of the “Start” card of additional channels of the “Optimum” package is necessary for decoding television broadcast channels, i.e. so that the channels start showing television pictures. We strongly recommend that you first catch the signal and only then register. Setting up a satellite dish is easier with an assistant, because You will have to navigate the actions taken based on the image on the TV. If the TV is close to the antenna installation site and you can see the image on it, then you can tune it alone. The process of self-tuning is greatly simplified by the SatFinder Professional (Satellite Finder), which is used to search for a satellite signal (purchased or rented in our office). 1. Determine the direction to the South. To do this: a) You can use a compass (the best and most accurate option). b) You can focus on the direction of your neighbors’ satellite antennas if they use Tricolor TV (a conditional definition, and therefore the tuning sector will be large and you can search for a signal for a long time). c) It is possible to approximately determine the direction to the satellite using the sun. For St. Petersburg and the Leningrad region, the direction to the satellite coincides with the position of the Sun, approximately at 13:30-13:45 summer time or 12:30-12:45 winter time (conditional definition, and therefore the tuning sector will be large and You can search for a signal for a long time).
2. Check that there are no obstacles in this direction. 3. Position the antenna vertically and slowly begin to move it horizontally to the left (to the east). Please note that the signal delay is 2-3 seconds. After moving the antenna 1 cm, you need to wait 2-3 seconds. By turning the antenna quickly, you risk never seeing the signal! 4. Look at the TV screen at the “Signal Strength” and “Signal Quality” adjustment scales.
a) If the values of the tuning scales are empty, then you have not yet received a signal. Then we continue to rotate the antenna. b) If one scale is full and the other scale is empty, you have caught the wrong satellite or there are obstacles. Then we continue to rotate the antenna. c) If the scales are filled, but there is no picture in the background, first check the channel that is turned on (the Tricolor TV channel must be turned on). If this is an open information channel “Tricolor TV”, but there is no picture, then you have picked up another satellite and you need to continue turning the antenna. (To check, press the “OK” button on the receiver’s remote control and select an information channel from the list). d) As soon as you receive a signal from the Tricolor TV Eutelsat W4 satellite, a television picture of the open Tricolor TV information channel will appear on the screen (in the background, behind the blue information fields of the menu), and the tuning scales will be filled. The picture on the TV screen will look like this:
5. After finding the signal, we fine-tune to the satellite. We rotate the antenna with a smaller amplitude (several millimeters) horizontally (left - right) and vertically (up - down). We achieve maximum readings on the tuning scales (with self-tuning, you can achieve 80% on both scales). Please remember that signal strength depends on weather conditions. In high clouds, heavy rain or snowfall, the signal level may be greatly reduced, down to 0%. Therefore, in clear weather, it is worth making sure that the settings are accurate and periodically clearing the antenna of snow and ice. 6. Tighten all adjusting bolts firmly so that the antenna no longer rotates. 7. Searching for a Tricolor TV signal from the Eutelsat W4 satellite is simplified by using a special device. This device can be purchased or rented from our office.
6. Registering a satellite receiver and activating the Start card. After completing the antenna setup, press the “Exit” button on the receiver’s remote control twice to clear the menu. It's time to register the receiver and activate the “Start” card of additional “Optimum” channels. Please note that registering the satellite receiver and activating the “Start” card of additional channels of the “Optimum” package is necessary to unlock the channels, i.e. so that the channels start showing television pictures. The search for a signal from the Tricolor TV satellite is carried out using equipment and is in no way connected with registration. We strongly recommend that you first catch the signal and only then register. Equipment registration is carried out in our office. Attention!!! From June 1, 2010, registration is possible only with passport data (if you have a DRE ID receiver and the secret code of the Start card) with the signing of an agreement for the provision of television broadcasting services. The unique 12-digit DRE ID number of the receiver can be found on the sticker on the packaging box; on a sticker on the receiver body; in the general menu of the receiver in the “Status” submenu. The secret code of the “Start” activation card for viewing the “Optimum” package for the first year is located under a protective layer. 7. Your next steps: a) Activation of the package of free channels. Now we turn on, using the channel switching buttons (“CH” and two buttons “+” and “-”) or using the number buttons, any of the channels of the free Basic package (for example, “ORT”, “Russia-1″ or “NTV” ) and we see a picture on TV:
You leave the channel on (you can turn off the TV, but you cannot touch the receiver) for a period of several minutes to several hours until the broadcast picture appears (we recommend leaving the receiver on overnight). Periodically look at the TV and wait for the broadcast to start. At this time, the Tricolor TV technical center will process information on registering your satellite receiver and activating the “Start” card of additional channels of the “Optimum” package. Next, the information is transmitted to the Eutelsat W4 satellite (36.0E) and from the satellite is sent to your receiver. Your receiver will receive signal unlock codes and the broadcast picture will appear on the TV screen. b) Activation of a package of paid channels. After the channels of the free Basic package (“ORT”, “Russia-1″ or “NTV”) start broadcasting, you turn on using the channel switching buttons (“CH” and two buttons “+” and “-”) or using the number buttons any channel of the Optimum additional package (for example, “Kinopokaz”, “Telenyanya”, “ZooTV”) and you see a familiar picture on the TV:
You again leave the channel on (the TV can be turned off, but the receiver cannot be touched) for a period of several minutes to several hours until the broadcast picture appears (we recommend leaving the receiver on overnight). Periodically look at the TV and wait for the broadcast to start. At this time, the Tricolor TV technical center will process information on registering your satellite receiver and activating the “Start” card of additional channels of the “Optimum” package. Next, the information is transmitted to the Eutelsat W4 satellite (36.0E) and from the satellite is sent to your receiver. Your receiver will receive signal unlock codes and the broadcast picture will appear on the TV screen. There is nothing complicated. Setting up in the absence of obstacles takes about 15-30 minutes, activation of channels from several minutes to 8 hours. And then all that remains is to enjoy watching your favorite programs.
Enjoy watching!
How to set up an antenna for the Tricolor satellite
In order to catch satellite channels, you need to install the appropriate antenna, which will be aimed at the operator’s satellite. For self-installation, a person will need:
- Hammer or drill.
- Screwdriver or screwdriver.
- Set of wrenches.
- Pliers.
- Compass.
- Knife.
- Insulating tape.
- Ties.
- Metal screws.
If you are not sure that you will be able to install the equipment yourself, you can ask the company’s employees to provide services for setting up Tricolor TV. This can be done on the website tricolor.tv or by calling 8-800-500-01-23.
The first thing a Tricolor client must do before installing an antenna is to choose a suitable location. For good signal reception, it must be precisely aimed at the operator’s satellite. It has Eutelsat coordinates 36A / 36B 36°. To set it up correctly, you will need to use a compass. Using the device, you need to determine the azimuth (the angle between north and the satellite) and point the dish at the desired angle.
If you can’t figure it out with a regular compass, it is recommended to turn to the help of the Satellite Antenna Alignment program. It should be downloaded and installed on your computer. It will help you find out the azimuth and determine the angle where you want to place the antenna.
After opening the program, you need to enter your coordinates. The utility interface is made in English, so let's make a few explanations:
- N—Northern latitude.
- S—South latitude.
- W—Western longitude.
- E—East longitude.
After entering the data, the program will show the angles for calculating the azimuth. If negative values are displayed, the satellite will not be able to be caught, since it is out of range.
Also in Satellite Antenna Alignment you can determine the geographic direction not by azimuth, but by the Sun. To do this, you need to indicate your coordinates and the current date, and also select an altitude of 0 meters above sea level for further calculations.
Several azimuth values will appear in the table. You need to choose the one that will be close to the same value for the satellite. In addition, you should pay attention to the date when the satellite is closest. It is at this moment that the antenna must be installed so that it can receive the signal.
When installing the antenna, you need to avoid the appearance of obstacles on the way to signal reception (trees, houses, etc.).
In the diagram above, daylight hours are indicated in yellow. The red line is the satellite's direction angle. To get more accurate coordinates for installation, you need to enter the parameters of your antenna.
After the program calculates the necessary coordinates, you can proceed to installing the equipment. According to the instructions, you need to assemble the antenna, attach the converter to it and secure the structure to the bracket. It should be fixed vertically to the ground.
The next step is connecting the antenna to the receiver using a television cable. Its wave impedance should be 75 Ohms.
During antenna installation work, the receiver must be turned off.
How to install the Tricolor TV antenna yourself
To watch satellite television, you need to purchase a special antenna, install and configure it. To do this, it is not necessary to resort to the help of specialists. You can set up the Tricolor TV dish yourself.
The plate is the main element of the entire system. It is a metal structure of a parabolic shape, concave inward. This shape is made so that signals coming from satellites, when in contact with the surface of the dish, are concentrated at one point - a circular convector. Thanks to this, you can obtain high quality communications. Signals from the convector are transmitted via cable to the receiver, where, after conversion, they are displayed on the TV screen.
Antenna space
How to set up the Tricolor TV satellite dish yourself? The success of the setup depends not only on the quality of the equipment, but also on the correct installation of the plate itself.
Antenna installation rules
- Select an available trajectory from the dish to the satellite. Those. choose the most suitable place where nothing will interfere with the signal from the satellite to the dish. To do this, you need to mentally draw a line from the antenna in the direction of the transmitting device. There should be no branches of trees, buildings, signs, flags on the trajectory line - i.e. any objects and objects that may interfere with the signal. The satellite signal cannot pass through walls.
- Install and secure the antenna at a high point. This could be the roof of a house, the outer part of a balcony or loggia, just a wall, or a special structure (tower) near the house.
You should not install the antenna inside the balcony, or in places where snow, water, tree leaves and other debris could potentially accumulate.
The best direction for a satellite dish is considered to be towards the equator (i.e. in the northern hemisphere it is towards the south).
When installing, it is best to choose a location that is as close as possible to the TV. This will make the setup work easier.
The external structure of Tricolor TV consists of several parts:
- bracket;
- antenna mirrors;
- coaxial cable;
- convector.
The bracket must be fixed to the wall or roof using anchor bolts. If the mount is not very reliable, then even a slight wind will begin to oscillate the antenna, which will immediately affect the image quality. It is recommended not to immediately tighten the bolts as tightly as possible, because Most often you have to change the position of the antenna during the setup process. The bolts can be finally tightened when all other work is done.
- How much does a standard installation of a Tricolor TV antenna cost?
When the brackets are installed, you can mount the dish mirror itself and the convector. The convector is installed on the holder with a connector in the lower position so that it does not flood with water.
Antenna assembly
When starting to assemble the device, you will first have to take care of the secure fixation of the bracket. Not only the force of the wind, the weight of the equipment, but also the material from which the house is built are taken into account. To prepare the plate you will need to do the following:
- If necessary, assemble the antenna, but often this is done by store employees.
- Install the converter and holder so that the connectors face down. In the future, this will allow you to get rid of water from entering the device.
- Attach the wire to the convector and insulate the connection.
- Fix the structure in the bracket, and then fix the cable on the device. It is important to leave up to a meter of cable in reserve.
At this point, the steps for installing the equipment have been completed and it’s time to move on to the next steps - setting up and adjusting the device.
Selecting a satellite dish.
The first thing I would like to focus on is the diameter of the “plate”. On the one hand, the larger the satellite dish, the higher the signal level, and, as a result, the better the image stability in bad weather.
On the other hand, as the antenna grows larger, its radiation pattern becomes narrower (the antenna requires more precise tuning to the satellite), the “windage” of the “dish” increases (which will require a more serious approach to the fastening and the surface on which it is planned to mount the antenna).
In addition, there is the concept of “standard antenna diameter for a given operator in a given area.” For example, in the Samara region the standard diameter of the “dish” for receiving Tricolor TV is 0.55 m, NTV Plus is 0.6 m, Telekarta is 0.8 m.
Antenna adjustment
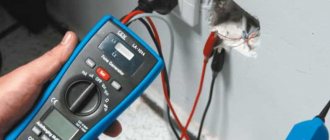
Before connecting, you need to adjust the device. It is better to do this in good weather when the satellite signal is optimal. The need for adjustment is to catch the satellite in a position where the television broadcast will be clear.
Of primary importance in this case is the elevation angle and azimuth angle where the dish is located. To calculate the indicators, it is enough to draw a horizontal line from the mounted receiving device and determine the angle that has formed. For different cities and towns, their own azimuth is determined. To get a more accurate value, you should use a compass.
Additional manipulations when installing the antenna
After the dish is securely attached to the outer wall, you should connect it to the tuner. To do this, use a special cable that must be plugged into the IN socket located on the rear panel of the tuner.
Please note that for synchronization you need to use high-quality cables.
When connected using cheap additional accessories, signal disruption occurs frequently. This significantly degrades the quality of performance characteristics. As a rule, all necessary equipment is included in the kit. The need for replacement arises if the antenna is located far from the receiver.
Setting the TV signal level
The signal setup procedure is not difficult, since it is necessary to change the position of the antenna until a high-quality signal is received. To help, you can attach instructions on how to set up the Tricolor TV antenna yourself:
- Open the “Antenna Installation” menu and enter “0000” in the password field.
- Select system settings, and then “Antenna installation”.
- Two scales “Signal” and “Quality” will appear in front of the user, where adjustments will need to be made.
When setting up the equipment, it is worth setting the scanning step to 1 cm. When a stable signal appears on the TV screen, a clear picture will appear. All you have to do is press the “Ok” button on the receiver remote control.
Connecting the receiver
Stages of connecting cable and convector
- Strip the end of the cable. To do this, cut the outer insulating material at a distance of approximately 15 mm from the edge, cut the inner material by 10 mm. Then remove the cut insulation. All this must be done very carefully so as not to damage the shielding braid.
- The shielding braid together with the foil must be bent in the opposite direction from the ends and screwed to the F-connector until it stops.
- Leave a 2 mm wire end behind the connector.
- The cable itself must be secured to the holder. To do this, they usually use electrical tape, adhesive tape, or nylon clamps.
- The connector must be sealed to prevent moisture from getting inside. To do this, you can use sealant, tape or tape.
This completes all the main external work on installing the antenna. Once the structure is installed, you need to configure it. To do this, you need to connect the cable to the receiver, and then configure the receiver.
Connecting the receiver to the TV can be done in two ways:
- using a high frequency (HF) antenna cable;
- using a low frequency (LF) cable with a connector.
The HF must be inserted into the TV socket, which is intended for an antenna and has the corresponding icon. The other end must be inserted into the “RF Out” connector on the receiver. When plugged into an electrical outlet, the word “BOOT” and the digital designation of the channel should appear on the TV screen. When you turn on channel search, the response “No signal” should appear. This means the device is working correctly.
Connecting the bass is done in almost the same way. Only after the message “BOOT” appears on the screen, you need to press the “A/V” key on the remote control, and then wait for the message “No signal”. If it appears, it means everything is working correctly. Any other inscription indicates that the equipment circuit was assembled incorrectly.
Setting up a satellite signal
How to achieve high-quality images?
To search for a signal, you need to do several steps in the satellite TV settings.
On the receiver control panel you need to select “Menu” => “Installation” => “OK”.
Enter four zeros. In the pop-up window, click “OK” again.
- Setting up Tricolor TV yourself: step-by-step instructions
Select the “Antenna installation” column and click “OK” again.
Find two scales – “Signal quality” and “Signal strength”. They show the level of information flow that the system is currently receiving. It must be at least 70%.
If the quality is below 70%, then the reasons for this may be either incorrect assembly of the circuit or incorrectly selected antenna position. If the cable is connected correctly, then it is necessary to change the values of the incoming signal by changing the position of the antenna structure itself.
Such actions must be performed very slowly and carefully. First move the antenna 1-2 mm, wait a few seconds so as not to lose the signal. The mirror of the plate should be directed as high as possible. At the same time, it is necessary to carefully ensure that the people performing this work do not accidentally block the signal with their bodies. You need to move the plate until a clear image appears on the TV screen. When it appears, you can completely tighten the bolts holding the brackets.
How to set up the Tricolor TV antenna yourself - watch the video:
Equipment installation
This is the first stage and consists of two important parts - installing a dish with an antenna and wiring all cables from one point of the system to another.
Antenna and dish
The antenna and dish from TricolorTV comes with clear instructions on exactly how to install and mount them. There are additional rules, by following which you will ensure a reliable and high signal level almost immediately after installation:
- Be sure to follow the slope prescribed for your region - this will determine whether the antenna will pick up the satellite signal or not.
- The plate must be located outdoors - it is not recommended to install it on loggias and glazed balconies, as the glass will create interference.
- There should be no additional obstacles between the antenna and the satellite in the form of other houses, green spaces or any building structures that could interrupt transmission.
- Be sure to make sure that the dish and antenna are not installed under a roof (slope) or rain gutter. This way you will avoid equipment damage during bad weather.
- The entire structure should “look” south.
- It is recommended to place the receiver as close to the antenna as possible. The permissible radius is one hundred meters, however, the closer, the stronger and better the signal will be.
When assembling the antenna and installing the dish, you must also follow several recommendations from TricolorTV:
- The equipment has a converter (see instructions). Under no circumstances should it be installed with the connector facing down, since this is one of the places where moisture easily gets in during rain. In this case, the signal will drop, and the equipment may even fail.
- The plate holder bracket should be mounted as firmly as possible, especially if you are installing the equipment on a windy side.
- First of all, do not fully tighten the nuts on the bracket when attaching the dish - you will still need to turn it to catch the signal, so do not fix it right away.
- The connectors on the cable should be screwed, having previously stripped it on both sides by approximately 1.5 cm.
Detailed assembly instructions should be included with your equipment.
Cable wiring
Running the cable after all the manipulations is not difficult. The diagram looks simple:
- One cable connects the antenna and receiver.
- The second cable connects the receiver and the TV (if you do not have Wi-Fi transmission).
An important point is to secure one side of the cable to the dish and antenna - it is best to do this with electrical tape so as not to damage the fastenings with anything else. Most often, it is because of a flimsily connected cable that users may lose the signal.
Solution
When frosty weather sets in, then you can use an elementary way to solve the icing problem - knock off the ice with any hard object. For these manipulations, it is not recommended to use axes, crowbars, knives and other sharp metal devices to avoid new complications:
- damage to the reflective surface of the plate due to scratching with a sharp object;
- changes in antenna direction;
- knocking down the settings needed to receive the signal.
All these consequences of “clumsy” work will further spoil the quality of the television signal.
There are safer, but no less simple ways to get rid of ice. The first method is to warm the icy surface with hot water, but not boiling water, so that the top layer of the reflector does not melt. When the ice moves away from the surface of the dish or antenna, remove it with your hands and carefully wipe the surface dry with a rag. After such manipulations, the working condition of the plate will improve for a long time.
Other effective enemies of ice are anti-freeze liquid and aerosol (liquid lubricant) for defrosting locks. Their effectiveness in combating antenna icing is associated with the following properties:
- low freezing point;
- the ability to remove water and not interfere with the signal passing through liquid or lubricant;
- the ability to prevent freezing of the reflective surface.
Receiver registration
Only after receiving the picture on the TV screen can you proceed to registering the equipment. There are several ways to perform this action. The following options are available today:
- on the company’s Internet portal;
- in the Tricolor TV office or in an automated center. Registration of the receiver is performed after purchasing the device;
- in the technical support service, but provided that the client already has a subscription service agreement.
Attention! During the registration procedure, the owner of the equipment will have to indicate not only the model of the receiver, but also the ID number and personal data.
The essence of registration is that the user confirms his right to use the company’s equipment and services, since he has a subscription agreement with the provider.
How to update Tricolor: some nuances
During operation, the satellite operator's receiver must receive update files. This is necessary for the system to function stably and provide the user with high quality images.
In order for the receiver to receive update files, it must be connected to the Internet via a patch cord or Wi-Fi.
When the next update appears, the relevant information will be displayed on the TV screen. The owner of the equipment will only need to confirm the action, after which the process of installing the current firmware version will begin. The receiver will then reboot.
If messages with available updates have not appeared for a long time, we recommend following these steps:
- Turn off the receiver and TV.
- Launch info channel 333.
- When the “Software Update” command appears on the screen, confirm its execution.
- Wait for the download to finish.
- Reboot your device.
- Go to the channel viewing menu.
- Confirm the action after the message “You need to update the software module” appears on the screen.
- Switch to the information channel.
The update process itself should take no more than 10 minutes. But if your home has outdated equipment, it may take much longer. Internet speed also plays an important role in fast loading.
Additional Information
At the end of the presented material, it is worth giving a number of tips that will simplify the installation of the equipment set:
- Do I need a special device to set up satellite dishes? The answer is no, because there is no need for it. The presence of such a device will simplify the process of searching for a satellite signal.
- To configure the equipment, you will need the azimuth and elevation angle where the antenna will be installed.
The installation process of Tricolor TV equipment does not present any difficulties even for people without experience in this matter. You should follow the instructions and prepare in advance for the event.
Variety of TV packages
Tricolor Television presents several packages.
Basic is a completely free package with 25 channels: all-Russian (Russia 1, Match, NTV, Channel 5, Russia K, Russia 24, Karusel, OTR, TVC, Ren TV, Spas, STS, Domashny, TV-3 , Zvezda, Mir, TNT, Muz-TV, Channel One, Friday), TV shop (SHOP 24), information channels (Promo TV, Infochannel "Tricolor TV", Teleinstructor, TV-TV), as well as three radio stations (Radio Russia, "Vesti FM", Mayak).
The minimum cost of the kit is 8800 rubles.
Connecting additional TV channels is possible for a separate monthly subscription fee. The following packages are available: “Match! Football", "Match! Football+”, “Our Football”, “Night”, “Children’s”, “Ultra HD”, “Unified”. Read more about current packages in the article about Tricolor 2017 tariffs.
Module for accessing Ultra HD channels
Why Tricolor TV
Using Tricolor satellite equipment, you will have access to over 200 channels, of which up to 30 in HD and 4 channels in 4K Ultra HD. Discover a world of entertainment for yourself and your family today!
And also this:
- Sports channels with live broadcasts of matches, family, adult, children's TV channels, TV series, foreign and domestic cinema, entertaining TV shows and educational programs.
- The ability to watch your favorite channels not only on TV, but also on mobile devices - tablet computers, smartphones, and other gadgets that support high-quality video broadcasting.
- Games on the GS GAMEKIT console with Full HD resolution are maximum fun for both children and adults.
Each client of the Russian operator Tricolor TV has already been able to appreciate all the benefits of installing and connecting a set of equipment for satellite television.
Advantages of satellite television
Tricolor is considered a new generation of satellite television broadcasting. The company is the largest operator in Russia, providing satellite digital broadcasting services virtually throughout the country, on a paid subscriber basis. Technologically, satellite television and audio broadcasts are developing, which increases the number of satellites launched into space every year, increasing, in turn, the volume of broadcast channels and, accordingly, the number of subscribers.
The advantageous features of choosing satellite television broadcasting are in the following aspects:
- Price. Payment for the use of television broadcasting (monthly fee) is inherent in virtually all cable channels broadcasting a limited number of programs. Satellite television provides a huge number of channels, the cost of a subscription fee for which is even slightly lower. Thus, sets of satellite equipment are often provided by the company for unlimited use, the price for which is symbolic.
- Broadcast quality – picture image. In this option there is nothing to stipulate; everything is already clear, given the cost.
- An assortment of channels to choose from relative to genre focus, which justifies any cost.