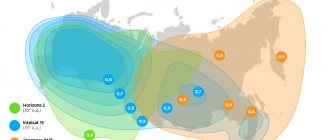
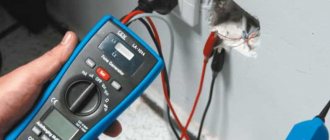
Choose a location to install the antenna. The main criterion for choosing an installation location is a clear view in the direction of the satellite, that is, there are no foreign objects on the imaginary line connecting the antenna and the satellite: buildings, trees, etc. The proximity of the antenna to the location of the TV and accessibility for the owner will simplify the installation process and settings. To determine the direction of the antenna to the satellite transmitting TricolorTV and NTV + (Eutelsat W4, W7 36.0E°), we suggest you use our interactive map of the direction to the satellite .
The antenna can be installed on the outside of a balcony or loggia, on a wall near a window or on the roof of a house. It is not recommended to install the antenna inside a balcony or loggia with glazing, in places where the antenna may be exposed to intense amounts of water, snow, ice: under the slopes of a sloping roof, drains, etc.
Satellite TV and receiving equipment
Analog TV is steadily moving into the distant past, being replaced by satellite broadcasting.
The Tricolor operator's package of channels has already gained widespread use and veneration, and in general, is well received by the consumer.
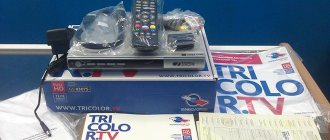
To use the provider’s services, you should purchase a standard set of equipment. The list of standard satellite equipment consists of the following components:
- Satellite antenna;
- Receiver;
- Converter;
- The required length of coaxial cable.
It is not difficult to purchase this equipment from any certified dealer, as well as in retail sales in retail chains. In addition to purchasing the necessary kit, it is worth knowing how to install the antenna and catch a satellite signal with this antenna. You can connect the antenna yourself, as well as choose the correct direction for its installation, and learn how to configure the TV and antenna to receive the signal.
Antenna adjustment
- Approximately set the azimuth and elevation angle of the antenna, focusing on the data for the city closest to you given in the table. The azimuth can be set using a compass. It is more difficult to accurately determine the elevation angle, because The angle of inclination of the offset antenna depends on its design, and antennas from different manufacturers are used to receive TricolorTV TV channels. For example, the exact vertical position of the Ulyanovsk antenna corresponds to an elevation angle of 26.5°. Therefore, in Moscow this antenna can be installed vertically, in Volgograd it can be tilted back a little, and in St. Petersburg it can be tilted a little forward. For antennas from other manufacturers, this situation may be different.
- In accordance with the operating instructions for the digital receiver, connect the cable coming from the converter to it. Carry out the cutting of the F-connector according to the method given above.
- Connect the receiver to the TV according to the operating instructions and turn it on.
Devices for receiving digital satellite signal Tricolor TV
It is known that Tricolor TV binds its own access cards to certain devices. Not many subscribers have the opportunity to choose devices that suit their taste, since in addition to everything, the company recommends using not only certain receivers, but also the CAM modules themselves.
For example, for the European part of the Russian Federation it is recommended to use the following receivers:
- GS-8306S
- GS-8307
- GS-8305
To receive Tricolor TV Siberia broadcasts, it is recommended to use:
- GS-8306
- GS-8305
- HD-9303 and other devices.
To receive support from the Tricolor TV operator, you must complete full registration and sign a service acceptance agreement. Cardsharing service provides typical services with more reasonable prices, but registration is also required. At the same time, registration on the portal and receipt of services occurs within a matter of minutes, also with the support of operators who are always online.
Nevertheless, in this publication it is worth considering a specific example of setting up satellite TV broadcasting from the Tricolor operator. By the way, you can watch TV from the operator Tricolor without a receiver.
Virtually every modern TV can be equipped with a tuner that supports DVB-S2, but we are talking exclusively about receiving free basic channels. So there is no need to talk about decoding.
Activating satellite broadcasting: setting up equipment
Before connecting the receiver to the TV and setting up the receiving device, it is worthwhile to properly install the antenna itself. Next, connect the receiver to the converter using a cable, and then connect the equipment to the TV. Of course, the receiver connects to the network and starts up.
Below are instructions on how to configure the Tricolor receiver. The instructions will be given using a specific example of the GS-8307 receiver. Connecting the device to the TV should be done using the SCART or HDMI output. It is worth noting that the picture from this device is output exclusively through one output. That is, if in the device settings the connection is made via SCART, and the TV is connected with an HDMI cable, the screen will display the absence of a signal.
Information about the connector used is displayed on the device display. It is possible to switch the output:
- Using the button on the receiver’s remote control: “in. signal";
- Or in its menu in the item “Setting up AV outputs and video inputs”.
There is an opinion that anyone can tune an antenna, we will not dispute it, but we note that a specialist will do it much better, using special instruments and his experience.
If you plan to install and configure the equipment yourself, please read the instructions below.
STEP 1: Choose a location to install the antenna.
Choose a location to install the antenna. The main criterion for choosing an installation location is a clear view in the direction of the satellite, that is, there are no foreign objects on the imaginary line connecting the antenna and the satellite: buildings, trees, etc. The direction to the satellite can be found, for example, using a compass. Another equally effective way to determine the direction (especially in the city) is to simply look at where the neighboring “ Tricolor TV ” or “ NTV Plus ” antennas are pointed and, based on this information, find a convenient place where you can place your antenna. The direction to the satellite can also be indicated by the Sun; for St. Petersburg, the direction to the satellite W4/W7 (36 East) from which Tricolor TV broadcasts coincides with the position of the Sun, at approximately 13:30 hours.
The proximity of the antenna to the location of the TV and accessibility for the owner will simplify the process of installing and configuring it. The antenna can be installed on the outside of a balcony or loggia, on a wall near a window or on the roof of a house. It is not recommended to install the antenna inside a balcony or loggia with glazing, in places where the antenna may be exposed to intense amounts of water, snow, ice: under the slopes of a sloping roof, drains, etc.
STEP 2: Assemble the antenna
1. Assemble the antenna according to the instruction manual.
2. Attach the antenna bracket to the wall. Fastening elements (anchor bolts, studs, nuts, screws, etc.) are selected depending on the wind load and the material of the wall on which the antenna is mounted.
3. Install the converter in the holder with the connector facing down so that precipitation does not get inside the converter.
4. Connect the cable to the converter using the F connector. To do this you need:
- Remove the top insulation of the cable by 15 mm without damaging the shielding braid.
- Place the braided shielding along the cable. — Carefully place the foil along the shielding braid.
- Remove 10mm of internal insulation. — Screw the connector until it stops.
- When screwing the F-connector onto the cable, you must carefully ensure that the thin threads of the cable shielding do not short-circuit with the central core, otherwise you can damage the receiver!!!
- “Bite off” the central conductor so that it does not protrude beyond the connector by more than 2 mm.
5. Attach the cable to the converter holder arc with plastic ties or insulating tape.
6. Seal the entire length of the F-connector with heat shrink tubing or 2 layers of insulating tape, and apply a layer of silicone sealant evenly to the insulating tape.
7. Install the antenna on the bracket. Tighten the adjusting nuts so that you can move the antenna in the vertical and horizontal planes with some effort.
8. Secure the cable to the antenna bracket with plastic ties or electrical tape. Leave a 1m cable reserve near the antenna, also securing it to the bracket.
STEP 3: Adjust the antenna
1. Approximately set the azimuth and elevation angle of the antenna. The azimuth can be set using a compass. It is more difficult to accurately determine the elevation angle, because The angle of inclination of the offset antenna depends on its design, and antennas from different manufacturers are used to receive TricolorTV television programs. For example, the exact vertical position of the Ulyanovsk antenna corresponds to an elevation angle of 26.5°. Therefore, in Moscow this antenna can be installed vertically, in Volgograd it can be tilted back a little, and in St. Petersburg it can be tilted a little forward. For antennas from other manufacturers, this situation may be different.
2. In accordance with the operating instructions for the digital terminal, connect the cable coming from the converter to it. Carry out the cutting of the F-connector according to the method given above.
3. Connect the receiver to the TV according to the operating instructions and turn it on.
STEP 4: Setting up TV viewing
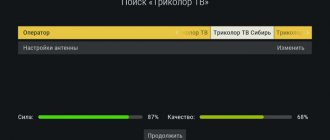
By slowly moving the antenna mirror in the vertical and/or horizontal planes around the intended satellite location, you should achieve a stable signal from the satellite. To control the signal quality level, use the “Antenna Installation” menu item.
For DRE-7300, DRE-5000, GS-8300 and analogue terminals
Complete the following steps: by successively pressing the remote control buttons, look at the screen of your TV: “MENU” ; “SETUP” , “OK” , (pin code 0000), “MANUAL SEARCH” , “OK” .
In the lower right corner of your TV, a graphic indicator of the level and quality of the received signal is displayed in the form of two empty windows. If the antenna is not configured, the level and quality is 0%. You can start tuning the antenna based on the received signal.
For GS-8302 and GS-8304 terminals
1. Open the receiver's Main Menu by pressing the MENU on your receiver's remote control; Use the arrow buttons to select “ Settings ” and confirm your selection by pressing the OK ;
2. Enter the password - 0000
3. The following menu will be displayed in front of you, in which you need to select the “ System settings ” item, and also click on the OK .
4. Select " Antenna Installation " and click OK.
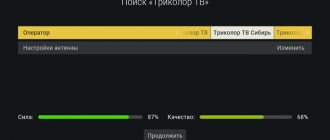
In the line opposite the “Satellite” item, you must select the satellite “Tricolor - Center”, or “Tricolor - Siberia”, depending on the region of installation.
At the bottom of the “Antenna Installation” menu item you will see 2 scales - signal level and signal quality. When configured correctly, these scales should be at least 70% filled.
If the signal level is less than 70%, you need to check the cable connection (cable from the receiver to the satellite dish) and adjust your antenna; the antenna may not be accurately tuned to the satellite and is not receiving a signal from it. You need to adjust the antenna position.
This can be done as follows: Looking at these scales of signal level and quality, it is necessary to slowly move the antenna millimeter by millimeter, in vertical and/or horizontal planes around the intended location of the satellite, maintaining 3-5 seconds in each position until both scales in manual search will not be filled at least 70%.
Please remember that signal strength depends on weather conditions. In conditions of dense clouds, heavy rain or snowfall, the signal level may decrease until the image disappears. Snow stuck to the antenna also significantly worsens reception conditions.
Tighten the adjusting nuts while monitoring the received signal level.
ATTENTION! Installing a satellite dish requires extreme caution. We are not responsible for failure to comply with safety regulations when performing work in accordance with these instructions.
If you are unable to set up the antenna, we recommend that you contact your dealer, who will come to you and set up reception of Tricolor TV channels.
Source
Setting up the Tricolor TV operator receiver: instructions for manipulation
In order to activate the receiver, it is turned on and an operator card is inserted into it. When connecting to the cardsharing service, the device should be registered on the sharing portal.
Often, when selling a device, Tricolor TV channels are scanned, but if this does not happen, or a receiver is used that was already in use, then the first time you turn it on, the “Installation Wizard” starts. It is worth going through three steps of setting up the provider:
- Selecting a location region;
- Operator selection;
- Scanning TV channels.
Step one involves selecting an operator, which is done using the remote control using the up/down and left/right buttons. In this section, the language used is selected.
Next, select the location region. Tricolor is broadcast from the Bonum-1 satellite and Eutelsat W4\W7. So the choice depends on your immediate location.
When selecting the main region, all the operator’s TV channels are scanned automatically.
The process is not complicated and takes minimal time.
Main menu
I would like to point out one more advantage. Now you can edit channels. Cards of the 13th and 14th series are read normally. There are no others, so it was not checked. Searching for channels is very fast. They've been threshing for the second day - no CCD has been observed yet.
A more informative (compared to the previous model) sign informing about a short circuit on the line. A red circle will make the owner wary.
Three-color signal strength scale.
In the wilds of the menu I discovered some interesting things. All possible satellites, as well as all types of encodings, are registered in the receiver's memory.
Compared to the previous model, the receiver does not differ much in current consumption. Maximum 0.8 A. The power supply is standard like the 8304. The EPG (TeleGuide) has become more convenient. Now on the selected channel, you can view the program schedule for the day by simply pressing the cursor left or right. In addition, the “green button” function has been preserved, allowing you to fully expand the entire list for the day.
Firmware for satellite receivers of Tricolor TV operator
In order to flash the receiver, you will need the following list of additional devices:
- RS232 – null modem cable;
- Personal Computer;
- GS Burner is a program designed for copying and downloading software and databases of GS devices: https://yadi.sk/d/z3wgU_GFf8a3U;
- Firmware for a specific receiver model.
Each presented firmware is provided inside the file with auxiliary instructions for the specifically specified Tricolor TV receiver:
— https://yadi.sk/d/mk1WpWd1fA9dA — firmware for Tricolor TV receivers: DRE-5001, DRS-5000, DRS-5003, GS-7300;
- https://yadi.sk/d/vMTpBa4OfAA4S - firmware for the HD9305B device;
— https://yadi.sk/d/zmAe_lA4fAACC — software for the DRS-8300 device;
— https://yadi.sk/d/e98fMw-sfAAJY — firmware for the Tricolor TV device: GS8300 M\N;
— https://yadi.sk/d/yTEqQZ3kfAATT — software for the GS8302 satellite receiver.
Satellite television Tricolor TV: biss keys
In fact, all Tricolor receivers created with the latest firmware versions are equipped with biss support. Entering the biss keys is quite simple:
- We stand on the encoded channel with bis encoding;
- We enter the device menu and find the settings;
- In the “Settings” section, select “Conditional access˃BISS”;
- Current biss keys are entered into the section;
- The yellow button is pressed to assign a key to the channel.
Then you can enjoy watching Tricolor TV. It is worth noting that the availability of entering biss keys allows you to enter no more than seven (7) pieces.
Instructions for updating Tricolor GS 8305 and GS 8306 software
To update the receiver software, you must do the following:
- Unplug the receiver's power cord from the outlet, then plug the receiver back into the mains. This is necessary for a complete reboot.
- Switch the receiver to the channel “Info channel “Tricolor TV”. After a couple of seconds, a message will appear on the TV screen about the need to update the receiver software; the body of the message will read: update the software? And the answer options: yes and no, you should click on “Yes”.
If this message about the need to update the software does not appear on the TV screen after 5 minutes, subscribers need to reset the receiver settings to factory settings:
- you need to go to the “Menu” of the receiver;
- go to the “Settings” option;
- Select “Factory settings” from the list;
- Press “OK” on the remote control.
After receiving consent for the update, service messages about the process of updating the receiver software will begin to appear on the screen.
Software updates take an average of five minutes.
When the update is completed, the receiver will reboot and turn on in the “Setup Wizard” mode.
At the initial stage of the Setup Wizard, subscribers will be asked to select the menu language and provider. You need to select “Tricolor TV Center” from the list, after which you can proceed to the next step. When the search for Tricolor TV TV and radio channels is completed, you will need to make sure that the receiver software version has changed to 1.1.001. To do this, you need to go through several steps:
- go to “Menu”;
- go to “DREInfo”;
- further - “Status”;
- After the transition, you can check the software value in the third line.
If the receiver's software version has not changed (you need to check it with the old one, which was obviously written down on a piece of paper), subscribers need to turn off and turn on the receiver to the Tricolor TV Infochannel TV channel and repeat the update procedure from the beginning.
