Advantages of the Tricolor TV operator
The Tricolor satellite dish provides high-quality signal reception in the city of Moscow (as well as the Moscow region). The provider is constantly working to improve the quality of services provided and expand the number of available services. One of the new products is online television with the ability to record, stop and watch video content from the beginning. The following advantages are also highlighted:
- Extended basic package with 200+ TV channels, including 30 channels with HD picture quality.
- Signal reception throughout Russia, including the Siberian Federal District.
- Possibility of connecting satellite equipment to 2 TVs with a subscription fee of only 1,500 rubles per year.
- High quality video and audio with Dolby Digital support.
Other, but no less important, advantages of Tricolor TV: affordable cost of equipment and installation, low subscription fee, regular promotions from the provider.
Receiver registration
The final stage of equipment installation is its registration in the Tricolor TV system. You can perform the action on the tricolor.tv website, by calling 8-800-500-01-23 or at an authorized sales office.
During registration, the receiver model, identification number and personal data are indicated. You can find out the parameters by referring to the equipment packaging.
ID is a combination of 12 digits. If you cannot find it on the package, you need to go to the receiver settings and press the “Status” button. Also, when concluding a contract in the office, you must provide personal data. This means that there is absolutely no point in going to the department without a passport.
Required equipment for installation
To install Tricolor TV in the Moscow region, specialists select the equipment necessary to ensure high-quality signal reception. The kit includes the following:
- Tricolor satellite dish with a diameter of 0.55 to 0.8 m, depending on the conditions of the region.
- Bracket for fastening.
- Converter selected taking into account the number of connected TV receivers.
- Tricolor receiver and module, the selection of which takes into account various criteria, for example, the need to support HD quality.
- Access card (if necessary).
- Coaxial cable of a certain length.
- F-connectors.
The entire set is inexpensive and varies depending on the signal reception conditions, the characteristics of the television receivers used, and the complexity of cable routing.
How to connect and configure
Instructions for independently setting up and connecting Tricolor TV satellite television equipment are given below. You can call a technician for professional installation and connection of tricolor TV satellite television equipment in the Moscow region by phone or E-Mail: [email protected]
If you plan to install and configure the equipment yourself, please read the instructions below.
STEP 1: Choose a location to install the antenna.
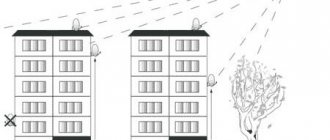
Choose a location to install the antenna. The main criterion for choosing an installation location is a clear view in the direction of the satellite, that is, there are no foreign objects on the imaginary line connecting the antenna and the satellite: buildings, trees, etc. The proximity of the antenna to the location of the TV and accessibility for the owner will simplify the installation process and settings.
The antenna can be installed on the outside of a balcony or loggia, on a wall near a window or on the roof of a house. It is not recommended to install the antenna inside a balcony or loggia with glazing, in places where the antenna may be exposed to intense amounts of water, snow, ice: under the slopes of a sloping roof, drains, etc.
STEP 2: Assemble the antenna
1. Assemble the antenna according to the instruction manual.
2. Attach the antenna bracket to the wall. Fastening elements (anchor bolts, studs, nuts, screws, etc.) are selected depending on the wind load and the material of the wall on which the antenna is mounted.
3. Install the converter in the holder with the connector facing down so that precipitation does not get inside the converter.
4. Connect the cable to the converter using the F connector. To do this you need:
– Remove the top insulation of the cable by 15 mm without damaging the shielding braid. – Place the braided shielding along the cable. – Carefully place the foil along the shielding braid. – Remove 10mm of internal insulation. – Screw the connector as far as it will go. – “Bite off” the central conductor so that it does not protrude beyond the connector by more than 2 mm.
5. Attach the cable to the converter holder arc with plastic ties or insulating tape.
6. Seal the entire length of the F-connector with heat shrink tubing or 2 layers of insulating tape, and apply a layer of silicone sealant evenly to the insulating tape.
7. Install the antenna on the bracket. Tighten the adjusting nuts so that you can move the antenna in the vertical and horizontal planes with some effort.
8. Secure the cable to the antenna bracket with plastic ties or electrical tape. Leave a 1m cable reserve near the antenna, also securing it to the bracket.
STEP 3: Adjust the antenna
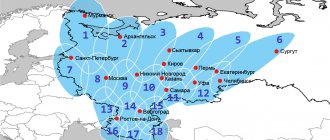
1. Approximately set the azimuth and elevation angle of the antenna, focusing on the data for the city closest to you given in the table. The azimuth can be set using a compass. It is more difficult to accurately determine the elevation angle, because The angle of inclination of the offset antenna depends on its design, and antennas from different manufacturers are used to receive TricolorTV TV channels. For example, the exact vertical position of the Ulyanovsk antenna corresponds to an elevation angle of 26.5°. Therefore, in Moscow this antenna can be installed vertically, in Volgograd it can be tilted back a little, and in St. Petersburg it can be tilted a little forward. For antennas from other manufacturers, this situation may be different. 2. In accordance with the operating instructions for the digital receiver, connect the cable coming from the converter to it. Carry out the cutting of the F-connector according to the method given above. 3. Connect the receiver to the TV according to the operating instructions and turn it on.
STEP 4: Setting up TV viewing
By slowly moving the antenna mirror in vertical and/or horizontal planes around the intended satellite location, you should achieve a stable signal from the satellite. To control the signal quality level, use the “Antenna Installation” menu item.
Activate the “Received signal level” item in the menu of your receiver.
- Open the receiver's "Main Menu" by pressing the MENU button on your receiver's remote control;
- Use the arrow buttons to select “Settings” and confirm the selection by pressing the “OK” button;
- Enter password – 0000
- The following menu will be displayed in front of you, in which you need to select the “System settings” item and also click the “OK” button.
- Select “Antenna Installation” and click “OK”.
In the line opposite the “Satellite” item, you must select the satellite “–EutelsatW4/W7” or “–Bonum1” depending on the region of installation.
At the bottom of the “Antenna Installation” menu item you will see 2 scales – signal level and signal quality. When configured correctly, these scales should be at least 70% filled.
If the signal level is less than 70%, you need to check the cable connection (cable from the receiver to the satellite dish) and adjust your antenna; the antenna may not be accurately tuned to the satellite and is not receiving a signal from it. You need to adjust the antenna position. You can do this as follows:
Looking at these signal level and quality scales, you need to slowly move the antenna centimeter by centimeter, holding for 3-5 seconds in each position, until both scales in the manual search are filled at least 70%.
Please remember that signal strength depends on weather conditions. In conditions of dense clouds, heavy rain or snowfall, the signal level may decrease until the image disappears. Snow stuck to the antenna also significantly worsens reception conditions.
Tighten the adjusting nuts while monitoring the received signal level.
If you are unable to set up your antenna, we recommend that you contact us by phone
Connection steps
Our company’s specialists have extensive experience in installing and configuring TV equipment, and carry out all work in several stages:
- Choosing the optimal place to install the plate. As a rule, this is the south side of the house, closest to the TV.
- Assembling the antenna in full compliance with the instructions.
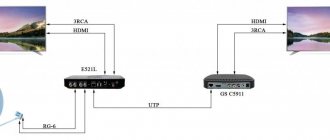
- Connecting the dish to the receiver using a coaxial cable and f-connectors.
- Connecting the receiver to the TV receiver via an HDMI interface or a “tulip” cable (old TVs).
- Setting up equipment under favorable weather conditions.
- Registering a subscriber card and searching for available TV channels.
How to update Tricolor: some nuances
During operation, the satellite operator's receiver must receive update files. This is necessary for the system to function stably and provide the user with high quality images.
In order for the receiver to receive update files, it must be connected to the Internet via a patch cord or Wi-Fi.
When the next update appears, the relevant information will be displayed on the TV screen. The owner of the equipment will only need to confirm the action, after which the process of installing the current firmware version will begin. The receiver will then reboot.
If messages with available updates have not appeared for a long time, we recommend following these steps:
- Turn off the receiver and TV.
- Launch info channel 333.
- When the “Software Update” command appears on the screen, confirm its execution.
- Wait for the download to finish.
- Reboot your device.
- Go to the channel viewing menu.
- Confirm the action after the message “You need to update the software module” appears on the screen.
- Switch to the information channel.
The update process itself should take no more than 10 minutes. But if your home has outdated equipment, it may take much longer. Internet speed also plays an important role in fast loading.
Cooperation format
Contact us and our specialists will select the best option for installing the Tricolor antenna on an individual basis, taking into account all conditions for receiving a TV signal. After agreeing on all the details, our specialists will go to the site, install and configure all the equipment as soon as possible. All devices included in the kit, as well as the work themselves, are covered by an official warranty.
We will do everything necessary for you to enjoy watching the best TV shows in Moscow and Moscow Region. For consultation and application, please contact Noutof specialists.
Antenna tuning using a special device
To make it easier for you to set up the dish, you can do it using the SatFinder device. The device is configured as follows:
- You need to cut about 20cm from the television cable and attach connectors to its ends.
- From the antenna you need to disconnect the cable that goes to the TV set-top box. It is connected to the device connector in the “TO REC” hole.
- The first end of the cut cable is connected to the indicator, and the second to the convector.
- Set the arrow to “5”, turn on the tuner, when booted, start rotating the antenna. In this case, the device is sensitive to any signal, so you need to rotate the antenna slowly. When the device beeps, you need to look at the TV screen.
- When the signal is caught, fine tuning begins on the TV receiver, the signal strength and its levels are checked.
- If there is no signal, then the arrow is again set to “5” and the procedure is repeated until the signal is caught and the arrow freezes.
- After these steps, the device is disconnected and the cables are returned to their place.
Parental control
To restrict access to some programs, change the default PIN code and install the Parental Control function. PIN is a password that can be used to protect settings from editing and a specific channel list from viewing.
- Enter the menu, scroll to “Parent Code” and press OK.
- Enter .
- Set the age limit for adult programs by selecting 18 years of age and confirm your selection.
- Find the menu item “Change PIN” and enter the new code.
From now on, when selecting channels with an age restriction, the receiver will ask for a password.
Tuning channels on TVs with a built-in satellite tuner
In Tricolor TV, tuning channels using a conditional access module installed in a TV with a DVB-S2 receiver differs from conventional adjustment and scanning through the receiver. Proceed with setup after completing installation and alignment of the antenna to the satellite.
- 1 step. Configuring satellite parameters.
Enter the “Select Satellite” menu sub-item; when prompted for a PIN code, enter “0000”. Check the box next to "Eutelsat 36".
When setting transponder parameters in “LNB Settings”, specify the lower and upper gen 10750 MHz, transponder – 12226.
- Step 2. Transponders.
In the menu sub-item “Search for satellite – Transponder”, create a new one and enter its data in the table. When you enter the first transponder, the network will be identified as belonging to Tricolor and automatic search will become available. In this case, the remaining transponders will also be configured automatically.
If scanning in automatic mode fails, the data of all 14 transponders must be specified manually using the same scheme.
- Step 3. Activation.
Insert the conditional access module with the installed card into the TV slot. Register your slot and activate your subscription. Find a test channel and leave it on it until the channels are completely decoded.
Creating a list of favorite channels
The initially available categories are sports, news, music and radio, and each of them can be edited:
- Enter the menu settings and enter the password for the receiver (0000).
- Select Organize Lists.
- A window will appear divided into two parts: on the left is a list of channels available for adding, on the right is a field for selected channels.
- By pressing the desired color of the button on the remote control, you can change the name, composition of channels or completely delete the list.
- After editing the list structure, distribute the necessary channels.
Ready! The channels are fully configured and you can move on to additional features.