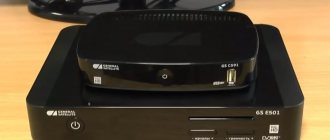
After purchasing equipment from a satellite provider, you need to connect it correctly. Setting up the Tricolor antenna is not a particularly difficult undertaking, although many people call craftsmen and specialists for this. In fact, why spend extra money (the price for the service is not the lowest) if it is enough to simply act in accordance with the attached instructions.
It is quite possible to independently install and configure a satellite signal, even for a person who does not have the necessary experience. Detailed information and explanation of significant points are presented in this article.
Tools and materials for work
To proceed to how to install the Tricolor TV dish yourself, you should read the attached instructions. This will allow you to determine what materials and devices may be required during the work. In general, the installation, connection and configuration procedure has several main stages, and it will not be difficult to handle this matter yourself. As for tools and materials, you will need for installation:
| Tools | Materials |
| drill | electrical insulating tape |
| screwdriver | silicone based sealant or heat shrink tubing |
| wrenches 8, 10 and 13 | screeds |
| open-end wrench 10 | washers 30-50 mm |
| pliers | Allen screws 13 x 6-8 cm long |
| compass | |
| knife |
It is likely that fasteners will also be needed to secure the base. This is necessary if the surface where the plate will be fixed is made of wood. It is better to use 10*100 anchor bolts.
Important! For connection, it is better to use a double-braided copper cable. You should not take more than 100 m, since this length is enough, and even if you need to extend the distance, you will need to install amplifiers.
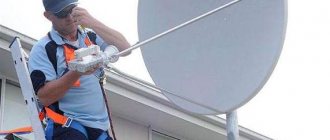
How to set up an antenna for the Tricolor satellite
In order to catch satellite channels, you need to install the appropriate antenna, which will be aimed at the operator’s satellite. For self-installation, a person will need:
- Hammer or drill.
- Screwdriver or screwdriver.
- Set of wrenches.
- Pliers.
- Compass.
- Knife.
- Insulating tape.
- Ties.
- Metal screws.
If you are not sure that you will be able to install the equipment yourself, you can ask the company’s employees to provide services for setting up Tricolor TV. This can be done on the website tricolor.tv or by calling 8-800-500-01-23.
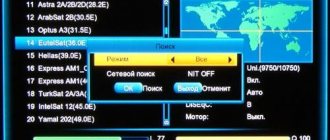
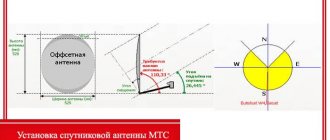
The first thing a Tricolor client must do before installing an antenna is to choose a suitable location. For good signal reception, it must be precisely aimed at the operator’s satellite. It has Eutelsat coordinates 36A / 36B 36°. To set it up correctly, you will need to use a compass. Using the device, you need to determine the azimuth (the angle between north and the satellite) and point the dish at the desired angle.
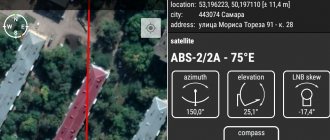
If you can’t figure it out with a regular compass, it is recommended to turn to the help of the Satellite Antenna Alignment program. It should be downloaded and installed on your computer. It will help you find out the azimuth and determine the angle where you want to place the antenna.
After opening the program, you need to enter your coordinates. The utility interface is made in English, so let's make a few explanations:
- N—Northern latitude.
- S—South latitude.
- W—Western longitude.
- E—East longitude.
After entering the data, the program will show the angles for calculating the azimuth. If negative values are displayed, the satellite will not be able to be caught, since it is out of range.
Also in Satellite Antenna Alignment you can determine the geographic direction not by azimuth, but by the Sun. To do this, you need to indicate your coordinates and the current date, and also select an altitude of 0 meters above sea level for further calculations.
Several azimuth values will appear in the table. You need to choose the one that will be close to the same value for the satellite. In addition, you should pay attention to the date when the satellite is closest. It is at this moment that the antenna must be installed so that it can receive the signal.
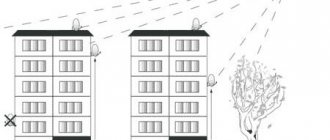
When installing the antenna, you need to avoid the appearance of obstacles on the way to signal reception (trees, houses, etc.).
In the diagram above, daylight hours are indicated in yellow. The red line is the satellite's direction angle. To get more accurate coordinates for installation, you need to enter the parameters of your antenna.
After the program calculates the necessary coordinates, you can proceed to installing the equipment. According to the instructions, you need to assemble the antenna, attach the converter to it and secure the structure to the bracket. It should be fixed vertically to the ground.
The next step is connecting the antenna to the receiver using a television cable. Its wave impedance should be 75 Ohms.
During antenna installation work, the receiver must be turned off.
Choosing a location to install the Tricolor TV antenna
The effectiveness of installing the Tricolor TV antenna largely depends on how correctly the location for the device was chosen. In the future, it is the correct choice of location for the device that will guarantee a constant signal from the satellite. When choosing where to mount the plate, you should consider the following nuances:
- there should be no obstacles in front of the device;
- no need to place the antenna near towers where there is a strong magnetic field;
- The distance from the device to the TV should be up to 100 meters.
It’s very good if the same Tricolor TV dish is located nearby, since this will make it easy to figure out which way to point the device so that the signal reception is high-quality.
Leave your review or complaint - Ask a question
Advice! If questions remain, and you can’t set up channels from Tricolor, then you should call the hotline 8-800-500-0123 or navigate by the coordinates - 36 degrees east longitude and the equator.
Installation of a television connector
Preparing a television connector for installing satellite television is easy if you follow the following instructions:
- in order not to damage the shielding braid, you need to remove the cable from the top insulation by about 15 mm;
- shielding braid and foil must be located along the entire length of the cable;
- Next, you need to remove 10 mm of the inner insulation layer from the cable;
- the next stage is to screw in the connector as much as possible and use wire cutters to disconnect the conductor, which should extend beyond the edges no more than 3 mm.
The video broadcast to the TV using the installed Tricolor dish directly depends on the quality of the work carried out by the installer. You should follow the order of the instructions very carefully. You need to put all your strength and work into setting up Tricolor TV!
Antenna assembly
When starting to assemble the device, you will first have to take care of the secure fixation of the bracket. Not only the force of the wind, the weight of the equipment, but also the material from which the house is built are taken into account. To prepare the plate you will need to do the following:
- If necessary, assemble the antenna, but often this is done by store employees.
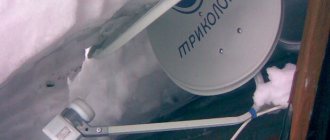
- Install the converter and holder so that the connectors face down. In the future, this will allow you to get rid of water from entering the device.
- Attach the wire to the convector and insulate the connection.
- Fix the structure in the bracket, and then fix the cable on the device. It is important to leave up to a meter of cable in reserve.
At this point, the steps for installing the equipment have been completed and it’s time to move on to the next steps - setting up and adjusting the device.
Equipment installation
This is the first stage and consists of two important parts - installing a dish with an antenna and wiring all cables from one point of the system to another.
Antenna and dish
The antenna and dish from TricolorTV comes with clear instructions on exactly how to install and mount them. There are additional rules, by following which you will ensure a reliable and high signal level almost immediately after installation:
- Be sure to follow the slope prescribed for your region - this will determine whether the antenna will pick up the satellite signal or not.
- The plate must be located outdoors - it is not recommended to install it on loggias and glazed balconies, as the glass will create interference.
- There should be no additional obstacles between the antenna and the satellite in the form of other houses, green spaces or any building structures that could interrupt transmission.
- Be sure to make sure that the dish and antenna are not installed under a roof (slope) or rain gutter. This way you will avoid equipment damage during bad weather.
- The entire structure should “look” south.
- It is recommended to place the receiver as close to the antenna as possible. The permissible radius is one hundred meters, however, the closer, the stronger and better the signal will be.
When assembling the antenna and installing the dish, you must also follow several recommendations from TricolorTV:
- The equipment has a converter (see instructions). Under no circumstances should it be installed with the connector facing down, since this is one of the places where moisture easily gets in during rain. In this case, the signal will drop, and the equipment may even fail.
- The plate holder bracket should be mounted as firmly as possible, especially if you are installing the equipment on a windy side.
- First of all, do not fully tighten the nuts on the bracket when attaching the dish - you will still need to turn it to catch the signal, so do not fix it right away.
- The connectors on the cable should be screwed, having previously stripped it on both sides by approximately 1.5 cm.
Detailed assembly instructions should be included with your equipment.
Cable wiring
Running the cable after all the manipulations is not difficult. The diagram looks simple:
- One cable connects the antenna and receiver.
- The second cable connects the receiver and the TV (if you do not have Wi-Fi transmission).
An important point is to secure one side of the cable to the dish and antenna - it is best to do this with electrical tape so as not to damage the fastenings with anything else. Most often, it is because of a flimsily connected cable that users may lose the signal.
Antenna adjustment
Before connecting, you need to adjust the device. It is better to do this in good weather when the satellite signal is optimal. The need for adjustment is to catch the satellite in a position where the television broadcast will be clear.
Of primary importance in this case is the elevation angle and azimuth angle where the dish is located. To calculate the indicators, it is enough to draw a horizontal line from the mounted receiving device and determine the angle that has formed. For different cities and towns, their own azimuth is determined. To get a more accurate value, you should use a compass.
How to install an outdoor TV antenna in a private home
To make TV antennas for a private home, steel, copper, aluminum alloys and dielectric materials are used: plexiglass, getinax, textolite, etc. Wood products can be used as insulators only in extreme cases, and even then after pre-treating the wood with paraffin or special varnishes.
Every effort must be made to protect metal parts from corrosion. Electroplating is an ideal option, but usually not available. Therefore, cover the parts with various varnishes and paints for exterior use, this will prevent the structure from aging.
Setting the TV signal level
The signal setup procedure is not difficult, since it is necessary to change the position of the antenna until a high-quality signal is received. To help, you can attach instructions on how to set up the Tricolor TV antenna yourself:
- Open the “Antenna Installation” menu and enter “0000” in the password field.
- Select system settings, and then “Antenna installation”.
- Two scales “Signal” and “Quality” will appear in front of the user, where adjustments will need to be made.
When setting up the equipment, it is worth setting the scanning step to 1 cm. When a stable signal appears on the TV screen, a clear picture will appear. All you have to do is press the “Ok” button on the receiver remote control.
Where is the best place to install the Tricolor satellite dish?
It is impossible to set up the Tricolor dish without choosing the right place to install it. The plate must be installed only on the wall of the house located on the south side. If the apartment is located so that all the windows face other sides, you need to fix it where the South is closest, and then tune it to the satellite.
When choosing a wall, you need to focus on one more important factor: there should be no tall buildings or trees in the immediate vicinity of the dish; they can interfere with the signal.
The closer the dish is located to the TV, the better the signal will be and the easier the setup work will be.
Unfavorable places to install the Tricolor plate:
- glazed balconies and loggias;
- places without drainage systems;
- an area where the plate can be covered with snow;
- roofs with a gable roof or more, asymmetrical roofing.
Receiver registration
Only after receiving the picture on the TV screen can you proceed to registering the equipment. There are several ways to perform this action. The following options are available today:
- on the company’s Internet portal;
- in the Tricolor TV office or in an automated center. Registration of the receiver is performed after purchasing the device;
- in the technical support service, but provided that the client already has a subscription service agreement.
Attention! During the registration procedure, the owner of the equipment will have to indicate not only the model of the receiver, but also the ID number and personal data.
The essence of registration is that the user confirms his right to use the company’s equipment and services, since he has a subscription agreement with the provider.
How to update Tricolor: some nuances
During operation, the satellite operator's receiver must receive update files. This is necessary for the system to function stably and provide the user with high quality images.
In order for the receiver to receive update files, it must be connected to the Internet via a patch cord or Wi-Fi.
When the next update appears, the relevant information will be displayed on the TV screen. The owner of the equipment will only need to confirm the action, after which the process of installing the current firmware version will begin. The receiver will then reboot.
If messages with available updates have not appeared for a long time, we recommend following these steps:
- Turn off the receiver and TV.
- Launch info channel 333.
- When the “Software Update” command appears on the screen, confirm its execution.
- Wait for the download to finish.
- Reboot your device.
- Go to the channel viewing menu.
- Confirm the action after the message “You need to update the software module” appears on the screen.
- Switch to the information channel.
The update process itself should take no more than 10 minutes. But if your home has outdated equipment, it may take much longer. Internet speed also plays an important role in fast loading.
Additional Information
At the end of the presented material, it is worth giving a number of tips that will simplify the installation of the equipment set:
- Do I need a special device to set up satellite dishes? The answer is no, because there is no need for it. The presence of such a device will simplify the process of searching for a satellite signal.
- To configure the equipment, you will need the azimuth and elevation angle where the antenna will be installed.
The installation process of Tricolor TV equipment does not present any difficulties even for people without experience in this matter. You should follow the instructions and prepare in advance for the event.
Bracket designs
According to the area of application, it is necessary to distinguish the following types of antenna brackets:
- Street;
- Indoor;
- Automotive.
Car brackets are specialized structures, and therefore it makes no sense to dwell on them in detail in this article.
For indoor installation, use special indoor antennas with appropriate mounting brackets. Their main feature: small dimensions, the ability to install anywhere, with the exception of some special models, as well as aesthetic appearance.
There are no difficulties in using such antennas and, accordingly, their brackets, especially since they are made as a single whole.
There are a lot of options for such brackets. Complexity and cost depend on many factors: the mass of the antenna itself; the need for adjustment in space; installation method; possibility of remote position adjustment.
Many people make their own antenna bracket
In this case, it is important to take into account your capabilities and provide sufficient strength and reliability of the structure
Devices for receiving analog TV signals
Classic antennas, gradually becoming a thing of the past, consist of several types of broadband receiving devices.
They are designed to receive an analog TV signal broadcast from a television tower. Such devices operate in two bands, receiving decimeter (UHF) and meter (MV) waves. Naturally, each of them differs in design elements.
Previously, many radio amateurs made and installed analog antennas themselves. They could be seen near every house on a long pipe secured with guy wires.
The most advanced was considered an all-wave design, capable of receiving signals from two ranges at once. Nowadays you can still find similar devices of domestic and foreign production on the market.
With the transition to digital format, antennas that receive the corresponding signal have become in demand.
But, when choosing a receiving device, you need to know that such television is broadcast in the UHF range. If you already have an installed analog UHF antenna, it can also be used for reception, the main thing is that the TV is equipped with a DVB-T receiver. For older TV models you will have to buy a DVB-T2 receiver, otherwise receiving digital TV will be impossible.
Lightning protection of antennas: lightning rod design
Lightning protection of outdoor antennas requires mandatory grounding. If the antenna is located within the range of the lightning rod at home, it does not need to be grounded.
The design of a lightning rod consists of three main parts: an air terminal, a down conductor and a grounding conductor.
The lightning rod can be made from a steel rod (diameter 12-15 mm) with a square section (10 x 10 mm) or a water pipe (gas pipe). In the latter case, the upper end of the pipe is flattened. The cross-sectional area of the lightning rod is at least 100 mm2, length 0.3-1.5 m.
The down conductor connects the lightning rod to grounding. This is either a strip of steel (cross section of at least 40 mm2) or a cable of the same cross-section. The wiring of the down conductor depends on the design of the lightning rod.
When manufacturing any lightning rod, the following must be observed:
Ground electrodes can be vertical or horizontal; in the first case, pipes (rods) are driven 2-3 m into pits (0.8 m deep), then the pits are filled up; in the second, pipes, pieces of iron, coils of thick wire, etc. are placed in holes of the same depth. The length of the horizontal pipe depends on the soil: in clay soils at least 2 m, for sandy soil up to 12 m.
Metal antenna masts are also grounded. If the mast is installed on a grounded metal roof, it is connected to the roof by a down conductor.
In general, the down conductor is connected to the zero potential point of the antenna (the middle of the uncut tube of a loop vibrator, the short-circuit jumper of a quarter-wave bridge, a metal boom, etc.). The shield of the reduction cable is also connected to the antenna's zero potential point.
Be sure to make a lightning rod at home, thunderstorms are quite common, and a simple lightning rod system will once again insure you against fire.
Necessary conditions for confident reception
One of the prerequisites for successful and reliable reception in the vast majority of cases, for example, for receiving satellite and television signals, is direct visibility between the transmitting and receiving antennas.
What does this mean? It's simple: the transmitting antenna, for example, a TV tower, is installed at the highest point of the landscape, this achieves the maximum coverage area, and the receiving antenna is yours. The main thing is that there should be no obstacles between these two antennas: hills, buildings, poles, fences, etc. That is, the signal from the transmitting station reaches the receiver along a forward vector, without encountering obstacles.
It is important to note here: if your house is located on a mountain, i.e., there are no obstacles between it and the transmitting station, then there is no point in “raising” the antenna high; a high location will not give any effect. It will be enough to use a simple bracket for the antenna on the wall, raising it 2-3 meters
Otherwise, when the antenna is installed in a lowland, a sufficiently high mast is required to provide direct visibility, which will ensure reliable reception of a signal of sufficient strength.
The next thing you need to know about is directionality. In this case, we are dealing with the need to accurately orient the receiving antenna to the transmitting one. In other words: the receiving side of the antenna must be directed strictly in the direction of the transmitting station, this achieves the maximum level of the useful signal.
In some cases, in addition to positioning in the horizontal plane, clear orientation is also required in the vertical plane, in particular: the bracket for a satellite dish must provide for adjustment in both planes, and do this with high accuracy.
Another prerequisite is sufficient structural strength. When exposed to external factors: wind, shocks, precipitation, etc., the antenna must maintain its position and also not pose a danger to others.
For safety reasons, when installed outdoors, at a sufficiently high altitude, it is necessary to provide protection against lightning strikes, which will avoid damage to equipment, the possibility of fire and electric shock to people during a thunderstorm.
1.7. Satellite antenna hangers
Antenna mount selection
The bracket for mounting the satellite dish must provide reliable support for the antenna with a large margin. Perhaps after some time it will be necessary to install a larger satellite dish instead of the existing antenna. The best option is to use a bracket already installed on the wall (balcony, loggia), which also has sufficient strength for a larger plate size.
Therefore, it is advisable to purchase the bracket separately. Types of brackets are shown in Fig. 1.42.
| A) | b) | |
| V) | G) | d) |
| Rice. 1.42. | Types of brackets for mounting satellite dishes: a – flat mount for antennas with a diameter of up to 60 cm; b – point mount for an antenna with a diameter of up to 60–90 cm; c – point mount for an antenna with a diameter of up to 90–120 cm; d – universal antenna mount for antennas with a diameter of up to 60–120 cm; d – support mount for a satellite dish with a diameter of 160 cm (on the roof, on the ground). |
Selecting the antenna size is one of the most important issues. The larger the antenna, the greater its gain. But antennas over 1.2 m are much more difficult to install and require a larger bracket. We need to find a “golden mean”. In reality, the size should be such as to ensure high-quality viewing of channels from the selected satellite.
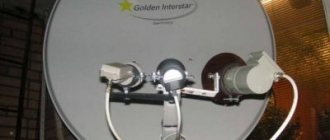
If you plan to watch several satellites and install a multifeed, then the dish should be 20–30 cm larger than in the case of receiving one satellite.
Methods for mounting satellite dishes
Satellite antennas come in direct focus and offset.
In a direct focus antenna, the receiving head is located in the center, and the focus is at the center of the antenna at a certain distance from the mirror.
In an offset antenna, the signal travels at an angle and, reflected at the same angle, hits the receiving head (the focus is shifted relative to the center).
The antenna mounting method can be of two types:
- azimuth-angle;
- polar.
The polar suspension allows you to redirect the antenna from one satellite to another using an electrically driven actuator lever or a motorized suspension.
Special requirements are placed on the suspension and fasteners, especially if a large-diameter antenna will be installed at a high altitude and in a very windy place. Wind loads can reach very large values. And very often, all the equipment for the antenna, in order to reduce its cost, is made without a significant margin of safety. Don't cut corners in cases like this.
An azimuth-angle suspension (Fig. 1.43), which has manual adjustments only horizontally and vertically, is used to receive a signal from one selected satellite. They allow you to tune the antenna to any satellite and firmly fix it. Of course, you can then deploy it and tune it to another satellite.
| Rice. 1.43. | Azimuth-angle suspension |
| Advice. |
| You should only purchase antennas with a clearly marked elevation scale. Also, make sure that the kit includes two pairs of mounting brackets. |
Polar suspension (Fig. 1.44), which allows the antenna dish to follow the entire visible part of the geostationary orbit, stopping at any selected satellite. The polar pendants are electrically driven and controlled remotely using an indoor positioner. They allow you to receive signals from a large number of satellites.
| Rice. 1.44. | Polar pendant |
The name of this type of suspension comes from the fact that the axis around which the antenna rotates when tuning is directed towards the North Star.
| Note. |
| Most often, offset antennas have a fixed azimuthal suspension, and direct-focus antennas have a polar one. |
Features of using the suspension
Let's consider the features of using these suspension designs. Azimuth-angular - as a rule, a fixed suspension, the antenna is tuned to a single satellite and is rigidly fixed to the mounting bracket. To receive another satellite, the antenna must be completely reconfigured. Simple and cheap pendant.
Polar is a much more complex suspension in design and configuration and, accordingly, more expensive. Provides the ability to receive several satellites located in different orbital positions. In Fig. Figure 1.45 shows a photograph of the polar suspension assembly used for a 1.8 m antenna.
| Rice. 1.45. | Photo of a polar pendant |
| Advice. |
| If you need to receive several satellites, for which a 1.2 m antenna is sufficient, then it is better to install a 1.8 m or at least 1.5 m antenna in the polar system. Some reserve will not hurt. |
Converter selection
The next step is choosing a converter. The converter is the same “head” that converts the signal from the satellite, which “pierces” the atmosphere well, into a signal for the receiver, which conventional electronics can process without much difficulty.
There are three types of converters: circular polarization, switchable HV and fixed. The first ones are the least sensitive, but can receive any signal. The latter are the most sensitive, but to receive signals with different polarizations they must be rotated 90 degrees. Under normal reception conditions, it is better to use a circular or switchable converter.
Sensitivity, noise level and stability of the local oscillator frequency (on which the level and quality of the signal significantly depend), as well as the protection of the converter from weather influences (after all, it is outside) vary greatly from model to model and from manufacturer to manufacturer. It is better to choose a specific model that is suitable for the price based on the recommendations of the antenna seller and reviews of experienced subscribers.
Grounding
Do I need to ground an outdoor antenna?
Theoretically, if there is no lightning rod on a personal plot, this safety measure is necessary. In the event of a lightning strike, the grounded antenna device will operate in lightning rod mode, saving the TV from fire. At the same time, experts are of the opinion that there is no particular need for grounding antennas, given that most people do not watch TV during a thunderstorm while removing the cable plug from the antenna socket.
Grounding diagram for a television antenna and mast:
We talked about how to make a lightning rod with your own hands in a separate article. The instructions for installing a grounding loop in a house were also described in detail earlier.
Now you know how to install an antenna on the roof of a private house. We hope that our step-by-step instructions, with photos and video examples, were useful and interesting for you!
We also recommend VIDEO:
https://krovlyakryshi.ru/elementi/ustanovka-antenny-780
https://okrovle.com/kroem-kryshu-sami/montazh-antenny-na-kryshe.html
https://stylekrov.ru/kak-ustanovit-antennu.html
https://samelectrik.ru/pravila-ustanovki-antenny-na-kryshe-doma.html
What and how will we watch?
The reference manuals indicate the locations and signal parameters of all stationary broadcast satellites. But in a particular locality, the conditions for their reception may vary significantly. An ordinary hillock, especially in the northern regions, can make a satellite invisible, which actually shines here well.
Therefore, when purchasing an antenna, consult with the seller which satellites are well received, select three (up to 3-4 satellites can be received on one antenna), and write down the parameters of their signals:
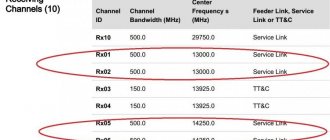
- Carrier frequencies of satellite transmitters. For example, for one of the most popular satellites - Sirius - it will be 11.766 GHz; all satellites broadcast in the so-called. Q-band with an average frequency in the region of about 10 GHz. But don’t try to “catch” the satellite’s frequency – it’s not the 20s, or even the 60s.
- Signal polarization planes. At the same frequency, two signals with mutually perpendicularly directed electromagnetic field vectors can be transmitted without mutual interference. The direction of polarization is considered to be the direction of the electric vector. Polarization can be horizontal "H" or vertical "V".
- Data transfer rates. Satellite broadcasting is digital, using SR (Single Root) technology. An example of speed designation: 27,500 SR or simply 27,500. The numbers mean how many frames (packets) per second pass through the communication channel. Just don’t confuse it with a TV frame: here a frame is a package of data organized in a certain way.
- Converter local oscillator frequencies for selected satellites. They lie in the same Q-band, but differ from the carrier by the value of the intermediate frequency that will go to the receiver. For example, with a carrier frequency of 11.766 GHz and a local oscillator frequency of 10,750 kHz (10.750 GHz), the receiver's receiving frequency will be 1016 kHz (1.016 GHz). This is why frequencies are not “caught”, as radio amateurs used to be: the closer we get to the TV, the greater the error in setting the frequency.