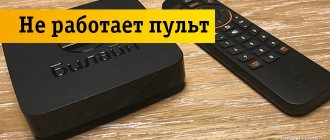
TV set-top boxes are one of the few available means of expanding the functionality of outdated and many modern televisions, as well as monitors. One of the most popular such products can be considered the MAG-250 TV Box from the manufacturer Infomir. Let's figure out how to equip the set-top box with a new firmware version and bring a non-working device back to life.
The main function of MAG-250 is to provide the ability to watch IP-TV channels on any TV or monitor with an HDMI interface. Depending on the firmware version, this option and additional functionality can be performed by the set-top box in different ways. Therefore, below are options for installing both official versions of the software and software shells modified by third-party developers.
All responsibility for the results of manipulations with the TV-Box software lies solely with the user! The resource administration is not responsible for possible negative consequences of following the instructions below.
What is firmware?
Firmware is the software that makes the hardware do what the manufacturer intended it to do. This is what tells your Wi-Fi, Bluetooth, graphics card, and other pieces of hardware that cause your software to "flag" what to do.
All Android TV boxes use the Android operating system, which has many different versions that sometimes require updating.
Why do you need to update the firmware?
To work properly and perform all the latest functions that a TV box should be able to do, you will need the latest version of Android.
An update can allow your TV box to do new things designed by the manufacturer without actually upgrading the hardware.
Updates also usually improve your device's performance, so you get faster streaming and better picture quality.
It can also help alleviate problems that may have occurred on the system as a result of other OS or software updates.
Firmware
There are three main ways to flash MAG250 firmware. In fact, the set-top box is quite capricious in terms of reinstalling software and quite often does not accept installed images from the OS. If errors occur while applying one method or another, simply move on to the next one. The most effective and trouble-free method is method No. 3, but it is the most labor-intensive to implement from the point of view of the average user.
Method 1: Built-in tool
If the set-top box is working normally and the purpose of the firmware is to simply update its software version or switch to a modified shell, you can use the built-in tool that allows you to update directly from the MAG250 interface.
Preparing a flash drive.
Attention! All data on the flash drive will be destroyed during the operations described below!
As mentioned above, the volume of media for manipulating the MAG250 TV Box should not exceed 4 GB. If you have such a flash drive, format it using any available means in FAT32 and proceed to step No. 10 of the instructions below.
How to update your TV box?
How you update the Android TV Box firmware depends on the type of TV box you have, since the operating system is associated with hardware, not software. So, this is what you get from your manufacturer, not from Android.
To get the specific files and instructions needed to update your TV box, you'll need to go to the manufacturer's website. They will have a page where you can download updates.
But be careful! You must ensure that the firmware you install matches the specific model of TV box you have. If you are trying to install an update to a "similar but different" TV box model from the same manufacturer, you may kill your TV box.
If the latest version is not compatible with your device, it may be because the manufacturer no longer supports your hardware.
Free firmware for consoles
The most popular among Russian consumers are digital receivers from manufacturers Cadena and Rostelecom. The set-top boxes offered by the largest domestic operator provide good quality access to all free channels. Not everyone knows that new devices have additional functions that are not available with factory settings. Fresh tuner firmware from this provider allows you to increase the number of channels watched and bypass tariff restrictions. It is recommended to periodically update the device, and information about this can be found on the official website of the provider.
A software update is also required in cases where various malfunctions begin to appear in the operation of digital television, for example, the picture quality has deteriorated or channels disappear. It is recommended to download program files for the Rostelecom set-top box from the official website. Before updating, you need to go through the preparatory stage. To download files, you will need to have access to the Internet on your computer or laptop. You also need a free Ethernet connector to which the digital device will be connected. A network cable is used to connect two devices. It is recommended to download a special utility from the software, for example, dualserver, mcast.exe or any similar analogue. If the user uses a digital set-top box from the manufacturer Cadena, he will need to prepare a USB drive, preferably with a capacity of at least 8 GB. You need to write program files that were downloaded from the developer’s website onto the flash drive.
Step-by-step instructions for flashing Rostelecom and Cadena tuners are as follows:
- First, you should create a folder on your computer where the program files and the dhcp server will be downloaded. Also place two files in this folder named imageupdate and bootstrap.
- Using the Win + R key combination, you call the command line, in which the “ncpa.cpl” command is written without quotes.
- After opening the window with network connections, you need to select the desired item and right-click.
- The Properties dialog box opens, allowing you to specify the TCP/IPv component
- Another window will appear, in which you must manually enter the following address: 192.168.1.1. And specify the value 255.255.255.0 as the maximum.
- Next, take a network cable and connect it to the computer on one side, and to the set-top box on the other.
- After turning on the tuner, you need to open the main menu using a special button on the remote control.
- Bios will open automatically, after which you will need to enable the dhcp server downloaded to a folder on the computer.
- The following path is specified in the command line: C:\Rostelecom\dualserver.exe. Then click on the “Enter” button.
- After launching the mcast.exe utility, enter the already known IP address and press the “Select” command. In the window that opens, you must specify the source of the Steam1 broadcast. It has the following address value: 224.50.0.70:9000, and for Steam2 224.50.0.51:9001 is used.
- Next to each of the streams there is a “Start” button, which you will need to click to start updating the software.
During the loading process, various inscriptions will begin to appear in sequential order. You don't need to pay attention to them, as they simply tell you what stage the download is at. At the end, the receiver should reboot, after which it will work with the new firmware.
Final words
We often buy technology and expect it to “just work,” and very often it does. But for how long? If you want your devices to last long term, you need to keep them up to date and secure.
For an Android TV Box, this means installing antivirus software and a VPN, downloading the best streaming software and apps, and keeping your operating system and firmware up to date.
Options for connecting to a TV using the example of DEXP HD 2991P
External side of the Dexp digital set-top box
In order to clearly demonstrate to you the procedure for connecting DEXP set-top boxes, we will take one of the popular models - HD 2991P. According to reviews, this console is one of the most reliable. According to the characteristics, it has the following parameters:
- Plastic case.
- Work with modern file formats.
- 2 USB ports.
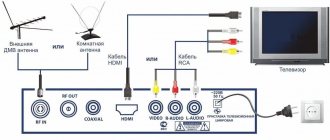
- Possibility of connecting to a TV via HDMI and RSA cable.
- EPG mode - built-in program guide.
- PVR mode - recording TV programs using a timer to a USB drive.
- Delayed viewing.
- Possibility of blocking some channels to protect against children.
Rear panel of DEXP-HD2991P connectors
To connect to a TV, we need to navigate depending on what connectors it has:
- If there is HDMI, then preference should be given to it. The same thing should be done if you want to connect the set-top box to a computer monitor.
- If you have an RSA input or SCART, you will need to choose regular tulips.
HDMI connection
Example of connectors on the back cover of a Samsung TV
The set-top box usually comes with an RSA cable. Therefore, you will have to purchase HDMI yourself. It costs around 500 rubles.
However, if available, it will allow you to connect even to ordinary computer monitors. To connect, just connect the TV directly and then insert the antenna input into the set-top box. After that, switch to Audio-Video (AV) mode. If connected correctly, the device menu should open.
SCART and RSA connection options
In practice, older TV models usually do not have HDMI connectors. Some models only have SCART. In the first case, it will be enough to use only “tulips” when connecting. They are connected directly by color. 2 connectors usually go to Audio inputs (R and L), the remaining one remains for Video.
If the TV only has SCART, you should purchase an additional SCART-RSA adapter. It's not difficult to find. It looks like this:
If Dexp doesn't find channels
To enlarge the photo, click on it.
During operation, various difficulties may also arise, due to which the set-top box may not find channels or not see the TV. In this case, there are several obvious solutions.
Can't find channels / Searches less than 20
- Check again that the device is connected correctly. Some adapter or cable may fail.
- Make sure to select the correct antenna. The greater the distance from the TV tower, the stronger it should be.
- Try retuning channels manually, making sure that the signal strength is available.
The set-top box does not see the TV
- Check your connection method again. Check to see if you have selected the display mode correctly. If the set-top box is connected via an HDMI cable, then you should select this mode on the TV. For RSA, you need to go to AV.
- The image plug may fail. This often happens on tulips. The third wire, responsible for Video, fails and as a result the picture is not displayed.
The console constantly reboots and turns off
The reason for this problem is software errors. It should be updated and the device should be flashed. This can be done via USB. To do this you need:
- Write the firmware file to a flash drive with a capacity of up to 4GB. You can download it on the official Dexp website.
- Insert it into the device and go to the “System” section.
- Click on software update and then select the previously recorded file.
- Once the installation is complete, the set-top box will reboot on its own.
If the remote control does not work
If there is no signal at all, you should replace the batteries with new ones. If the problem does not go away, then most likely the remote control is faulty and should be replaced. On some TVs, there may be a problem in which some remote control buttons will not work. For example the volume button. In this case, you can try to flash the console.
Reviews on the DEXP set-top box
Dexp consoles were among the first to appear on our market. With the advent of the first multiplex, their cost was slightly above 1000 rubles and for most models remains the same.
On the Internet you can find many reviews of these consoles. When choosing, we advise you to focus primarily on newer models, for example 2991 and similar ones. The fact is that not everyone can update consoles. As a result, there may be problems with the software when connecting to the TV. It will simply refuse to work with this console or will do it incorrectly.
Another advantage of the new models is more stable elements. According to reviews, some models begin to make noise or burn out after 1-2 years of operation. This is primarily due to the use of cheap components. On the same 2551p this problem has already been fixed.
Thus, in general, users are satisfied with this set-top box. If the antenna is configured correctly, it is capable of picking up all digital channels available in broadcasting.
Setting up 20 channels on a DEXP digital set-top box
After the device is connected, you need to perform an initial search for channels. With proper configuration and antenna selection, the device should find up to 20 free digital broadcast channels. The sequence of actions to enable and search is as follows:
- We turn on the TV and set-top box to the network.
- Select the display mode in the TV menu. It is selected depending on how the device was connected. If it is HDMI, then select the mode corresponding to it; in the case of tulips, you need to set it to AV. An example of selecting a display mode on a Supra TV
- After this, the console menu should open. In it we indicate the display language and country. After which you will be prompted to automatically search for channels. Click OK and wait for the device to independently select for you the frequencies available for reception. At the end, the set-top box will exit on its own and save the list.
Manual search
In most cases, the manual search mode copes with its task and, with the correct choice of antenna, finds the entire available list of TV channels. However, in practice, there may be times when it will be necessary to reconfigure everything manually. To do this you should:
- Find out the digital signal reception frequency for your broadcasting region. To do this, you need to go to the interactive CETV map and select the TV tower closest to your home.
- After this, in the device menu you should select the “Search for channels” section and go to manual search.
- In the window that opens, you should set the channel number and make sure that the signal strength has appeared.
- This should be done for both multiplexes.
You can change the list of found channels, set their order, etc., through the program editing section. When you log in, you will be prompted to enter a password. If you have not done this before, it will be: “ 000000«.


