It is difficult to find a house where there is not a single TV. But free channels are one thing, and quite another when it comes to paid satellite television. The number of paid NTV Plus channels depends on the package that the user paid for. But to get them, you need a little setup, which you can do yourself or by contacting the service for help.
Then you will have the opportunity to watch your favorite films, sports programs, domestic and foreign programs, and much more. In addition, finding out which settings are correct for NTV Plus is not at all difficult, since the official website has all the instructions, not only general ones, but also depending on specific receiver models.
Setting up NTV Plus channels
At the moment, there are several ways to configure channels from the NTV Plus provider. There are two most popular options.
- Automatic setup that looks like this:
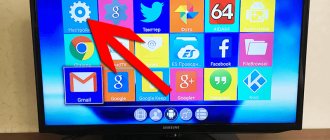
- Enter the menu using the remote control;
- Find the “Search for channels” subsection there;
- Click it and monitor the search status. When it ends, all channels will start showing.
- Setting up the TV manually has the following specifics:
- First you need to reset the settings. This is done in this way: “Settings” → “Default installation” → “Channels” → “Antenna” → “Satellite settings”;
- The set-top box will require you to enter a password. Feel free to enter four zeros, but only if this option has not been changed;
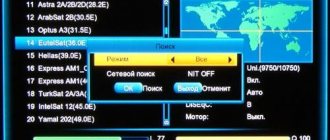
- After this, when manually searching for TV channels on NTV Plus, you need to uncheck the satellites that are allowed, selecting only the one with which NTV Plus works. In this case, it is EutelsatW4 36E. Sometimes it happens that the service in question is blocked by the tuner or TV itself, and to open access you just need to remove the access card and insert it back;
- Next, you need to configure the transponder. Here are the settings: 12130 R and Lnb levels (low = 0; high = 10750).
When the entire procedure is completed, you can move on to the final stage: Select the transponder and set the “Network Search” command. Afterwards you have to wait, because the setup takes a long time. But if all the changes were correct, then in half an hour you will have all your paid TV channels working.
Features of the application for smart TV
How to watch NTV-Plus online television on smart TV?
First of all, you will need a smart TV with support for Android TV, a Samsung released no earlier than 2021, running on the Tizen or LG HD operating system, running WebOS version 3.0 and higher, an Internet connection and the NTV-Plus TV application - its you need to download from the built-in store. If you don’t have a smart TV, then an Apple TV media player or an Android TV-based set-top box that connects to the TV using an HDMI cable will come in handy. So, through the built-in search we find the application, install it and launch it. If you are already a user of NTV-Plus online television, then simply log in to the application and all purchased subscriptions will be available to you. A new user will need to register and subscribe to a package of TV channels.
User profile. Photo: Telesputnik
Satellite subscribers of NTV-Plus receive an advantage in the cost of access to the service - they do not need to subscribe to thematic online channels, and when subscribed, they can automatically watch TV channels online in accordance with their satellite subscription. It is worth remembering that satellite and Internet rights may differ.
The NTV-Plus online TV account is the same for all devices. Thanks to this, you can, say, start watching a series on smart TV at breakfast, and continue on your smartphone or tablet on the way to work. To do this, the NTV-Plus TV application must be installed on all devices, and the user must be logged into his account. You won't be able to watch TV channels on multiple devices at the same time under one account - this is done to protect against piracy. Soon NTV-Plus plans to add a paid service that allows you to watch TV channels simultaneously on five devices.
If your TV supports CAM modules, then you can watch paid satellite TV, such as NTV Plus, on it.
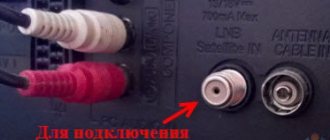
The surest way to determine whether a TV has a satellite tuner is to look at the back, where all the connectors are located, and find the “LNB IN” antenna input.
All such TVs have a “CI” slot for “CAM” modules.
How to correctly configure an LG TV with an installed CI+ CAM NTV PLUS module to the channels of the NTV+ operator is described below.
The principle of setting up all TVs from this manufacturer is approximately the same. Depending on the software version and model, the names of menu items may differ, but the essence is the same.
We install the NTV+ smart access card into the CI+ CAM NTV PLUS conditional access module. Chip to the thick side of the module.
We install the conditional access module into the switched off TV.
Turn on the TV and switch it to satellite reception mode. Call up the list of channels on the screen using the LIST button
Next, press the red button on the remote control to select the reception mode
Select the “Satellite” mode, go to and click on OK,
To configure, press the SETTING () button and go to the CHANNELS section
We look at the information about the module and the access card (serial number of the NTV PLUS smart card) in the module menu CI Data (CAM) > Information > Smart card > General information. If there is no information or an error, go to the module setup menu CI Data (CAM) > Settings and select the “Reset to” item in the “CHANNELS” section of the main menu
We check that all settings are the same as in the photo above.
On the left you see two scales - you can use them to check the signal quality, and if you do not have an antenna configured, set the antenna to the NTV-PLUS signal from the satellite
Next, two configuration options are possible: - for those TV models that have auto-tuning for NTV-plus - for those models where there is no auto-tuning for NTV-plus
Option #1
From the “Satellite Settings” menu, return to the previous menu (using the BACK button) and go to the AUTO SEARCH menu. Select the “Satellite” mode and move on.
We choose the operator NTV-PLUS. If you don’t have NTV-Plus in the list or your TV doesn’t offer to choose an operator at all, then it’s better to use it to set up channels.
Below in the “Satellite Settings” window just click OK
Search mode and click “OK”
Click OK on “Run”
We wait for the search results, click “Close”, exit the menu with the EXIT button
To display a list of found channels, press the LIST button
With this search option, your TV automatically divides all channels into topics. The name of the current theme is indicated at the top of the list and can be changed by pressing the blue button on the remote:
Option No. 2
Go to the “Manual tuning” (Manual search) menu in the “CHANNELS” section of the main menu
We check that all the settings are as in the photo below, and that there is a checkmark in the “Network search” item. Then go to “Add” and click OK
We wait for the search results Click
OK to “Close”, exit the menu.
To display the list of channels on the screen, press the LIST button. All channels will be configured in one list.
Also in the main menu “CHANNELS” in the menu bar CI Data (CAM) > Information > Smart card > Providers > you can view information about packages (subscription classes) and their expiration dates.
NTV+ subscription classes and their description:
class = E3 - Light West class = E6 - VIP-Cinema West class = E7 - Supersport West class = E8 - Entertainment West class = E9 - Children's West class = EA - Educational West class = EB - Musical West class = FF - Starter West class = 13 - Viasat West class = 3C - Night West
Set-top boxes and TV
Setting up the NTV-Plus Vostok antenna on different TVs
For different brands of TVs, the setup principles may be different. It's not difficult to understand them.
Instructions for setting up Samsung and LG TVs
- To set up NTV-Plus channels on Samsung TVs, first make sure that the device has a CAM module.
- Select “Broadcast” from the menu.
- Go to the selected antennas, check the box next to “Eutelsat W4-36E”.
- Save the specified settings.
- Go to the “LNB Settings” tab, select a transponder (any).
- At the same time, make sure that the “DiSEqC” mode is turned off. Set the lower and upper LNB settings to 9750 and 10750 respectively. Be sure to enable TOH 22 KHz.
- On the remote control, press the “Return” button 2 times, then go to manual channel search.
- Select the Eutelsat W4-36E satellite and transponder number 11900 (V/R) 27500. Start the search process.
If the setup was carried out by an experienced technician, then the channels can be sorted into categories to make them easier to use.
Setting up NTV-Plus on LG TVs is carried out according to the same scheme, only other parameters are taken into account, which can be found in the instructions.
Many users prefer to install satellite equipment themselves. What you might encounter in such cases, what subtleties accompany the installation process, how to set up NTV Plus channels - you can find out below.
Solving possible problems
On some models of SMART TV receivers, the application may work with errors or may not start at all, for example, after an update. If there is no sound or image, or the program closes spontaneously, you must contact technical support, describe the situation in detail, and be sure to indicate the hardware model and software version . It wouldn't hurt to take a photo or video of what's happening on the screen.
On a note! Signal delay, image noise, or audio lag may indicate an unsatisfactory connection with the router.
In general, reviews of the NTV Plus application for SMART TV are positive. The program is easy to install, configure and master. The choice of channels for users who are not satellite TV subscribers is somewhat narrower, but the developers plan to expand the list of available packages and video catalogs. Each new version contains amendments, many of which are based on requests from users to the company's technical specialists. The quality of the application is evidenced by the increase in the number of new viewers within the Russian Federation and abroad.
Satellite Internet
is one of the few that offers the ability to connect to two-way Internet based on satellite communications.
The service is very relevant in populated areas where there are problems with wired communications.
| Rate | Max. downstream speed (Mbit) | Max. outgoing speed (Mbit) | Limit for dynamic speed limiting (in GB) | Subscription fee (RUB/month) |
| Unlimited 40 | 40 | 12 | 50 | 4990 |
| Unlimited 20 | 20 | 5 | 25 | 2990 |
You cannot switch from one tariff to another and change the traffic priority. Once the limit is reached, the drop in speed will not be affected in any way.
Equipment is purchased separately at a price of RUB 14,990. per set.
Antenna
And now, the installation is complete, everything is fine, and you can proceed to the next stage - setting up the NTV antenna.
- The converter cable is connected to the receiver, and the receiver itself is connected to the TV. It is important to follow all instructions from the manufacturer, this will help avoid breakdowns.
- Slowly and carefully rotate the antenna dish vertically and horizontally towards the location of the satellite until excellent quality pictures and sound appear. To make the process go faster and more comfortably, it’s better to do everything together – one rotates the antenna, the other coordinates by phone.
- And now, the screen pleases with a high-quality picture, the next step is to activate the “received signal level” command on the receiver. Try to make the scale as full as possible.
With due patience, setting up an NTV satellite will not cause problems.
Connection difficulties
Difficulties may arise at any of the above stages.
- It is not possible to align the antenna for a sufficient signal level.
- The supplied antenna cable is not enough for connection.
- The receiver does not find all channels.
- It is not possible to connect the set-top box or TV module to the TV.
- And others.
The solution to the problem can be found in the instructions for the devices. Or involve specialists or service centers if the equipment does not work properly despite following the operating rules.
Preventive measures:
- Check the connections, make sure the connectors are installed correctly.
- Turn on the power.
- Check the expected satellite angles. They are given in the official documentation of the provider.
- Repeat the setup procedures, check that they are correct.
- Contact your provider and find out if there are any problems with broadcasting or planned preventive measures.
- Check information on services in the client’s personal account.
- technical support service. Perhaps she has a ready-made solution.
History / about the company
Few people know that NTV is not decrypted in any way. The original idea of the creators was to organize “New Television of Russia”, but investors and management had their own options (“ours”, “non-state”, “Neva”, etc.). And the company owes its emergence in 1993 to the conflict of interests of the hosts of the “Itogi” program (Kiselev and Dobrodeev) and the current management of Channel One.
The channel's audience grew rapidly due to the fact that not only high-profile news programs were broadcast here, but also foreign-made films.
In 1996, the current owner V. Gusinsky voluntarily transferred the TV channel to the state.
In the same year, a subsidiary was created. She focused on satellite broadcasting. It was the first satellite TV operator in Russia. Financing was provided by the Government of the Russian Federation and the NTV channel. Among the first channels were “World of Cinema” and “NTV-Plus Sport”. At the end of 1996, the audience numbered more than 17 thousand subscribers.
In 1997, the number of subscribers increased to 133 thousand, and the number of channels - to 6. Work began on the creation of its first satellite, Bonum-1 (now removed from orbit).
In 1998, the company's official website and satellite were launched.
And in 1999, the company switched from analogue to digital broadcasting and launched more than 30 new channels, including MTV, Discovery, Nickelodeon, Eurosport, Euronews and others.
In 2000, the company launched another satellite and NTV-Plus satellite television significantly expanded its coverage area and list of channels. Now many channels from analog frequencies (TNT, ORT, RTR, etc.) were broadcast digitally.
In 2001, more than 200 thousand clients were already using it, by the end of 2003 - 260 thousand, and in 2004 - 360 thousand.
In 2005, the second basic package, “Advanced,” was launched for the first time. The tariff plan provided for the broadcasting of new own channels and some foreign ones.
In 2006, the audience grew to half a million people.
In 2007, the company introduced the first channels with high image quality (HD), and in 2010 - 3DTV.
By 2015, NTV-Plus was gradually moving away from producing its own content. Channels are transferred to other companies or closed. At the same time, a new hanging format is being introduced - via the Internet.
In 2018, the operator launched an online store where you can select equipment with delivery and order a connection. And satellite subscribers were able to view their channels from an active subscription on any other devices with Internet access ().