The CAM module must be installed in a switched off TV to avoid damage to the equipment. Before connecting the TV to the network, make sure that the CAM module is completely inserted into the corresponding connector (PCMCIA port) of the TV.
ATTENTION! After turning on the TV, information about the initialization of the CAM module will appear on the screen.
For the correct orientation of the Card in the module, pay attention to the image of the chip on the sticker of the TV module.
Setting up the CAM module:
- We reset the settings on the TV to factory settings. Menu - support - self-diagnosis - reset - ok.
- After the TV reboots, go to the menu - channel - antenna - select the value “satellite”.
- Then in the same section: satellite - system - enter the password - 0000 - in the menu that appears, click “select satellite”.
- We uncheck all satellites that are installed by default (if this cannot be done, then you need to remove the CAM module from the slot and reset the settings again), scroll through the list of satellites and select the “USER SAT” satellite.
- Create your satellite (check the box next to it) and save it. Next, the “LNB power” option should be ON. Then we go to the LNB settings, do as in the picture below, except:
section “transponder” - we don’t fill anything in there, so we’ll enter it manually.
- Next, we exit this submenu, go to the “manual setup” section, see our new satellite and click “scan”.
- The “transponders” section will be empty, select “create”.
- Next, we enter the frequencies we need (list below), indicate the appropriate transmission speed and select the type of polarization (L or R). Click “save”.
- The channel package for this transponder will be scanned and saved into the TV memory.
- Then everything is repeated for each subsequent transponder. There, in the “manual setup” menu, click “scan” in the “transponder” section, create the next one with your data, and so on. All previous loaded and scanned transponders with settings and channels are saved.
List of NTV-Plus transponders:
Source: https://satinfo.by/tuner-tune/ustanovka-i-nastrojka-cam-modulya-ntv-plyus-na-televizorax-samsung.html
Required equipment set
To connect NTV Plus in a minimal configuration you will need:
- antenna;
- converter;
- attachment or CAM module;
- TV.
If the length of the supplied cable is not enough, buy another similar one. Don't forget about the set of tools necessary for installing fasteners, laying wires, installing adapters, etc.
Some types of antennas may be compatible, so do not rush to purchase the entire set at once - consult with specialists.
The official NTV+ store offers the following decoder options.
CAM module
NTV Plus CAM - module
Its advantages:
- Compact.
- Installs directly into the TV and does not take up extra space.
- Does not require a separate remote control.
- The antenna is connected directly to the TV without any attachments.
Flaws:
- Compatible only with TVs equipped with a CAM port.
- Additional functions directly depend on the technical capabilities of the TV.
Standard receiver
Has the following advantages:
- Connects to any TV.
- Provides advanced functionality, even if some features are not available on the TV: recording broadcasts, viewing media files, etc.
Flaws:
- Controlled by a separate remote control.
- Takes up extra space and outlet.
- May cause connection difficulties due to the large number of interfaces.
- Doesn't work with online TV.
Interactive console
NTV Plus interactive set-top box
NTV offers the VA-1020 model, but there are alternative solutions. Advantages of interactive consoles:
- They can work not only with a satellite signal, but also connect directly to the Internet. And this is a whole layer of additional technologies and services, such as online cinemas, broadcast rewinding, etc.
- Expand the capabilities of your TV to the maximum.
- They can connect to both old-generation and modern TVs.
There are also disadvantages. Such a prefix:
- Takes up space and an additional outlet.
- Controlled by a separate remote control.
- It costs more when compared to previous options. You will have to pay for Internet. Some types of online content are also paid.
The user selects the appropriate option depending on his preferences and TV model. If you need interactivity, an option with Internet connectivity is suitable. If only satellite TV is enough, a CAM module will suffice. A universal solution is a classic console. It is compatible with all TVs and is inexpensive.
Questions and answers
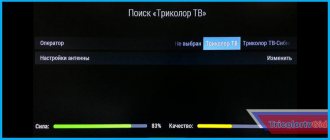
For the sample, we chose an LG TV manufactured in 2015 on the WEB OC operating system. Fundamentally, the manual tuning algorithm for other TV models is not much different. So. The TV is connected to a configured and working satellite antenna, and is configured in the TV reception mode - “Live TV”.
On the screen we see accordingly:
On the remote control, press “Settings” or “Q.MENU”. Select “Advanced settings” from the menu that appears. The full settings menu appears, where we select “Channels”, “Channel search”.
After clicking on “Search channels”, select “Manual search”
and
“Sputnik”
(if there is no additional terrestrial antenna or cable television is not connected).
The all-important search menu appears with setting parameters.
Let's say you need to find all the channels of the NTV Plus operator and only that one!
We select the satellite “Eutelsat 36”.
A very important parameter: “LNB frequency” (different TVs may have a slightly different name: “intermediate frequency”, “upper and lower frequencies separately”... It doesn’t matter.
Always and everywhere we put it there 10750
. Because other models may offer 10600, 9750, 5100..., but we set only 10750 everywhere.
Next, select the “Transponder” (or the frequency of one of the satellite transmitters). Since we need NTV Plus channels, we take any frequency from the section Information on the parameters of NTV PLUS channels (transponder frequencies, polarization, FEC) to manually configure DVB S2 TVs and receivers with CI+ modules (if you need to tune to Tricolor TV, then take from the section What are the frequencies and parameters of Tricolor TV channels?). We have now selected a transponder with a frequency of 12130 MHz, right circular polarization. Next, we monitor the signal level and quality scales. If everything is installed correctly, then they should be more than 70%.
Turn on the “Network Search” option! Then the TV will automatically, based on information from one transponder we installed, find all the others and only
from the operator “NTV Plus” (and not another ~250 channels of unnecessary “garbage” from Tricolor TV and so on, which happens in automatic search mode).
Some TVs do not have a network search mode. Then you will have to manually scan each transponder from the list (referred to above) separately.
Next, click “Add” to start the network search mode for all NTV Plus frequencies and channels. We observe the search process until 8 out of 17 transponders have been found:
As a result, we see that the TV found all 17 transponders of the NTV Plus operator.
Click “Finish”, exit the settings menu and watch the channels we need if you have a CI+ module with an activated access card.
PS If in the end you suddenly realize that it is difficult to edit channels, create and switch favorite lists, an inconvenient TV Guide, etc. (which is inherent in all primitive satellite receivers built into TVs
) and this is so annoying that they are ready to use 2 remote controls (the first is for on/off.
TV, another for everything else), then we recommend purchasing for your access module any of the specialized satellite receivers from the Skyway .
Which, by the way, are often purchased by owners of high-end TVs, which, of course, have a built-in satellite receiver and a slot for a CI+ access module.
Source: https://www.sat39.ru/faq/
Set-top boxes and TV
Setting up the NTV-Plus Vostok antenna on different TVs
For different brands of TVs, the setup principles may be different. It's not difficult to understand them.
Instructions for setting up Samsung and LG TVs
- To set up NTV-Plus channels on Samsung TVs, first make sure that the device has a CAM module.
- Select “Broadcast” from the menu.
- Go to the selected antennas, check the box next to “Eutelsat W4-36E”.
- Save the specified settings.
- Go to the “LNB Settings” tab, select a transponder (any).
- At the same time, make sure that the “DiSEqC” mode is turned off. Set the lower and upper LNB settings to 9750 and 10750 respectively. Be sure to enable TOH 22 KHz.
- On the remote control, press the “Return” button 2 times, then go to manual channel search.
- Select the Eutelsat W4-36E satellite and transponder number 11900 (V/R) 27500. Start the search process.
If the setup was carried out by an experienced technician, then the channels can be sorted into categories to make them easier to use.
Setting up NTV-Plus on LG TVs is carried out according to the same scheme, only other parameters are taken into account, which can be found in the instructions.
Source
Setting up NTV Plus on Samsung and LG TVs with a receiver yourself
Many users prefer to install satellite equipment themselves. What you might encounter in such cases, what subtleties accompany the installation process, how to set up NTV Plus channels - you can find out below.
Setting up equipment and channels
The first thing you need to do to install NTV Plus is to install and mount all the necessary equipment. If the user does not use the services of the company’s specialists, but decides to do it on his own, then it is important to follow several basic rules:
- The direction of the plate is south. The reason is that the company's main satellites, Eutelsat 36A and Eutelsat 36B/36C, are located above the equatorial zone of the planet. To make the process easier, you can use an ordinary compass. The satellite direction angle is in the range of 17-38 degrees, depending on the equipment manufacturer, since the provider uses the services of several;
- Another very important parameter is the clean area in front of the plate. Make sure that there is no interference in the direct line in front of it, such as trees, high-rise buildings, etc., as they can greatly degrade the quality of the received signal;
- Attaching the bracket should be given no less attention, and installed as securely as possible, since otherwise over the years it will become loose, the plate will get knocked down, and the image quality will greatly decrease;
- You should not save when buying a cable - its resistance to various weather conditions is extremely important.
Antenna
And now, the installation is complete, everything is fine, and you can proceed to the next stage - setting up the NTV antenna.
- The converter cable is connected to the receiver, and the receiver itself is connected to the TV. It is important to follow all instructions from the manufacturer, this will help avoid breakdowns.
- Slowly and carefully rotate the antenna dish vertically and horizontally towards the location of the satellite until excellent quality pictures and sound appear. To make the process go faster and more comfortably, it’s better to do everything together – one rotates the antenna, the other coordinates by phone.
- And now, the screen pleases with a high-quality picture, the next step is to activate the “received signal level” command on the receiver. Try to make the scale as full as possible.
Tips for setting up your Sony TV
Every user can set up the TV correctly. Just follow the recommendations from the professionals. Setting the sound (volume, volume) is easier. Go to the corresponding tab of the main menu and select the optimal parameters.
- All about the Cam module: what it is, why it is needed, how it works
Adjusting the image will take more time. In order for a clear and rich picture to appear on the screen, you need to adjust a lot of parameters. Now let's look at the basic subtleties of setting up a Sony TV.
Preparatory work
Save the image calibration chart below to a flash drive or external hard drive. Connect the memory drive to the TV via a USB connector. Open the picture for customization through the media player.
Features of setting up NTV PLUS channels on LG TVs
If your TV supports CAM modules, then you can watch paid satellite TV, such as NTV Plus, on it.
The surest way to determine whether a TV has a satellite tuner is to look at the back, where all the connectors are located, and find the “LNB IN” antenna input.
All such TVs have a “ CI ” slot for “ CAM ” modules.
How to correctly configure an LG TV with an installed CI+ CAM NTV PLUS module to the channels of the NTV+ operator is described below.
- The principle of setting up all TVs from this manufacturer is approximately the same. Depending on the software version and model, the names of menu items may differ, but the essence is the same.
- We install “ NTV+ smart access card into the CI+ CAM NTV PLUS . Chip to the thick side of the module.
- We install the conditional access module into the switched off TV.
Turn on the TV and switch it to satellite reception mode. Call up the list of channels on the screen using the LIST
Next, press the red button on the remote control to select the reception mode
Select the “ Satellite ” mode, go to and click on OK .
To configure, press the SETTING (MENU) and go to the CHANNELS
We look at the information about the module and the access card ( serial number of the NTV PLUS smart card ) in the module menu CI Data (CAM) > Information > Smart card > General information. If there is no information or an error, go to the module setup menu CI Data (CAM) > Settings and select the “ Reset to factory settings ” item.
- Turn off the TV completely and turn it on again.
- Next, go to the “ Satellite Settings ” menu item in the “ CHANNELS ”
- We check that all settings are the same as in the photo above.
- On the left you see two scales - you can use them to check the signal quality, and if you do not have an antenna configured, set the antenna to the NTV-PLUS signal from the satellite
- Next, two configuration options are possible: - for those TV models that have auto tuning for NTV-plus
- - for those models where there is no auto-tuning for NTV-plus
Option #1
From the “ Satellite Settings ” menu we return to the previous menu ( using the BACK button ) and go to the AUTO SEARCH . Select the “ Satellite ” mode and move on.
We choose the operator NTV-PLUS . If you do not have NTV-Plus in the list or your TV does not offer to choose an operator at all, then it is better to use Option No. 2 to set up channels.
- Below in the “ Satellite Setup ” window just click OK
- Search mode and click “ OK ”
- Click OK on “ Run
- We wait for the search results, click “ Close ”, exit the menu with the EXIT
- To display a list of found channels, press the LIST
- With this search option, your TV automatically divides all channels into topics. The name of the current theme is indicated at the top of the list and can be changed by pressing the blue button on the remote:
Option No. 2
- Go to the menu “ Manual tuning ” (Manual search) of the main menu section “ CHANNELS ”
- We check that all the settings are as in the photo below, and there is a checkmark in the “ Search for network ” item. Then go to “ Add ” and click OK
- We are waiting for search results
- Click OK on “ Close ” and exit the menu.
To display a list of channels on the screen, press the LIST . All channels will be configured in one list.
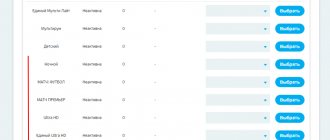
- Also in the main menu “ CHANNELS ” in the menu bar CI Data (CAM) > Information > Smart card > Providers > you can view information about packages (subscription classes) and their expiration dates.
- NTV+ subscription classes and their description:
- class = E3 - Light Westclass = E6 - VIP-Cinema Westclass = E7 - Supersport Westclass = E8 - Entertainment Westclass = E9 - Children's Westclass = EA - Educational Westclass = EB - Musical Westclass = FF - Starter Westclass = 13 - Viasat West
- class = 3C - Night West
Debugging channels
To tune NTV channels, you can use two available options - manual and automatic tuning.
Setting up NTV manually is not so simple, but with due care everything will go well:
- In the receiver settings section, enter the default settings. There you need to enter the “channels” menu, then “antenna” and “satellite settings”.
- If the set-top box asks for a password, try entering four zeros, this is the standard password.
- A tab will appear in which we leave only the EutelsatW4 36E satellite, and uncheck the rest. If the tuner does not allow you to carry out the procedure, you need to remove the access card.
- The next item is the transponder settings. Set the high level of Lnb to 10750 and the low to zero. Settings - 12130 R.
- The last step is to select the above transponder in the manual configuration section and click “network search”. The process is quite lengthy, so no need to worry. Upon completion, depending on the selected tariff plan, the required number of channels will appear.
NTV plus - setting up channels manually 2021
It is difficult to find a house where there is not a single TV. But free channels are one thing, and quite another when it comes to paid satellite television. The number of paid NTV Plus channels depends on the package that the user paid for. But to get them, you need a little setup, which you can do yourself or by contacting the service for help.
Then you will have the opportunity to watch your favorite films, sports programs, domestic and foreign programs, and much more. In addition, finding out which settings are correct for NTV Plus is not at all difficult, since the official website has all the instructions, not only general ones, but also depending on specific receiver models.
Setting up satellite equipment
A lot depends on how the equipment is configured, including the quality of the signal. Therefore, you need to understand some of the features of installing equipment if the user decides to save money, and not order the services of a specialist who will install and configure everything himself. So, here are the instructions to follow:
Since NTV satellites are located above the equator, in order to catch the signal you need to point the dish to the south side. To avoid guessing where it is, take a compass or use an online compass by downloading this application to your smartphone. But as for the tilt angle of the satellite dish, depending on the area and manufacturer it should be somewhere in the range of 17-38 degrees; Carefully inspect the area to determine if there are any obstacles. This is very simple to do - if the view in the right direction is good, then everything is fine, and if not, then you need to find another place with a better view; Try to fix the plate as tightly as possible so as not to disrupt the settings. Setting up channels every time quickly gets boring, so it’s better to use a reliable bracket and enjoy satellite TV from NTV with pleasure;
And of course, for any TV channel to work normally, it is important to choose the right cable that will be resistant to weather conditions. It will be exposed to snow, rain and other precipitation, so the equipment must be reliable; The cable must be connected to the receiver, and the receiver to the TV;
- Even if you don’t know the exact settings, you can catch them yourself by turning the plate in the horizontal and vertical plane until an image appears on the TV screen. When there is a picture, you need to look at the signal reception level - it should be above 50%; Log in to the site and get access rights to various packages. The operator helps beginners fully enjoy the broadcast. The newly registered user has a small amount in his account that pays for broadcasting the standard package - all that remains is to configure the channels.
- When the “Contract Registration” operation is completed, the access card will activate its work, and within 24 hours a person will be able to see what the provider has prepared for new users.
Setting up NTV Plus channels
At the moment, there are several ways to configure channels from the NTV Plus provider. There are two most popular options.
Automatic setup, which looks like this: Enter the menu using the remote control; Find the “Search for channels” subsection there; Click it and monitor the search status. When it ends, all channels will start showing.
Setting up the TV manually has the following specifics: First, you need to reset the settings. This is done in this way: “Settings” → “Default installation” → “Channels” → “Antenna” → “Satellite settings”; The set-top box will require you to enter a password. Feel free to enter four zeros, but only if this option has not been changed; After this, when manually searching for TV channels on NTV Plus, you need to uncheck the satellites that are allowed, selecting only the one with which NTV Plus works. In this case, it is EutelsatW4 36E. Sometimes it happens that the service in question is blocked by the tuner or TV itself, and to open access you just need to remove the access card and insert it back; Next, you need to configure the transponder. Here are the settings: 12130 R and Lnb levels (low = 0; high = 10750).
When the entire procedure is completed, you can move on to the final stage: Select the transponder and set the “Network Search” command. Afterwards you have to wait, because the setup takes a long time. But if all the changes were correct, then in half an hour you will have all your paid TV channels working.
Setting up NTV Plus Vostok channels
The NTV Plus television company is one of the most popular in Russia, but in the eastern part of the country there were interruptions in broadcasting, which were resolved with the help of a new package and the Express-AT1 satellite. The change took place in 2014, so in 2017 users have been able to enjoy excellent broadcasting of popular channels and more for several years.
- If for some reason your equipment does not want to receive the signal coming from this satellite, you can manually search for TV channels after entering the settings. This is not so difficult, since reconfiguration can be done manually. Soon television will begin to operate in standard mode, delighting viewers with a full package of TV channels.
- So, to gain access to the package, you need to check the satellite settings, and if they are not there, then first enter this satellite, and then fill in the broadcast parameters. The instructions on how to set up channels are simple:
- Open the receiver settings via the remote control and the “MENU” button; Turn on the search for NTV channels; Go to “Settings” - “Installation” - “Password” - “Search Mode” - “Enable”; Enter the transponder parameters: frequency – 12475; polarization – left; transmission speed – 27500; broadcasting – DVB-S2; modulation – 8PSK; FEC: 5/6; Check the “Level” and “Quality” of the signal. Click on “Search” again; Wait for the results and save them.
Setting up LG and Samsung TV
The user will find the instructions for setting up Samsung and LG TV useful, because these devices have a CAM module, so their work with NTV satellite equipment is slightly different from the standard. However, we will provide simple instructions on how to deal with the problem and set up your equipment correctly.
- You can install NTV Plus channels for Samsung like this:
- The setup for LG looks similar, so you can figure it out easily.
- You may be interested in:
Enter the menu and go to the “Broadcast” item; Select the antenna “EutelsatW4 36E” and save the data; Enter “LNB Settings” and select the transponder, turning on the DiSEqC mode - off. The lower LNB should be 9750. The upper LNB should be 10750. And the Tone switch should be 22KHZ; Go to manual search to enter channel settings; Take the EutelsatW4 36E satellite and select the 11900(V/R) 27500 transponder, specifying “Manual Search” or “Network Search”.
Antenna installation and configuration steps
Before you begin installing a satellite dish, you need to make sure that the equipment kit includes everything you need. Sometimes it happens that for some reason the equipment is incomplete, or a person does not understand why this or that part is needed.
To install the antenna you need:
- satellite receiver or built-in set-top box;
- coaxial cables with connectors;
- a plate with a diameter of at least 60 cm;
- converter and access card;
- user manual and contract.
The very first thing to do before installing the NTV-Plus antenna is registration on the company’s official website. The user must go through the hardware registration procedure, otherwise it will not work.
Assembling a plate for NTV-Plus with a diameter of 60 cm
When a place has been chosen, among the equipment you need to find a bracket on which the plate itself is attached. A cable is attached to it, which is pulled to the TV. Different brands of TVs have different locations (sockets) where cables need to be attached. If the receiver is not built-in, then the wire will have to be connected to it.
Self-tuning "NTV-Plus"
When the antenna is configured and the cables are connected, the most important stage begins - the actual setup. To do this, you need to know the settings. In particular, it is necessary to know the frequency of the signal. If after entering the data the channel does not show, it means something was done incorrectly. If the equipment is configured incorrectly, contact your operator.
There are 2 ways to tune channels - manual and automatic. The second one requires virtually no effort on the part of the user, because To start the automatic setup mode, you only need to press a few keys on the remote control. This is done in several steps: “Menu => channel search => ok.” If the parameters on the receiver (including the frequency) were set correctly, then the setup will be successful.
Manually setting up a satellite dish
The manual search option is much more complex, so experience is required to carry out this procedure effectively. But if you decide to do it yourself, you can follow the following instructions.
- Reset all existing settings if they were previously set. This is done in steps: “Menu => setup => default installation => channels => antenna => satellite setup.”
- After this, use the receiver to set up the satellite dish, and when you are prompted to enter a password, you must enter four zeros.
- After this, a tab will open where there will be many satellites. Opposite some you can see check marks. These are the satellites that are allowed by default. You need to remove the marks opposite the satellite, otherwise their broadcast frequency will also be taken into account. In this case, you must leave a checkmark next to the “Eutelsat W4-36E” satellite. In some cases, such manipulations may be impossible for the user. To open access, you will need an access card.
- Check transponder parameters. The following indicators are usually used: 12130 R and Lnb levels (lower - 0, upper - 10750).
- After setting up the transponder, you need to move on to the final stage, namely, entering all the parameters in a special line. The broadcast frequency must be entered in the “Manual setup” section. To start searching the network, you need to select the previously specified transponder. Be prepared that the search will take a very long time. But a tuned antenna will show any channel.
How to configure the NTV+ receiver?
A receiver is a special device that allows the TV to receive a satellite signal and converts it into a standard television signal. And without this device, watching satellite television becomes impossible.
Required: – TV; – receiver.
To configure the Golden Interstar 7XXX series receiver, you need to go to the “Installation” menu and, having selected the name of the Eutelsat Seasat satellite, press the right arrow. It is necessary to set the LNB frequency value to 10750 or 9.7/10.75.
Set the DiseqC parameter value to Off. Then run a web search. Do not change any other parameters. Having selected the “Install programs” item in the menu, press the blue key and confirm the action by pressing the “OK” button.
Setting up the receiver on NTV+ has been successfully completed.
note
To set up a Samsung receiver on NTV+, select “Installation” in its menu and enter the code 0000. Then go to the “LNB Setup” item.
Here you need to enter the name of the EutelsatW4 satellite and set the value of the lower and upper local oscillator frequency to 10750. Confirm the completed manipulations by clicking on “OK”. To exit, use the Exit button.
Then you should select the manual search option and find the EutelsatW4 satellite.
The value of the “TP Number” parameter should be selected so that the frequency contains the numbers 12322. Activate the network search option. The signal and the name of the network will appear on the Thermometer. Now you need to click “OK” and check for the presence of NTV+ channels.
Setting up the Humax VA-ACE receiver. To receive NTV+ channels, you need to go to the “Settings” menu and select the “Organization of channels” item. Then enter the code 0000. Having opened “Organize networks”, proceed to deleting the NTV+ network and others. Click on Exit twice. Start setting up channels.
Specify the option “Search for channels” => “Antenna setup”. To perform a manual search, you need to enter the transponder frequency equal to 12322. Also specify the value of the “Polarization” parameter - “Auto”, 27500 (for SR) or ¾ (for FEC). Then start a network search, and when it’s finished, click “OK” twice.
Setting up NTV+ channels for the Humax VA5200 receiver. First of all, you need to delete all existing channels. Go to the “Settings” menu => “Organization of channels” => “Organization of networks” => “Delete all networks”.
Then start searching for channels by opening the corresponding menu item and selecting the “Antenna setup” option. Specify the Eutelsat w4 channel, the local oscillator frequency is 10750, and the transponder frequency is 12322. The polarization value should be 27500.
Perform a network search adding NTV+ channels to the receiver.
Source: https://remont-fridge-tv.ru/otvet_/-vopros-otvet_/kak_proizvesti_nastrojku_resivera_ntv.html