NTV PLUS is a carefully designed hardware solutions and methods for authorizing users who wish to receive paid satellite television content. But what if errors occur? No software or hardware environment is immune from this. Failures also occur during the operation of NTV PLUS equipment. Users should always maintain close communication with the service provider to resolve difficulties promptly. You can fix some of the problems yourself.
Errors in accessing NTV Plus channels
NTV PLUS is a carefully designed hardware solutions and methods for authorizing users who wish to receive paid satellite television content. But what if errors occur? No software or hardware environment is immune from this. Failures also occur during the operation of NTV PLUS equipment. Users should always maintain close communication with the service provider to resolve difficulties promptly. You can fix some of the problems yourself.
Where to go if you can’t fix problems yourself
If the user does not have sufficient qualifications to troubleshoot problems or simple methods do not help, it is worth requesting the help of specialists. Their mandatory list looks like this:
- subscriber service of the television company, telephones, email, messenger contacts of which are listed on the official website of NTV PLUS;
- the company or individual specialists who installed the equipment and carried out its initial configuration;
- service centers of companies that produced certain components of the satellite television reception system.
It is recommended to use these coordinates first. After all, even when working independently, you must follow safety rules. Equipped with all the necessary equipment, NTV PLUS specialists will efficiently and quickly perform even such a simple operation as cleaning the deflector. And most importantly, they will do it completely safely and with a guaranteed good result.
How to set up NTV + channels and equipment
Setting up NTV PLUS begins with installation and installation of equipment. If they are carried out independently, it is important to follow the following rules:
- NTV satellites + Eutelsat 36B/36С, Eutelsat 36A are located above the equator, so the dish should be directed to the south. The exact direction can be determined using a compass. The direction angle of the satellite is approximately 17 - 38 degrees. It depends on the manufacturer of the dish; satellite television operator NTV has several of them.
- In order for the satellite dish to receive an excellent signal, during installation it is important to take into account the overview of the territory; interference in the form of vegetation and tall buildings is not allowed. Failure to comply with these requirements may result in problems with signal transmission.
- The bracket is attached firmly and reliably, otherwise over time the dish will get knocked down, the direction of the direction will change, all this will affect the quality of the signal.
- It is not recommended to skimp on cable; it must be resistant to different weather conditions.
Nagravision 2 encoding system
Nagravision 2 encoding is widely used among satellite operators in Europe. Partially hacked, but all vulnerabilities were eliminated by updating encryption and changing key cards for more than 4 million subscribers. Due to the change of maps, Germany suffered the most financially.
If the Nagravision 2 encryption is cracked again, German satellite operators will have to replace another 17 million cards, which will entail enormous financial losses.
Hardware failures or incorrect configuration
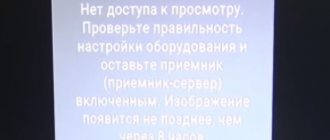
In case of equipment failures, a negative account balance, or incorrect access card encoding, the following error texts may be displayed on the TV screen:
- no access rights to the program;
- no access rights to the channel;
- the channel is encrypted.
Eliminating all errors should begin with a simple and understandable procedure: checking the account balance and the activity of ordered subscriptions . It is in this case that the message “No access rights to the channel” is displayed.
TV set-top box failure
If the settings of the TV set-top box fail, they must be reinitialized. To do this, disconnect the device from the network and remove the access card. Then the set-top box turns on. Here you select one of the channels of the ordered paid subscription. After this, the subscriber identification card is inserted.
TV expansion module
A CI card, inserted into a special connector on the TV, is a convenient hardware tool for watching NTV PLUS broadcasts. If the settings in this module fail, you can try to initialize it in the same way as the set-top box.
- If the image does not appear on the screen, reset the expansion card parameters according to the operating instructions for the TV, enter the expansion interface management section. Its name may include the abbreviation CI or simply the phrase “embedded interface.”
- After entering the settings section, you should enter the Information block.
- Here you can find the Factory settings item.
- After activating the command, the expansion card will be reset.
- To apply the new settings, you need to turn off and turn on the TV again. After this, the card is initialized using the same algorithm as the set-top box.
If both methods of eliminating the problem did not help, you need to re-configure the TV channels. How exactly to do this for satellite broadcasts can be found in the model’s operating instructions. For TVs from some manufacturers, the setup algorithm is given on the official NTV PLUS website.
No signal
Very rarely, a missing or weak signal error is caused by incorrect channel encoding. In most cases, you need to look for the cause in the hardware modules for receiving satellite broadcasts . The simplest troubleshooting measures include:
- checking the cleanliness and, if necessary, servicing the surface of the antenna deflector;
- elimination of icing of both the deflector and the converter;
- checking that the antenna is configured correctly and that it is carefully and firmly mounted;
- examination of the cable structure, search for breaks, creases, cable abrasions and elimination of identified deficiencies;
- checking the contacts of F-connectors, necessary cleaning.
It is worth considering the simplest possible problem. The signal can drop sharply during thunderstorms, heavy snowfall, fog, and excessive solar activity. Problems will resolve themselves when weather conditions improve.
Serious problems can arise from breakdowns of the converter, as well as the TV set-top box itself or the TV expansion card. Therefore, if simple troubleshooting methods do not help, you should seek qualified help.
Problems in the contact group
Fingers are a source of fat, which inevitably contaminates the contacts and leads to malfunctions of the reader. Understanding what to do to clean is quite simple. You need to use a light solvent that will remove grease, but will not damage the design and materials of the card.
It is recommended to use pure medical or formic alcohol, which can be purchased at any pharmacy. The procedure for cleaning the contact surfaces of the chip is as follows:
- the surface of the foil is thoroughly wiped with alcohol;
- the card is left to dry completely;
- The contact pads of the chip are carefully wiped with a school eraser.
After this, you can insert the card into the reader and check its functionality.
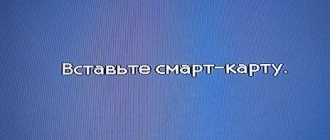
Smart card not detected by receiver error 5
Having understood the main sources of difficulties, it remains to figure out what to do when error 5 is displayed in Tricolor. To deal with the problem, the first thing we recommend is:
- make sure that the card is placed correctly (not upside down);
- clean clogged or dirty areas of the card surface;
- see if there are any scratches, kinks or visible damage on the card;
- reboot the receiver;
- If rebooting does not help, you should reset the settings of the set-top box to the factory level and start re-flashing the firmware.
To flash the firmware, users will have to update the hardware software to the current level. You can install the update through an information channel or, if this approach turns out to be unavailable, by downloading the required program from the provider’s website and installing it yourself. An important condition for firmware is the continuity of the process. That is, after starting the update, the set-top box cannot be turned off.
Videoguard and Irdeto 2 encoding systems
Videoguard and Irdeto 2 encoding systems are among the most secure in technical terms. They are used by a number of satellite television providers in Europe, Russia and Ukraine. Although the system keys have not been hacked and made available to the public for free, channels encrypted in the Videoguard and Irdeto 2 systems can easily be viewed illegally using cardsharing.
The Videoguard encoding system is used by the Ukrainian satellite television provider Viasat, and the Russian operator Raduga TV encodes its channels with the Irdeto 2 system.
How to find out the balance through My NTV Plus account?
It is necessary to monitor your subscriber account at least once a month so as not to be left without television. The most convenient way to control your balance is in your personal account, where the information is displayed on the main page on the left.
You can use your personal account installed on your mobile device. When you log in, balance information will be displayed on the main page.
In addition to this method, there are two more:
- Subscribers of MTS, Beeline and Megafon can use SMS alerts. To do this, send the message CARD NUMBER#200 6788 .
- Use the mobile application (Android, iOS).
- For those who actively use WhatsApp and Viber instant messengers, you need to add the number 916-57-102-79 . Support specialists answer this phone number.
Setting up NTV Plus channels
At the moment, there are several ways to configure channels from the NTV Plus provider. There are two most popular options.
- Automatic setup that looks like this:
- Enter the menu using the remote control;
- Find the “Search for channels” subsection there;
- Click it and monitor the search status. When it ends, all channels will start showing.
- Setting up the TV manually has the following specifics:
- First you need to reset the settings. This is done in this way: “Settings” → “Default installation” → “Channels” → “Antenna” → “Satellite settings”;
- The set-top box will require you to enter a password. Feel free to enter four zeros, but only if this option has not been changed;
- After this, when manually searching for TV channels on NTV Plus, you need to uncheck the satellites that are allowed, selecting only the one with which NTV Plus works. In this case, it is EutelsatW4 36E. Sometimes it happens that the service in question is blocked by the tuner or TV itself, and to open access you just need to remove the access card and insert it back;
- Next, you need to configure the transponder. Here are the settings: 12130 R and Lnb levels (low = 0; high = 10750).
When the entire procedure is completed, you can move on to the final stage: Select the transponder and set the “Network Search” command. Afterwards you have to wait, because the setup takes a long time. But if all the changes were correct, then in half an hour you will have all your paid TV channels working.
Setting up NTV Plus Vostok channels
The NTV Plus television company is one of the most popular in Russia, but in the eastern part of the country there were interruptions in broadcasting, which were resolved with the help of a new package and the Express-AT1 satellite. The change took place in 2014, so in 2017 users have been able to enjoy excellent broadcasting of popular channels and more for several years.
If for some reason your equipment does not want to receive the signal coming from this satellite, you can manually search for TV channels after entering the settings. This is not so difficult, since reconfiguration can be done manually. Soon television will begin to operate in standard mode, delighting viewers with a full package of TV channels.
So, to gain access to the package, you need to check the satellite settings, and if they are not there, then first enter this satellite, and then fill in the broadcast parameters. The instructions on how to set up channels are simple:
- Open the receiver settings via the remote control and the “MENU” button;
- Turn on the search for NTV channels;
- Go to “Settings” - “Installation” - “Password” - “Search Mode” - “Enable”;
- Enter the transponder parameters: frequency – 12475; polarization – left; transmission speed – 27500; broadcasting – DVB-S2; modulation – 8PSK; FEC: 5/6;
- Check the “Level” and “Quality” of the signal. Click on “Search” again;
- Wait for the results and save them.
Setting up LG and Samsung TV
The user will find the instructions for setting up Samsung and LG TV useful, because these devices have a CAM module, so their work with NTV satellite equipment is slightly different from the standard. However, we will provide simple instructions on how to deal with the problem and set up your equipment correctly.
You can install NTV Plus channels for Samsung like this:
- Enter the menu and go to the “Broadcast” item;
- Select the antenna “EutelsatW4 36E” and save the data;
- Enter “LNB Settings” and select the transponder, turning on DiSEqC mode - off. The lower LNB should be 9750. The upper LNB should be 10750. And the Tone switch should be 22KHZ;
- Go to manual search to enter channel settings;
- Take the EutelsatW4 36E satellite and select the 11900(V/R) 27500 transponder, specifying “Manual Search” or “Network Search”.
The setup for LG looks similar, so you can figure it out easily.
Everyone chooses their own method of receiving channels in digital quality, this is what I proceeded from when choosing:.
Terrestrial digital television did not suit me, due to the small number of channels.
Cable television - everything is more complicated here, the operator that provides television via coaxial cable without using coding (no set-top boxes are needed) does not serve my home, and the operators that provide television through the set-top box did not suit me either, since I have to pay a subscription fee for connecting one TV 300 rubles or more, in my opinion, is expensive. Based on this, I chose satellite television. The disadvantage of this method is that to use it you must initially have an amount of about 10 thousand rubles. for the purchase of equipment. But you can always save money, for example, I had an old NTV+ receiver, and through a promotion I exchanged it with an additional payment for a new NTV+ receiver - I’ll immediately clarify that this was a temporary promotion, I was just lucky to meet the deadline. But promotions change and there is always the opportunity to buy a satellite kit cheaper. So, I didn’t have to choose between satellite operators, since I got an NTV+ set with a contract and a card for cheap. All that remained was to install the dish and enjoy digital channels, even channels in HD quality.
A little theory about satellite television.
For those who are not at all aware of the installation of satellite equipment, I will explain that the dish must look strictly at the satellite broadcasting signal. Here it’s worth telling a little more about satellite television technology.
The television signal is broadcast from a geostationary satellite hovering above the Earth. If you go a little deeper, then the satellite rotates in the plane of the earth’s equator at an altitude of approximately 35,000 km above the earth’s surface. The period of revolution in this orbit is one day. That is, a satellite moving in a geostationary orbit does not change its position relative to the Earth’s surface (it constantly “hangs” above the same point of the equator).
Using a satellite dish, we focus the signal from the satellite to the point where the converter is located.
A converter is a receiving device that is mounted at the focus of a signal reflected from a satellite dish and converts this signal into an electrical signal, after which it transmits it to the receiver.
A receiver is a device that converts the signal coming from the converter into a “understandable” signal for the TV. The receiver connects to the TV using the HDMI, SCART, “tulip”, etc. interface. depends on the model of the receiver and the connectors on the TV.
The general diagram is presented below.
Installation of NTV+ dish
So, let's move from theory to practice. Below I will describe how I installed and configured NTV+ (for those who set up Tricolor, the connection diagram will be similar).
I climbed onto the roof of my house and saw the following picture - two satellite dishes hanging, there was a place left just for mine.
If you pay attention, one dish is used for Tricolor (judging by the inscription on the plate, although this may not be the case), this is good, since Tricolor and NTV+ broadcast from the same satellite, which means they are directed to the same point in the sky, adjust the direction accordingly antennas will be easier, since the sample will be nearby. When installing a satellite dish, you can also look around, since most people use either Tricolor or NTV+, accordingly you will understand in which direction you need to turn the antenna. If there are no dishes nearby, turn the dish to the south (since the satellite “hangs” on the equator), it should be taken into account that there should not be any trees or buildings on the path between the satellite and the direction of the dish, since they will not allow the signal to reach the dish.
The first step is to fasten the antenna bracket using anchor bolts (usually they come with the antenna). To do this, attach the bracket to the wall, mark the places where you need to drill holes, and use a drill to make holes with a depth and a radius the size of an anchor bolt. Then insert the bolts there.
Then attach the bracket to the wall and screw it.
As a result of all actions, check that the bracket is firmly secured and does not wobble.
After this, assemble the plate and attach it to the bracket.
Next, you need to run a coaxial cable from the receiver (where the TV will be) to the satellite dish converter. If the cable exceeds 10 meters, you can buy a high-quality 75 Ohm coaxial cable of the required length.
After that, use an HDMI, SCART or “tulip” cable to connect the receiver to the TV. Then turn on the receiver, select AV mode (corresponding interface) on the TV. You will see the receiver menu, select the satellite in the settings (let me remind you, for NTV+ and Tricolor it will be the same satellite), for the European zone it will be EUTELSAT W4/ W7 or EUTELSAT 36A/ 36B (they have been renamed).
The next step is to set the dish strictly to the satellite. In order not to use additional devices to help set up channels, which cost a lot of money (and there’s no need if you want to set up one satellite dish for yourself), you will need an assistant who will monitor the signal level, while you turn plate. You can use a cell phone for communication.
You should rotate the plate millimeter by millimeter in order to catch a good signal. The antenna rotates not only horizontally, but also vertically, do not forget about this.
In the end, I set up an NTV+ dish (I decided prematurely).
I managed to achieve a signal of more than 70 percent; it was cloudy, so perhaps the result was no better. Coming down after setting up the antenna, I quickly tuned in the channels using auto search and was quite pleased. BUT, when I turned on the HD channel, an information sign “No signal” appeared in front of me.
How so?! All channels work normally, but all HDs write “No signal”.
A call to technical support did not bring any results. I decided to spin the plate some more to achieve at least some signal level (as you can see in the picture below, the signal level of HD channels is 0%). To do this, in the menu I selected List TP - 11823/27500/V (it is responsible for some of the HD channels).
I climbed onto the roof and again began to slowly turn the antenna; my assistant remained near the TV and told me the signal level. After literally 10-15 minutes I managed to set up the HD channels; they showed a signal level of about 73%. Having gone down, I could already see the channels in HD quality, the other channels were also excellent.
The bottom line of this whole story is, do not believe people who say that only specialists with special equipment can install and configure satellite television. Almost anyone can do this!!!
There are TV models that are equipped with a built-in receiver. Their advantages can hardly be overestimated. Firstly
, there is no need to buy a receiver.
Secondly
, you don't need to use an HDMI-HDMI cable. Thirdly, you can switch channels and use other functions using the television remote control.
The only caveat is that to view satellite channels from paid telecom operators, the digital tuner must support the DVB-S2 standard.
Of course, you can’t do without a correctly configured satellite dish.
. Most TV models can easily scan TV channels in any mode. They can provide signal reception from 4 satellites. But even after correctly setting up the antenna, the familiar “Encoded channel” message will appear on the TV screen. In order to fully view TV channels of any company, you need a decoding device, that is, an access card.
How to set up a Samsung TV to receive satellite TV
1.
We don't need the factory settings, so we reset them.
Go to the menu, select the “Support” section
, go to “Self-diagnosis”, click on “Reset” and confirm the selection with the OK button.
2.
After the reboot, we go back to the menu.
Here you need to select the “Channel” section, go to “Antenna” and then “Satellite”
. Select “System” and enter the password (on all TV models from any manufacturer it is 0000). It is necessary to unmark each satellite (if this cannot be done, remove the CAM module from the slot and reset the TV again).
3.
We
select the EutelsatW4 36E satellite, transponder 12130 R, lower gen.
LNB – 0, upper – 10750 . Click “Manual settings”, transponder 12130 R, click on “Network search” and confirm the selection. When the channel search process is completed, save what was found. If you wish, you can sort the TV channels.
4.
If there is no EutelsatW4 36E satellite, we proceed as follows.
We select “User sat 1” . Next, create your own satellite and save it. Please note that “LNB power” should not be turned off.
Go to LNB and select the following characteristics:
DISEqC – off, Lower gen. LNB – 10750, Upper gen. LNB – 10750Tone 22 KHz. - Auto.
Next, go to the “Settings” section, from there – to “Manual setup”, and begin scanning the newly identified satellite. We leave the “Transponders” section blank. Select “Create”. It is necessary to enter transponder frequencies, flow rates, and polarization types for all TV channel packages.
5.
When the network name appears on the device screen (in our case, “”),
you must click on “Search” and confirm your choice by pressing the “OK” button
. The procedure is repeated again and again for each individual transponder.
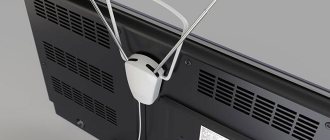
Antenna
And now, the installation is complete, everything is fine, and you can proceed to the next stage - setting up the NTV antenna.
- The converter cable is connected to the receiver, and the receiver itself is connected to the TV. It is important to follow all instructions from the manufacturer, this will help avoid breakdowns.
- Slowly and carefully rotate the antenna dish vertically and horizontally towards the location of the satellite until excellent quality pictures and sound appear. To make the process go faster and more comfortably, it is better to do everything together - one rotates the antenna, the other coordinates by phone.
- And now, the screen pleases with a high-quality picture, the next step is to activate the “received signal level” command on the receiver. Try to make the scale as full as possible.
With due patience, setting up an NTV satellite will not cause problems.