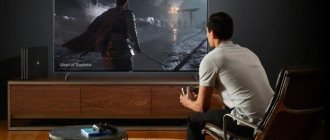
Not sure if you can sing, but really love karaoke and relaxing in a karaoke club? Are you seriously into singing and need karaoke systems that allow you to hear yourself through the speakers, practicing every free minute? How about organizing professional karaoke not in a club, but right in your apartment, in the comfort of your home, by connecting your professional home karaoke system to your home theater and amplifying the speakers?
Personal karaoke connected to a home theater is a real chance not to limit your desires and capabilities. The karaoke system allows you to enjoy singing at any time, when you really want it, by turning on the home theater and “turning up” the speakers. Sing karaoke in the morning, recharge yourself with positivity before the work day, sing with friends in your home karaoke room. Instead of booking a table at a karaoke club and waiting for hours for your turn at the microphone, a home karaoke setup helps you do what you love without discomfort. Organize your own sing-a-party outside the club using your own karaoke console and see for yourself the attractiveness of such a karaoke holiday!
Karaoke devices
Today, the household appliances market is filled with all kinds of devices, the main function of which is to play phonograms. Buyers purchasing this equipment may have a reasonable question: is it possible to connect karaoke to a TV? Naturally, you can, however, depending on the model and year of manufacture of the TV, the connection method will vary.
Moreover, karaoke can be set up on a personal computer, laptop and other devices. The only difference is that many PCs have the appropriate codecs to play the required audio formats, and for full-fledged singing you only need a disc with soundtracks.
Useful tips when connecting a microphone to a music center
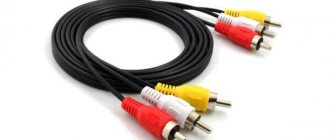
As you can see, the procedure itself is not complicated. The main thing is to choose the right cable, with the help of which the two devices are connected. For example, if the adapter from the plug is a so-called mini-jack at the base station, then there must be a “jack” on the socket. As for the connecting cables, they must be of the same type as “jack”.
ATTENTION! When adjusting the microphone for sensitivity and other parameters, it is strongly recommended to move some distance away from the speakers, since it is possible that a sharp and rather unpleasant sound may appear. If, nevertheless, it began to be published, then there is, of course, nothing wrong with that. It is only necessary to slightly reduce the gain, since it is on the basis of feedback that it directly enters a mode such as self-excitation.
Setting up karaoke at home
In fact, figuring out how to connect karaoke to a TV is very simple, even on your own.
The setup consists of the following steps:
- connecting speakers and a subwoofer to the player to enhance the sound;
- connecting a cable from DVD to TV;
- inserting a disc with songs;
- microphone connection.
The best option for doing what you love is to use special players (usually DVD receivers, as well as so-called home theaters). They are equipped with stereo sound systems and the necessary connectors for connecting to many models of televisions and microphones. In addition, with new models you can choose playback methods - via DVD or flash drives.
Which karaoke is better to buy for your home?
A modern karaoke system is two fundamentally different concepts:
- Budget karaoke for home use. Talking about high-quality sound, clear voice and a decent volume level in this case will be superfluous. In fact, this karaoke is a slightly modernized version of the same DVD karaoke intended for home use. It has nothing to do with clubs and works on the principle: if you make it louder, that’s good. The karaoke kit is elementary and includes a cheap karaoke system, a similarly cheap microphone, a set of disks and, perhaps, that’s all. Karaoke has a low cost, but demonstrates quality no better than if you connected a microphone to your computer, turned up the speakers as loud as possible and sang along with soundtracks from Youtube.
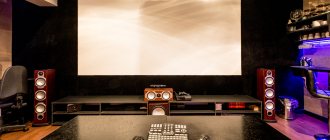
- Complete home karaoke equipment. The karaoke complex includes the necessary system, software and hardware solutions for home use. At the same time, the prefix “homemade” does not at all hint at low quality. With the help of this karaoke you can practice vocal exercises, hold karaoke parties and just relax in comfort. An obvious example is the AST Mini home karaoke equipment. Karaoke is based on a professional player for karaoke clubs. Its capabilities are almost as good as those used in karaoke clubs. This is an ideal solution for home use and modern home cinema. Voice processing, convenient control of the volume and tempo of karaoke using a smartphone, connection to any speakers, a huge collection of professional minuses and a truly large catalog of songs on the hard drive, like in a karaoke club - you can give odds to any club or bar karaoke – party with your home sing-party!
Using karaoke via Smart TV
And the very latest achievement of technology is televisions with built-in players. The leadership race is so far won by LG and Samsung. And for example, even a child can figure out how to connect karaoke to a Samsung Smart TV, since it comes with detailed setup instructions.
Smart TVs have created a real sensation among those who like to sing their favorite songs in a relaxed home environment. In addition, the new models are equipped with two microphone connectors, as well as fairly powerful speakers. Loud, comfortable - and you can perform compositions as a duet.
There is one more nuance. When looking for solutions on how to connect karaoke to an LG Smart TV, you should remember that now new equipment has direct access to the Internet. This means that songs can be played directly from the Internet, without connecting additional devices.
Step-by-step instruction
Having a microphone that will be compatible with your existing home theater system, you can begin the connection procedure:
- Device compatibility.
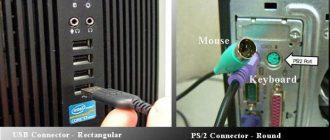
You need to know that not every microphone can be connected. It is important to determine connectivity and check the availability of the necessary connectors. There may be several of them:
- mini-Jack (3.5 mm);
- jack (6.3 mm);
- XLR;
- TRS;
- bluetooth, etc.
The latter type of connector is more used with studio microphones, but taking into account the rapid development of technology, it can also be present in a home theater.
- Preliminary preparation.
Before you start connecting, there are several important steps you should take:
- turn the microphone volume to minimum so that a very loud sound does not accidentally escape (it can not only hurt your ears, but also damage your speakers);
- Additionally, you need to lower the overall volume on your home theater, since even a very quiet microphone can cause severe distortion in sound (this happens when the device is damaged, the cable is broken, and similar faults, especially hidden ones);
- The echo function should also be disabled for the above reasons, especially since the echo can become looped and will indefinitely get stronger.
- Plug and connectors.
When all conditions are met, you need to find the appropriate microphone connector. It is usually designated as MIC (if two are available, then MIC1 and MIC2).
It can be located on the front panel or on the back. Sometimes there are also connectors on the side specifically for a microphone.
- Functionality check.
Once physically connected, you should ensure that the microphone actually communicates with the system and is correctly recognized by the home theater as a suitable device.
This is done in the main menu, on the central block. Information should appear that the microphone is connected and ready for use.
But sometimes this is not enough and the devices do not contact each other in any way. There are many conditions that influence this process, and each one needs to be dealt with.
Help from the Internet in setting up karaoke on Smart TVs
The World Wide Web is filled with many useful applications, so it’s easy to figure out how to connect karaoke to your TV and set up high-quality vocal playback, even without calling specialists. A variety of applications, codecs and drivers, millions of soundtracks - all this is available, with the small caveat that you will have to pay for it.
These programs usually have limited coverage, so you'll have to subscribe, but it's relatively inexpensive. But the result will be fantastic - powerful and clear sound, without the danger of damaging the TV.
Important! In order not to install any application crookedly, you need to carefully read the instructions on how to connect karaoke to a Samsung TV (all manufacturers have the same connection and setup principles).
Criterias of choice
When purchasing microphones, you need to take into account several points:
- Price. Brands with a low price are short-lived and have a short battery life, and frequent signal loss occurs.
- Technical specifications. The reception distance is important; there must be appropriate batteries. Dynamic microphones are suitable for karaoke singing.
- Sound quality. The microphone should not make any crackling sounds.
- Compatibility.
- Device operating time.
- Design.
Microphone settings
In fact, choosing a good microphone for your karaoke system is also not an easy task. Here you need to look at the manufacturer, the quality of the output audio stream, power and the availability of a suitable connector.
Therefore, before connecting a karaoke microphone to an LG or Samsung TV, you need to check the back or side panel of the TV (or the output connectors of the DVD player).
There are several types of microphones, from professional to amateur:
- wireless;
- USB microphone;
- standard plug-in microphone.
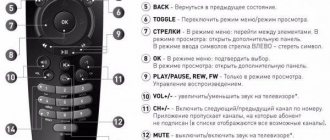
Basic steps for connecting and setting up sound
- Reduce the volume to the minimum level to avoid sound distortion.
- Connect the device plug to the connector
- Use the MIC VOL button to adjust the sound volume.
- Set the device's echo level by pressing the ECHO button.
- Set the pitch to suit your voice.
- The VOCAL button allows you to change the audio channel to mute vocals.
- Check the microphone connection on the AV processor (central unit) in the main menu.
If you hear strange noises (howling or screeching) from your speakers, move away from the device or turn down the volume.
Alternative microphones
Well, if purchasing a wireless microphone seems too wasteful, then you can use an alternative method. There are quite inexpensive devices with a standard connector and cord. Of course, you will have to look for the connector you need for your DVD player or Smart TV, but the result will still be a little cheaper. There are two types - with a 6.3 mm and 3.5 mm connector.
There are also USB microphones, which are universal, since almost all karaoke devices and televisions are equipped with these connectors. Unfortunately, to use such a microphone you will need additional settings, which the average person may not be able to handle. Then it is better to contact either specialists or knowledgeable people who have similar equipment, or visit the necessary sites with instructions on the Internet.
Safety precautions
Microphone sets are designed in such a way that their use is safe for human health. However, if the connection is incorrect, the risk of electric shock or short circuit increases, which will lead to breakdown and, of course, repair of the home theater. To avoid unpleasant consequences, follow the basic rules for using the device.
Before connecting a microphone to your home theater system, please read the safety guidelines.
- Make sure the power cord and connectors are not damaged.
- Do not expose the device to heat, high temperatures or water. If liquid gets on the surface, immediately turn it off from the electrical outlet.
- Do not insert third-party objects into the connectors.
- Make sure that the voltages of the power source and the connected device match.
- Do not suddenly pull the plug out of the connector.
- Watch the wires - they should not be twisted.
- Do not drop the microphone on the floor or subject it to mechanical shock.
- Do not repair or disassemble the device yourself.
When purchasing a home theater, choose a speaker system with a karaoke function and connect the microphone according to the instructions. And our rating of the best home theaters will help you in choosing equipment.
Karaoke is one of the most popular types of recreation. This method of entertainment is liked by both adults and children. To equip a regular TV with this useful option, various additional equipment is used.
How to set up karaoke software
In addition to how to connect karaoke to your TV, you need to know how the software is configured for the full functionality of music programs.
There are several installation options:
- when connecting the TV to a PC or other device (laptop, tablet);
- directly to the TV.
When downloading software from the Internet, it is best to make sure that the disk or flash drive is free of viruses and other potentially dangerous programs. Otherwise, you can cause serious damage to both the PC you are using and the TV itself. We are talking about technical failures, up to the need to flash or reinstall the OS.
Therefore, the best way to connect karaoke to an LG TV (this company is very demanding on its products) is to copy the drive from acquaintances or friends, that is, from the original disk. This will completely eliminate the possibility of viruses infecting your devices.
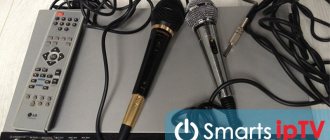
Instructions on how to connect a microphone to a home theater
The first and most important thing you need to pay attention to even at the stage of purchasing a microphone is the compatibility of the connectors. There are several types of them:
- mini-Jack (3.5 mm);
- jack (6.3 mm);
- XLR;
- TRS;
- bluetooth, etc.
It is important not to make a mistake when purchasing; you should first find out which connector is suitable for your cinema. If it’s hard to figure it out on your own, you can take the documents for the TV and show them to a consultant at a hardware store, and he will select the right option.
Before connecting a microphone, you need to set the sound on it to the lowest level. The same should be done with the TV. Next, we need to find the appropriate connector for our device. When all conditions are met, you need to find the appropriate microphone connector. It is usually designated as MIC (there are other variations with the prefix 1 and 2).
After connecting, you need to make sure that the home theater “saw” and recognized our microphone as a device. The appropriate information about contact with the device should always be displayed on the screen. If all conditions are met, the devices are in contact with each other, then you can begin testing and sound check. Choose the appropriate volume and mode for yourself, if any. Our device is ready to go!
Sources
- https://setafi.com/elektronika/mikrofon/kak-podklyuchit-mikrofon-k-muzykalnomu-tsentru/
- https://smarts-iptv.com/kak-sdelat-karaoke-doma-na-televizore.html
- https://iponte.ru/raznoe/podklyuchenie-mikrofona-k-domashnemu-kinoteatru.html
- https://sovetexpert.ru/kak-podklyuchit-mikrofon-k-domashnemu-kinoteatru.html
- https://FB.ru/article/373398/kak-podklyuchit-karaoke-k-televizoru—poshagovaya-instruktsiya-i-rekomendatsii
- https://mixfacts.ru/articles/obzor-luchshih-domashnih-kinoteatrov-s-funkciej-karaoke-besprovodnoj-akustikoj-opticheskim-vhodom
- https://setafi.com/elektronika/mikrofon/kak-podklyuchit-mikrofon-k-domashnemu-kinoteatru/
What to choose – paid or free karaoke software?
As for the fee for using specialized karaoke software, the situation here is ambiguous. On the one hand, having purchased a licensed program once, the user receives all its benefits on an ongoing basis, namely:
- regular updates;
- replenishment of the music library;
- improvement and comfort when working with the program.
But free applications are downloaded at your own discretion, and you will also have to answer for the consequences yourself. Of course, there are very good programs among free software, but they may not have support and compatibility with certain TV firmware.
There is, however, another option. If you don’t have the desire or skills to install karaoke software, you can use the simplest solution. Now there are a lot of special sites on the Internet that make it possible to test your vocal abilities directly through your browser. The only disadvantage of such singing is that most resources do not support performance evaluation, and many karaoke portals have a limited number of songs. Of course, there are also several dozen special sites that have ratings and a colossal music library. But usually they are only available after you subscribe.
Selecting and connecting a microphone
A microphone is one of the elements of karaoke. The sound of vocals depends on the quality and method of connection to the TV. When choosing a microphone, be sure to take into account the sound range, analyzing the area where you will use it. For ideal sound, you also need to purchase high-power stereo speakers. A mixer is also used for sound – a device that harmoniously combines the performer’s voice with the sound from the speakers. An equalizer will help you adjust the sound to a specific style of music, revealing its advantages.
Microphones are divided into two categories - wired and wireless. Wired is equipped with a 6.3 mm or 3.5 mm plug. For TV, the second option is usually used. It is easy to identify - the wire is pink. If you do not find such a cable, use USB connections. There should be no problems with further connection, since Smart TV provides the necessary drivers.
A wireless microphone is slightly more expensive, but much more convenient to use. This microphone has a longer service life and a longer operating distance. And the wires do not interfere while performing songs. The signal is transmitted via radio waves and Bluetooth. Using the first option, you need to connect to the TV by installing batteries and activating the antenna module. And only after these steps the devices will begin to work. If you want to use Bluetooth, make sure your TV and microphone support this feature. If not, then you need to additionally buy an external module.
Modern trends in the development of karaoke at home
In principle, taking into account the latest technologies and the large-scale development of the Internet, it’s easy to figure out how to connect karaoke to a TV. The main thing is to have a desire to show your vocal skills.
Modern TVs are so similar to computers that they perform virtually all settings automatically, without additional human intervention. An important point here is setting up the synchronization of audio and video.
This means that the audio stream coming out of the microphone must be matched with the text video. In addition, the combination of the user's voice with the sounding soundtrack must be harmoniously adapted. They must be on the same spectrum.
But the capabilities of modern technology are such that you don’t need to worry too much about how to connect karaoke to a Samsung or LG TV. Firstly, the application stores of these companies (Samsung Apps and LG Apps) provide special software for karaoke lovers, which can easily independently optimize all settings and prepare the TV for playing soundtracks.
Well, if your TV doesn’t support the Smart function, don’t be upset. No one canceled the opportunity to sing for the pleasure of yourself and your neighbors, using a DVD player or PC (laptop). The only difference is that you will need additional software, as well as several adapters, depending on how you can connect this device to the TV.
About the product
A portable karaoke system for home is a set of equipment that includes:
- player with the ability to play audio content from different media;
- speakers responsible for the accuracy of frequency range transmission;
- microphone, most often 2, to enable correct “pairing” with the source sound file.
The latest generation of professional home karaoke not only allows you to sing your favorite songs to the original “backing track”, but also provides its user with additional “goodies”, for example, voice processing, tonality “calibration” and so on. A truly high-quality device for home will differ little from professional equipment for karaoke clubs. The only difference between them will be the higher level of wear resistance of “commercial” devices designed for many hours of daily use.
Among the most popular types of home karaoke systems are:
- a set of equipment, the “center” of functionality of which is a traditional DVD player, equipped with a number of additional functions;
- a multifunctional device designed for vocal training, or an all-in-one system;
- multi-component set of high-quality karaoke equipment.
The main advantage of karaoke systems with a DVD player is their compactness. Disadvantages - average quality of reproduced audio and not always accurate reproduction of the frequency range of music.
The advantage of special karaoke devices is high sound quality and a wide range of additional features. But when deciding to buy a professional device, you should take into account its disadvantages: bulky dimensions and high cost.
The multi-component system is capable of not only providing the user with the opportunity to perform songs, but also adjusting the tonality, automatically recording “performances” and saving them on media or in the device’s built-in memory. This technique is distinguished by high-quality Hi Fi and Hi End sound. The disadvantages of the devices are the complexity of installation/configuration and the exorbitant price of a really high-quality kit and its consumables.
A few final tips
You can also add that when choosing a method for connecting the TV to a playback device, you need to pay attention to the following aspects:
- sound quality;
- video clarity;
- synchronization of audio and video.
Therefore, if you are using a laptop or PC, then it is best to use an HDMI cable as an adapter. It will provide decent quality (no squares on the screen) and better sound reception/output.
If you choose a DVD receiver, then you can get by with a regular “tulip” adapter, although it is optimal to use a digital SCART connector (if the TV has one).
How to choose
When choosing a karaoke system, you should consider:
- type of microphone in the basic configuration (the choice should be made in favor of wireless);
- power of functional speakers (it is better to choose a device with a power of at least 50 W);
- supported audio and video formats (optimally – MP3, WMA, OGG, MPEG4, DivX, XviD, VideoCD, SVCD, HDCD, JPEG, Picture CD);
- type of digital media compatible with the karaoke system (ideally CD, CD+G, DVD, CD-R, CD-RW, DVD±R / RW);
- memory capacity of the device’s built-in “storage” (at least 320 GB);
- range of reproduced frequencies (ideally, the frequency range is from 20 Hz to 20 kHz);
- additional options (a nice “bonus” for the user will be the presence of automatic recording of a “performance” on a USB drive; the ability to scale the image displayed on the screen; built-in Wi-Fi and Bluetooth modules; and so on).