Many people love to sing, so karaoke is a great entertainment for the home, especially if you need to keep a noisy group busy at a party. It’s not easy to choose among the variety of devices, because they all do an excellent job of playing music. Therefore, the main task for users is to connect the device and configure it correctly. There are many options: from DVD players to LG and Samsung TVs with Smart-TV technology. Microphones also vary in how they are connected and come in two types: wired and wireless.
Connecting karaoke to TV
To connect a karaoke device to TV, you can use three main methods:
- Through a regular DVD player.
- Connect two devices using a computer.
- Apply Smart TV technology.
To choose the appropriate option, you need to familiarize yourself with each of the methods, and then act depending on the available equipment.
Connection via DVD
How to install:
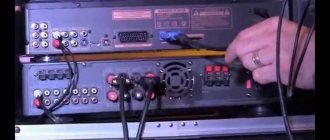
- Connect the TV and DVD set-top box via cable. Regular tulips, HDMI or SCART are used. You need to choose depending on the available ports.
- Connect the microphone to the player.
- Using the remote control, select DVD as the signal source.
- Turn on the player and insert a special music disc into it.
If you have a Blu-Ray player at home, then the same actions can be done with this equipment.
Connection via computer
Next, choose one of the ways to display the image:
- First screen.
- Repetitive.
- Expand.
- Second screen.
The sound will pass through the computer speakers or TV panel if the connection was made using an HDMI cable. If the sound is too quiet, you need to additionally buy a microphone amplifier.
Karaoke on Smart TV
- How to connect and configure a Wi-Fi router? Step-by-step instructions for all models
To set up the device on a Samsung Smart TV, you will need to perform a more complex operation. First you need to choose the right connector for your existing microphone.
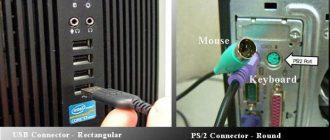
The port is located on the back or side of the TV. For connection you need to use 3.5 mm or 6.3 mm outputs. If such options are not available, you can also use a USB connection.
Now you need to download the appropriate karaoke software to your TV (LG, Sony or any other popular model). The program must be found on the Internet by connecting to the network.
Third Party Applications
Your devices don't have a microphone jack? Then use the diagram for connecting a laptop with an HDMI cable. If you have a certain type of microphone, you will have to download additional utilities from the World Wide Web. The main difference is the installation.
Download using one of the following methods. The first one with home Internet. Second, when using a flash drive or a separate memory card. If you download a file from an unverified source, check it for viruses. Such widgets are harmful and lead to breakdowns. Install reliable versions that have been used by someone else.
Selecting and connecting a microphone
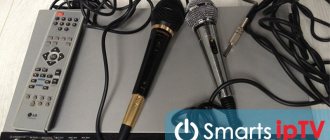
You won't be able to use a karaoke system without a special microphone. You can find wired and wireless models on sale.
Wired microphone
When connecting to a Smart TV with karaoke function, there should be no problems detecting the device, since all drivers are already installed.
Wireless microphone
You will have to spend more money to purchase such equipment than in the previous version, but the user receives certain advantages:
- The wires will not get in the way while a person is performing songs.
- The operating range of the equipment is much higher than in the previous version.
- The microphone lasts longer.
There are several types of signal transmission from a microphone to a TV with karaoke: via radio waves and via Bluetooth. In the first option, you need to connect the receiver to a TV (LG, Samsung or any other popular brand), after installing the batteries, activate the antenna module. After this, the two devices will start working.
If Bluetooth communication is used, then the microphone and TV must support this technology. Otherwise, you will have to additionally purchase an external module that will connect to the USB port via the Audio In input. Synchronization occurs automatically. If the TV does not recognize the microphone, you need to go to the settings and, using the user manual, fix the problems that have arisen. Karaoke on TV is a good way to have fun.
Often, while watching TV, people want, just like popular singers, to be on stage, sing and bask in the rays of popularity. Of course, not everyone has such an opportunity, but you can show off your vocal abilities at home. That's what karaoke is for. And at the same time, it is not at all necessary to go to a karaoke club, which costs a lot of money. You can create your own concert hall at home.
- Connecting wireless bluetooth headphones to a computer and laptop
Popular models
Let's look at some high-quality models:
- Palmexx PX/MIC-Q7. I have this exact model. The meaning is simple. Install any karaoke application and that’s it. This wireless microphone connects to the app and you sing.
- The LG DP547H DVD player has one microphone input. Can work with formats – MP3, MPEG4, DivX and JPEG. HDML output is provided.
- The evolution lite 2 plus system has more than 4 thousand clips and 6 thousand songs. The device uses special algorithms that allow you to change the tempo and key of compositions. An assessment of the quality of execution is provided.
- The madboymfp 2000 model has different functionality. You can connect any media to the device. The design has 2 microphone inputs, a USB port, a software equalizer and the ability to update the firmware.
- BBK DVP032S has one microphone input and supports MP3, VideoCD and HDCD formats. Individual microphone levels can be adjusted.
Karaoke is a wonderful technique that lifts your spirits. Experts have proven that such singing not only has a positive effect on well-being, but also cures mental disorders.
Karaoke devices
Today, the household appliances market is filled with all kinds of devices, the main function of which is to play phonograms. Buyers purchasing this equipment may have a reasonable question: is it possible to connect karaoke to a TV? Naturally, you can, however, depending on the model and year of manufacture of the TV, the connection method will vary.
Moreover, karaoke can be set up on a personal computer, laptop and other devices. The only difference is that many PCs have the appropriate codecs to play the required audio formats, and for full-fledged singing you only need a disc with soundtracks.
Cueist
Beautiful and realistic billiards with the ability to choose any type of game: eight, nine, snooker with friends or against the computer. There are hundreds of different tables and cues to choose from. This game can be controlled using the proprietary Apple TV Remote with a built-in gyroscope and accelerometer. Also supports controllers and virtual reality.
Setting up karaoke at home
In fact, figuring out how to connect karaoke to a TV is very simple, even on your own.
The setup consists of the following steps:
- connecting speakers and a subwoofer to the player to enhance the sound;
- connecting a cable from DVD to TV;
- inserting a disc with songs;
- microphone connection.
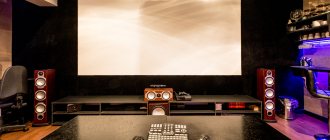
The best option for doing what you love is to use special players (usually DVD receivers, as well as so-called home theaters). They are equipped with stereo sound systems and the necessary connectors for connecting to many models of televisions and microphones. In addition, with new models you can choose playback methods - via DVD or flash drives.
Personal Computer
As a tool for broadcasting karaoke on TV, you can use almost any personal computer - desktop or laptop . The main thing is that the video card has an HDMI connector and supports working with third-party peripherals. In this case, the TV will act as a second monitor.
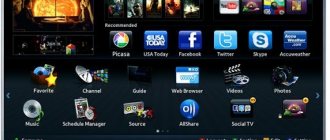
First of all, you need to install the karaoke program on your PC. Fortunately, there is plenty of such software on the Internet. Among others, the following interesting utilities can be noted:
- Karaoke 5;
- PyKaraoke;
- JichiMultimedia;
- KaraWin;
- UltraStar Deluxe.
To enable karaoke on your TV, you need to connect it to your PC video card with an HDMI cable and configure your desktop.
TV as a second monitor:
- Karaoke microphone – what is it, device, how does it work, characteristics, which one to choose?
- Right-click on your PC desktop.
- In the context menu, select “Display Settings”.
- In the “Multiple Displays” section, click “Detect”.
- Select the TV model and agree to the broadcast.
Here you can decide on the method of displaying the picture: use TV as the main screen, additional, repeating, and also expand or reduce the scan. All that remains is to connect the microphone to the motherboard or sound card.
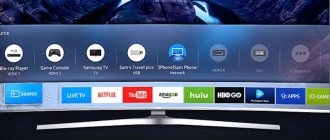
Using karaoke via Smart TV
And the very latest achievement of technology is televisions with built-in players. The leadership race is so far won by LG and Samsung. And for example, even a child can figure out how to connect karaoke to a Samsung Smart TV, since it comes with detailed setup instructions.
Smart TVs have created a real sensation among those who like to sing their favorite songs in a relaxed home environment. In addition, the new models are equipped with two microphone connectors, as well as fairly powerful speakers. Loud, comfortable - and you can perform compositions as a duet.
- How to mount a projector correctly and avoid common mistakes
There is one more nuance. When looking for solutions on how to connect karaoke to an LG Smart TV, you should remember that now new equipment has direct access to the Internet. This means that songs can be played directly from the Internet, without connecting additional devices.
Consoles
For karaoke at home on your TV, you need a special set-top box. On sale you can find both specialized equipment and complex options. In the latter case, the main thing is that the device has a karaoke function. More advanced solutions have Internet access, advanced options such as backing vocals, and can work using wireless protocols.
Budget models are ordinary DVD players, supplemented with a microphone jack. Old equipment is connected via SCART or RCA (“tulips”) interfaces, and new equipment is connected via an HDMI port. In the first case, special adapters may be needed.
How to connect karaoke to your TV using a set-top box:
- We connect the cable to the TV and set-top box into the corresponding connectors.
- On the TV, open the settings and select the desired signal source (HDMI, SCART or RCA).
- Connect the microphone and turn on the devices.
Important! If the equipment is branded, then the task becomes much easier. For example, when you connect a set-top box of the same brand to an LG TV, synchronization occurs automatically.
Help from the Internet in setting up karaoke on Smart TVs
The World Wide Web is filled with many useful applications, so it’s easy to figure out how to connect karaoke to your TV and set up high-quality vocal playback, even without calling specialists. A variety of applications, codecs and drivers, millions of soundtracks - all this is available, with the small caveat that you will have to pay for it.
These programs usually have limited coverage, so you'll have to subscribe, but it's relatively inexpensive. But the result will be fantastic - powerful and clear sound, without the danger of damaging the TV.
Important! In order not to install any application crookedly, you need to carefully read the instructions on how to connect karaoke to a Samsung TV (all manufacturers have the same connection and setup principles).
Why is this necessary?
There are many reasons to establish a direct connection between your phone and TV. Here are just a few of them.
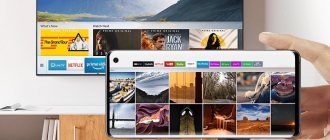
- To watch videos from the Internet. You can’t watch them directly on TVs without Wi-Fi, and you don’t want to be content with a small screen on mobile devices when you have a full-fledged LED panel. Displaying videos from YouTube on TV will help solve the problem without replacing the equipment with a more modern one.
- Instead of a remote control. Using some programs, you can control the TV from a smartphone in the absence of a remote control, and change channels. The optimal solution for those who always lose everything.
- To play the game. This method allows you to take a fresh look at your favorite racing simulators and RPGs. Playing familiar applications from your phone on a big screen is much more fun and enjoyable - the picture itself becomes richer, richer, and you can see the smallest details of the graphics.
- View video content, photos. Playing files as part of their transfer from the phone occurs in a similar way to other external media. Even TVs released more than 10 years ago can be connected by wire.
- Internet surfing. This is especially true for sites that do not have a mobile version. In addition, a large screen is very useful in online stores or social networks.
- View presentation materials . On a mobile screen it is impossible to examine in detail all the details that the author of the product wants to convey. If you need high resolution, you should use the capabilities of connecting your smartphone and TV 100%.
For karaoke. Modern smartphones support applications for singing to “minus” arrangements. After connecting, you can turn on music on your mobile device and broadcast it and the picture through the TV screen.
This does not exhaust the potential of connections between different devices. You just need to choose the right way to connect, and everyone will find the rest of the advantages of pairing a phone and a TV for themselves.
Microphone settings
In fact, choosing a good microphone for your karaoke system is also not an easy task. Here you need to look at the manufacturer, the quality of the output audio stream, power and the availability of a suitable connector.
Therefore, before connecting a karaoke microphone to an LG or Samsung TV, you need to check the back or side panel of the TV (or the output connectors of the DVD player).
There are several types of microphones, from professional to amateur:
- wireless;
- USB microphone;
- standard plug-in microphone.
Wireless connection methods
You can connect your phone to your TV using wireless communication in several ways, depending on the brand, model, and technical capabilities of the equipment.
The smartphone can be synchronized with the TV through a common home network - just connect both devices to it, and then link them together.
However, there are other ways in which you can pair devices and duplicate data.
To connect, you need a TV with a Wi-Fi module and a smartphone on the Android platform. You can link devices without a router or wired connection. The TV acts as an access point for a cell phone. Using this connection, you can configure sending media files from the smartphone menu to the screen of another device. Pairing can be done quite simply.
- On a Smart TV connected to the Network, enter the settings menu. In the section to activate wireless communication, enable Wi-Fi Direct.
- On your smartphone, select “Wireless” as the network to connect to. Find and enable the item called Wi-Fi Direct.
- Wait until the search for devices is completed, select the TV.
- Using the “Send” menu, transfer audio, photo or video files from the smartphone’s memory to the TV.
This is not the most multimedia-rich option, but it is quite simple to implement.
Via DLNA
Using this method, you can combine any Android smartphone and TV that supports a DLNA connection to the router. The operating principle is similar, but both devices are connected to the home Wi-Fi network created by the router. It is enough to combine the devices, and then you can use the gallery, projecting the data onto the screen with a higher resolution. You can display files in different formats.
The connection order will be as follows:
- connect both devices to a single network;
- in the TV settings, select the “DLNA connection” option;
- launch the gallery in Android, open the file for broadcast, in its “Menu” go to the item for selecting a media device/player;
- Click on the name of the TV model in the drop-down list.
You can expand the settings and range of program files available for playback and import using third-party utilities.
From the market, just install BubbleUPnP - this application will solve the problem.
Using Miracast
If your TV supports Miracast technology, you can mirror the broadcast data from the screen of a compatible smartphone. On Smart TVs this option is usually preinstalled. If you have an HDMI port, you can equip it with other TVs, but only through an adapter. It’s better to choose a universal one – for Chromecast, Miracast, AirPlay.
If you have Miracast by default, you just need to follow a series of steps.
- Enter the menu. Select and enable Miracast.
- On your smartphone, in the “Screen” section, select “Wireless Monitor”. Enable this option.
- Select a TV from the available devices.
- Wait for the picture to appear on the TV screen.
Connection via AirPlay
If you have an Apple TV and an iPhone at home, you can use their joint operation mode, similar to Miracast. To do this, you just need to use the AirPlay function. After pairing the devices, you can play games together, display presentations, and view video and photo content.
To use the AirPlay feature, you must connect your devices to your shared home network.
Next, on the smartphone, select “Control Center” in the menu, then “Screen repeat”. In the available list, you need to select Apple TV and wait until the image appears on the TV screen.
Connect via Chromecast
This method is good because it is suitable for Android smartphones and iPhones, and any TVs. To connect you will need a dongle - a special Chromecast media player from Google. It connects to the TV via HDMI, turning any equipment without Smart functions into a full-fledged multimedia device.
After connecting to a smartphone and TV, the technology will allow you to wirelessly access the gallery and phone memory, and launch games.
To establish a connection, you need to connect the set-top box to a Wi-Fi network and install Google Home on your smartphone to control smart devices. All other settings are launched through the application and Google account.
Screen Mirroring for Samsung
If you have to combine two Samsung devices at once, you can solve the problem of connecting a TV and a smartphone quite easily. This manufacturer has a proprietary Screen Mirroring application, with which you can activate duplication of data broadcast on the screen. The procedure for connecting will be as follows:
- in the settings of your Samsung phone, find the item “Tablet/smartphone visibility”;
- activate this function;
- Open the notification shade on the TV and click on the Smart View icon;
- From the remote control, press the Menu button and select Screen Mirroring;
- Confirm pairing after displaying the relevant information on the smartphone screen.
Using this option, you can view files that are not directly available for viewing on TV due to format incompatibility.
Alternative microphones
Well, if purchasing a wireless microphone seems too wasteful, then you can use an alternative method. There are quite inexpensive devices with a standard connector and cord. Of course, you will have to look for the connector you need for your DVD player or Smart TV, but the result will still be a little cheaper. There are two types - with a 6.3 mm and 3.5 mm connector.
There are also USB microphones, which are universal, since almost all karaoke devices and televisions are equipped with these connectors. Unfortunately, to use such a microphone you will need additional settings, which the average person may not be able to handle. Then it is better to contact either specialists or knowledgeable people who have similar equipment, or visit the necessary sites with instructions on the Internet.
WiFi connection
The method is only suitable for modern TVs that have a built-in Wi-Fi module and devices based on Android version no lower than version 4.
After a few moments, the smartphone connects to the TV and begins transmitting a signal, duplicating the image (and transmitting sound) from the mobile to the TV.
Advantages:
Flaws:
How to set up karaoke software
In addition to how to connect karaoke to your TV, you need to know how the software is configured for the full functionality of music programs.
There are several installation options:
- when connecting the TV to a PC or other device (laptop, tablet);
- directly to the TV.
When downloading software from the Internet, it is best to make sure that the disk or flash drive is free of viruses and other potentially dangerous programs. Otherwise, you can cause serious damage to both the PC you are using and the TV itself. We are talking about technical failures, up to the need to flash or reinstall the OS.
Therefore, the best way to connect karaoke to an LG TV (this company is very demanding on its products) is to copy the drive from acquaintances or friends, that is, from the original disk. This will completely eliminate the possibility of viruses infecting your devices.
A few final tips
You can also add that when choosing a method for connecting the TV to a playback device, you need to pay attention to the following aspects:
- sound quality;
- video clarity;
- synchronization of audio and video.
Therefore, if you are using a laptop or PC, then it is best to use an HDMI cable as an adapter. It will provide decent quality (no squares on the screen) and better sound reception/output.
If you choose a DVD receiver, then you can get by with a regular “tulip” adapter, although it is optimal to use a digital SCART connector (if the TV has one).
What to choose – paid or free karaoke software?
As for the fee for using specialized karaoke software, the situation here is ambiguous. On the one hand, having purchased a licensed program once, the user receives all its benefits on an ongoing basis, namely:
- regular updates;
- replenishment of the music library;
- improvement and comfort when working with the program.
But free applications are downloaded at your own discretion, and you will also have to answer for the consequences yourself. Of course, there are very good programs among free software, but they may not have support and compatibility with certain TV firmware.
There is, however, another option. If you don’t have the desire or skills to install karaoke software, you can use the simplest solution. Now there are a lot of special sites on the Internet that make it possible to test your vocal abilities directly through your browser. The only disadvantage of such singing is that most resources do not support performance evaluation, and many karaoke portals have a limited number of songs. Of course, there are also several dozen special sites that have ratings and a colossal music library. But usually they are only available after you subscribe.
Is it possible without programs?
Inexperienced users are faced with the question “Is it possible not to use programs?” If you do not have computer experience, we recommend using online platforms. There are many paid and free versions here. They do not require downloading or installation. The only thing you need is a reliable Wi-Fi connection. Otherwise, the picture will freeze and glitch. However, such services also have a number of disadvantages. Often, they contain outdated collections and low-quality backing tracks. However, this is not a sentence! It won't hurt to test your vocal abilities.
Modern trends in the development of karaoke at home
In principle, taking into account the latest technologies and the large-scale development of the Internet, it’s easy to figure out how to connect karaoke to a TV. The main thing is to have a desire to show your vocal skills.
Modern TVs are so similar to computers that they perform virtually all settings automatically, without additional human intervention. An important point here is setting up the synchronization of audio and video.
This means that the audio stream coming out of the microphone must be matched with the text video. In addition, the combination of the user's voice with the sounding soundtrack must be harmoniously adapted. They must be on the same spectrum.
But the capabilities of modern technology are such that you don’t need to worry too much about how to connect karaoke to a Samsung or LG TV. Firstly, the application stores of these companies (Samsung Apps and LG Apps) provide special software for karaoke lovers, which can easily independently optimize all settings and prepare the TV for playing soundtracks.
Well, if your TV doesn’t support the Smart function, don’t be upset. No one canceled the opportunity to sing for the pleasure of yourself and your neighbors, using a DVD player or PC (laptop). The only difference is that you will need additional software, as well as several adapters, depending on how you can connect this device to the TV.
Special Features
You can buy a TV with karaoke at any modern electronic devices store. They differ in both diagonal sizes and sets of basic functions. Modern optical drives built into TVs can support the Blu-Ray format. This allows you to record several thousand backing tracks for karaoke on one disc in excellent sound quality.
A useful feature of modern TVs with karaoke is the intelligent sound level control function. This allows you to smooth out any differences in the singer’s voice and synchronize them with the playback recording. Some device models allow you to drown out the original voice of the performer, even on licensed media. Instead, the voice of the karaoke singer will be heard, and the musical accompaniment will remain original.
How to turn on the microphone?
Karaoke involves singing songs to music. For this you simply need a microphone, there is no other way. Peripherals can be either wired or wireless. There are many different devices on the market from different price segments.
Wired
Typically, such a microphone has a 3.5 or 6.3 mm plug . TVs often have ports for the first option. The input is usually indicated by a microphone icon or Audio In. You can also use a device that connects via USB.
Samsung TVs quickly and easily recognize microphones.
Wireless
Such models are more expensive than wired ones. Wireless microphones are more convenient to use. They can be used at any distance from the TV. And such microphones also last longer, because the cable wears out from constant connection and disconnection.
This type of device can pair via Bluetooth or radio waves. In the second case, a receiver is connected to the TV. Batteries are installed in the microphone, and an antenna module is connected. Then just turn on the peripherals - and you can enjoy the result.
If your TV has Bluetooth , you can use that too. If not, you will have to buy an additional adapter. Synchronization via Bluetooth occurs automatically. Problems arise extremely rarely. To solve connection problems, you need to go to the TV settings and make sure that the data channel is active.
In some cases, you will have to refer to the manufacturer's instructions. It describes possible malfunctions in the operation of the Bluetooth module and how to eliminate them.
As a last resort, it is worth remembering that even a wireless microphone can be connected with a cable. It is always included.
What is it for?
- Watch videos, photos, and other media files from your phone;
- Launch games, applications;
- Engage in full-fledged Internet surfing;
- Arrange presentations and demonstrations.
For greater convenience and control, connect a computer mouse, keyboard or gamepad via Bluetooth.
On some TV models (with a built-in Wi-Fi module), after connecting, the phone can be turned into a full-fledged replacement for the remote control. This is convenient when the “native” one is out of order.