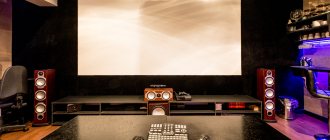
“How to make karaoke on your TV at home?” is an important question in 2021 for those who love this kind of entertainment. An excellent option for performing songs alone, with friends or loved ones. Children especially like to sing like this. There are many devices that support this feature, but the easiest way to set it up is on a Smart TV. Read about how to do this and what you will need in this article.
What's the best free karaoke app?
15 Best Karaoke Apps That Are Completely Free
- Sing karaoke from Starmaker.
- SingPlay. © Photo from Google Play Store. ...
- Singa. © Photo from Google Play Store. ...
- Karaoke singing machine.
- Smule. You may have heard of Smule, one of the most popular karaoke apps available today. ...
- Voice. © Photo from App Store. ...
- Voloco. © Photo from App Store. ...
- We sing from Tencent Music Entertainment.
20 Jan. 2021
What else can you do
When wondering how to connect karaoke to LG TVs, given that connecting a standard microphone with a 6.3 mm jack, and sometimes even 3.5 mm, is not possible, you should pay attention to wireless devices. However, there are other free solutions - connecting the TV to a computer, to which a microphone is also connected. If the TV has a USB output, it’s even easier, perhaps a microphone with the same connector can be connected. However, the reality is that there is still no direct connection.
In order not to waste time on trial and error, you should pay attention to the fact that there are only two effective options for turning on karaoke to your LG Smart TV:
- Through a DVD player, which is much easier to connect to the TV and has the necessary functions;
- Via HDMI cable and laptop.
Which of these two methods to choose is not important. It all depends on the capabilities and preferences of the user. For some, it is more convenient when the text is displayed on the TV screen, but for others it is quite comfortable when it is displayed on a laptop monitor.
Third Party Applications
Karaoke on LG Smart TV can be done using software. First of all, you must connect the microphone. You can do this directly by connecting the cable to a set-top box or TV, or use a computer and connect it to the TV via HDMI. This determines where the application will be installed. Thus, you can:
- Download to your computer or laptop.
- On TV.
Downloading and installing the program is carried out via the Internet using the Smart TV function or via a flash drive, where you need to place the installation file in advance. Please note that when using the Internet to search for the software you need, you run the risk of catching a virus, which can cause crashed firmware or serious errors. Therefore, it is better to use the official market on Smart TV to install the required applications.
How to connect karaoke on a Samsung Smart TV: step-by-step instructions
How to make karaoke on your home TV
For optimal operation of karaoke at home, developers offer different installation options. Choose the one that is most convenient for you.
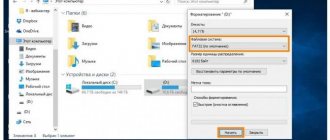
Via flash drive
To implement the connection method via a flash drive you will need:
- flash drive;
- PC or laptop;
The user needs to download a special program to a PC, and then transfer the file to a flash drive. You insert the drive into a separate dedicated slot on the Smart TV, and its contents open. Next, find the name of the application and install it on TV.
Smart TV or set-top box
To use karaoke, a user can buy either a regular set-top box or a complex device. You need to be more careful with the latter options. They are more convenient because you get a large number of functions in one device. But it is important to make sure that karaoke is in the list of its capabilities.
How to set up a universal remote control for a Samsung TV: codes, instructions
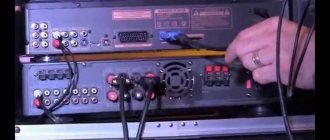
To get started, follow a simple algorithm:
- connect the cable to the set-top box;
- open “Settings”;
- determine the desired signal source - HDMI, SCART or RCA;
- First turn on the microphone, then start the device.
You can play the song and have fun.
Via computer
To sing via computer, connect the microphone to your PC or laptop. In this case, TV is used as a large screen with the current line.
To configure, follow the instructions:
- install the karaoke application on your PC;
- To display the image on the screen, click on “Settings”.
You can find many utilities on the Internet. But it is advisable to download official programs so as not to catch viruses on your PC.
If searching for programs and further installation is a process that you don’t want to waste time on, then you can constantly search the Internet for a new song in karaoke mode and just start singing.
The system offers sound playback through speakers via an HDMI cable. If the sound is very quiet, then buy an additional amplifier.
Via DVD
The DVD device was invented to watch movies on discs, play tracks and sing karaoke. Nowadays you won’t find such a device in every home. Companies don't make them anymore. But if you didn’t have time to throw away the device, then do the following:
- connect the TV to the DVD and the microphone to the player with a special cable;
- Use the remote control to select DVD as the signal source;
Insert a disc and start singing.
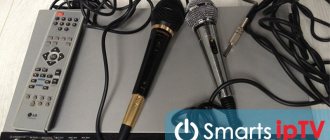
How to connect a karaoke microphone to an LG Smart TV
The question of how to connect a microphone to an LG Smart TV worries many. In fact, the procedure is quite simple. Try one of the four solutions described below.
Method 1
If you used a DVD player, then connect the microphone directly to it. Usually this is a 3.5 mm jack. Additionally, you will have to take care of reinforcement, because The device does not provide this criterion. To do this, just go to the Internet and enter the microphone model in the search bar, and then select an amplification circuit. Instructions will definitely be included there. After the operation, connect the wired device to the DVI AUDIO IN output located on the rear panel.
How to connect a keyboard and mouse to Samsung Smart TV: methods, instructions
Method 2
The second option, which allows you to connect a wired microphone, involves using the SCART connector, which is mainly present only in older TV models. For the procedure, you will have to take care of an adapter - RCA or tulips, consisting of three branched multi-colored plugs (yellow, red, white). Initially, connect the microphone to the adapter, and then to the SCART connector. Finally, use the remote control in the TV settings to select the connected device.
Method 3
In some situations, users are unable to connect the device in question directly to the TV or player. Then the only solution will be a computer or laptop. Simply connect your device via HDMI and connect the microphone to your PC.
Method 4
The last method is the simplest. In the store you can find a microphone that connects via USB, which greatly simplifies the task. Just insert it into the appropriate input and you are ready to use it. All modern TV models have a USB connector. A wireless microphone is connected in the same way. Insert the transmitter into the desired input, press the power button and you can sing.
What you need for karaoke on TV at home
To be able to sing karaoke on your TV, you need to connect a simple set:
- prefix;
- player;
- boombox.
The set-top box must support karaoke in order to run the program. With its help, the sound quality is adjusted. For ease of use, the user can create separate folders and fill them with favorite tracks. Give folders names depending on the occasion or mood, and quickly find them when necessary.
The developers recommend installing updates periodically so as not to deprive yourself of the opportunity to use interesting additional features. If desired, you can start backing vocals, as well as control karaoke from your tablet and phone.
Before buying a set-top box, check which file formats the device supports. This will ensure that further operation will not require unnecessary effort.
Ashampoo Burning Studio
In this paragraph, we will look at how to burn karaoke songs to disk using the Ashampoo Burning Studio software. What are the advantages of this product? Ashampoo Burning Studio is a completely Russified program with an intuitive interface, which allows even beginners to use it. In addition, Ashampoo Burning Studio supports working with many formats and allows you to burn absolutely any discs, CDs and DVDs are no exception. Let's take a closer look at recording karaoke files in DVD format. Again, here's a detailed guide:
- Download the program, launch it, select the Russian language and install using the prompts.
- Let's launch the program.
- We get to the main screen, where we need to select the “Burn files” option.
- Insert a blank disc and select “create DVD”.
- A new window appears; here you need to add the files you want to record. For more correct operation of the program, first save the files on your computer’s hard drive.
- Here you can give a name to your new disk, and at the bottom you can see the filling scale, so you can figure out how much free space is left on the disk. Click the “Next” button.
- The next item is to select “Change options”. The recording speed needs to be adjusted. You need to set an indicator equal to half the maximum. That is, if the maximum recording speed is 48, then we set the indicator to 24. This applies to both CD and DVD formats.
- "OK" and "Burn DVD".
- We are waiting for the process to complete.
- If you want to further add some songs, then you should do everything in the same sequence, only instead of “Create a new DVD”, you need to select “Update existing”.
Karaoke
Before we move on to the question of how to record karaoke onto a disc, let’s get acquainted with the very concept of “karaoke”.
Russians' favorite pastime is singing, no matter where you are or what you do. Remember, you take a bath and always hum your favorite composition, walk and always replay some song in your head, and, of course, your favorite place to relax is a karaoke bar, where you can not only relax your soul and body, but also show off your skills singing.
In order to organize a karaoke evening at home, you will need:
- Computer with CD-rom or DVD player.
- TV.
- Microphone (their number varies depending on the performer).
- Karaoke disc.
Almost every home has all this, but few people use this set to organize karaoke parties. Most of the finished discs sold in stores do not suit us, since the media contains many compositions that we do not like. We suggest making your own karaoke disc with familiar and favorite compositions. But before we look at the question of how to record karaoke to disk, let’s figure out the file format and the most suitable disk. We will also look further at some software tools that will help us when recording.
CATALOG
SUBSCRIBE TO THE NEWSLETTER, stay tuned to the “Karaoke” topic
WE INFORM ABOUT NEW PROMOTIONS, PROMOTIONS, SALES
(you consent to the processing of personal data)
Follow us:
The characteristics of MadBoy products comply with the standards of the EAC Customs Union certification system. Musical equipment does not contain substances hazardous to humans and nature.
Store information
- Moscow, Leningradskoe highway 25, Family Room shopping center, minus the first floor. Tel. consultation and order (multi-channel) Email
ImgBurn
Now, very briefly about how to record karaoke to disk using ImgBurn:
- We install the program (it is free, it is possible to Russify).
- Select "Burn to disk".
- Adding files.
- Insert a blank DVD-R or DVD-RW.
- We choose a speed of no more than 4, 2.4 is best.
- Let's give our disk a name.
- You can start recording.
Happy New Year everyone!
The essence of my problem: a friend has an .iso file with karaoke on his computer, 8 gigs in size. He asks to burn it onto a disc so that he can play it not from a computer, but from a regular DVD with a karaoke function.
He gave me two DVD+R discs of 4.7 gigs each. Okay, I divided the file into two parts and brought them into DVD5 form, that is, I have folders AUDIO_TS and VIDEO_TS. Then I converted them to . iso.
The question is: how and in what form to write these files to disk?
Will the disc, after recording the .iso, be played in a regular DVD player?
Is it possible to write the specified folders from a computer to disk and is it necessary to do so?
If I just had a disc, I would use CloneDVD, but I’m so confused)))
I don't have my own DVD player for testing.
Did you like the article? Subscribe to the channel to stay up to date with the most interesting materials
Question
Answer
Question
Answer
Question
Answer
Question
Answer
Question
Answer
Question
Answer
Question
Answer
Question
Good afternoon. Please tell me, is it possible to connect the MFP 2000 to a computer or IPAD? For example, so that songs can be played from a computer without transferring them to a flash drive. I have it as part of Mini Maniac
Answer
Good afternoon. The MFP-2000 karaoke player cannot be connected directly to a computer or IPAD, but you can use the speakers on the MINIMANIAC by connecting via a miniJack - 2RCA wire (not included). If you connect it to the line in connectors instead of the MFP-2000, the sound from the computer will go to the MINIMANIAC speakers, but in this case the microphones will not work, because the player through which they are connected is disconnected. The issue of connecting microphones in the proposed version can be solved by purchasing the MadBoy REMIX-10 mixer; it will not only provide the ability to connect a computer at the same time as the player, but also good sound processing and advanced configuration of microphones for karaoke.
Question
Answer
Question
Answer
Selecting and connecting a microphone
The biggest connection challenge is choosing a good microphone. For convenient use, follow these simple tips:
- If possible, buy wireless models.
- check the integrity of all wires by purchasing a microphone with a USB connector;
- test the settings for correctness.
How to cancel a subscription to TNT Premier from your phone and computer
Wireless microphones are much more practical because they do not require a huge number of adapters that get underfoot.
If you are looking for a more affordable option in price, then pay attention to a microphone with a USB connector. If you can’t connect it to the TV, before changing the device or taking it in for repairs, check its operation on your computer.
If you have any questions or complaints, please let us know
Ask a Question
Any malfunctions in most cases are associated with errors in the software. Check on the official website if there is new firmware and update it.
Methods for connecting a microphone to a home TV depend on its type.
The following step-by-step instructions are suitable for USB microphones:
- unplug the TV from the outlet;
- connect the microphone cord to the console;
- connect the yellow, red and white RCA cable that come from the microphone;
- turn on the TV;
- Use the buttons on the microphone to select a song to view and start the lyrics.
Make sure your microphone has fresh batteries.
Bluetooth models - wireless microphones work after:
- purchasing a converter that converts digital sound into an analog signal;
- Connecting the red and white RCA cables from the converter to the audio input of the mixer.
Next, use the TV remote control to select “Sound Settings” / “Audio Format” / “PCM”.
After performing these steps, the sound is sent to the speakers of the karaoke system.