Digital signals have been known to everyone for a long time. All television organizations have switched to the new format. Analogue television devices have moved aside. But despite this, quite a few are in working condition and can last for more than one year. In order for outdated equipment to complete its allotted operational life, while still being able to view digital broadcasting, you will need to connect DVB-T to the TV receiver and catch wave signals with a zigzag antenna.
For those who want to save their family budget and at the same time receive high-quality television broadcasting, you need to pay attention to the Kharchenko antenna for digital TV with your own hands.
This unique design has been known for a long time, but found itself relatively recently.
Operating principle of an antenna for digital television
After radio communications appeared, the relevance of using an antenna device increased. Since the 60s of the twentieth century, the then recognizable engineer Kharchenko flaunted a design of 2 rhombuses. This device allowed him to catch US airwaves.
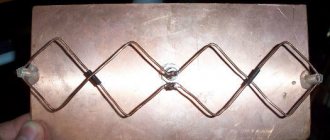
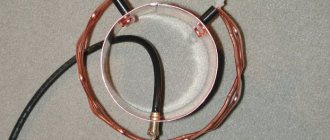
This is a double square made of thick copper wire. The squares are connected through open corners; this is where the cable from the TV is connected. To increase directivity, a grid made of material capable of conducting current is mounted at the rear.
The perimeter of the squares is equal to the wavelength to which the reception is tuned. The diameter of the wire should be about 12 mm for broadcasting from 1 to 5 TV channels. The design turns out to be far from compact, in the case of assembly for radio communications and meter-wave TV with up to 12 channels.
To make the device lighter, 3 wires of a smaller cross-section were used. Despite this, the size and weight remained impressive.
The antenna in question received its second wind when broadcasting appeared in the UHF range. Most people know rhombuses, triangles and other homemade figures in the form of antenna devices for receiving a signal of decimeter waves. Antennas of this type can be found on balconies and windows of both private houses and multi-storey buildings.
At the beginning of the 2000s, American professor Trevor Marshall came up with a proposal to use this design in Bluetooth and Wi-Fi networks.
The biquad antenna is also an antenna device of a Soviet engineer. This option is created according to the same principles as a regular biquadrat. A distinctive feature is that at the tops of the squares, instead of the corners, there are additional squares.
As for the sizes of these squares, they are identical to the usual ones. This avoids additional calculations. It is enough to use the standard biquadrat calculation.
Let us remind you that the wires in the place where they intersect require insulation from each other.
Making a biquad antenna with your own hands
The time required for assembling the structure is a maximum of 1 hour. If you know how to handle tools, and have at least some skill in assembling other structures, you can do it in 30-40 minutes. Elements for the structure can often be found at home. As a last resort, the components can be easily purchased at the radio market or at a hardware store.
Materials and tools
Main list:
- copper wire with a cross-section of 1.5-5 mm (it is better not to use an aluminum conductor or other material, since it is difficult to solder on them, and these places directly affect signal loss);
- coaxial cable with a resistance of 75 Ohms (for digital television broadcasting), 3-5 m long (depending on the location of the antenna, the further the installation is from the TV, the longer the cable will be);
- pliers to bend the wire in the right places if the material is thick and making bends with your hands is problematic;
- material for cleaning the places to which the cable will be connected (file or sandpaper);
- tape measure, centimeter or ruler to accurately measure the length of the element;
- soldering iron, materials for easy and high-quality soldering (rosin, tin);
- F-plug, which is mounted on the second end of the cable and inserted into the antenna connector of the TV.
If the antenna is installed on the roof of a private house, you may need a long wooden, plastic or even metal bar. It will serve as a matcha on which Kharchenko’s design will be fixed.
To protect connections when installed outside buildings, it is better to protect the antenna from moisture. The easiest way to wrap the joint and solder joints is with electrical tape. This option is simple, since the electrical tape can be torn off at any time and access to the connections. An option that will reliably close the connections (but tightly) is to fill them with epoxy resin, silicone sealant, hot melt adhesive or varnish.
Video
Manual calculation
You don’t have to calculate the antenna for T2, but then you are not sure that you will be able to watch digital channels at all. Therefore, you need to have accurate data; this will allow you to catch at least 20 channels in your region. Thirty channels (the third multiplex) can only be watched in Moscow, the region and Crimea.
Let's perform the calculation using the example of the city of St. Petersburg.
- First you should find out the frequencies of the channel numbers that are broadcast in the region. Since the biquad antenna must operate in both frequency ranges, you need to find out the channel frequency of the first and second multiplex. Based on the parameters of the repeaters on the TsETV map, the first multiplex (TVK 35) broadcasts at a frequency of 586 MHz, and the second operates at a frequency of 666 MHz (TVK 45).
Using the same map you can find out your frequencies yourself. Enter your exact address in the search bar and click on your home on the map.
- Determine the average value. This will make it possible to make the antenna in an intermediate design and catch the radio signal from both multiplexes at once. We calculate the arithmetic average: (586+666)/2=626 MHz. The value will be used in further calculations.
We calculate the length using the formula: λ = c/F, where
- λ is the desired wavelength;
- C – speed of light (3*108 m/s, which is equal to 300 s);
- F – average frequency determined earlier (626 MHz).
If we substitute the available values into the formula, we get the following:
λ = 300/626 ≈ 0.4792 m ≈ 47.92 cm.
This is a figure that is equal to the length of the copper conductor to make one diamond.
In practice, when making a “biquadrat”, such dimensions can become very large. It is allowed to take a smaller value, exactly two or four times.
We have:
- λ = 47.92 cm/2 = 23.96 cm;
- or λ = 47.92 cm/4 = 11.98 cm.
Now it’s worth calculating the length of each side of the rhombus. We will use the original value of 47.92 cm.
- This means that the side will be equal to L = 47.92/4 = 11.98 cm ≈ 12 cm.
- The total length required to bend the entire antenna (two diamonds) of wire is 47.92*2 = 95.84 cm ≈ 96 cm.
Kharchenko antenna calculator
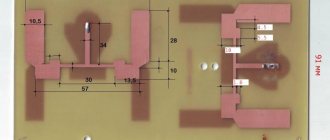
Instead of manual calculations, you can find out the most accurate dimensions of a digital antenna using the online calculator below. All you need to do is enter the average frequency in the first field of the calculator. Next, click on the “Calculate” button and the calculator will immediately display the final parameters. The advantage of the calculator is that it performs a full calculation, and not just determining the size of the outer side of the vibrator.
All dimensions are indicated in millimeters. The required values are indicated on the left in the figure.
Manufacturing
- On the wire, starting at one end, make 8 equal marks with a marker, with the same distance between each. The distance is equal to the length of the side, calculated earlier - 12 cm.
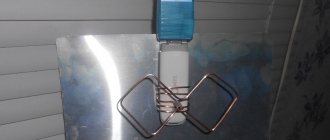
The last mark can be made a little further (for example, 13 cm), exactly, as well as leaving 1 cm before the first mark. At the end and beginning of the conductor there will be a small “shoot” that can be bent. It will be easier to join and solder to it. You will see an example of the process in the third image below.
- Consistently bend the wire along the marks until you get a “double square”.
- If you previously left small “extra” sections of copper wire, then bend them down, perpendicular to the entire structure. Make sure that there is no short circuit between one corner and another.
- Carefully strip the free ends of the wire and the adjacent solid corner. Use sandpaper or a file. Connect the ends together by winding them with thin copper wire.
- Perform final fixation through soldering.
- Remove approximately 2 cm of the cable's top insulation. Twist the shielding layer. Also remove some of the inner insulation that covers the center copper core. If possible, also strip the cable core and shield to make soldering easier. Solder the core to one center corner and attach the shield to the other fold. Do not allow the bends to close, otherwise the biquad will not work.
To prevent the cable from wobbling, thereby “losing” the connection, secure it to one of the adjacent sides with a plastic clamp or electrical tape. The first option is preferable.
Cable fixation - Cover the soldered areas with insulating agent. For example, varnish, silicone, hot melt adhesive, epoxy. As a last resort, wrap it with electrical tape.
Execution options (photo)
Plug installation
The antenna is connected to the television receiver using an adapter (plug). The part is mounted on the second free end of the antenna wire.
The adapter consists of two parts - the connector itself and the plug. The latter must be unscrewed before installation on the cable, and then screwed back in.
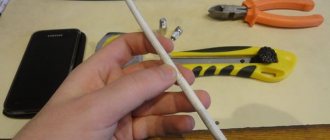
- Remove 10-12 mm of the top PVC layer of the cable. Cut the material carefully so as not to cut the inner insulating layer.
- Bend the entire screen (braid with foil layer, if any) back.
- Strip the cable from the internal insulation until approximately 2 mm of material remains.
- Screw the F-connector onto the cable on top of the screen. It is necessary to screw in until a small part of the central insulation enters the connector and the cable core protrudes from the connector. If putting on the connector is difficult, you can carefully clamp the part with pliers and continue screwing. You should not squeeze the connector too hard, as often the metal is not of the best quality and can crack.
- Screw the F adapter into the connector and insert the cable into the antenna socket (“RF IN”, “ANT IN”) on the rear panel of the TV. If the TV is hung on the wall and there is practically no free space behind it, then it would be wiser to use a corner adapter rather than a straight one.
Required materials and tools
Kharchenko's DIY television antenna for DVB T2 is quite economical. In order to assemble the structure, you will need the following parts:
- Wire;
- Coaxial cable;
- Wooden slats.
As for tools: pliers, hammer, sharp knife. If you plan to attach the antenna device to a wall or other surface, you will most likely need a drill for mounting.
What is needed for production
To make an antenna with your own hands you will need:
- copper wire with a thickness of 1.5 to 5 mm;
- antenna cable with a resistance of 75 Ohms (standard value for TV signal transmission), the length of the wire depends on the location of the antenna (the further away, the longer the length);
- measuring instrument (ruler, centimeter or tape measure);
- pliers or a vice to bend the wire evenly;
- a soldering iron to connect the inner ends of the biquadrate to each other and to the television cable;
- F-type connector for installing an adapter on the second end of the cable to connect to a TV or set-top box;
- insulating material to protect connections from external influences if installation is done outside the building (insulating tape, epoxy resin, varnish, hot melt adhesive).
Depending on the installation location, material may be required to construct the fastening. For example, if Kharchenko’s structure is placed on the roof of a private house, then a mast can be made. In this case, you can use plastic pipes or wooden blocks.
Antenna calculation
Before you start creating the design, you will need to calculate the Kharchenko antenna. This will allow you to assemble an effective device with maximum accuracy. The dimensions of the DVB T2 zigzag antenna play a significant role in increasing signal reception.
Since technology has stepped forward, there is now no need to leaf through reference books or look for formulas for calculating dimensions. And even more so, carry out complex mathematical calculations in order to correctly develop a sketch or future drawing.
Just open the online calculator to calculate the Kharchenko antenna. Select the channel number for two multiplexes. To find out this information, open the interactive digital TV map, find the TV tower closest to you and click on it.
After this, you receive information: about the required length of the copper wire, its sides, and diameter.
What about the amplifier
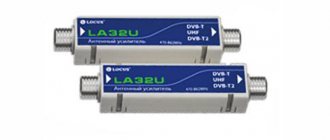
For maximum long-range reception, you can connect an amplifier to the antenna. The latter comes in two types:
- external (remote), which is attached after the antenna, cuts into the cable indoors;
- internal, connected directly to the antenna, hidden, as a rule, in a plastic case.
There are no internal issues; you just need to cut the cable in the right place and make the connection through two F-connectors.
But the outer one is attached to two bends on the diamond at once. Therefore, it is additionally necessary to consider the protection (box).
In addition to installing the amplifier, it is necessary to provide power to the antenna.
If the Kharchenko antenna is connected directly to the TV, then an external power supply is required.
Then the cable from the antenna is inserted into the TV through a separator, which is located on the power supply wire.
It is necessary to “crawl” the amplifier as close to the antenna as possible. Ideally, immediately after installing the cable into the apartment.
If a digital set-top box is connected to the TV, then you can supply power through the device search menu. In this case, an external power supply is not needed.
Assembly of Kharchenko antenna for digital TV
Step-by-step instructions that will allow you to quickly assemble a Kharchenko antenna for digital television with your own hands:
- Determine the polarization and frequency of the wave. The device must be linear.
- The biquad type zigzag antenna device is made of copper. All elements are located at the corners, with one of them touching. For horizontal type polarization, the figure eight must stand upright. If you do vertical polarization, the structure lies on its side.
- The side of the square is calculated using a special formula - wavelength, which is divided by four.
- Imagine the structure, it should be oval in shape, and pulled together in the center across the larger side. The sides do not touch, but are in close proximity to each other.
- We connect the antenna cable to the approach points on both sides. It will be necessary to block one direction of the diagram; for this, a fetal screen made of copper is mounted; it will be located at a distance of 0.175 from the working wavelength. It should be placed on the cable braid.
As for the reflector, previously it was made of textolite boards that were coated with copper. Today, this component is made from metal plates. It is on this principle that the design for receiving digital television is made. Nothing complicated. Everything you need is at hand.
Making a reflector
The reflector is a metal base located behind the main structure. It will reflect the signal to the main receiving element, thereby amplifying it.
What can a reflector for a “Kharchenko biquadrat” be made from:
- solid sheet of metal;
- an electrical board, one side of which is covered with a solid copper layer;
- any durable surface on which a layer of foil is glued on the reflective side;
- a grid of metal conductors (similar to an animal cage).
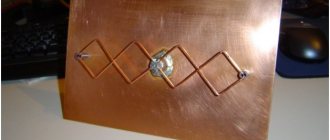
In the photo below, the reflector is represented by a piece of metal from the computer system unit case.
When installing a “double diamond”, the distance from the reflector to the main structure should be taken into account. The value should be equal to the seventh part (1/7) of the wavelength, that is, seven times less than one side of the rhombus.
The size of the reflector is maintained so as to completely cover the antenna area with a margin. You can take a sheet 20% larger than the area of the “bisquare”.
There should also be no short circuit between the reflector and the biquadrate. Therefore, the mounting legs must be made of plastic or other non-conductive material. A good solution would be to mount it on legs made of thin plastic pipe.
The example below shows a mount using a marker shell and a clamp. The inner ink rod is removed and a clamp is threaded through the shell.
Antenna testing
The device has been created, it’s time to check the effectiveness of the work done. To test the reception quality of the wave channel, you need to connect the antenna to the receiver. Turn on the TV and receiver.
Open the main menu of the set-top box, select automatic channel search. On average, this process will only take a few minutes. You can find channels manually, but to do this you will have to enter their frequency. To test Kharchenko’s design for a TV, it’s enough to simply evaluate the quality of the broadcast. If the channels show well, then the job was done correctly.
What to do if interference is visible? Rotate the TV antenna and see if the picture quality improves. Once the optimal location is determined, simply secure the device. Naturally, it should be directed towards the TV tower.
Previously published: Review of the Huayu DVB-T2+2 universal remote control and Review of the Huayu DVB-T2+TV version 2017 learning remote control.
to the learner - learning from an old TV remote control, etc. It will be possible to control only 1 remote control, and not 2 as usual:
Universal remote controls will be needed when your original remote control is broken, lost somewhere, or chewed by a dog.
Also, sometimes they flash the console with someone else's firmware and you can lose control, then it is cheaper to buy and use a universal remote control than to send it in for repair to restore the original firmware.
Let me remind you that in Buzuluk, Yekaterinburg, Izhevsk, Krasnodar, Moscow, Novosibirsk, Orenburg, Samara, Saratov, Simferopol, Togliatti, Ulyanovsk, Ufa, Cheboksary, Yaroslavl, similar remote controls can be purchased for a minimal price:
• universal Huayu DVB-T2+2 - p. • universal Huayu DVB-T2+3 - p. • universal Huayu DVB-T2+2 version 2021 - p. • universal Huayu DVB-T2+2 version 2021 - p. • +trained Huayu DVB-T2+TV - p. • +learnable Huayu DVB-T2+TV version 2021 - p.
Moreover, if it is not available in your branch, they will send it from another for free.
Well, for those who are far from these cities, the almighty AliExpress - there you can order a trainee - from r.
Moreover, the photo may show the previous version +2, but in reality, for a long time, all sellers only have the latest one +5.
Comes in a regular plastic bag with two inserts - instructions + codes:
Remote control standard classic medium size:
As usual, on the back side there is a brief instruction for Automatic search of the set-top box remote control code:
Automatic search for the set-top box code - press the right green DVB POWER button and release the button volume
Then check the operation of other buttons and, if they do not match, continue Automatic search again.
A complete search of all the codes takes 3 minutes and then starts again from the beginning.
You can also manually enter the code for a specific set-top box: simultaneously press the green DVB POWER and SUB-T , the red indicator will light up and enter the code of the desired remote control in numbers.
But as a rule, it’s easier to run Autosearch, because not all models are listed.
For example, there is no World Vision Premium, but code 078 is almost completely suitable (or take the original remote control by p).
There are 142 codes in total (the last 141 is World Vision T34):
000 — 017
018 — 048
049 — 088
089 — 140
I’ll note right away that there is no code for the latest Oriel remote control - 6 (the universal one indicated at the beginning has it), and there is also no code for World Vision T62 (you can take the original remote control by the p).
As always, there are D-Color, BBK RC-SMP712, RC-SMP121, RC-STB100, Oriel, Rolsen, Delta, Divisat and many others. Remotes for Dune HD TV-101, TV-102, TV-301. Codes for various Ukrainian Strong, Trimax, Romsat, Tiger, Azerbaijani satellite Yupiter, various Kazakh Alma TV and OTAU.
In general, many manufacturers do not strive for a variety of remote control codes, and even the newest models use widely used codes. And, for example, World Vision is the opposite: no matter the prefix, it’s a different code. Although, with the advent of their learning remote control, World Vision seems to have calmed down and now there is one code for all new ones (T70, T61, T62, T63).
To learn from the TV remote control, you need to place them opposite each other at a distance of about 5 cm.
Simultaneously press the left red button TV POWER and OK , the red indicator will light up, then press, for example, TV and, accordingly, press POWER on the TV remote control - the red indicator will blink 3 times, which means it has learned and remembered.
Program other buttons in the same way: AV/TV and VOL – / + .
Of course, it is not necessary to program, for example, AV/TV exactly as TV/AV, SOURCE or INPUT on the TV - all these 4 learnable buttons: TV , AV/TV , – / + can be assigned any buttons you need on the TV remote control.
Please note: if your original remote control required precise aiming, then any universal remote control will work the same way, because the reason is that the plexiglass of the front panel is too dark (drill a hole opposite the photo sensor or remove it altogether), bend the photo sensor closer to the front panel.
I would also like to note that the learning remote control sold on AliExpress (3 remote controls in 1 - 3 sets of 42 learning buttons):
is intended only for training from existing working consoles of set-top boxes and televisions. And if the set-top box remote control is lost or broken, then Chunghop L336 will not help, you need to find a universal DVB-T2 or the original remote control for your set-top box.
Positive: trainable, i.e. the ability to control the set-top box and the TV with not 2, but only 1 remote control, there are codes for the most common models of set-top boxes, a classic medium-sized remote control in a sturdy case.
Negative: there are still fewer codes for DVB-T2 set-top boxes (especially rare and new models) than the latest Huayu DVB-T2.
In general, this universal learning remote control can help all those who do not have other options for purchasing Huayu DVB-T2 remote controls.
5/5 — (6 votes)
You can ask questions about digital television on the DVBpro forum
Author: Alexander Vorobyov, 05 Jul 2021 | Permanent link to the page:
"Triple Square"
Structurally, these are three square frames: a director, a vibrator (from which the received signal is taken) and a reflector. Active elements have different sizes relative to each other. To make a “triple square” you will need the following materials and tools:
- copper wire (aluminum or steel is also suitable) with a cross section of 3–5 mm;
- powerful soldering iron 75–100 W, solder, rosin;
- antenna cable and plug for connecting to a television receiver or digital TV set-top box;
- pliers, wire cutters.
Manufacturing instructions:
- From the wire, make three squares measuring 15.2 cm, 12.5 cm (with a matching outlet 12.3 x 3 cm), 10.5 cm.
- Solder the joints of each element.
- Cut off a straight piece of wire 13 cm long.
- Solder the manufactured squares to it in sequence from largest to smallest at a distance of 7.6 and 5.2 cm, respectively, the outlet of the middle frame should “look” down.
- Strip the coaxial cable, solder the wires to the bend points of the matching frame, and attach the plug.
Advantages and disadvantages
increased sensitivity - the design “receives” a weak signal well over a long distance;
ease of manufacture - no need to drill any holes, “fidget” with fasteners, adjust parts, etc.;
It matches well with the amplifier - and the reception range increases many times over.
narrow directionality - it is necessary to point the antenna quite accurately at the transmitting tower;
To achieve maximum range, it is important to observe the dimensions during its manufacture.
If desired, the “triple square” can be assembled from a single piece of copper or aluminum core, giving it the desired shape in compliance with the dimensions indicated above. This method is technologically complex, but does not require a powerful soldering iron to connect the elements.
Top 8 indoor antennas
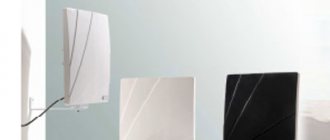
Now let’s review specific proposals from manufacturers of indoor antennas for digital TV.
An antenna is required to receive over-the-air digital television broadcasts. But there are times when it is impossible to connect to a collective one or install an individual one on a wall or roof. An indoor digital TV antenna can help here, and these devices are becoming increasingly popular. Let's consider their advantages and disadvantages. Let's figure out how to choose them and under what conditions to use them. We will also present the ranking of the most popular ones.
Connecting and setting up the antenna
- Install a "double square" outside or inside the room.
Internal location is allowed only if there is direct visibility of the signal and there are no strong obstacles to the tower.
Use the instructions for correct antenna installation to point the structure as accurately as possible at the DVB-T signal broadcaster
- Stretch the cable to the TV and insert the plug into the antenna input of the device.
- Try auto-searching for channels.
If the antenna for receiving digital TV channels is made correctly, the search will find at least 10 channels. If the signal arrives over a wide area and arrives at a high level, then the TV will find two dozen TV programs.