Digital television is rapidly coming into our lives. And right now you need to think about purchasing it. After all, it is planned to turn off the analog signal very soon. In this case, your TV will not show pictures without the appropriate equipment. Today we will think about purchasing an antenna for receiving DVB-T2 digital television.
Homemade antennas for DTV reception
On the territory of the Russian Federation, the implementation of the federal digital broadcasting program in 2021 was marked by the commissioning of two multiplexes with a completely free state package of 20 TV channels and 3 radio programs. The channels are not encrypted; they are transmitted in clear text in the UHF wavelength range. That is, for high-quality reception of digital public television, any antenna operating in the UHF range is suitable.
A little theory. The dimensions of the vibrators (the active elements of any antenna) must be equal to the full wavelength, half or a quarter of it. In the decimeter range, a radio wave has a length of less than one meter. This means that the dimensions of the elements must be consistent with this value.
The radio engineering literature describes many receiving designs for the UHF range. Most of them will perfectly receive modern digital television. The popular devices described below, which anyone can make with their own hands, have the following characteristics:
| Design option | Gain, dB | Reception range without amplification, km | Reception range with amplifier, km | Operating range, MHz |
| Cable loop | 0 – 3 | 15 | 15 | 440–800 |
| Antenna made from aluminum cans | 3 – 5 | 15 | 40 | 470 – 622 |
| "Butterfly" | 5 – 11 | 20 | 70 | from 300 MHz |
| "Triple square | 9 | 15 | 60 | 300 MHz and above |
| Antenna Kharchenko | 5 – 6 | 10 | 50 | from 300 MHz |
| Log-periodic antenna | 8 – 12 | 30 | 100 | more than 300 MHz |
How to make an antenna for a TV
Below are step-by-step instructions to make a DVB-T2 antenna with your own hands. Attached are links to additional detailed instructions where you can learn more and see a more accurate creation algorithm.
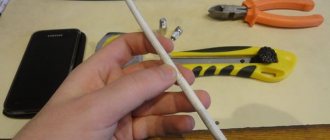
From cable
The advantage is ease of manufacture. You don't need to be an experienced electrical engineer. You only need to mark the cable according to the exact dimensions and strip it with a knife. It is also used indoors, but can also be installed outside if the structure is well secured and exposed areas are protected from moisture (rain).
Disadvantage: There is no point in connecting an amplifier. There will be no effect from the device. It only catches a nearby strong signal, which arrives without interference to the antenna.
To make a digital receiver, you need to have:
- a cable of the required length (you can use an old cable from a previous television line if you plan to lay a new one);
- ruler;
- knife;
- plug for connecting to a TV connector.
Instructions on how to make an indoor antenna from a cable:
- in accordance with the diagram below, strip sections of the cable at certain distances;
- twist the first and last sections together;
- shape the loop as close to a circle as possible;
- if the shape does not hold, cut out a circle of the required diameter from thick cardboard, wood or plastic, then fix the loop on the material.
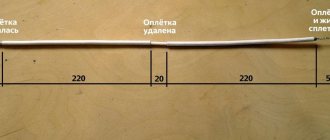
The last step is to put the plug on the free end of the cable so that you can connect the antenna to the TV. You need to remove the top shell by 1 cm, and leave about 2 mm from the inner shell. The screen is bent back. The connector is screwed onto the cable over the screen until the end. Then the adapter is screwed in and plugged into the TV socket. See the image below for more details.
"Beer"
An antenna for digital television from beer cans is made only from an even number of containers. The easiest way is to secure two cans of conductive material.
Suitable not only for beer containers, but also for other drinks. The main thing is that the banks conducted electricity, otherwise the signal from the repeater would not excite current in the elements.
The advantage, as in the case of the loop, is the ease of manufacture. The materials needed can be obtained at home or at a grocery/home improvement store. And there are tools in every home. Another advantage is the fairly good level of reception. If nothing interferes with the signal (hills, tall buildings, dense foliage of trees outside the window) to the structure, you can tune digital television to a full list of two dozen channels from a distance of up to 40 and even 50 km. The antenna can be used both indoors and outdoors.
When installed outdoors, windage is possible. That is, a change in shape, deformation, displacement of elements due to gusts of wind. Therefore, you need to fasten it thoroughly, use full-fledged fasteners, and not adhesive tape, as described below. Also, for maximum reception quality, precise adjustment of the sizes of containers and the distances between banks is required.
For production you need:
- a couple of half-liter jars;
- a block of sufficient length or other straight material (for example, plastic), but not conductive; often use a regular hanger as a basis for attaching cans;
- scotch;
- 3 metal screws with washers;
- screwdriver;
- cable;
- a piece of sandpaper.
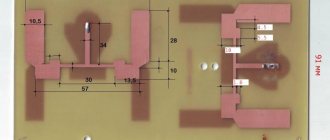
The template for assembling the receiver is shown in the figure below. Below the diagram the instructions exactly match the picture.
How to do:
- To make it easier to work, break off the “tabs” on both cans.
- In the bottom of one of the cans, make a hole with the diameter for the cable.
- Place the first can on a hanger so that it faces the drinking hole inward. You can attach with tape, but it is better to make a hole in the side of the jar and screw a screw to a piece of wood through the cavity of the container. Nylon ties are also a good replacement for adhesive tape. For each jar, use two zip ties, one at the top and one at the bottom of the jar.
- The distance between the cans should be maintained at approximately 7.5 cm. This means that you need to strip the cable so that the length of the stripped section is sufficient to screw it to the second can. Therefore, about 9-10 cm of the top insulation can be removed. The inner layer does not need to be completely removed to minimize the risk of the screen shorting to the core in the future. Therefore, you can remove about 5-6 cm.
- On the fixed can, on the sides of the drinking hole, mark the places where the self-tapping screws will be screwed, which will connect the surface to the cable screen. Clean very carefully with sandpaper or a knife. Especially if the material of the can is originally painted in a different color, which often happens.
- Screw in the screws halfway.
- Pass the cable through the bottom and remove it from the top hole of the can. Divide the braided shield into two parts as shown in the diagram above. Screw the braid onto each self-tapping screw in the direction of twisting, then screw until the end.
- Screw part of the screw into the second jar. Don't forget to clean the area on the can.
- Wrap the core under the washer onto the self-tapping screw and tighten it.
- Fix the second can at a distance of 75 mm from the first.
- Mount the F-plug to the other end of the antenna wire.
Afterwards, you can check the antenna. Be sure to make sure the jars are facing each other clearly. If you use tape or other adhesive material to attach to the frame, you can adjust the second can to increase or decrease the distance as necessary. Thus, sometimes it is possible to improve the premium “digits” with a homemade T2 antenna.
Butterfly
Suitable for receiving television signals from distant repeaters. It is possible to install an amplifier, which can achieve even stronger reception. So, the antenna can be used for a summer house or country house. The construction is quite durable, especially if you make this antenna from one wire and not in parts.
The disadvantage is that it is susceptible to the slightest design changes. Due to minimal deformation and bending, the quality of work may noticeably decrease. As with other TV antennas, achieving the required characteristics is achieved only through accurate calculations. If the broadcast frequencies of both multiplexes (TV channel packages) are far from each other, then it is likely that one butterfly will not catch twenty or thirty channels. In this case, you will have to make two butterflies, each will be responsible for showing one digital TV multiplex.
To make a butterfly you need:
- copper wire;
- a vice or pliers for bending wire;
- two F-connectors (one for the TV, the second for connecting the cable to the antenna);
The antenna is very easy to make. You need to get two equilateral triangles from the wire. The bottom side is made 20 cm long, the sides are approximately 27 cm each (more precisely, 26.9 cm).
Butterfly drawing
Both triangles are then attached to the antenna connector. A piece of cable is first inserted into the connector using standard installation technology. Afterwards, the two upper ends of the triangle must be soldered to the cable core from the side of the entrance to the connector, and to the body of the part. You can understand the essence from the figure below.
There is a butterfly made from many elements. There are 16 tendrils attached to a meter-long piece of wood. Made from 8 solid pieces of wire, which are bent at an angle of 30°.
First, the antennae are screwed to the block with screws. Then the vibrators of the future decimeter television antenna for digital television are connected to each other according to the circuit. The connection is made from the upper extreme mustache to the lower one on the same side through the inner two middle elements. Between the central two antennae, two intermediate fasteners can be made to attach the cable connector.
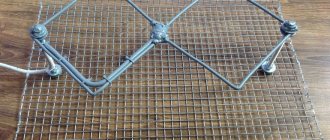
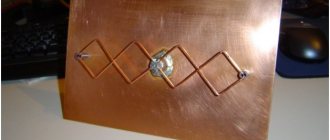
Antenna Kharchenko
Requires calculation using a formula or calculator. You need to know the wavelength that a digital television radio signal is transmitted to. The wavelength corresponds to the size of the side of the square. Read more in the article about calculating the Kharchenko antenna for digital TV.
In accordance with the calculation carried out taking into account the broadcast frequencies in your region, you need to make two diamonds from one wire. Bends are made with pliers or by hand. You should get even squares with angles of 90°. The free edges after bending are fixed by soldering. Then a cable is fixed to each inner corner.
It is advisable to protect the central point where soldering is performed from moisture if the device is planned to be installed outdoors. You can fill it with hot glue, wrap it with electrical tape or cover it with plastic. It is also important to prevent the inner edges from touching each other.
Log-periodic
The name consists of two parts: logo and periodic. Both parts determine the design of the device. The construction is carried out according to logarithmic laws.
It is difficult for a beginner to make a log-periodic construction. Not only does it require a lot of manual work, but it also requires some complicated calculations.
It can be used not only for digital television broadcasting, but also to strengthen mobile and Wi-Fi signals. It has a wide frequency range and high gain.
It consists of two parts - a collecting line (two rods) and vibrators. The lines attach vibrators to themselves. Fastening is performed alternately, through one vibrator. There is an alternation on each side. First, the vibrator is attached to the bottom line, then to the top, and so on until the end of the line.
It is necessary to strictly follow the values of the length of the vibrators and the distance between each element.
It is easier to take hollow tubes for the fastening line (axis). So, you can insert the vibrator inside and press it with a bolt.
The box can also catch digital TV
The device is similar to the first option considered in this material.
- You need to cut two pieces of television cable, each 50 cm long.
- The ends on both sides of each wire are stripped 2-3 cm.
- Fluff the braid and twist it.
- Select a box size so that you can fit two circles of cable parts on it.
- The bottom of the box is covered with foil. Presses tightly to the surface. And so that the foil does not lag behind, you can use glue.
- The box is closed, and a cable bent into a circle is attached to the top of the lid with tape. Both circles should have their ends facing each other.
- The television wire that goes to connect to the TV receiver is connected to the antenna. The cable core is twisted with two braided “rings”. The wire shield is also twisted with other braided circles.
To prevent the TV cable from wobbling, it can be pulled into the hole made through the entire thickness of the box.
Triple square
This DIY TV antenna is also not so easy to make. The name fully corresponds to the design. It consists of three squares of different sizes, which are connected on one axis, directed to the DVB-T2 signal television tower. Copper and steel wire is used. Aluminum will also work, but there will be problems with soldering the joints.
There are two ways to make a digital device:
- from a solid conductor, bending according to a certain algorithm, and then only the joints in the upper part are soldered to create a closed square;
- from pieces of wire, making each square separately. Additionally, you will need wire jumpers to connect the squares.
The central square (vibrator) is made with a tap at the bottom, to which a wire is soldered or an SWA amplifier board is attached.
You can increase the number of squares by expanding the application area and increasing the antenna gain.
Homemade options for DVB-T2 reception
In Russia, after the introduction of federal digital broadcasting throughout the entire territory (with the exception of some areas where it turned out to be cheaper to allow all residents to use satellite broadcasting for free), two multiplexes should be received - a set of 20 channels included in the state package. Access to them is free, they are transmitted, although digitally, but openly on the decimeter range.
There are many design options suitable for receiving a DVB-T2 television signal: the UHF range and the conditions for its reception have been thoroughly studied by generations of physicists and radio amateurs.
Here is a comparative table of characteristics of the simplest and most effective homemade products used for receiving digital television:
| Antenna type | Gain, dB | Max. reception range without amplifier, km | Max. reception range with amplifier, km | Received range, MHz |
| Cable loop | 0–3 | 15 | 15 | 440–800 |
| From beer cans | 3–5 | 15 | 40 | 470–622 |
| Butterfly | 5–11 | 20 | 70 | Any (by calculation) |
| Triple square | 9 | 15 | 60 | Any (by calculation) |
| Antenna Kharchenko | 5–6 | 10 | 50 | Any (by calculation) |
| Log-periodic | 8–12 | 30 | 100 | Any (by calculation) |
Selecting an antenna for receiving DVB-T2 digital television
To choose an antenna for DVB-T2 , you first need to consider the distance from the transmitter. This is a very important criterion. After all, the closer you are to the transmitter, the stronger the signal and reception in this case is possible even with the smallest or even indoor antennas.
In some cases, it is easy to make an antenna for DVB-T2 yourself from a piece of television cable.
Manufacturing will not be difficult.
We measure 15 cm from the F connector and cut the cable, and then remove 13 cm of outer insulation and braid from the cut edge. We leave only the central copper core. When setting up, we bend the copper core left and right, up and down until the best picture appears on the screen.
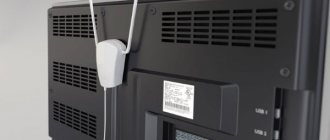
External television antennas are another matter .
Almost any receiving UHF wave will do.
And if you already have a “Polish grid” antenna, it can also come in handy and in most cases this is what is used.
At large distances from the repeater, it may not be suitable because its amplifier, along with the useful signal, also amplifies noise. During reception, not all channels will be shown, and even less in bad weather.
In this case, you should replace it with a weaker one, or completely abandon such an antenna.
Crow antenna
A simple, inexpensive antenna copes well with DVB-T2 . Shows excellent performance even with imprecise tuning. But still, at a distance of more than 30 km from the transmitter, it may not cope with the task. In this case, you will need a more expensive and powerful antenna.
DIPOL antenna
More expensive and high quality television antenna. With proper use it will serve you for a long time. The antenna copes well with DVB-T2 at a distance of up to 100 km. A prerequisite is that it must be precisely adjusted and placed at a height above the roofs of houses. But with uneven terrain, the receiving signal may be weak and can be strengthened.
a type of dipole antenna.
Antenna cable loop
The simplest of the homemade TV antennas is the loop one. To make it, you don’t need anything other than the cable itself (preferably with a copper core), a knife, pliers and an F-plug, which is needed to connect to the TV.
In short, it is done like this:
The loop can be improved by using a spiral cable of a pre-calculated radius instead of a ring, improving the quality of the assembly (at the same time reducing losses), and calculating the matching. However, the only advantage of this type is that it is the most primitive. It’s easier to catch using a stripped coaxial cable or a piece of wire inserted into the central socket of the antenna plug on the TV.
Triple square
The triple square, also known as the Sotnikov antenna (non-standard radio devices are usually named after the name of the inventor or popularizer), consists of three square frames of variable perimeter:
This antenna is a development of the principles inherent in the design of the wave channel, but it is much simpler to manufacture. Outwardly, it looks like three squares gradually decreasing in size, mounted on common crossbars so that their axis faces in the direction of the signal source.
In short, it is assembled from steel or copper wire as follows:
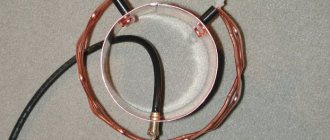
Antenna Kharchenko
The Kharchenko antenna (also known as “biquadrat” or “Z-antenna”) is a simple but technologically advanced radio wave receiver, popular at one time not only among shortwave amateurs, but also among ordinary users who watched analog television in the meter range. The fact is that this design equally effectively accepts both UHF and MV, if made in the appropriate sizes.
Outwardly it looks like two squares (hence its second name - “biquadrat”), joined together by open corners. Since reception is carried out by vibrators connected together (of which only each quarter actually works), this same design is often called a Z-antenna in popular literature.
Dipol ATX 91/21-60
Description:
Television passive external antenna Dipol ATX 91/21-60
designed for receiving analogue channels in the UHF (UHF) range and digital terrestrial television. Pipe mounting is provided.
Technical characteristics of ATX 91/21-60:
- Range of received channels: 21-60
- Received frequency range: 470-862 MHz
- Output impedance: 300 ohms
- Polarization: horizontal
- Beam width: 31-48
- Number of elements: 91
- Packing: cardboard
- Length 2260 mm
- Material: aluminum
- Weight: 2.3 kg
External Raven antenna
External Raven antenna
Post by Vladislav Eremenko » 04 Jan 2014, 16:10
Re: External Raven antenna
Post by Oleg Bondarenko » 04 Jan 2014, 17:37
Re: External Raven antenna
Post by gelo11 » 04 Jan 2014, 17:56
Re: External Raven antenna
Post by Vladislav Eremenko » 04 Jan 2014, 20:10
Re: External Raven antenna
Post by Vladislav Eremenko » 04 Jan 2014, 20:20
Re: External Raven antenna
Post by gelo11 » 04 Jan 2014, 20:34
Re: External Raven antenna
Post by Oleg Bondarenko » 04 Jan 2014, 20:51
Re: External Raven antenna
Post by Vladislav Eremenko » 04 Jan 2014, 21:26
Re: External Raven antenna
Post by Netsuke » 04 Jan 2014, 21:34
You didn’t understand the question that you caught analog TV or digital T2
Re: External Raven antenna
Post by Vladislav Eremenko » 04 Jan 2014, 21:43
Netsuke wrote: You didn’t understand the dawn of the question that you caught analog TV or digital T2
Re: External Raven antenna
Post by gelo11 » 04 Jan 2014, 21:45
.[/quote] What then is on the antenna itself? I want to catch the air, so I catch it, but the antenna is connected through a separator with a power supply, but I don’t understand why there is a power supply if there is no difference with it or without it.[/quote]
Re: External Raven antenna
Post by gelo11 » 04 Jan 2014, 21:45