It is difficult to find a house where there is not a single TV. But free channels are one thing, and quite another when it comes to paid satellite television. The number of paid NTV Plus channels depends on the package that the user paid for. But to get them, you need a little setup, which you can do yourself or by contacting the service for help.
Then you will have the opportunity to watch your favorite films, sports programs, domestic and foreign programs, and much more. In addition, finding out which settings are correct for NTV Plus is not at all difficult, since the official website has all the instructions, not only general ones, but also depending on specific receiver models.
Satellite television
- MIGSAT.RU »
- FAQ »
- Setting up channels in a satellite receiver on NTV plus
Setting up channels in a satellite receiver on NTV plus
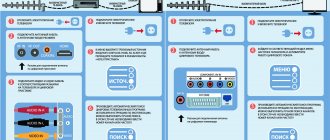
If you receive TV channels using standard settings for digital receivers included in the list located in the recommended HTB equipment section, and you have an individual satellite antenna installed, then your satellite receiver will be reconfigured to the new parameters automatically.
It is enough to turn it off - turn it on with the button on the remote control. If the reconfiguration does not occur, then turn off the power to the terminal and reconnect the 220 Volt power supply. If, after rebooting the receiver, automatic tuning of all or part of the NTV-PLUS channels does not occur, you will need to perform the following steps. 1. Reset the receiver settings to factory settings:
| Receiver model | Menu path to reset settings to factory settings |
| Opentech OHS 1740V | Menu - Installation - Reset settings - Yes - 0000 |
| Sagemcom DSI87-1 HD | Menu - Settings - System Configuration - Factory Reset - 0000 - Yes |
| Sagemcom DSI74 HD | Menu - Settings - System Configuration - Factory Reset - 0000 - OK - OK |
| NTV-PLUS 1 HD VA | Menu - Settings - Default settings - Yes - 0000 - OK |
| NTV-PLUS 1 HD VA PVR | Menu - Settings - Default settings - Yes - 0000 - OK |
| Humax VAHD-3100S | Menu - Settings - Installation - 0000 - Factory settings - Yes - 0000 |
| Humax VA-4SD | Menu - Installation - 0000 - Factory settings - Yes - 0000 |
| Humax VA-5SD | Menu - Settings - Installation - 0000 - Factory settings - Yes - 0000 |
2. After turning on the satellite receiver, it will automatically tune in NTV-PLUS channels.
For Humax VA-4SD terminals, after turning on, you must confirm the use of the NTV-PLUS automatic setup procedure by clicking - Yes.
3. If, after these steps, automatic tuning to NTV-PLUS channels is not completed or is not completed completely, it is recommended to repeat the procedure for resetting the satellite receiver to factory settings.
For Humax VA-4SD receivers, it is recommended to repeat the automatic setup procedure up to four times, if the first three attempts fail.
If you are the owner of a Humax VHDR-3000S tuner, and restarting the terminal did not help, we recommend doing the following:
Go to Receiver Menu > Installation > NTV-PLUS auto search.
Baud rate 27500
Press the button> SEARCH
Baud rate 27500
Clicks the button> SEARCH
4. If, after resetting the settings to factory settings again, the receiver cannot automatically configure/update all or part of the TV channels, it is recommended to check the system’s receiving path in the following order:
Check the quality of the antenna tuning using the values / indicators of the quality scale in the tuner menu:
a) turn on the terminal to a channel on which there is no image,
b) check the value/indicator of the signal quality scale in the corresponding menu item:
| Receiver model | Menu path to check the level and quality of the received signal |
| Humax VHDR-3000 | Menu - Settings - System - Signal information |
| Humax VAHD-3100S | Menu - Settings - System - Signal information |
| Humax VA-5SD | Menu - Settings - System - Signal information |
| Humax VA-4SD | Menu - System - Signal Information |
| Opentech OHC1740V | Menu - Installation - Channel search - Edit TP - Q scale |
| Sagemcom DSI87-1 HD | Menu - Technical information - Signal strength |
| Sagemcom DSI74 HD | Menu - Technical information - Signal strength |
| NTV-PLUS 1 HD VA | Menu - Settings - Manual channel search |
| NTV-PLUS 1 HD VA PVR | Menu - Settings - Manual channel search |
c) if the value on the Quality / Q scale is less than 80%, adjust the antenna to achieve the maximum level.
— Check the quality of the coaxial cable and the condition of the F-connectors connecting the cable to the antenna converter and the receiver.
— Replace the antenna converter.
— Replace the coaxial cable connecting the antenna converter to the terminal.
Manual adjustment to new parameters will be required if you use:
— CI+ CAM Viaccess or NEOTION CAM CI+ 1.3 MV module with an LED LCD TV that does not provide the NTV-PLUS auto-search function (it is necessary to reconfigure the channels in the TV itself according to its operating instructions);
— Digital terminals that do not provide the NTV-PLUS auto-search function; digital terminals that provide an automatic configuration function, but are configured by the user with the option disabled;
— If you receive the specified TV channels using non-standard settings for digital terminals included in the list posted on the TV Company’s website, as well as channels from other satellites, then we recommend that you contact the installers of your equipment to reconfigure the channels.
— If your digital terminal is connected to a cable IP network or a collective antenna and has not been reconfigured automatically as a result of turning it off and on, or if you need to set up a digital terminal with an individual list of TV channels, then we recommend contacting the installers of your equipment to set up TV channels.
Author: silver from 10/27/2017, views: 12754
Source
Frequent problems and solutions
Many users are unable to immediately set up the NTV Plus set-top box. Let's look at the main problems:
- The TV screen shows the message No signal. In this case, check that the cables are connected correctly and that the input is selected correctly in the TV menu.
- Message No permission to view. Make sure that the TV channel is included in the subscription, check that the card is installed and that you have rights.
- Message on TV Smart card memory is full. Contact the NTV Plus branch to replace your access card.
- The remote control does not work. Check the charge of the power supplies, point the remote control at the console.
- The tuner does not find any channel. Check your signal reception and try tuning the TV channels again.
In many cases, resetting equipment to factory settings helps. To do this, go to the Settings section, and then System Configuration and Reset to Factory Settings.
If you cannot set up the NTV Plus set-top box yourself, dial 8-800-55-567-89 and consult with a specialist.
Setting up equipment and channels
The first thing you need to do to install NTV Plus is to install and mount all the necessary equipment. If the user does not use the services of the company’s specialists, but decides to do it on his own, then it is important to follow several basic rules:
- The direction of the plate is south. The reason is that the company's main satellites, Eutelsat 36A and Eutelsat 36B/36C, are located above the equatorial zone of the planet. To make the process easier, you can use an ordinary compass. The satellite direction angle is in the range of 17-38 degrees, depending on the equipment manufacturer, since the provider uses the services of several;
- Another very important parameter is the clean area in front of the plate. Make sure that there is no interference in the direct line in front of it, such as trees, high-rise buildings, etc., as they can greatly degrade the quality of the received signal;
- Attaching the bracket should be given no less attention, and installed as securely as possible, since otherwise over the years it will become loose, the plate will get knocked down, and the image quality will greatly decrease;
- You should not save when buying a cable - its resistance to various weather conditions is extremely important.
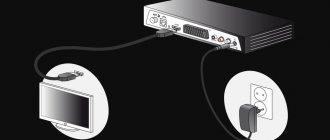
How to connect the receiver
To begin, install the tuner in a dry and well-ventilated area where there is no risk of exposure to rain, lightning or sunlight. The equipment package (depending on the model) includes the set-top box itself, a power supply, a remote control, a user manual, and two cables (SCART and HDMI). The set of elements included in the kit may vary.
First, let's look at how to connect the NTV Plus set-top box to a TV to receive a high-quality signal. Take the following steps:
- Connect the cable from the satellite dish to the special socket on the tuner. It is most often called the SAT.
- Connect the terminal to the TV. Connecting the NTV Plus set-top box to the TV can be done using HDMI, SCART or “tulips”. To obtain maximum image quality, it is better to use the first option.
- Connect the tuner to your home theater amplifier (optional). For these purposes, coaxial cable is used. Alternatively, you can connect and set up a Hi-Fi system that provides the best sound quality.
- Insert the RJ-45 cable into the dedicated connector on the rear panel of the terminal. Connect the other end to your modem/router. Before connecting to the Internet from the NTV set-top box, make sure there is a connection from another device.
After this, make sure there is an image, proceed to setting up the sound and channels.
Antenna
And now, the installation is complete, everything is fine, and you can proceed to the next stage - setting up the NTV antenna.
- The converter cable is connected to the receiver, and the receiver itself is connected to the TV. It is important to follow all instructions from the manufacturer, this will help avoid breakdowns.
- Slowly and carefully rotate the antenna dish vertically and horizontally towards the location of the satellite until excellent quality pictures and sound appear. To make the process go faster and more comfortably, it is better to do everything together - one rotates the antenna, the other coordinates by phone.
- And now, the screen pleases with a high-quality picture, the next step is to activate the “received signal level” command on the receiver. Try to make the scale as full as possible.
With due patience, setting up an NTV satellite will not cause problems.
Debugging channels
To tune NTV channels, you can use two available options - manual and automatic tuning.
Setting up NTV manually is not so simple, but with due care everything will go well:
- In the receiver settings section, enter the default settings. There you need to enter the “channels” menu, then “antenna” and “satellite settings”.
- If the set-top box asks for a password, try entering four zeros, this is the standard password.
- A tab will appear in which we leave only the EutelsatW4 36E satellite, and uncheck the rest. If the tuner does not allow you to carry out the procedure, you need to remove the access card.
- The next item is the transponder settings. Set the high level of Lnb to 10750 and the low to zero. Settings - 12130 R.
- The last step is to select the above transponder in the manual configuration section and click “network search”. The process is quite lengthy, so no need to worry. Upon completion, depending on the selected tariff plan, the required number of channels will appear.
Connection cost
Before setting up the NTV Plus set-top box yourself, decide on a suitable tariff plan. The following packages are available to users to choose from:
- Basic priced at RUR 199/month with access to 180 channels, more than 100 of which can be watched on any device;
- Economical - 750 RUR/year. Provides access to 73 channels with the ability to connect additional thematic packages.
Of the additional packages, you can buy and configure Cinema Plus (279 rubles/month), Sport Plus (399 rubles/month), Supersport (679 rubles/month), Educational (249 rubles/month) and others.
Setting up LG and Samsung TVs with a CAM module
TVs from LG and Samsung have a CAM module installed, so the setup process is a little different. Let's look at it using the example of a Samsung TV:
- In the menu, select the “broadcast” section.
- From the drop-down list of antennas, select EutelsatW4 36E and save.
- Go to the “LNB settings” tab, select any transponder there. Turn off DiSEqC mode and 22 KHz tone. We set the upper LNB to 10750, the lower one to 9750.
- On the remote control, press the “Return” button twice and go to the manual search mode for TV channels.
- Once again, select the EutelsatW4 36E satellite, then look for 11900(V/R) 27500 in the list of transponders, select and save.
- Select the “network search” command, go to the “broadcast” item and select “change channels”. Using the “change number” tab, select the channel for which you want to set a number.
- Next, we go to “sorting” and distribute the found channels depending on the categories - TV, music, radio.
- Installation and setup is complete, enjoy your viewing.
For LG TVs, the process is almost identical, you only need to change the transponder value, as in the photo below:
Setting up transponders and NTV frequencies with due care is not a problem. If difficulties and problems arise, it is better to use the services of the company’s specialists, this will help save both time and nerves.
Source
Self-tuning of NTV PLUS channels on your TV
Setting up NTV PLUS begins with installation and installation of equipment. If they are carried out independently, it is important to follow the following rules:
- NTV satellites + Eutelsat 36B/36С, Eutelsat 36A are located above the equator, so the dish should be directed to the south. The exact direction can be determined using a compass. The direction angle of the satellite is approximately 17 - 38 degrees. It depends on the manufacturer of the dish; satellite television operator NTV has several of them.
- In order for the satellite dish to receive an excellent signal, during installation it is important to take into account the overview of the territory; interference in the form of vegetation and tall buildings is not allowed. Failure to comply with these requirements may result in problems with signal transmission.
- The bracket is attached firmly and reliably, otherwise over time the dish will get knocked down, the direction of the direction will change, all this will affect the quality of the signal.
- It is not recommended to skimp on cable; it must be resistant to different weather conditions.
How to set up an antenna
The next stage is setting up the NTV satellite dish.
- Connect the converter cable to the receiver, and connect the receiver itself to the TV. To avoid malfunctions or equipment breakdown, you must follow all recommendations specified in the manufacturer's instructions.
- Slowly and carefully rotate the satellite dish mirror in the horizontal/vertical plane towards the location of the satellite. Goal: to get the image to appear on the TV.
- After the picture appears, you need to activate the “RECEIVED SIGNAL LEVEL” command on the receiver. For a good television picture, the scale should be as high as possible.
To register this equipment, authorization is required on the operator’s official website.
If the data is filled out correctly, you will receive an email confirming your profile activation. After which the subscriber will have access to the “Registration of Agreement” operation on the website. After concluding the agreement, the card will be activated automatically within 24 hours.
How to configure the receiver to broadcast NTV channels
Without this device, watching satellite television is impossible. The NTV PLUS television company offers various models of TV set-top boxes, so the equipment settings may vary.
Models of NTV + receivers for watching television from the Eutelsat 36B/36C satellite offered by the provider in 2021:
- Digital interactive TV set-top box VA1020;
- NTV-PLUS 1 HD VA;
- HUMAX VAHD93100S;
- Humax VA-4SD;
- Humax VHDR 3000S;
- Sagemcom 87-1HD;
- Sagemcom DSI74 HD;
- Opentech OHS1740V.
The VA1020 set-top box is the most modern development, it went on sale in the fall of 2021. New subscribers of the company have the opportunity to purchase at a discount. The promotion is valid until the end of January 2017.
Setting up channels
There are two options for tuning channels: automatic method and manual tuning. In the first method, you need to select the “SEARCH FOR CHANNELS” item in the setup menu; if the equipment is configured correctly, all channels will soon appear.
Manual search is a more complex process:
- Resetting the specified settings - go to the menu, select the section “SETUP” → “DEFAULT INSTALLATION” → “CHANNELS” → “ANTENNA” → “SATELLITE SETUP”.
- When prompted for a TV set-top box password, enter a number consisting of four zeros. If the password has been changed, you must enter the changed version.
- In the tab that appears, uncheck the boxes next to the satellites allowed by default and leave EutelsatW4 36E. If this procedure is blocked, you need to remove the access card from the tuner.
- Then it is important to configure the transponder.
- Settings: 12130 R and Lnb levels (low = 0; high = 10750).
- The final stage. After entering all the data in the “MANUAL SETUP” section, select the previously recommended transponder and set the “NETWORK SEARCH” command. The operation can take quite a long time; upon completion, all available channels will appear. The quantity depends on the package selected by the user.
- Step-by-step setup of NTV PLUS for Samsung:
- Go to the menu and select “BROADCAST”
- From the proposed antenna types, choose EutelsatW4 36E. Save data.
- Go to the “LNB SETTINGS” tab and select any transponder. Set DiSEqC mode to off. Lower LNB = 9750. Upper LNB = 10750. 22 KHz tone is off.
- Make two clicks on the “Return” button on the control panel.
- Go to manual channel search.
- Select the EutelsatW4 36E satellite again, then find the number 11900(V/R) 27500 in the list of transponders, press the OK button.
- Set the “NETWORK SEARCH” command.
- Then, in the “BROADCASTING” section, select “CHANGE CHANNELS”. Select the channel to which you want to give a number using the “CHANGE NUMBER” tab.
- Select the “SORT” item and organize channels into categories: radio, music, TV.
- The setup and installation of channels is complete.
For LG, the setup is similar, but the transponder value changes according to the photo:
If setting up NTV PLUS causes difficulties, it is better to call a company specialist to your home.
televopros.ru
How to set up a satellite dish?
Setting up equipment is a very important process that directly affects the level and quality of the signal. If you decide to save money and not call a technician to install and configure everything, you must follow some rules when setting up.
NTV Plus satellites are located above the equator; in order to find a signal, you need to point the dish to the south. There are two options on how to do this:
- Look where your neighbors' plates are pointed and do about the same.
- The second and more reliable option is to use a compass; if you don’t have one, download an application on your phone or use an online compass. The dish angle depends on your location and the antenna manufacturer. The approximate range of the angle at which the antenna should be located is 17-38 degrees.
Before installing the antenna, you must make sure that there are no obstacles in the signal path. There should be no trees, buildings, or large branches. You can check this by looking in the direction of the signal; if there is nothing in the way, you can install a dish; if interference is visible, it is better to hang it in another place.
Be sure to secure the antenna as securely and firmly as possible. With a slight shift, for example, from a strong wind, the signal may be lost and all channels may be lost, then you will have to set everything up again, over time this will get boring. To do this, it is recommended to use a highly reliable bracket.
If you don't know the exact settings, you can still adjust the antenna yourself. To do this, slowly move the antenna horizontally, stopping at each point for 5-7 seconds. Continue to do this until an image appears on the TV. When the picture appears, pay attention to the signal level, it should be at least 50%.
Equipment registration
In order to register a new contract, you don’t have to go anywhere; you can do it online. But for this you need to know the following information:
- Subscription contract number.
- NTV card number plus.
- FULL NAME. subscriber
- The date when the contract was concluded.
- Equipment installation address.
- Your phone number or email.
- The name of the digital set-top box that receives the signal and the model of the television module.
- Serial number of the set-top box.
- The date when your channel package starts working.
There are three ways to register a contract without leaving home:
- Through the official website of NTV Plus, using a special form.
- If you don’t want to do this yourself, you can call the support service at 8-800-555-67-89, and they will do everything for you.
- You need to fill out and scan the contract, then send it to the email address
This is a slow process and may take more than 7 business days from the date the contract is sent.
Step-by-step instructions on how to draw up an agreement online:
- We go to the official website of NTV Plus.
- If you do not have a personal account, you need to create one. Click on the form in the upper left corner and register it.
The fields with the contract and card number are left blank.
- After registration, you will receive a confirmation email with further instructions.
- You need to go to the website and go to your personal account, select the item: “Register an agreement.”
- A window with conditions will appear in front of you, put two checkboxes.
- We fill out the field with the contract number, it consists of 10 digits, then enter the smart card number without spaces.
The item with the card number where the family package is indicated does not need to be filled out. - In the date line we put today's date.
- Next, fill out the section with personal information (full name, address where the equipment is located).
- We issue personal account statements upon request, the service is paid.
- We choose a subscription, the contract will be issued within 24 hours if there are funds in the account.
- We link the agreement to your personal account.
- You need to fill out a paper agreement, send a photocopy of the agreement and passport to the company’s email address.
- When all documents and contracts are concluded, an image will appear on the screen. On average, this procedure takes one hour. If the channels do not work, contact support to clarify the reason.
Search channels
There are two ways to search for new TV channels, automatic and manual:
- Automatic search does not require additional knowledge. Just run it and wait for the process to complete.
Manual search is more professional and requires additional settings, but thanks to it, you can find all available TV channels.
Automatically
The automatic setup looks like this:
- Enter the menu using the remote control.
- Find the “Channel Search” subsection.
- Select this section and wait until the search ends. Upon completion, all found channels will begin broadcasting the image.
Resetting and setting parameters manually
The manual version is much more complicated, so for the best result you will need some knowledge. If you decide to do this yourself, use the following instructions:
- Before you start searching, you need to reset your previous settings. To do this, go to the “menu”, then the “setup” tab, select “default installation”, “channels”, click on the item “antenna”, “satellite setup”.
- After resetting the settings using the receiver, you need to configure the satellite dish, the system will ask you to enter a code, it is simple and most often - 0000.
- A tab with a huge list of satellites will appear in front of you, and you need to know exactly which one to choose. Remove all marks that are opposite the satellites, otherwise their purity will be taken into account when searching. You must leave one check mark next to the Eutelsat W4-36E satellite.
In some cases, these actions will not be available; you will need an access card to open them.
Channel packs and app features
There are several thematic packages for different categories of viewers: TV channels for children and everyone who loves animation, movies and TV series, news, entertainment and educational channels, as well as sports. When purchasing any of the paid packages, you receive all-Russian channels as a bonus, including Channel One, Rossiya-1 and others. In total, the application has more than 200 channels.
To find out which TV channels are included in the package, just select it in the application menu. Here you can subscribe to the package that interests you. There is an annual subscription to "Children's" with a significant discount - for a month - 249 rubles, for a year - 1990 rubles.
The application menu has three sections. Their content can be easily guessed from the name. Through the “Subscriptions” section, you can select TV channel packages and watch them in the “TV” section. “Profile” shows information about your current account and in-app purchases. Here you can top up your account using a linked bank card and activate a promo code.
Main menu. Photo: Telesputnik
TV channels are represented by horizontal strips that you can navigate through. Under the channel logo, the current program and its air time are indicated. The rewind icon means you can rewind the program to the beginning and watch it if you missed it. The function only works where it is allowed by rights.
Linear TV channels. Photo: Telesputnik
When watching a TV channel, you can call up an electronic guide, which shows past and future programs of each of the channels included in the package. From the same menu you can launch another TV channel.
The player menu has several buttons: “pause”, “rewind”, “fast forward” and Live - this button returns to watching the live broadcast.
Player menu. Photo: Telesputnik
Compared to the mobile application, the current version of the NTV-Plus TV application for smart TV has only linear TV channels - other functionality, for example, video-on-demand libraries, purchasing sports broadcasts, access to the highlights section of football matches and an archive of television programs, operator promises to be implemented in updates.
For TVs with a CAM module
Modern TVs can receive a signal without installing additional equipment (receiver). In order to watch premium channels, television equipment manufacturers have made an option with which you can connect an external CAM module. It converts the receiving signal and sets up the channels.
Instructions for installing the CAM module:
Via Common Interface slot:
- Insert the access card into the CAM module.
We connect the CAM module with the card into the slot located on the side of the TV (Common Interface).
- Remove the sticker on the back of the TV.
- Insert the adapter into the corresponding hole.
- Lightly press the adapter to connect to the connector.
- Make sure the connection is secure and the adapter does not wobble.
- Insert the access card into the CAM module.
- Attach the CAM module with card to the CI adapter.