| Place | Name | Characteristics in the rating |
| Top 5 Best Lumax Digital Receivers |
| 1 | LUMAX DV-2120HD | The most popular |
| 2 | LUMAX DV-3215HD | Metal body. Two USB slots |
| 3 | LUMAX DV-4205HD | Built-in Wi-Fi module |
| 4 | LUMAX DV-2115HD | Indoor antenna included |
| 5 | LUMAX DV-2108HD | The best ratio of price and quality |
Why is the module needed?
How to make a Wi-Fi adapter for a TV or set-top box yourself
This module is similar to a flash drive. In order to use it, you need to plug it into the connector intended for it. After this, the set-top box will have access to your home wireless network.
Note! The adapter is designed for use with a set-top box. It is necessary that there is compatibility between them. Lumax DV0002HD WiFi is used in conjunction with a set-top box from the same manufacturer, which ensures a high degree of compatibility.
Typically, in a home network, Internet access provided by the provider is via cable. It is connected to the router. Typically there are 4 slots for connecting devices using network cables and access via wireless communication.
The adapter in question provides high-quality access to the Wi-Fi network created by the router. It, when connected to the set-top box, allows the TV to access signals that are transmitted via the Internet, and opens up more possibilities than before.
Sorting
After setting up digital programs, you may have trouble sorting. In order for the found programs to have normal positions and numbers and not start with number 800, it is necessary to perform some manipulation.
- To do this, go to the settings menu.
- We are looking for the Programs section.
- Here you need to turn off LCN autonumbering.
- Next, go to the Sort section and select by multiplexes.
- After that, exit the settings and look at the list of channels, everything should be in order.
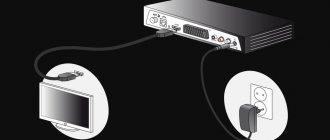
How to connect Lumax to TV
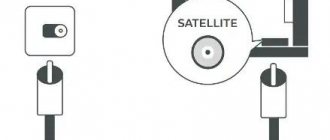
The principle of connecting the Lumax digital set-top box to a TV depends on the TV and the type of connectors available. Taking into account the situation, a decision is made on connection methods. At the same time, the Lumax console has several connectors:
- antenna connection - Ant IN;
- receiving a digital signal from the antenna and connecting tuners - Loop Out;
- connecting a tuner, monitor, TV and other equipment - HDTV;
- connection with other equipment - RSA (“tulips”).
The set of contacts may vary depending on the model. This point must be taken into account before connecting the set-top box to the Lumax TV. Detailed information can be found in the instructions or contact your provider.
Towards modern TV
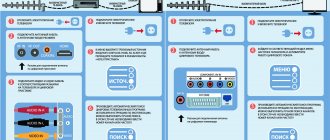
If you have a modern TV at your disposal, connecting and setting up a Lumax digital set-top box is not difficult. The action algorithm is as follows:
- Connect the cable from the antenna to the TV set-top box. When choosing the latter, take into account the possibility and strength of signal reception in your region of residence, as well as the location of the transmitter. Alternatively, you can connect a cable that is directly supplied from the provider.
- Connect the tuner to your TV. To do this, you can use one of two options - an HDMI connector or an RCA connector. The first option is more preferable, because in this case you can achieve a better image.
- Turn on the set-top box and TV, then use the menu to select the optimal video input. If you managed to correctly connect the Lumax digital set-top box to your TV, an image from the tuner should appear on the screen.
At the final stage, configure the necessary channels and use the capabilities of the equipment. Let's look at how to do this correctly below.
To the old
The situation is more complicated when you need to connect and configure IPTV on a Lumax set-top box for an old TV. In this case, the algorithm of actions will be the same, but there are nuances. In particular, there will be no modern HDMI outputs on older TVs. In this case, you can use alternative options:
- RCA ("tulips"). Such connectors are found not only in new, but also in old TVs. The connection principle is simple. The yellow connector is video, and the red and white connector is audio. To configure the Lumax set-top box for digital television, select AV on the remote control and go to this section.
- SCART. This is an older connector, but is often found on older TVs. If the Lumax console does not have such a socket, you can use an adapter, for example, RCA-SCART. Further approaches are similar.
- Via antenna input. Very old TVs do not have an AV input. In this case, a dilemma arises on how to connect the Lumax Electronics set-top box to the TV. Such tuners do not support RF signal transmission to the TV, so the only option is to use an RF modulator. The principle here is simple. First connect the antenna to the tuner, and then connect it through an adapter to the RF modulator. Connect the latter to the TV input.
As you can see, even an old TV can be connected to the Lumax set-top box. The peculiarity is that for connection you will have to use older connectors or buy adapters.
Reviews about Lumax set-top box
Currently, the company's products are popular among users. Firstly, everyone appreciates the ease of installation of these devices and their overall reliability. On average, one such set-top box can work for more than 5 years, while some devices from other companies burn out after six months of use.
In addition, when purchasing, you have the option of an additional cinema hall, which contains only the most popular films. There are also about 100 Soviet cartoons, which your children will appreciate with a bang.
If we talk about the average rating on the Internet, then the company’s products can be safely given 4.5 on a 5-point scale.
Lunax cinemas
It is no coincidence that the company’s devices have become so popular. For all owners of equipment, Lumax gives the opportunity to additionally download some Russian and foreign films and cartoons completely free of charge. The list includes more than 500 options that you can download to your receiver and watch on your TV, with the ability to rewind and stop the broadcast.
To receive a particular film, you must:
- Buy the corresponding branded WiFi adapter for the set-top box - LUMAX DV0002HD. It costs 550 rubles.
- Go to the menu and select “Network and Applications”. Click OK and select “FTP download”
- After that, press the blue button on the remote control.
- The update will begin downloading; its duration depends on the Internet speed. When finished, click OK and confirm the installation.
- Subsequently, in the menu itself, you can go to the “network and applications” section and select the movie you need from the general catalog.
Thus, in addition to 20 free channels, with the purchase of a set-top box you can also watch some premieres for free.
Troubleshooting
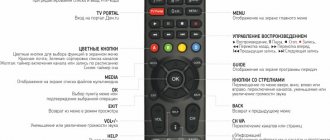
Instructions for the remote control from Lumax
When operating the equipment, various situations may arise that will partially or completely limit the full operation of Lumax devices. In this case, we will provide the most effective solutions, based on popular errors:
The set-top box is not visible on the TV/the image disappears
- If the image periodically disappears, then in most cases this indicates a malfunction of some cable.
- If there is a complete absence of a picture, you must also make sure that the device display mode is selected correctly. We wrote about this earlier.
Finds few channels/does not find them at all
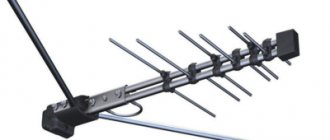
- Check the antenna. To do this, it is best to connect another set-top box to it and see the signal reception level.
- Make sure to select the correct frequency when manually searching.
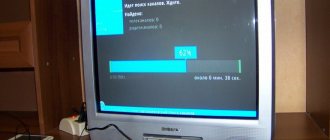
Long download of updates
The download speed of the set-top box updates depends on the Internet speed in your home. The higher it is, the faster the module will be able to order the necessary files via Wi Fi.
The device randomly turns off and reboots
You need to reset it to factory settings and search for channels again. The reason may also be an outdated software version.
Common problems
Connecting and setting up the Lumax tuner is only the first step, and sometimes after connecting to the TV, various malfunctions begin. Let's highlight the main problems:
- The image disappears - check the cable and the quality of the connector.
- If it doesn’t find all channels, rotate the antenna, make sure it is connected correctly, and perform a manual search.
- No image - try connecting the equipment again, change the connection method.
- Updates take a long time to load - check your Internet speed.
- Unauthorized reboot of equipment - reset the Lumax set-top box to factory settings and connect it to the TV from scratch.
If you can’t resolve the issue yourself, dial the provider’s number.
Setting up channels
After you have connected the equipment, we proceed directly to setting up the channels on the set-top box. However, successful completion depends on your antenna; it must be powerful enough to catch the digital signal. At the moment, twenty digital channels are available in most of our country; in Moscow there are more than thirty.
Auto search
- Using the TV remote control, select the video channel you are using; it can be HDMI, AV1, TV, Component, etc.
- Next, remove the TV remote control and take the remote control for your set-top box.
- Press the power button.
- Next, go to the menu by pressing the appropriate key.
- Find the channel or Search section
- The search range must be set to DVB-T2.
- The next step is to go to the Auto search item.
- We start the scan and wait for it to finish.
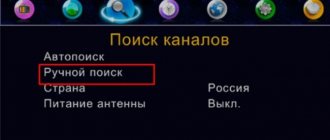
Manual search
On any set-top box you can use frequency search. Manual tuning of digital channels may be necessary if the automatic option does not produce results, or you need to update some channels.
- You can find out the frequency of the multiplex on the RTRS website by selecting your locality on the interactive map.
- Go to the console settings menu
- Select Search.
- Next, select Manual search.
- Select the desired frequency using the left and right buttons.
- Bandwidth should be 8 MHz
- Click on update.
- If the frequency is correct and the signal strength is sufficient, channels will begin to be added
- To set up the next channel package, enter its name and run the update again.
Setting up cable channels
As mentioned above, many Lumix set-top boxes have the ability to receive DVB-C channels in which cable telecom operators broadcast. Before doing this, of course, check the capabilities of your device.
- We connect a coaxial cable connected to the provider’s network to the set-top box.
- There are some important changes you need to make in the settings.
- To do this, you need to change the Search Range to DVB-C cable channels, otherwise scanning the channels will not produce results.
- After you have selected the correct parameters, click on auto search
- Next, select Full search
- For Network, you will need to specify the starting frequency, modulation, network ID. Therefore, by selecting Full, everything will be configured by itself.
How to connect and configure the Internet
Many Lumax tuners can be connected to the World Wide Web to allow you to watch additional content on your TV and get more options. Setting up the Internet is a matter of several steps. Do the following:
- Connect the router or receiver via USB.
- Open the menu on your TV.
- Go to the WiFi section and find the network.
- Enter password.
After this, wait for the connection and use additional Lumax options.