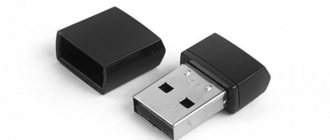
The hero of today's story is a gadget designed to make it possible to work with the Internet through a TV, which initially does not support Smart TV or the Internet in general in any form - neither via cable nor via WiFi. This miracle is called the Android Smart TV Box for TV, which is essentially a mini computer (Mini PC Box) with a pre-installed mobile operating system. This device connects via a modern HDMI or old-fashioned AV cable to any TV that has these connectors, and turns it into a large tablet with Internet access. In this manual, I will tell you in detail how to connect a TV set-top box and set up Smart TV.
The article will be about a TV set-top box on Android, and not about digital set-top boxes from Rostelecom, Beeline, MTS, Megafon and the like for watching central or cable television channels. These models are suitable for TVs of any brands - Samsung, LG, Sony, Philips, Xiaomi, etc.
What is needed for the first launch
Before you start setting up the set-top box, you will need to familiarize yourself with the different types of devices so that the purchased device can fully meet the requirements for use:
- In order to be able to watch movies on TV, it is enough to purchase a budget device that has a dual-core processor;
- If you also plan to listen to music or install games on the console, you will need to purchase a device whose processor has four cores;
- To watch 4K video and play any games, you will need to purchase an eight-core console.
You can find a large number of different devices on the market, so everyone can choose the model that is most suitable for them.
Where can I buy?
To ensure that purchasing a new device does not become an adventure with elements of a lottery, it is important to remember some important points. For example, you need to pay attention to the seller’s rating, the number of orders, packaging and, of course, reviews from customers who have already purchased the product. For convenience, we analyzed a number of popular sellers on AliExpress, and identified from them, in our opinion, the most conscientious and trusted ones.
Option 1 - Ugoos X3
Option 2 - Ugoos X3
Option 3 - Ugoos X3
How to set up an Android set-top box the first time it starts
You can configure the Android set-top box as follows:
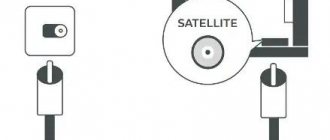
- To begin with, the set-top box, which is designed for watching television, must be installed next to the TV and connected to it using an HDMI cable. It comes complete with the device, and if you didn’t have it, you can connect the gadgets using the AV port;
- After this, you need to connect the device to the electrical network so that energy is supplied to it;
- When you launch the gadget for the first time, the system may prompt you to install the latest updates. If the owner does not mind, then he will simply need to follow the instructions that pop up on the screen;
- After installing all the necessary files, the desktop of the Android console will be displayed on the TV screen.
If the user wants to change certain settings of the gadget, he can simply connect it to a personal computer using a USB cable.
Also, at the very first start, you will need to configure the standard settings.
Language
In order to set the language on the set-top box, you need to go to the “Settings” section, and then open the “More Settings” item. After this, more advanced settings should be displayed on the screen, among which you need to find the “Language & Input” item. In it, the device owner can select the required language.
Please note that after these steps the language will change automatically, but some sections may also remain in English.
date and time
Each user must understand that if the time and date are set incorrectly, the operation of the set-top box will not be correct. There will be no Internet connection, and various errors will appear in browsers.
You can set the correct date and time by going to the “Use network date and time” section and turning it on. You also need to enable the “24-hour format” and select the appropriate time zone.
Internet connection via WI-FI
You can connect to the Internet on the set-top box as follows:
- First you need to go to the “settings” section;
- After this, you need to open the “Wireless Networks” item, it can also be called “WI-FI”;
- The gadget's system will automatically begin searching for all available networks, from which you will need to select the one you need;
- Then you need to authenticate by entering your password using the keyboard.
If the user has completed these steps correctly, the WI-FI network will be in connected status.
However, sometimes there are cases in which additional configuration of the network equipment may be required because the device cannot connect to a certain network. You can solve this problem by opening the router settings, and then the “Wireless Networks” section. Next you need to go to the “Basic Settings” section, where you need to set “Channel 9/13”
It should be noted that all changes will take effect only after they are saved and the device is rebooted.
Ugoos X3 auto frame rate setting
Ugoos X3 smart set-top boxes can switch the refresh rate of the TV screen in accordance with the frequency of the content being played. This feature is called "Auto Frame Rate". The Auto Frame Rate function is not initially installed on all TV Boxes, but it is a significant factor influencing the final image. Most TVs operate at a screen refresh rate of 60 hertz. Television broadcasts produce images at a frequency of 50 hertz, and most films are shot on film at a frequency of 24 hertz. Or rather, even 23.94 hertz). For a smoother image, without jerking - especially in large scenes, you need to switch the refresh rate of the TV screen. If the film is running at a frequency of 24 hertz, the screen should also work the same. Setting up Ugoos X3 allows you to set the screen frequency to automatically switch without human intervention. You simply turn on a movie, series or TV channel, and the set-top box switches the TV to the desired mode. To enable this function, follow the following menu items: Settings - X3 Settings - Playback Settings. In this menu you need to open the top item “Automatic frequency adjustment”. In this menu, select the option “Changes only the screen frequency.” This will be enough for a smoother image on the screen. In the future, you can enable or disable autoframe rate separately for each application.
Additional settings for the Ugoos X3 pro console
Ugoos X3 consoles have a huge number of different additional settings. It is simply unrealistic to reveal them all in one article. Below we will go through different points of Ugoos X3 settings, for a general understanding. They may be useful to you in the future.
Settings - Device Settings
About the device - system updates and general information about the set-top box. Screen - Adjust the screen resolution and configure the Ugoos X3 to have HDMI CEC functionality to control two devices with one remote. Keyboard and AutoFill - Choose from different keyboards. You can install a keyboard from the Play Market instead of the standard one. Mouse—setting up a computer mouse or air mouse. Pointer speed, view, etc. Sound - settings for sound output on various channels, as well as system sounds. Leave everything unchanged if you do not use a home theater. Storage - the amount of free space on the console. Power—various options for turning the console on and off and interacting with the remote control. Home screen - the point for selecting the main launcher. You can install additional launchers on Ugoos X3 and enable or disable them at this point. Voice input application - important for a connected air mouse with a microphone. Select one or the second option for correct voice recognition. Goole Assistance - enable voice assistant. Screen saver—setup to turn on the screen saver if the set-top box is inactive. Reset - a menu that allows you to reset Ugoos X3 to factory settings. This will delete all programs and accounts installed by the user. The console will reboot and return to its original state. It can be useful if the set-top box starts to fail.
Settings - X3 Settings
Superuser - enable ROOT and Magisk to flash the console firmware. Without certain knowledge, it is better not to enable this function. File client - connecting a hard drive to a home network. Information panel - displays a panel at the top of the screen with various Tv Box status data. Gamepad settings - reassign buttons on a connected gamepad if they do not work in games. Debugging setup, custom scripts - for advanced Android users. System bars - enable information and navigation bars (black bars with information at the top and bottom of the screen).
These are all the main points for setting up Ugoos X3. Most of them are unlikely to be needed by the average user. And traditionally, if you have any questions, leave them in the comments, we will try not to miss a single one.
Linking a Google account to the set-top box
This section is very important, because if you do not link the set-top box to a specific account, the user will not be able to use absolutely all the capabilities of his gadget. Many applications will not be able to work without linking an account. In addition, the user will have limited access to the movie and application store.
If the owner already has personal mail in the Gmail service or any other account in the Google service, then he can simply go to the device settings and open the “accounts” item. There you will need to enter the password and login for an existing account.
There is also a second method in which you can create a new account in one of the Google services, and then log into it through the set-top box. It is most convenient to create an account using a personal computer. To do this, you need to go to the official Gmail website and click on the “register” button. After that, you just need to follow the instructions.
Follow the link to watch a video that explains how to create an account on the set-top box:
Installing TV and Movie Apps
Most movies and applications can be downloaded using Google Play. However, it lacks applications with a large number of different channels. You can solve this problem by installing the necessary applications on a flash drive, and then from it to the set-top box.
This can be done by installing the archive from a trusted site, then unzipping it and transferring the program files to a flash drive. After this, the flash drive is connected to the USB port on the device. A menu should open in which you can view all files from the portable drive.
It needs to be minimized, and in the gadget’s application menu you need to find the auto installer - it’s called AppInsraller. You need to open it and select “USB storage”.
This application will display all programs that are available for download. At the top right you need to click on the three dots and click on the “Select All” item.
After this, you need to click on these points, and then click on the “Install” item.
Next, the process of installing all applications should begin. After a certain time they will be installed on the console.
How to watch movies
On Android consoles, it is possible to watch movies online in several ways.
Watching movies in the browser
To use this method, you need to open a pre-installed browser on the console, and enter the name of the movie into the search bar.
The user may encounter advertising when using this method, and the site where the film will be watched must have an html5 player.
Watching torrent movies
To watch movies via torrent, you will need to install the movie torrent file. After installing the movie, you can open it using the video player.
However, the user may encounter memory size limitation in this method. You won’t be able to download more than three films and will have to delete the one you’ve already watched.
Watching movies using special applications
This is the most convenient way because you don’t have to wait for the movie to install or bother searching for it. In such applications, you can search for films by genre, view their descriptions and select the maximum quality to watch. Such applications can be installed both from Google Market and from third-party sources.
How to watch TV
You can watch TV on your Android set-top box using a free TV application called Lazy Media, which can be installed from the Google Market.
The application has playlists in which you can watch TV channels. In addition, there is a program for each television channel for orientation on the air, and you can also set a reminder and create a list of favorite channels. The playlist can be found on the Internet by searching for the corresponding query.
All added playlists with channels will be displayed in the “Playlist Manager” section.
You can view the available channels in the “all channels” section.
Inner world
Traditionally, we will analyze the TV box. In order to get to the giblets, you need to snap off the lid.
I want to say right away that the latches are not reusable
The entire board is tightly arranged.
And on the other side
Let's look at the inner world in more detail under the spoiler
Additional Information
An interesting Ethernet transceiver is the RTL87211F. Datasheet
WiFi-Bluetooth controller AP6255. Datasheet
eMMC memory from Samsung KLMBG2JETD-B041. Datasheet
The version of the console is written on the sticker
RAM: SpecTek DDR4 PS054-053 BT
Photo for HDMI protection evaluation
Audio driver TPF632. Datasheet Well, the Reset button is closer
Possible problems
Vyacheslav
For several years he worked in mobile phone stores of two large operators. I understand tariffs well and see all the pitfalls. I love gadgets, especially Android ones.
Ask a Question
Question to the expert
Data takes a long time to load.
This problem may arise if the device was configured using a remote access point. In such a situation, you need to connect to the Internet using a network cable.
Online services and applications do not work.
If such a problem occurs, it is worth checking that the time and date set are correct.
There is no sound.
For sound, you need to specify the correct output depending on the type of TV. A regular TV is set to PCM mode, while more modern TVs have RAW output.
4.7/5 — (30 votes)
Main characteristics
| Model | X3 CUBE | X3 PRO | X3 PLUS |
| Type | TV set-top box (Android TV Box) | TV set-top box (Android TV Box) | TV set-top box (Android TV Box) |
| OS version | Android 9.0 | Android 9.0 | Android 9.0 |
| Supports over-the-air (OTA) firmware update function | Eat | Eat | Eat |
| CPU | Amlogic S905X3 | Amlogic S905X3 | Amlogic S905X3 |
| GPU | ARM G31 MP2 GPU | ARM G31 MP2 GPU | ARM G31 MP2 GPU |
| RAM | 2Gb LPDDR4 | 4Gb LPDDR4 | 4Gb LPDDR4 |
| Built-in memory | 16Gb | 32Gb | 64Gb |
| Video format support | H.265, AVI, TS, VOB, MKV, MOV, ISO, WMV, ASF, FLV, DAT, MPG, MPEG-4, VP9-2, etc. | H.265, AVI, TS, VOB, MKV, MOV, ISO, WMV, ASF, FLV, DAT, MPG, MPEG-4, VP9-2, etc. | H.265, AVI, TS, VOB, MKV, MOV, ISO, WMV, ASF, FLV, DAT, MPG, MPEG-4, VP9-2, etc. |
| 4K support | Eat | Eat | Eat |
| HDR support | Eat | Eat | Eat |
| Autoframerate | Eat | Eat | Eat |
| Audio format support | AAC, AMR, APE, FLAC, M4A, MP1, MP2, MP3, OGG, RA, WAV, WMA | AAC, AMR, APE, FLAC, M4A, MP1, MP2, MP3, OGG, RA, WAV, WMA | AAC, AMR, APE, FLAC, M4A, MP1, MP2, MP3, OGG, RA, WAV, WMA |
| Dolby True HD and DTC-HD HI RES support | Eat | Eat | Eat |
| Photo format support | JPEG, BMP, GIF, PNG, TIFF | JPEG, BMP, GIF, PNG, TIFF | JPEG, BMP, GIF, PNG, TIFF |
| Wireless connection | WI-FI 2.4G + 5G + Bluetooth 4.2 | WI-FI 2.4G + 5G + Bluetooth 4.2 | WI-FI 2.4G + 5G + Bluetooth 4.2 |
| Antenna | Yes, removable | Yes, removable | Yes, removable |
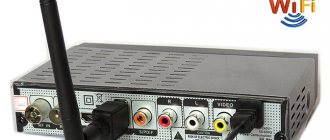
| Ports | USB 2.0, USB 3.0, HDMI, TF, AV, S/PDIF, RJ-45, IR, Reset, 5V/2A | USB 2.0, USB 3.0, HDMI, TF, AV, S/PDIF, RJ-45, IR, Reset, 5V/2A | USB 2.0, USB 3.0, HDMI, TF, AV, S/PDIF, RJ-45, IR, Reset, 5V/2A |
| average cost | from 4,500 to 5,000 thousand rubles. | from 6,000 to 6,500 thousand rubles. | from 7,000 to 7,500 thousand rubles. |