TV does not respond to commands? Don’t rush to sound the alarm and save money to replace it. You may just need to repair the remote control. When the TV remote control does not work, of course you can suspect that the entire device has failed. However, usually the situation is resolved much simpler. The problem will be fixed if you simply fix the TV remote control.
Where to carry out repairs, and how difficult is it? If your TV remote control is broken, use the instructions in this article.
Result of the fall
Frequent falls and strong impacts can render the remote control inoperative.
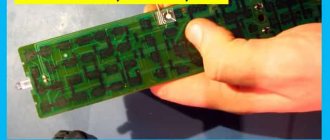
If an element bounces off the board, the device will require soldering. Let's consider the question of how to check the presence of a signal from the board. This can be done using a camera on a mobile phone or a digital camera. In remote controls, the signal is transmitted using infrared radiation:
- Switch the device to shooting mode;
- Place the lens close to the front of the remote control, to the diode;
- Press any button to try;
- If the remote control is sending a signal, you will see a large red dot on the screen of your phone or camera.
The operating principle of this method is based on the ability of digital cameras to capture infrared radiation. The presence of a dot indicates that the board is working properly. In this case, look for the problem elsewhere - for example, in the buttons. If the point is missing, you will have to repair the board itself, or replace the emitting diode directly.
To investigate the problem, disassemble the remote control:
- Remove the batteries;
- Separate the housing parts. Remove the screws with a screwdriver, then pry up the edges of the plastic;
- If the remote control does not respond immediately, use a thin and flat screwdriver. Using it, press out the latches located on the inside;
- Examine the board carefully using a high-magnification magnifying glass.
If a breakdown occurs in the quartz resonator, it will have to be replaced entirely. A quartz resonator is a small box attached to the board. Make sure the contacts leading to it are intact. How to check its serviceability?
Gently shake the resonator. Any noise coming from inside will indicate a malfunction of this board element.
How to fix the remote control in a situation where the contacts on the board have come loose? You will have to use a soldering iron with a small tip. To carry out the work accurately, it is better not to choose a large tip for working on the remote control board. If you do not have the necessary skills, it is better to take the remote control to a repair service or immediately buy a new one.
Cleaning the remote control
In order to clean the device from dirt, prepare the following devices:
- Alcohol or alcohol-containing liquid.
- A small brush with soft bristles.
- Clean pieces of soft cloth.
Using this kit, you can carry out external cleaning every week without disassembling the device.
Important! To ensure that the assembly of the PU does not cause difficulties, lay out the parts in the order in which they were removed.
In the future, try to keep the device away from food and drinks. To prevent the remote control from getting too dirty, purchase a special case for it. It will protect the device from contamination. In this case, the question of how to disassemble the remote control for a Philips, LG or Sony TV will not worry you too often.
Over time, any remote control becomes clogged, and in order, for example, to change the channel or turn off the TV, you have to press the corresponding buttons for a long time and with force. Such clogging of the remote control is a completely natural phenomenon. Dirt, gradually accumulating on the main chip, blocks the action of the pressed buttons. In such a situation, you can either buy a new remote control, or, by disassembling a device that has been tested for years, return it to functionality.
You will need
- small screwdriver
Instructions
- To disassemble the TV remote control, remove the batteries from it. Sometimes there are retaining screws in the battery compartment that hold the top and bottom of the remote housing together. If your remote control model has such screws, use a suitable screwdriver and unscrew them. If there are no screws, then the remote control body is held on by latches located on the top or bottom of it.
- Insert a screwdriver into the junction of the housing parts. Pry the upper or lower part of it and, applying force, disassemble the remote control. You will see that it consists of three main parts: the Body;
- Look at the microcircuit. One of the main reasons why TV remotes malfunction is that frequent use wears off the conductive coating on the buttons or microcircuit. If the coating remains intact under the layer of dirt, the remote control can be restored to functionality.
- Wipe the chip with a cleaning solution. Remove dirt from the TV remote control housing and the gasket with the buttons. If the contamination is too strong, such as happens from many years of using the remote control in a plastic bag, thoroughly rinse all its parts with water, except, of course, the microcircuit. The main thing is to let them dry thoroughly before assembling the remote control, so as not to provoke accelerated oxidation processes in the already assembled device.
- A screwdriver made of plastic or hard rubber, a blank sheet of paper.
Remote control chip;
Rubberized pad with control buttons
Tip added July 19, 2011 Tip 2: How to disassemble the remote control Every home has household appliances that are usually equipped with a remote control. This remote control is very convenient, as it can be used to control equipment from a distance. However, remote controls very often break down and require repair. How to disassemble the remote control to repair it?
You will need
Instructions
Useful advice Carry out all work with extreme caution so as not to accidentally damage parts and latches.
How to disassemble the remote control - printable version Rate the article! The remote control is an important thing in the house. However, people usually begin to appreciate the ability to change channels and adjust the volume of the TV without leaving the couch when the battery runs out or the remote control starts to work poorly. Replacing the battery is a simple task, but it’s a completely different matter when the remote control simply starts to work poorly. Usually the reason is simple - the mechanism is clogged, the buttons become difficult to press, and it becomes clear that the device should be urgently disassembled and cleaned. How to do this correctly?
Is it possible to repair the console remote control?
Repairing a remote control for a set-top box is similar to restoring a regular remote control. The only thing is that before disassembling the equipment and trying to re-solder it, you should reset the remote control settings to the factory settings.
Instructions for resetting or updating your remote control settings vary depending on your digital TV operator. For example, to perform a reset on a device from Rostelecom, you must:
- Point the remote control at the TV and hold down the OK and TV buttons at the same time.
- Hold the command for two or more seconds.
- Wait for the LED to blink twice.
- Enter the numbers 977. The Power light should blink 4 times.
The code may vary depending on the model of the remote control, TV, or set-top box. But the sequence of actions is general.
Expert answer: how to clean the TV remote control (video)
Let's summarize, the remote control is a very important thing in the house, which is difficult to do without. However, without proper protection and care, the TV remote control quickly becomes dirty, both externally and internally. To avoid this, you should use a case or wipe the device from time to time, both externally and internally. In order to open the remote control, you should use a screwdriver or, in extreme cases, a knife, which should be used to unscrew the screws and open the cover. Sometimes modern remote controls are closed with latches; in this case, you need to carefully open the lid along the edge until it comes off completely.
Attention, TODAY only!
Restoring remote controls
First you need to disassemble the remote control. This process will be the same for different devices.
You need to remove the batteries and unscrew the screws located under the factory stickers. New models may not have them, then you need to immediately start disassembling them.
All remote control panels consist of two halves, and to separate them, you can use two methods:
- Any suitable object is inserted into the connecting seam - a knife or a plastic card.
- They need to be carefully inserted into the slot, and begin to separate all the halves of the case until a click appears.
Replacement of boards and conductive coating
Rubber is a dielectric, but all the buttons on the remote control have a conductive coating. Its condition can be checked with a tester.
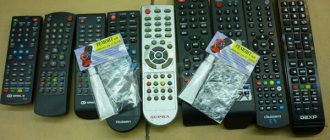
Over time, all contacts wear out. In this case, a repair kit or foil may come in handy. As mentioned earlier, the repair kit is sold together with silicone glue and conductive rubber bands.
To restore the operation of the keys on the remote control, an unused film keyboard is also useful. It includes three films that are glued together.
You need to cut out the contact with the insulator and stick it on the remote control board located above the graphite contact. By pressing the keys on the switch, the contact will be closed through the contact pad from the keyboard.
Only some buttons do not work
This defect is common among owners of old switches. Modern devices with touch controls have a different design and therefore the device buttons break less often.
After 3 years of operation of the remote control, the rubber wears out, and a viscous substance begins to appear in the area of the buttons on the device. It interferes with normal contact of the conductive coating.
The reason for the appearance of a sticky substance may be hidden in the accumulation of dust on the device, dirt, or spilled liquid. All these elements remain between the buttons and contacts of the board.
You must disassemble the remote control and clean the areas where thick matter has accumulated.
A damp cloth will help remove dirt, after which the remote control should be wiped and dried.
TV malfunction
In addition to the switch, the TV may also be faulty. To check your guess, you need to:
- Replace the remote control. If, when changing the switch, the TV still does not respond to the signal, then it is broken.
- Use the remote control on another device. If the equipment works properly when changing the remote control, then the breakdown should be looked for in the TV panel.
Checking the remote control without a TV panel
This method is only suitable for remote controls that operate on infrared radiation. To check, you will need a mobile phone, any brand, and its camera.
A digital camera will also work if you don’t have a smartphone at hand. Place the switch under the phone's camera that is turned on. This must be done so that the infrared LED located at the top remains visible.
Next, just press any button and repeat the action on your smartphone camera. If the switch is working properly, an infrared signal will appear on the screen, displayed in purple.
This means that the batteries are working and the remote control is working. When the batteries are half discharged, the signal brightness will decrease.
Common faults
It's a shame when the remote control fails. This can be understood by several signs.
- The TV does not respond at all to button presses. Doesn't turn on or adjust volume.
- Only some of the buttons work.
- You need to press hard on the keys.
- The remote control only works at very close range.
In the latter case, most likely the batteries are dead. Such a “breakdown” is very likely, even if you changed them recently. Batteries may sit in storage for a long time and lose their charge or be initially defective.
By the way, 80% of problems occur for this reason. When the remote control stops working, it is better to start repairs by checking the batteries.
Their minimum permissible voltage is 1.3 V. If after replacing your remote control does not work, you need to take action.
Check the remote control - to do this, point its infrared diode at the smartphone camera and press any button. If a flash appears on the screen, the remote control is working. So you need to check every key. If this is not observed, the remote control needs to be repaired.
Features of Smart Touch Control
The remote control for Samsung TVs with the Smart TV function, among other things, has a hydraulic sensor - a motion sensor. Thanks to it, you can control the TV by moving the remote control. In order for the cursor to appear, just touch the touchpad. Then it will move in accordance with the movement of your hand.
You can switch between menu items using the joystick. Also, some models have the ability to display a virtual remote control (analogous to a virtual keyboard on a computer). With its help, you can quickly set up your TV, activate certain functions and edit content.
To find out about the source of the signal, you need to touch the touchpad. If you hold your finger on it, a list of available channels will appear in front of you. If you hold down the touchpad while in the Smart Hub section, a window with the parameters of the element you selected will open in front of you. You can switch between its panels by sliding your finger left and right.
When using this device, it is desirable that the distance between it and the TV is no more than 6 meters. Otherwise, the signal may not reach.
Today, such remote controls are included with TVs of the H, K, J and F series, which have the Smart TV function. Depending on the series, the devices themselves will differ. And not only in appearance, but also in the configuration features.
Cause of software failure
There can be several reasons for a software failure. The most popular are:
- Carrying out technical work on the manufacturer's server. Smooth operation is observed by turning on the device after work.
- No Internet connection or low data reception speed. To resolve this, you will need to check your network settings and manually enter the DNS server values.
- Outdated firmware version. You need to download a new version of firmware from the Internet for a specific TV model. If you install firmware for a different series, you can harm your Smart TV.
- Incorrect installation and operation of applications. To fix it, you will need to update or reinstall the program.
- Lack of memory.
- The cache memory in the browser itself is overloaded (the memory should be cleared periodically).
- Old software version.
The above problems are only part of the reasons for the software failure. If it is necessary to correct incorrect work, it is not always possible to do it yourself. If the situation cannot be corrected, the easiest solution is to reset the TV settings to the original (factory) settings.
Typical problems with the Smart Samsung remote control.
Since the TV is a computer, software problems may occasionally occur. Most often, Samsung TVs, when controlled by the remote control, have the following failure. The remote control can only turn the TV on or off. The TV does not respond to any commands from the remote control.
This happens because an infrared signal is used to turn on the TV. The remote control must be pointed towards the TV, when you press the power button, the remote control emits an optical pulse that is invisible to the human eye. This pulse is received by the infrared receiver on the TV. Having received a command to turn on, the TV goes from standby mode to operating mode. The supply voltage is supplied to the main board. After turning on Smart, the remote control also works with the TV via the Bluetooth protocol. If there is a failure in connecting the remote control, it may not work correctly.
How to disassemble and repair the remote control for a Samsung Smart TV?
Modern TVs operate from remote controls. A person is so accustomed to this invention that when it fails, using the TV becomes difficult and is accompanied by a number of inconveniences. Today we will help owners of Samsung Smart TVs deal with problems that most often arise with remote controls.
Setting up the remote control on your TV
The original push-button “remote” does not require configuration. All you need to do is insert the batteries, point the remote control towards the TV receiver and press the power button. However, when using the remote control for the first time, it is recommended to turn on the TV in advance using the key on the body, and there should be no operating devices with remote control nearby.
Whereas the smart touch remote control will need to be configured on the TV. You can bind the device after installing the batteries and turning on the TV from the “remote” (using the “Power” key). To pair on the remote control, you need to press the “Back” and “Play/Pause” buttons and hold them for several seconds, as a result of which the messages “Searching for devices” and “Connecting to the Samsung smart remote control” should appear sequentially on the TV screen, and if synchronization is successful - "Pairing complete."
On a note! Setting features for different remote control models may differ. You can learn about all the subtleties from the instructions or on the manufacturer’s portal. And if the instruction manual is lost, it can be downloaded in electronic form from the company’s website.
The remote control is malfunctioning
If the remote control was selected incorrectly and the best device for controlling the TV was not found, there is a chance that it will slow down. Specific reasons may be:
- Often these are temporary glitches, so you can just turn off the TV and wait a couple of hours. If necessary, it is better to reset the settings;
- if the method indicated above did not help, you should register the remote control in the TV again;
- Sometimes the problem can be solved by replacing the batteries, even if they are new.
How to clean the outside
Cleaning the outside can be done frequently as it does not require time or effort
Don’t forget to pay attention to this device when wiping furniture and equipment. Walk over it with a damp cloth or prepare an alcohol solution and a dry microfiber cloth
Do not get the remote control wet, just wipe it clean.
If the button sticks, something foreign could have gotten into it: food crumbs or large specks. How to clean the spaces between the buttons from dirt and grease:
- Take a cotton swab, soak it in a cleaning solution or alcohol and wipe all the buttons.
- Use a toothpick.
You'll be surprised how much dirt is hidden in the spaces between the buttons. Try cleaning them, and this procedure will be included in the list of mandatory ones during every cleaning.
Instead of water, it is more convenient to take alcohol or alcohol wipes: the substance evaporates instantly, and nothing threatens the electronics.
Another tool to quickly clean the gaps between buttons is a slime. This is a special sticky material that penetrates small cracks and collects all the debris. Typically, slime is used to clean a laptop keyboard.
Try using compressed air cans. Such products are sold in hardware stores. When you press the cylinder, the air comes out sharply, clearing the space between the buttons from dust.
Proper cleaning of the TV remote control at home
In most cases, to fully clean the remote control, it will be enough to open the main box of the device and thoroughly blow it out. Sometimes you will need to wipe individual elements with a cloth. However, it happens when the remote control is very dirty and can only be saved by complete cleaning. In this case, get ready to disassemble the device as expected - separate the top and bottom covers, separate the rubber gasket under the buttons and the board with microcircuits. You shouldn't clean the board, it can damage it, but you can even wash the rubber gasket under the tap. In this case, you should first dry it completely and only after drying use it again.
As a last resort, if even the board is dirty and you definitely want to clean it, then arm yourself with a cotton swab, moisten it with alcohol and wipe with careful, gentle movements so as not to damage the microcircuit.
If you don’t want the remote control to quickly become dirty and require detailed cleaning when disassembled, we recommend cleaning it regularly from the outside, which is much simpler and easier. To do this, you can use ordinary wet wipes or cotton wool soaked in alcohol. Although alcohol is a liquid, it evaporates instantly, so it will not cause any harm to the remote control, nor to the microcircuits inside.
There are other preventive measures that will prolong the stable operation of the remote control without cleaning, these are:
- Buying a cover.
A simple but extremely effective solution that allows you to keep your remote control clean and tidy. Yes, each time you use the remote control you will have to remove it from the case, but this will protect the device from debris and dust. - Polyethylene.
If you don’t want to spend money on a full-fledged case, we offer you a simple, but also effective solution - wrap the remote control in film. It could even be cling film, the ends of which can either be hidden behind or carefully sealed with tape. No dirt will get inside the remote control, and the film can be replaced at any time. - Hygiene.
Of course, the most basic precaution is first of all your personal hygiene; you should not use the device with dirty hands or while eating.
All you have to do is resist the temptation and your TV remote control will serve much longer and more reliably.
Typical breakdowns and their elimination
Like any electronic device, the remote control is also prone to failure. The reasons for this can be either incorrect operation or independent external factors, or physical wear of parts. And since the remote control is more often than other devices at risk of physical damage (if used carelessly), it is most important to know how to repair it.
In order for the remote control to work flawlessly and for as long as possible, it is recommended to carry out maintenance periodically (at least once a year). This process includes cleaning the “insides” of the remote control from dust and debris, followed by wiping the parts with a soft cloth soaked in alcohol. To carry out maintenance, as well as for repairs, the remote control device must be disassembled.
How to disassemble the remote control
You can disassemble the remote control using a suitable screwdriver (usually a Phillips head). First you need to open the battery compartment cover and take out the batteries, and then unscrew the bolts on the back panel. To separate the housing halves from each other, you can use a flat-head screwdriver. After this, you should carefully remove the parts: buttons, rubber membrane, microcircuit and others.
What problems can you fix yourself?
A number of remote control malfunctions occur quite often. You can deal with some of them yourself:
- If the TV does not respond to pressing the remote control buttons, you should replace the batteries with new ones;
- if only the power button works, you need to check the batteries, and if there is no result, re-bind the remote control to the Smart TV;
- if the sensor does not work, the actions are similar to those described in the previous paragraph;
- If individual keys on the push-button remote control cannot be pressed, you need to disassemble it, clean the contacts from dirt with a damp cloth or a cotton swab soaked in alcohol, wait for it to dry completely and reassemble it in the reverse order.
When to contact a repair shop
If the problem is not solved using the methods described above, it is better to contact a service center. And in the event of extraneous sounds that are heard when turning the remote control over, DIY repairs are generally impossible, since they indicate damage to the board (for example, after a fall).
Sticky buttons
If steam or liquid gets inside the device, a kind of oil condensation occurs. Dirt accumulated over years of service reacts with wet steam or drops. Roughly speaking, the insides of the remote control “stick together” due to dirt and grease deposits, so it becomes impossible to press the buttons properly.
IMPORTANT ! There is an old method for preventing breakdowns caused by dirt. To prevent fat, skin particles and dust from settling inside the remote control, you can wrap the device in polyethylene or wrap it in simple cellophane. If you do this carefully and tape it in the right places to fit the shape of the remote control, you can even preserve the aesthetic appearance of the device.
In this case, repair of the remote control is carried out by simply cleaning the device:
- Disassemble the remote control.
- Soak a cotton swab in alcohol.
- Gently wipe the board with a cotton swab, removing any dirt.
- Clean the contacts on the buttons.
- Tidy up the spring contacts for the batteries. You can get rid of oxidation by cleaning the contacts with sandpaper.
- Wait for the device to dry.
- Put it back together.
At the end of the process, you should check the remote control for functionality.
IMPORTANT ! Chinese models of remote controls may permanently fail after cleaning with alcohol! To treat them, use a regular soap solution with water. Wipe the remote control parts with a stick soaked in soapy water. Then rinse the rubber gently with lukewarm water. Don't soak the entire board! Just remove any remaining soap from it. Wipe the device with paper towels. Take some time with assembly - first wait until the remote control is completely dry. After assembly, check if the remote control works.
Sequencing
Simple instructions for opening almost any modern remote control:
- Inspect the remote control for placement of fasteners. Some manufacturers put some of the screws in the battery compartment. Remove the batteries;
- Take a screwdriver of the appropriate size and remove all fasteners;
It may be difficult to ask the question - how to disassemble the remote control for an LG TV that does not have screws? Pay attention to the joints on the sides of the device. It is necessary to create gaps in the joints, then widen the cracks and pry to remove the plastic shell
Step-by-step instructions, with a description of the nuances:
Check the seams on the body. If they are connected with glue for security, use a knife or flat-head screwdriver. Use them to pry up the edges of the case until the edges separate;
- To disassemble the Sony Bravia TV remote control, like many other devices of this type, you need to use a knife to remove the latches located inside the case. Do not pull the body halves in different directions at once, run the blade along the edges and feel for hidden fasteners. Gently squeeze them out;
- Use a plastic card to slide it along the joints between the cases to finally loosen the plastic and open the remote control;
Take out the keyboard; Carefully unscrew the chip without removing the sensor from it;
Carry out the necessary procedures to clean or repair the product.
How to open the remote control if the plastic is sitting on mounting screws and there is no Phillips-head screwdriver nearby? The fasteners can be rolled using the tip of a knife. It will be convenient to take a knife with a curved blade at the end for this purpose.
The Philips remote control can be easily snapped off using even simple tweezers. In Philips, the fastening of the top cover may be slightly recessed into the plastic of the rear surface. How to properly disassemble the remote control in this case? Carefully pry the lid at the joints, preferably not with a blade. A knife may scratch the lid and ruin its appearance. There is also a danger of accidentally running a sharp edge over the buttons. If you damage something, it’s okay - remote controls for Samsung TVs and other common manufacturers are inexpensive, and in some cases are interchangeable.
Model rmctpj1ap2 – original Samsung TV remote control.
The parsing process is not fundamentally different from the scheme already described. If you still can’t open the TV remote control, try pressing on the narrow edges to force the plastic to slide out of the grooves.
How to disassemble the remote control?
Proper disassembly is half the repair. Be careful when working, especially when unscrewing small screws. It is better to disassemble the remote control over a sheet of paper or cloth so as not to lose important parts. And most importantly, provide enough light.
To work we need the following:
- small Phillips screwdriver;
- a sharp pocket knife or blade;
- mediator, plastic card or flat-head screwdriver;
- soldering iron with a thin tip, solder, rosin;
- powerful magnifying glass;
- flashlight.
The remote control is disassembled according to this principle.
- Remove the battery compartment cover. It is usually secured with a latch.
- Remove the batteries.
- Carefully inspect the remote control for screws, especially under the cover. If there are any, unscrew them. Sometimes they are hidden under rubber plugs.
- If there are no bolts, the halves of the remote control are held together with latches and glue. The task becomes a little more complicated, then when working, do not show much effort and do not rush. On some models, the latches are disposable and inevitably break during disassembly. After this, the device is assembled only with glue.
- Sometimes a combined fastening is used, that is, screws together with latches. The main thing when working is not to make much effort. If the remote control cannot be disassembled, look for the remaining screws.
- Pry up the seams on the body with a pick. If the body halves are glued together, use a razor blade to cut the glue seam. Start work from the side opposite to the diode. If the pick or screwdriver slips, burrs may appear, but they will not be visible on this side.
- Go along the entire contour of the remote, paying special attention to the corners. If you hear light clicks, the work is going well; the latches are unfastening. But don't overdo it, as the plastic casing can easily crack.
- Open the remote control. Remove the board and keyboard. Attention: the board may get caught on the case by the battery contacts, so remove it carefully.
Be careful. On some models, the central buttons may fly out. Especially if they are plastic and secured separately.
In addition, there may be rubber washers between each key and the chip. They are usually glued to the keyboard, but sometimes they come off and get lost. If the remote control is touch-sensitive, carefully disconnect the cable that connects the display to the microcircuit. It is usually secured with latches. To dismantle you need to pull both sides at the same time. Then you can begin cleaning and restoration.
Fixing common problems with the remote control
If the TV can only be turned on or off using the remote control, then usually the problem is with the Bluetooth connection. Perhaps the remote control has lost connection with the TV or the problem has arisen in the TV at the software level. And as a rule, in this case it is not possible to pair the remote control with the TV. The solution to the situation is to restart the TV. To restore the functionality of the remote control, you can try the following.
- Disconnect the TV from the power supply and wait 30 seconds. Or wait until the TV indicator goes off.
- Connect the TV to the mains
- Pair the remote control and the TV.
How to open the touchpad remote
Not long ago, Samsung began producing remote controls with a touch panel. Despite the wider functionality and differences in the device, such designs are disassembled in the same way as conventional models.
The touch sensor does not pose any problems with disassembling the remote control.
The main point concerns the train, which you need to be careful with.
The cable connects the touchpad to the board. We take out all the parts from the plastic case, clean it, and then proceed to repair the product according to a single scheme.
How to clean the outside?
Cleaning a television remote control at home is not complete without external treatment of its surface. Perform the work after removing the batteries from the battery compartment. After this, you can prepare the necessary cleaning kit: you will need a toothpick, a cotton swab or swabs, and an alcohol composition. Cosmetic pads made of cotton that can be soaked in alcohol are also suitable.
First, mechanical processing is performed. Use a toothpick to clean grooves, corners, and joints. After this, all surfaces are treated with an alcohol solution several times until the cotton swab remains clean. There is no need to try to perform the treatment using household or cosmetic wet wipes or cloth moistened with water.
Ready-made compositions for cleaning consumer electronics are available. Among the most popular we note these.
- PARITY. The kit comes in the form of a bottle with a spray and a microfiber cloth. The composition is intended for use as a computer keyboard cleaner, but can also be used to care for the remote control. The ingredients contain degreasing, stain-removing substances.
- Deluxe Digital set clean. Another cleaning kit that quickly dissolves grease and dirt. The composition is also good for removing stains on light-colored remote controls.
- WD-40. Classic mixture for cleaning contacts. Used for deep degreasing, removing traces of dirt and carbon deposits. The contact capabilities of the electrical board will be completely restored after such care. Release in spray form ensures ease of application.
Is it possible to repair the console remote control?
Repairing a remote control for a set-top box is similar to restoring a regular remote control. The only thing is that before disassembling the equipment and trying to re-solder it, you should reset the remote control settings to the factory settings.
Instructions for resetting or updating your remote control settings vary depending on your digital TV operator. For example, to perform a reset on a device from Rostelecom, you must:
- Point the remote control at the TV and hold down the OK and TV buttons at the same time.
- Hold the command for two or more seconds.
- Wait for the LED to blink twice.
- Enter the numbers 977. The Power light should blink 4 times.
The code may vary depending on the model of the remote control, TV, or set-top box. But the sequence of actions is general.
We carry out repairs
Mechanical damage to the housing cannot be effectively repaired during remote control repairs. Large cracks look bad even when glued together. In addition, the vulnerability of the entire device increases sharply - most likely, from now on the housing will break regularly. If you step on the remote control, there is a high probability of damaging not only the case, but also rendering the entire board unusable. Any crack on the board cannot be repaired. There's nothing you can do about it - you'll have to buy a new device.
IMPORTANT ! Before you begin repairing the remote control, make sure the batteries are in working condition. In the vast majority of cases, the problem will be resolved at this stage.
If the touch panel on the Samsung service remote does not work normally, try calibrating the product.
- Replace the batteries.
- Press and hold the “GUIDE” button for a few seconds. Count to 5.
- If the sensor still does not work, reconnect the entire remote control to the TV.
Leave a request and receive a 15% discount on your first repair!
Submit your application
DIY diagnostics and repairs
According to statistics, a large proportion of problems in the operation of the remote control are associated not with global violations, but with local malfunctions, including:
- The TV receiver does not respond to key presses.
- Discharge of batteries (type AA, AAA).
- The remote control was dropped and stopped working.
- Worn contact pads on the board or keyboard.
- The remote control is dirty (inside and outside).
All these difficulties can be dealt with by a semi-skilled home handyman.
No TV response
Typical situation: when you press a button on the remote control, the television receiver does not respond or only fires once. The range of possible causes is wide: from contamination of the emitting LED to abrasion of the thin conductive layer on the keyboard. It also happens that the batteries are discharged or the remote control has been dropped on the floor. Both can be eliminated. But first you need to disassemble the device.
The batteries are low
In the ranking of current problems with remote controls, this is the second most important. While going through all sorts of possible faults, remote control owners often overlook the issue of power supply. Sometimes it is enough to install fresh batteries so that the silent remote control begins to show signs of life again.
You dropped the remote control on the floor
The remote control is not a device intended for extreme use. Therefore, after serious falls on hard surfaces, rustling noises appear in it, and performance decreases sharply. And in order to understand where the fault is hidden and what can be fixed, the remote control will first need to be disassembled.
Failure of some buttons
According to statistics, on the control keyboard unit there is never a simultaneous failure of adjacent buttons: some are used more often, others less often. This causes wear and contamination. It happens that the buttons “stick” in the case due to debris or fat deposits from the hands that have gotten into the gap.
Heavy pollution
A layer of dirt found on the keyboard from above or below (on the board, contact pads) is a serious obstacle to the operation of the remote control. To restore functionality, you will need to wash the surfaces with alcohol. For this, ear cotton swabs and wet wipes are used. After drying, the keyboard is installed in the remote control and it should work.
But you can see and eliminate it only by disassembling the remote control. An eraser and alcohol are used to remove oxides.
It is not recommended to use sandpaper or a knife - the layer of copper on the board tracks is very thin and can be easily damaged.
Erasing contacts
The remote control operates on the principle of closing contact pads: one is applied to the key on the back side, the second is located on the board. The conductive coating is subject to wear due to intensive use and repeated pressing of the buttons.
It can be repaired by gluing special rubber or thin foil. A “resuscitation” kit, including glue and contact pads, is sold in radio parts stores. If you have the skills to work with small parts, it is permissible to cut out circles or squares of foil for previously identified “defective” buttons, and then carefully stick them on the remote control keyboard. Rubber, superglue, and shoe glue are used as glue. By no means PVA.
Settings
Setting up the LG Smart TV universal remote control can be automatic or manual. Each model of TV or any other equipment has its own key encryption code. To enable synchronization, a person only needs to enter a certain sequence of numbers. If it is possible to enable automatic code search, the universal remote control will be able to independently select the encoding for the equipment.
If the owner of an LG TV detects any impact, for example, turning the TV on or off, he should press the corresponding key, which will turn off the automatic code selection mode. This way, the appropriate settings will be saved and the remote control will be ready for full use.
Universal remote
The LG Smart universal remote control is quite easy to set up, so even an inexperienced user can handle it. It may not be possible to activate all functions and assign commands to each button the first time, but you should not be upset, since this procedure can be started again. If the device has already been checked for compatibility and no problems have arisen, setup will include several methods:
- The first option is to press and hold the button on the SET TV remote control until the LED lights up. After this, you need to press the Power key once. Next, you need to enter the TV code, after which the light should go out. If this does not happen, you need to press the MULT key, but only after the code has been entered.
- The second option is to dial the required number and simultaneously hold down the SET TV and Power buttons.
- Another option involves holding the SET TV button until the light comes on. After this, you need to press the Power button once and point the remote control at the turned on TV. If it turns off, you must press the button labeled MULT.
In the first two cases, you can link the LG remote control to the TV only if you know its specific model. This information can be found in the instructions. But sometimes it happens that several numbers are assigned to one model at once. In such a situation, you will have to try each of them. If there is no response to key presses, it is recommended to use the third method to configure.
There are special remote controls and universal ones.
Beeline
The Beeline remote control can be configured for several devices at once, including a TV. To do this, it is enough to bring it to a certain frequency in order to bind. At the moment, LG TV owners use two main setup methods. This is an automatic search or code entry. Experts recommend using the latter option, as it is approximately 95 percent successful. To do this, follow the following instructions:
- Setting up television channels on an LG TV begins by turning it on. After this, you need to point it to the remote control device.
- Now you should press the TB key and, without releasing it, the “OK” button. Both of them should be held for 1-2 seconds.
- After this, the indicators of all keys will blink twice. At the next stage of setting up the Beeline universal remote control, you can enter the code “992”. After this, the indicator of the selected key will blink twice.
- Now you should point the universal control panel at the TV and press the “Play” button.
- After selecting the code, the TV will turn off. If this happens, you need to press the Enter button to confirm. Next, you need to give the remote control about 2 more minutes to complete the binding.
- If the shutdown has not occurred before this point, you will have to use a manual search. To do this, you need to repeat the first settings listed above and then additionally press the FF and Power buttons. Pressing these buttons should be repeated until the TV turns off. When this happens, remember to press the “Enter” button.
Phone control
In order to be able to control an LG TV using an Android phone, it is necessary that both of these devices are simultaneously connected to the same network. No additional programs or smartphone applications are required. If the apartment already has a configured and installed WI-FI router, this will be a big plus. Most likely, everyone who has a phone has already managed to connect to this router. Now you should do the same with the TV.
To do this, you need to open the menu in it and find the “Network” item; often it can be opened using one key. Here you can consider the available connection methods. After selecting the WI-FI Direct line, the TV will begin searching for a device to connect. To synchronize via TV, select your mobile phone model from the list. After this, you will receive a connection request; you need to confirm it.
How to remove parental controls
Another option that is often implemented on modern TVs is parental controls. It is designed to limit the actions of children: for example, watching prohibited TV channels, changing system settings. To perform such actions, the TV will ask for the set PIN code.
But sometimes this control plays a cruel joke on the parents themselves: by turning it on and forgetting the code, you yourself can face inconvenient restrictions. Resetting the TV settings, namely the password, will help remove them. Here is the algorithm for LG smart TVs:
- go to Menu/Settings;
- go to the Security/PIN code reset tab;
- enter any combination of numbers without pressing OK;
- press the channel switching buttons: up twice, then down and up again;
- enter code 0313 and click OK.
The result of these measures should be to reset the PIN code to the factory one, that is, four zeros.
What to do if the buttons do not work selectively
Severe contamination, dust or sweet soda can cause a separate button to become stuck or broken. So, when liquid gets inside the device, oil condensation appears. And it can be eliminated quite easily on your own.
If the TV remote control selectively stops working, or there is no signal coming from some of the buttons, do the following:
Disassemble the remote control according to the diagram presented above. First, unscrew the screws near the batteries after removing them. Run a thin object around the perimeter of the case to release the latches. Take a cotton swab or swab. Dip it in an alcohol solution or alcohol. Gently wipe the board with cotton wool. Look at the contact pads on the rubber part. Wipe the body. Keys. Do everything with light movements, without strong pressure
Pay attention to cleaning the spring contact. He goes to the batteries
And if it is very dirty, you can use sandpaper. But only for him. After cleaning, wait for all elements to dry and reassemble the device in the reverse order.
Types of breakdown
Whether it’s repairing remote controls for a Samsung smart TV or restoring a control device from an old Chinese Panasonic, the principle is the same. Since the remote controls of different models are structured approximately the same way, repairing a TV remote control will follow the same procedure, regardless of the model.
If the TV remote control does not work, this can happen for a whole range of possible reasons.
Main types of breakdowns:
- Loss of functionality due to contamination.
- The graphite coating on the buttons has worn off.
- The batteries are dead.
- Mechanical damage to the housing or control board, for example due to a fall. Mechanical damage can be different: an LED, a contact terminal has come off, or something in the quartz resonator has broken.
- Some buttons do not work or stick because liquid or wet steam has gotten inside the product.
Causes of failure
The technician can identify the problem in a few minutes, but he will use special tools and equipment. Ordinary users may not have such knowledge and skills, so they are forced to turn to specialists for help. But you shouldn’t make hasty conclusions and immediately run to the nearest workshop in panic. The reason for the failure may be so trivial that to restore the device you will need to perform a few simple steps.
The most common causes of remote control failure include the following:
- Low batteries. It is recommended to replace the batteries or check the functionality of the old ones. Using a voltmeter or tester, you need to measure the power source. The minimum indicator should be at 1.3 V.
- Different signal frequency. You need to pair it with your TV receiver. If the device is used simultaneously for several electronic devices, you need to make a separate connection for each.
- Some buttons may not work. The cause is usually dirt or moisture, but sometimes it is due to mechanical damage resulting from a fall or impact.
- When you press one of the keys, the command of the other is executed.
- The malfunction lies in the operation of the TV itself.
If the user spills liquid on the device, it is recommended to disassemble it and clean it. Water becomes a short circuit catalyst, and when it settles under the rubber components, it forms a sticky consistency. The sticky layer on the contacts must be removed with a soft cloth soaked in alcohol, or use a cotton swab for this purpose.
Repair features
Problems may arise with a new remote that may not seem to work. The solution to this situation may involve several actions:
- First you need to make sure that the device is suitable for your TV model. This information may be contained in the operating instructions or on the manufacturer's official website.
- After checking the compatibility of the TV and the remote control, you need to remove the batteries and insert them back.
- You can also disconnect the TV from the power supply, and after a few minutes insert the plug back into the outlet.
A common problem is poor button operation. The reason for this behavior of the remote control is severe contamination or spilled liquid.
Let's consider how to act in such situations:
- Let's disassemble the remote control . Using a lint-free cloth soaked in alcohol, wipe the dirty areas.
- It will be more difficult to remove contaminants from the microcircuit - you need to be careful here . Excessive pressure or careless action will render the fragile part inoperative.
- Don't forget about the contacts in the battery compartment. They also need cleansing . Some people use sandpaper for this purpose. Experts do not recommend practicing this method.
- After removing dirt, the disassembled remote control should be left to dry for a day . After this, you can assemble it and check for functionality.
During operation, the remote control may be subject to mechanical damage - impacts and falls. The result of such situations are cracks and contact failures. Thin cables are used to connect microcircuits. You need to check each board and solder those that were damaged.
Mechanical wear is a common problem for all devices. In remote controls, the conductive layer under the buttons most often wears off. You can solve this problem yourself by restoring the conductive coating.
For this work, you can purchase a special kit or use regular foil.
Remote controls with a touch panel are worth talking about separately . The most common problem is the increase in battery drain rate. Over time, the remote control stops working even with new batteries. This problem is associated with a malfunction of the capacitors, which are located at the positive input. The solution to the problem is simple - just remove the capacitors.
In this form, the remote control will work normally, but the safety of its use is questionable.
If the touch panel malfunctions, you need to calibrate it. It is performed as follows:
- The batteries in the remote control are replaced, their type is indicated under the cover;
- Hold the Guide button for 5 seconds;
- calibration has been completed - you can check the operation of the touch panel;
- If the touchpad still does not respond, you need to reconnect the remote control.
What's the result?
As a result, the remote control works like new, all the buttons respond and work as they should.
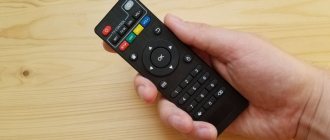
On my own behalf, I would like to recommend you a silicone case for the remote control. YES, many will now tell me that you can stretch the cellophane (bag) - perhaps, but the silicone case looks much more aesthetically pleasing, and is also nicer in your hands; you can buy it on ALIEXPRESS for literally pennies (about 70 - 90 rubles). For the kitchen and bedroom (if you use creams), it is simply necessary. Any fat and cream will not pass under the buttons, and the remote control will always work like new.
Now let's watch the video version
This is how the article turned out, I think it was useful to you. Disassemble - clean your remote controls and restore their functionality. And that’s all for me, read our repair blog.