From this article you will learn how to configure NTV-Plus channels on LG TVs.
If your TV has support for CAM modules, this means that you can watch paid satellite television channels on it, in particular such as NTV-Plus.
How to find out if your TV has a satellite tuner? To do this, you need to inspect its rear wall, on which the connectors are located, and find there the input for the LNB IN antenna.
It is also worth noting that all TVs are equipped with a CI slot for CAM modules.
To correctly configure NTV-Plus on LG using the CI+ CAM module, you must follow the instructions below.
The general principle by which all LG TVs are configured is generally the same. Only the names of menu items may differ, which is caused by different software versions, but the essence of the settings is the same.
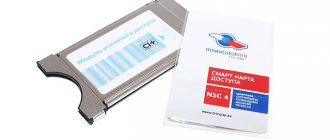
First of all, you need to install the NTV+ access smart card in the CI+ CAM module in a that is TURNED OFF . The chip should be facing the thick side of the module. Next, the conditional access module is installed.
The next step is to turn on the LG TV and switch it to satellite reception mode. The list of available channels is displayed on the screen by pressing the LIST button.
After that, take the remote control and press the red button on it to select the reception mode. Oh and click OK.
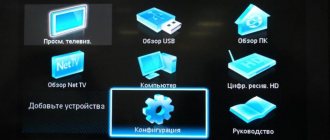
To make further settings, press the SETTING (MENU) button and go to the CHANNELS section.
Read the information about the module and access card (serial number of the NTV-Plus smart card) in the module menu CI DATA (CAM) - Information - Smart card - General information. If there is nothing there or an error appears, go to the module setup menu CI DATA (CAM) - Settings and select the RESET TO FACTORY SETTINGS section.
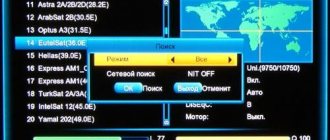
Next, turn off the TV, wait a few seconds and turn it on again. Then go to the SATELLITE SETUP menu section in the “Channels” main menu item.
Make sure all settings are the same as in the image above. On the left are two scales on which you can check the signal quality, and if you do not have an antenna configured, tune it to the NTV-Plus satellite signal.
After this there are two configuration options:
- For LG TVs with NTV-Plus auto-tuning.
- For models without it.
Resetting the CAM module CI+ from NTV-PLUS to factory settings
TV module, abbreviated as conditional access module CI+ CAM, is designed for decoding the NTV digital television signal. The TV module provides broadcasting of TV channels on modern TVs with a built-in digital receiver DVB-S, DVB-S2 and with support for the CI+ standard. The CAM module from NTV allows you to correctly exchange data between the access card and the TV when decoding your favorite paid channel included in your subscription.
If, while watching NTV-PLUS TV channels, the message “Channel is encrypted” appears on the TV screen, then one of the ways is to completely reset the NTV-PLUS CI+ CAM module to factory settings.
What needs to be done: Step 1. First of all, make sure that the card installed in the LCD TV is active and the contract is connected. Remove the card from the TV after turning it off. Log in to your Personal Account on the NTV-PLUS website. Check whether your contract is connected and check the card number removed from the TV with the card number indicated in your Personal Account. Install the card in the CAM module in accordance with the image of the chip position on its sticker.
Step 2. If the contract is connected and the card is activated, reset the CAM module to factory settings. To do this, you need to go to the module menu. Depending on your TV model, this can be done as follows:
| LCD TV model | Menu path to reset settings to factory settings |
| LG | Press the Menu button on the remote control (SETTING) -> SETUP (may be called CHANNELS) -> CI PARAMETERS |
| SAMSUNG | Press on the remote control Menu -> BROADCAST (may be called CHANNEL) -> GENERAL INTERFACE -> CI MODULE MENU |
| SONY | Press Menu on the remote control (may be called HOME or an icon in the form of a house) -> SETTINGS -> DIGITAL CONFIGURATION -> CA MODULE SETTINGS |
| PANASONIC | Press on the remote control Menu -> SETTINGS -> REGULAR INTERFACE -> VIACCESS -> SLOT 1 |
| PHILIPS | Press on the remote control Menu -> SETTINGS -> SATELLITE SETTINGS -> GENERAL INTERFACE -> VIACCESS |
| SHARP | Press on the remote control Menu -> SETTINGS -> OPTION -> CI INPUT MENU |
| BBK | Press on the remote control Menu -> OTHERS -> CI information |
| THOMSON | Press on the remote control Menu (gear icon) -> SYSTEM -> OPTION |
Next, the module menu will be available to you. Depending on the model of CAM module you are using, follow these steps:
| CAM module type CI+ | Menu path to reset settings to factory settings |
| SMIT 1.2 (white sticker on the module) | 1.Select “SETUP” and press OK 2.Select "FACTORY SETTING" and press OK 3.A message will appear on the screen: “Do you want to restore factory settings?” 4.Press OK on the remote control. The screen will go dark and after a few seconds access to the channels should resume |
| SMIT 1.3 (black sticker on the module) | 1.Select “SETTINGS” and press OK 2.Select "FACTORY RESET" and press OK 3.A message will appear on the screen: “Confirm restoring factory settings” 4.Press OK on the remote control. The screen will go dark and after a few seconds access to the channels should resume |
| NEOTION | 1.Select the line “GENERAL SETTINGS” and press OK 2.Select the line “RESTORE FACTORY SETTINGS” and press OK 3.The message “Confirm restoring factory settings” will appear. If you select OK, the module will be rebooted." 4.Press OK on the remote control. The screen will go dark and after a few seconds access to the channels should resume |
Step 3. If these steps do not help: disconnect the LCD TV from the 220 volt power supply, remove the CI+ module, reinstall it and turn on the TV. If after downloading the channels remain scrambled, try resetting the module to factory settings again. If there is no positive result (the message “Channel encrypted” remains), it is necessary to check the serviceability of the module and access card.
Author: silver from 08/29/2018, viewed: 1978
migsat.ru
Equipment registration
Everything is connected. Now let's register the equipment:
- Go to the official website of the company;
- Register in your personal account;
- We confirm registration;
- Enter your login and password;
- Find “Registration of agreement”;
- Enter the contract number and card number;
- We do not write anything in the paragraph about the “Family” package”;
- Set the current date;
- In the terminal model line, you need to select “CI+ Viaccess conditional access module”;
- Enter the serial number of the receiver;
- Leave the INU empty;
- We also do not indicate the name of the point of purchase of the subscription kit;
- Click “Next”;
- Select your gender, enter your full name, email, phone number, equipment installation address;
- At the “Order a medical statement” level, you can select “Refuse”, since the service is paid;
- Opposite the obligations to provide the company with a subscription agreement and confirm the accuracy of the data provided, check the boxes;
- Determine your preferred service rate and click “Register agreement”;
- We link the contract to the personal account;
- In your personal account, indicate the contract and card number and click “Add”;
- We fill out the agreement on paper;
- We send the first page of the document to the NTV+ mailing address;
- Connect the card to the module;
- Within an hour the TV broadcast begins.
How to Set Up NTV Plus on Lg TV
Setting up NTV-Plus on LG TVs
From this article you will learn how to configure NTV-Plus channels on LG TVs.
If your TV has support for CAM modules, this means that you can watch paid satellite television channels on it, namely NTV-Plus.
How to find out if your TV has a satellite tuner? To do this, you need to inspect its rear wall, on which the connectors are located, and find there the input for the LNB IN antenna.
It is also worth noting that all TVs are equipped with a CI slot for CAM modules.
To correctly configure NTV-Plus on LG using the CI CAM module, you must follow the instructions below.
The general principle by which all LG TVs are configured is generally the same. How to set up satellite channels on lg tv. Only the names of menu items may differ, which is caused by different software versions, but the essence of the settings is the same.
First of all, you need to install the NTV access smart card into the CI CAM module when the TV is TURNED OFF. Setting up NTV Plus. How to set up an image to appear on your TV. The chip should be facing the thick side of the module. Next, the conditional access module is installed.
The next step is to turn on the LG TV and switch it to satellite reception mode. The list of available channels is displayed on the screen by pressing the LIST button.
After that, take the remote control and press the red button on it to select the reception mode. Oh and click OK.
To make further settings, press the SETTING () button and go to the CHANNELS section.
Read the information about the module and access card (serial number of the NTV-Plus smart card) in the module menu CI DATA (CAM) - Information - Smart card - General information. If there is nothing there or an error appears, go to the module setup menu CI DATA (CAM) - Settings and select the RESET TO FACTORY SETTINGS section.
LG TV setting up satellite channels
Instructions on how to set up an LG satellite TV to view Tricolor TV satellite channels. Satellite
Setting up satellite channels on LG webOS 4.0 TV
Setting up satellite channels on an LG TV (new models) LG webOS 3.5 Setting up.
Next, turn off the TV, wait a few seconds and turn it on again. How to configure NTV NTV Plus settings yourself. How to set up channels on lg TVs yourself is one of the frequently asked questions from users. Once on the lg tv,. Then go to the SATELLITE SETUP menu section in the “Channels” main menu item.
Make sure all settings are the same as in the image above. On the left are two scales on which you can check the signal quality, and if you do not have an antenna configured, tune it to the NTV-Plus satellite signal.
After this there are two configuration options:
- For LG TVs with NTV-Plus auto-tuning.
- For models without it.
Auto-tuning of NTV-Plus channels on LG
From the “Satellite Settings” menu, go back using the corresponding BACK button and open the “Auto Search” section, then select the SATELLITE mode and move on.
You must select the NTV-Plus operator. If there is no such operator in the list or your TV does not offer to select it, we recommend using the second setup method, which we will discuss in more detail below.
Below in the “Satellite Settings” menu, simply click OK.
Select the “Quick Search” mode and click OK again.
On “Run” we also click OK.
We wait for the end of the search and its results, click “Close” and exit the menu using the Exit button.
Next, in order to display a list of found channels, click the List button.
Using this search option, all channels found by the LG TV will be automatically divided into topics, the name of which will be indicated at the top of the list. Installing and configuring the NTV plus cam module on the TV for setup. If desired, the name can be changed by pressing the blue button on the remote control.
Manual setup of NTV-Plus on LG
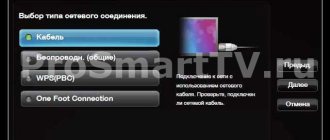
Open the “Manual Tuning” (or “Manual Search”) menu in the “Channels” section of the main menu. How to set up digital channels on an LG TV for beginners. Check that all the settings are in accordance with the image below, and that there is a checkmark in the “Search for network” item, then go to the “Add” item and click OK.
We wait for the search results, click OK on the “Close” item and exit the menu.
In order to display the list of found channels on the screen, click on the List button. All channels will be displayed as one list.
Also in the main menu “Channels” in the line CI DATA (CAM) - Information - Smart card - Providers, you can view information about packages and their expiration dates.
Source
“Close” exit, “Close” exit menu, configure, plus, satellite channels, TV
ipsillon.ru
Debugging channels
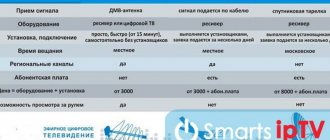
To tune NTV channels, you can use two available options - manual and automatic tuning.
Auto-tuning is simpler - select the “search for channels” command in the menu, and the set-top box will find and install everything on its own.
- NTV plus dish: select a set, connect, configure
Setting up NTV manually is not so simple, but with due care everything will go well:
- In the receiver settings section, enter the default settings. There you need to enter the “channels” menu, then “antenna” and “satellite settings”.
- If the set-top box asks for a password, try entering four zeros, this is the standard password.
- A tab will appear in which we leave only the EutelsatW4 36E satellite, and uncheck the rest. If the tuner does not allow you to carry out the procedure, you need to remove the access card.
- The next item is transponder settings. Set the upper level of Lnb to 10750 and the lower level to zero. Settings - 12130 R.
- The last step is to select the above transponder in the manual configuration section and click “network search”. The process is quite lengthy, so no need to worry. Upon completion, depending on the selected tariff plan, the required number of channels will appear.
Setting up NTV-Plus
NTV plus settings
When installing NTV Plus equipment yourself, first of all it is necessary to carry out high-quality installation and installation of technical equipment.
It is recommended to follow the following rules:
1. It is worth taking into account that the satellite television operator NTV Plus has several different dish manufacturers, and the exact direction angle of the television dish itself (from 17 to 38 degrees) will depend on them.
The dish also needs to be pointed south since the NTV satellites themselves are located high above the equator. For accuracy, it is recommended to use a compass.
2. In order for the image quality to be excellent, it is necessary to install the antenna in such a way that the receipt of the television signal is not obstructed by various high-rise buildings, trees, structures, etc.
3. The installation of the bracket must be approached with maximum responsibility. The quality of the signal will depend on the strength of the installation.
Otherwise, over time, the plate may turn around or settle, the direction angle will change, which will certainly affect the level of the television signal.
4. The cable must be durable and resistant to weather conditions.
Important! Be sure to consult with the NTV Plus operator before installing technical components yourself.
Installed equipment NTV plus
Setting up the NTV plus antenna
After installing the equipment, you need to configure the antenna itself (satellite dish):
- First the conversion cable must be connected to the receiver. The device receiving the signal is connected to the television device;
Note! For proper operation of the equipment, in order to avoid its breakdown or poor quality work, carefully read the installation and operating instructions!
- a small mirror installed on the dish must be carefully rotated (right/left/up/down), thereby adjusting its exact direction towards the satellite.
- In this case, you need to observe the changes on the TV screen. Manipulations must be done before the image appears;
Correctly installed mirror on the satellite
- When it is possible to detect the presence of an image, you need to activate the “Signal reception level” function on the receiving equipment. The higher the value on the signal definition scale, the better the image will be.
Received signal level
Equipment registration
To make further settings, you should register on the official resource of the NTV Plus operator.
This must be done in order to register the access card and CL module.
Example of contract registration
The CL module is a device that, using a special hole in the TV and a decoding device (access card), allows the subscriber to access closed programs of the television operator.
After registering and activating it via email, this will become active in the user’s personal account.
After registration, the access card will be activated automatically within 24 hours.
Receiver setup
If you use your own equipment and an NTV Plus dish, then when using the standard receiver settings recommended for NTV satellite television users, the receiver will be configured to the necessary parameters automatically.
To do this, just use the remote control to turn it off and then turn it on again.
If automatic configuration does not occur, try disconnecting the terminal from the electrical power source, and repeat the manipulations when connecting to the network further.
If, after the above recommendations, automatic tuning does not occur, you should reset all settings to the factory settings, after which the receiver will begin again to automatically search for channel settings of the NTV plus television operator.
Don't forget to check the level of the signal reception scale, the problem may be a low frequency.
Auto search for NTV plus receiver SETTINGS.
Setting up NTV plus channels
In this case, channel tuning can occur either automatically or through manual settings.
To automatically tune channels, select “Automatic channel installation” in the menu.
If you have installed the equipment correctly, all channels will be tuned in fully automatically without your participation within a few minutes.
Searching for channels manually is a more labor-intensive process:
1. You need to reset the settings to factory defaults, then in the Menu item you need to select Settings, and then Default Installation.
After selecting this item, select Channels, Antenna, and then Satellite Settings.
2. The receiving equipment will ask for a password, which, when set to factory settings, corresponds to four zeros (“0000”).
If you managed to change this numerical value, then enter your option.
3. In the window that appears, you will see a list of allowed satellites.
It is necessary to remove the checkmarks next to each of them, leaving only Eutelsat w4 36e. If the function is unavailable for some reason, you must remove the access card from the device.
4. Afterwards, you need to configure the receiving device (transponder) itself according to the following parameters: 12130 “R”, the lower level of the LNB should correspond to “0”, and the upper level to “10750”.
5. So, after changing all the above settings in manual configuration mode, you need to select the receiving equipment recommended by the device and set the target
Search the web. Perhaps in this mode, setting up channels will take a lot of time, but all the channels included in the package will certainly be configured as expected.
Setting up Samsung and LG TV
TV models from these companies often automatically have a CAM module.
A CAM module, or conditional access module, is a decoding device built into the TV that allows you to receive closed-access television signals.
Samsung TV setup instructions:
1. Using the remote control, you need to go to the Settings Menu of the TV itself, and select “Broadcast” there.
2. A list of satellite antennas will appear again, from which you must select Eutelsat w4 36e. After this, it is better to save the settings.
3. Next, go to the LNB Settings section (the LNB converter receives satellite signals and converts them into low-frequency ones), and select any receiving device recommended by the device. You need to turn off DiSEqC mode, and the tone is 22 KHz. The lower level of the LNB should correspond to “9750”, and the upper level to “10750”.
4. On the control panel, press the “Return” button twice.
5. Next, you need to find the Manual settings tab in the Menu.
6. From the list of satellite antennas, again select Eutelsat w4 36e, and from the list of transponders, select the one listed under number 11900 (v/r) 27500, and then agree to save the settings.
7. Select “Search network”.
8. In the Menu we again find the Broadcast section, and in it Change Channels. If you need to assign a specific number to a channel, we do this using the “Change number” function
9. In the “Sorting” Menu item, you can assign channels to various target categories, for example, News channels, Children's, Entertainment, etc. After this, the Samsung TV setup is considered certified.
LG TV setup instructions:
1. Using the remote control, you need to go to the TV settings and select the “Broadcast” item there.
2. A list of satellite antennas will appear again, from which you must select Eutelsat w4 36e. After this, it is better to save the settings.
3. Next, go to the LNB Settings section and select any receiving device recommended by the device. You need to turn off DiSEqC mode, and the tone is 22 KHz. The lower level of the LNB should correspond to “9750”, and the upper level to “10750”.
4. On the control panel, press the “Return” button twice.
5. Next, you need to find the Manual settings tab in the Menu.
6. From the list of satellite antennas, again select Eutelsat w4 36e, and from the list of transponders, select the one listed under number 12322 (r) 27500, and then agree to save the settings.
7. Select “Search network”.
8. In the Menu we again find the Broadcast section, and in it Change Channels. If you need to assign a specific number to a channel, we do this using the “Change number” function
9. In the “Sorting” Menu item, we can also divide channels by topic.
| NTV plus Vkontakte | NTV plus on Facebook |
| NTV plus in | NTV plus in Odnoklassniki |
Download the NTV Plus app on Android Download the NTV Plus app on iPhone
General rules for self-installation of equipment
At the first stage of setting up NTV Plus, you should install the equipment according to the following instructions:
- NTV broadcasts via Eutelsat 36A/36B/36C satellites located above the equator. Accordingly, the layout of the plate should provide for its rotation in the south direction. The exact coordinates of the direction can be determined by a compass. Minor deviations to the east or west are possible in accordance with the geographical location of the facility where the work is being performed. The satellite's inclination angle is 17-38 degrees in accordance with the manufacturer's model. NTV supports antennas from several manufacturers.
- You need to pay attention to the quality of the overview of the territory. Trees, buildings and other obstacles should not block the signal reception line.
- So that the plate does not have to be reconfigured, the bracket must be secured as securely as possible.
- The cable must be of high quality and weather resistant material.
Bottom line
Setting up transponders and NTV frequencies with due care is not a problem. If difficulties and problems arise, it is better to use the services of the company’s specialists, this will help save both time and nerves.
Good afternoon, I have the following problem, and not technical support, no one else can help me. The essence of the problem is: two LG TVs, one new for a month, diagonal 55, the second six months old, 43 diagonal, both TVs are not cheap, with support for 4K, and an NTV + CI module. And it doesn’t want to work, namely, every 15-20 minutes it freezes, writes the channel is encrypted, then it turns on and changes itself. And after 2-3 such work, the card is blocked, and on both one and the other TV, now I installed a receiver on one TV and it works fine, but I would still like it to work through the CAM module. NTV+ LG also called support, no one can help, they say everything should work well!
Have you bought a new TV? And do you have an NTV+ satellite dish installed? Many subscribers of NTV+ satellite television prefer the absence of a receiver, a bunch of wires and remote controls. In the case of the CAM module, you only need a cable from a satellite dish connected to the TV. The main condition is the presence of a satellite DVB-S2 tuner in your TV. So, let's consider the situation when you have a tuned antenna and purchased an NTV+ module, what to do next?
1. First you need to connect the antenna cable and scan the channels.
The satellite connector can be labeled SAT, Satellite and is a “cheater”.
On TVs of different brands, settings are made differently, so here is a list of general steps for scanning NTV+ channels:
- Selecting the Eutelsat 36.0E satellite
- We set the LNB settings: Lower range 9750 (or 10750), Upper range 10750
- Find the Manual search item
- Selects any frequency (NTV+ transponder), for example 12130 V 27500
- Turn on the Network search item (Network search)
- Click search
2. Only after you have scanned the channels, you need to register the NTV+ agreement.
- How to connect NTV Plus without a dish
- Go to the official NTV+ website using the link https://service.ntvplus.ru/activate/
- We check all the boxes and enter the contract number, card number and select the receiving equipment and serial number
- Enter your personal data
- Selecting a channel package
3. Insert the Module into the switched off TV, turn on the TV, wait for the module to initialize and set it to any channel (for example Russia 1). We wait up to 1 hour for the picture to appear.
More detailed information on setting up different brands of TV.
To set up channels on your TV, you must refer to the instructions for your TV.
(Since the menu for each TV is individual, it is impossible to prepare a single setup instruction) You can only give recommendations for setup (if your TV does not offer auto-tuning for NTV-plus, as, for example, on some LG models)
In the search (settings) section for satellite channels:
- Satellite name EUTELSAT W4 36.0E, or Eutelsat 36A/36B
- LNB frequency (or local oscillator frequency) 10750. If in your settings there are two of them (high frequency and low frequency), then both should be. 10750
- Transponder (or search frequency) – 12322 / 27500/ R(V)
- Search type – network (network)