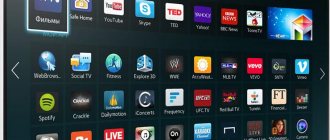
If you purchased a Samsung TV with the function of watching television via the Internet Smart TV, then it will not take you much time to set up. To use the Smart TV function, you need an Internet connection, and the recommended speed is 10-20 Mbit/sec and higher.
Smart TV cannot work without the Internet; you can connect it in several ways: via a cable from a router, using wi-fi, as well as WPS, Plug & Access and One Foot Connection technologies. This is done in the “Network Settings” section of the menu, which for Samsung looks like this:
The final step of setting up the service
When the Smart TV connection on Samsung is completed, a notification about this will appear on the screen. To complete the operation, configure the Smart Hub service:
- Visit the menu and find the "Support" item.
- Activate the Smart Hub service.
- Turn on System Explorer.
Leave a request and receive a 15% discount on your first repair!
Submit your application
How to set up Smart DNS on Samsung Smart TV?
If you want to watch geo-restricted content on your Samsung SmartTV, Smart DNS is the easiest way to help you. Smart DNS is a content unblocking service based on a DNS proxy that redirects you to blocked content, bypassing restrictions enforced by both the content server and your local Internet Service Provider (ISP). It is a very simple, easy and affordable way to access modern entertainment and information from any regional content servers like Netflix, Hulu and others. You can set up Smart DNS service on multiple devices including smart TVs, computer and other devices.
To access the content you want, you need to configure your Samsung smart TV for Smart DNS service. To set up Smart DNS service, you will need the IP address of your Internet-connected device and the IP address of your Smart DNS service provider's Smart DNS server. You can obtain your device's IP address from your Internet Service Provider (ISP) and Smart DNS Server IP address from your Smart DNS service provider as described in the following procedures. Here is a site where you can get free trials.
How to find your public IP address?
When you register with your local ISP to connect to the Internet, they provide you with an IP address—static or dynamic—for your Internet devices, such as your router, computer, or others. Therefore, to obtain an IP address, you need to register with your local Internet service provider and prepare the connection for use.
A static IP address is provided to you by your Internet service provider when you subscribe to Internet services; but you can find out your existing IP address at any time using certain commands as mentioned below.
So, to find out the IP address of your existing ISP, follow this procedure:
- If your TV is connected to the Internet, press Menu
on the remote device and select the
Network
. - Select Network Settings
and then select the
IP settings
. Your TV's existing IP address will appear. This will be a private IP address if you are using a router to connect to your ISP. - You can also find out the IP address by connecting your computer to the Internet and clicking Start Menu >> Accessories >> Command Prompt. A command prompt window will open.
- Enter the command ipconfig
and press the return button.
The details of the computer's IP address and the router's IP address appear, shown as Default Gateway
. - To find out your public IP address, open any browser on your computer and open the Google search engine. Type in the search engine " What is my current public IP address?
" It will return your existing public IP address.
Or just go to a site like www.wimi.com to see your public IP address.
How to get a Smart DNS IP address?
To get a Smart DNS IP address, you need to register with a reliable Smart DNS service provider online. There are a large number of DNS service providers who offer you smart DNS services at very reasonable prices. The smart DNS server provider automatically registers your IP address in their database and allows your connection based on your IP address to use their DNS server service to connecting to blocked content. Obtain the IP address of the DNS server to be used in the configuration from your Smart DNS service provider.
Setting up Smart DNS Server on Samsung Smart TV
To set up a Smart DNS server on your Samsung Smart TV, follow the following step-by-step procedure.
- Power on your Samsung SmartTV.
- Connect your Samsung Smart TV to the Internet using a cable or wireless connection provided by your ISP using the Samsung Smart TV user manual.
- Press the menu button on the remote smart TV device. A list of menu items appears.
- Select the Network option. A list of network functions appears.
- Select the Network Settings option. The Network Setup Wizard appears.
- Select the media type—Ethernet cable or wireless—to connect to the Internet and click the Start button.
- A full set of network tests are performed. Two (2) check marks will appear on the network diagram indicating successful completion of the connection test.
Click the "IP Settings" button. Numerous IP settings options appear. - In the DNS setting field, switch from the Obtain automatically option to the Enter manually option. The DNS server fields are enabled.
- In the DNS Server fields, enter the DNS server IP address provided to you by your Smart DNS service provider. After entering the IP address, click OK.
- Reboot your Samsung Smart TV for the settings to take effect. Your TV should be able to connect to blocked content once the configuration has been successfully implemented.
Important Note:
- This configuration only needs to be implemented once; it needs to be reconfigured if the DNS service provider or ISP changes.
- Samsung is a giant electronics manufacturer; and produces many models and batches of smart TVs that have different capabilities, features and supported functions. To make sure your Samsung Smart TV supports the feature you want, see your Smart TV User Guide.
- Smart DNS service providers automatically add your IP address to their database to help you bypass restrictions during registration. If your IP address changes due to dynamic IP allocation by your Internet Service Provider (ISP) later, the Smart DNS service may not work. You will either need to manually add the new IP address to the Smart DNS database, or you will need to Login to your account from the changed IP address to replace the old IP address with the new one and activate it. For more information, contact your local Internet Service Provider regarding these issues.
- You may experience some glitches and anomalies when accessing content if your connections are low capacity or insufficient to support high definition content.
- There may be some issues running certain applications on Samsung Smart TVs due to the characteristics of the firmware implemented on the Smart TVs. For more information about such issues, please refer to the application specifications and software features.
.
Connecting to a network using WPS
There is also a faster way using WPS technology (TP-Link routers call this function QSS). It is necessary that both the router and the TV support this function. To connect using this method:
- Open the menu item “Settings” -> “WPS”.
- Find the WPS button on the router, press it and hold it for some time. Typically this process is completed in a few seconds, but in some cases it may take up to 1 minute.
- The connection result will be displayed on your TV screen.
As you can see, when using this technology you do not need to enter any settings at all, everything is registered automatically. This is its big advantage.
What do you need to connect your TV to the Internet via cable?
To establish a wired connection, you need:
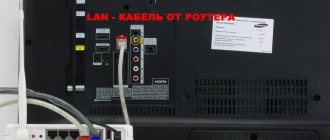
- the provider cable that comes from the entrance or from the modem in your apartment, or a LAN cable (if we connect through a router);
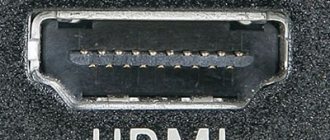
- TV with Smart TV and LAN connector;
- router (if a direct connection is not suitable for you);
- availability of Internet access (paid tariff);
- network type - find out from your provider what protocol it works with: call technical support or look at your contract with the company. Protocol options: PPPoE, L2TP, PPTP, dynamic IP, static IP.
Purpose of the router
LAN connectors, built-in Wi-Fi adapters, and new multimedia capabilities have made it possible to create a local network at home and transfer files and streaming video without downloading. However, it is obvious that no matter how “smart” the TV is, it cannot connect to the Internet on its own, since it does not have built-in L2TP or PPPoE clients to receive the corresponding network protocols.
A router is a router through which the home network data packet is redirected, which allows you to combine all existing devices and provide access to external packets, that is, to the Internet. In other words, it helps to competently manage your home network. It can also become a Wi-Fi point.
Connecting cables to the router (Back view).
A TV, unlike a router, does not have such functions. It can only act as a separate device within a home network and to connect to it you need an internal or external Wi-Fi module or a connection cable.
Thus, there are two options for connecting the router to the TV to access the Internet:
- via TV router via cable;
- via Wi-Fi.
Let's figure out step by step how to connect a TV through a router to the Internet in each of these cases. Let's start with the first one - via cable. When connecting via cable, the following scheme is used:
TV connection diagram via cable.
To connect the TV to the Internet via a router, it must have a free LAN port, since the TV is connected to the router via a UTP modification cable. As a network connector, you can buy a simple Cat 5 patch cord:
One end of it is inserted into the LAN port on the router, the other into the corresponding Ethernet port on the TV.
This method has a certain disadvantage, since sometimes you have to pull the cable throughout the room. An excellent solution would be two PowerLine adapters (PLC), then the signals will be transmitted via the electrical network. Another option is to give preference to television via a wifi router.


