Home > Help > NTV Plus frequencies
This table shows the frequencies of NTV Plus transponders. The frequency list is updated regularly. Last updated November 19, 2021
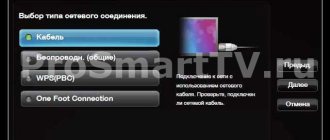
Using this list, you can tune NTV Plus channels manually.
| Transponder | Frequency, MHz | Polarization | Flow rate | FEC |
| NTV Plus | 11785 | R | 27500 | 3/4 |
| NTV Plus | 11823 | R | 27500 | 3/4 |
| NTV Plus | 11862 | R | 27500 | 3/4 |
| NTV Plus | 11900 | R | 27500 | 3/4 |
| NTV Plus | 11938 | R | 27500 | 3/4 |
| NTV Plus | 11977 | R | 27500 | 3/4 |
| NTV Plus | 12015 | R | 27500 | 3/4 |
| NTV Plus | 12207 | R | 27500 | 3/4 |
| NTV Plus | 12245 | R | 27500 | 3/4 |
| NTV Plus | 12265 | L | 27500 | 3/4 |
| NTV Plus | 12284 | R | 27500 | 3/4 |
| NTV Plus | 12322 | R | 27500 | 3/4 |
| NTV Plus | 12341 | L | 27500 | 3/4 |
| NTV Plus | 12399 | R | 27500 | 3/4 |
| NTV Plus | 12437 | R | 27500 | 3/4 |
See also TRICOLOR TV FREQUENCIES
Today, the NTV Plus satellite network is one of the most extensive in the country, and can delight users with a wide selection of content for every taste.
The television company has a network of its own NTV satellites, broadcasting at appropriate frequencies from various points on the planet. NTV Plus frequencies are what we will talk about today.
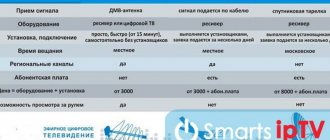
Equipment
The first and main question is what equipment will you need to fully enjoy the affordable quality of satellite television?
Needed:
- High-quality audio system capable of providing good stereo sound.
- LED, LSD or plasma panel that supports HD video reception.
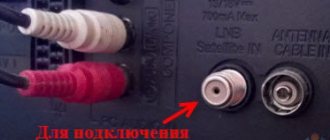
- Convector, HD receiver and TV antenna.
For more complex systems, this list of equipment may not be enough, and additional purchases will be required, but in the vast majority of cases, customers choose the above set.
The stability of the received signal depends on many factors: nearby high-rise buildings, bad weather, trees and wires. By the way, the latter can not only greatly distort the signal, but also completely block it, which is why it is better to entrust all work on laying cables, installing network components and the satellite dish itself to specialists.
Otherwise, self-installation of equipment by a person who does not have special training and the necessary knowledge of configuration will not lead to the expected results.
- How to watch satellite TV without a subscription fee: the difference between paid and free
The two main transponders of the television company are NTV plus HD and NTV plus. They are divided into devices with right and left polarization types. They strongly depend on two main flow parameters - speed and frequency. These two parameters also have a great influence on ensuring the required reception frequencies and stable operation of the transponders themselves.
Next, we will consider in detail the three main types of transponders.
Antenna installation and configuration
Determining the installation location of the NTV-Plus antenna
To ensure reliable reception of a satellite television signal, you need to choose an open area. There should be no tall trees, branches, buildings, bridges, flagpoles, etc. Most often, the antenna is installed on the roof; you can also simply mount it on the wall, on a loggia or balcony. It is very important to protect the structure from bad weather.
Each user can install and configure the HTB-Plus antenna independently. But still, some parameters are best left to professionals.
Left circular polarization
NTV Plus transponders with left polarization and circular frequency are divided into two main types:
- frequency 12341 L. Includes TNT channels, Home, NTV Mir, STS and Pervy. Flow rate with FEC value, 27500 SR - three quarters. Encoding – Viacces;
- frequency 12265 L: Russia 24, REN, Pyatnitsa, MIR, channel 5 and Russia 1. The main part of the channels is included in multiplex No. 1, with the QPSK standard and MPEG-2 DVB-S modulation format.
Meanings and their interpretation:
- Viaccess – access to pay TV channels. The most popular are the fifth and sixth versions. Others have been hacked or are on the verge of being hacked.
- Forvard Error Connection (FEC) – corrects errors proactively. Using this method you can restore the parcel information.
- SR is the streaming speed, which shows how dense the information flow is in the signal from the satellite.
Right circular polarization
Frequencies of this type of transponder:
- 12322 R: Nostalgia, NTV-Plus Sports, KVN TV, Our Cinema, Much TV, Men's Cinema, A Minor TV, TV Kitchen, TV India, Cinema Club, Auto Plus.
- 12437 R: Russian Bestseller, Russian Novel, Arkhyz 24, RTR Planet, Country, Live, Sarafan;
- 12245 R. In addition to television, there are also radio channels: Komsomolskaya Pravda, Radio Station Vanya, Chanson, Russian Radio, Autoradio, Maximum, Echo of Moscow. A good choice for those who like to watch interesting TV and listen to the radio. It is worth highlighting that the ability to listen to the radio is only available here;
- 11900 R. Mainly information channels, such as Gubernia and Euronews, as well as divisions of Viasat and TV 1000. Suitable for viewers who want to watch their favorite films and keep abreast of the latest events;
- 11785 R. NTV Plus informational, Our football, U, RBC, TNT, federal channels Zvezda and NTV, channels of the MATCH holding!
All of the above devices have a number of common parameters:
- FEC value - three quarters;
- streaming speed - 27500 SR;
- encoding type – Viaccess;
- MPEG-4 8PSK standard;
- DVB-S2 modulation.
Transponders for HD
For lovers of satellite TV in HD quality. A number of special devices with HD frequencies are available:
- 12399 R: KHL TV HD, Discovery Channel Russia HD, Film Premiere HD;
- 12207 R: TLC Russia HD, Eurosport 1 HD, History Russia HD, Amedia Premium HD;
- 11930 R: Viasat Nature/History HD, Viasat Sports HD, FOX Russia HD, Viasat Sport East HD, TV 1000 Comedy HD;
- 11823 R: Match! Football 1/2/3 HD, Nickelodeon HD, MTV Live HD, Our Football
It must be said that the transponders listed above have frequencies in the range of 11800-12400 MHz. The reason is that they make it possible to maintain a high-quality HD signal without degrading the coverage area or interruptions.
Right polarization allows you to produce a clear, complete and stable signal, which, importantly, does not at all affect the channels from multiplexes No. 1 and No. 2.
- Satellite TV which is better to choose reviews 2020
Bottom line
The above data will allow users to easily understand modern channels. Depending on the territory, satellite coverage ranges from 46-52 DBW.
The company has two main satellites - Eurotelesat 36B and Eurotelesat 36A, operating at frequencies of about 12000 MHz. The priority is to use right polarization, left polarization only in special cases.
Using the transponder table, you can easily navigate the channels and their technical parameters, which can provide invaluable assistance when “manually” setting up channels. The latest changes in the transponder table can be found on the website page “Satellites and channels” >>
Additional packages and services
Packages with channels and prices:
- Kino Plus (19) – 0 rubles for new subscribers included with the “Basic Vostok” tariff.
- Supersport (12) – 599 rubles.
- Sport Plus (10) – 399 rubles.
- Children (15) – 119 rubles.
- Night (4) – 169 rubles.
- Viasat (7) – 299 rubles.
- Cinema mood (4) – 299 rubles.
- Egoist TV (2) – 150 rubles.
- ViP (5) – 399 rubles.
- Match Premier (2) – 219 rubles.
The provider also offers to connect the following options:
- Multiscreen (Online TV): 177 channels especially for satellite subscribers for 199 rubles per month.
- Satellite Internet (for the Urals and Western Siberia) - for 3588 rubles per month.
Table of transponders and frequencies of NTV Plus TV channels
| Signal parameters | NTV Plus channels |
| 11785 R | |
| 11823 R DVB-S2/8PSK MPEG-4 27500 3/4 | |
| 11862 R DVB-S2/8PSK MPEG-4 27500 3/4 | |
| 11900 R DVB-S2/8PSK MPEG-4 27500 3/4 | |
| 11938 R DVB-S2/8PSK MPEG-4 27500 3/4 | |
| 11977 R DVB-S2/8PSK MPEG-4 27500 3/4 | |
| 12015 R DVB-S2/8PSK MPEG-4 27500 3/4 | |
| 12092 R DVB-S2/8PSK MPEG-4 27500 3/4 | |
| 12130 R DVB-S2/8PSK MPEG-4 27500 3/4 | |
| 12174 L DVB-S/MPEG-2 4340 3/4 | TNV Tatarstan |
| — R — Bolgar Radiosy 91.5 FM Kazan | |
| 12207 R DVB-S2/8PSK MPEG-4 27500 3/4 | |
| 12245 R DVB-S2/8PSK MPEG-4 27500 3/4 | |
| 12265 L DVB-S/MPEG-4 27500 3/4 | |
| 12284 R DVB-S2/8PSK MPEG-4 27500 3/4 | |
| 12322 R DVB-S2/8PSK MPEG-4 27500 3/4 | |
| 12341 L DVB-S/MPEG-4 27500 3/4 | |
| 12399 R DVB-S2/8PSK MPEG-4 27500 3/4 | |
| 12437 R DVB-S2/8PSK MPEG-4 27500 3/4 |
Transponder parameters and channels may change.
Irradiation area for NTV Plus signals
In Fig.1. the irradiation zone of NTV Plus signals from the territory of Russia from Eutelsat 36C (enlarged version) and 36B (36 east) satellites is indicated. The irradiation map will allow you to accurately select the optimal dish size for your installation location. Fig.1. Irradiation area of NTV - Plus signals from satellite Irradiation area of Eutelsat 36B enlarge >> Irradiation area of Eutelsat 36C enlarge >>
Satellite television NTV+ is one of the largest digital television operators in Russia. The channels are broadcast from four satellites, which makes it possible to cover the entire territory of the country.
In its western part, NTV + broadcasts from EUTELSAT 36B and Express-AMU1 satellites. In April 2021, the company launched broadcasting of paid channels from 2 more satellites. The name of the first is Express-AT1, and the second is Express-AT2. Both cover the eastern part of the country.
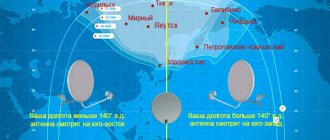
When setting up an NTV Plus antenna, it is important to know the location of the signal source. Because only by pointing the equipment at it will it be possible to obtain a stable signal and set up channels. All satellites are located in eastern longitude, but in different positions: 36 and 140 degrees. The former broadcast to the west, the latter to the east.
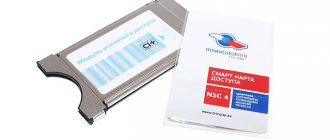
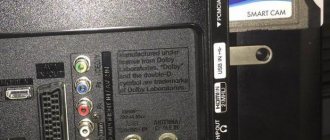
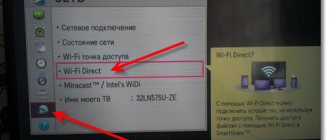
For TVs with a CAM module
Modern TVs can receive a signal without installing additional equipment (receiver). In order to watch premium channels, television equipment manufacturers have made an option with which you can connect an external CAM module.
It converts the receiving signal and sets up the channels. Instructions for installing the CAM module:
- Via Common Interface slot:
- Insert the access card into the CAM module.
We connect the CAM module with the card into the slot located on the side of the TV (Common Interface).
- Installation via CI adapter:
- Remove the sticker on the back of the TV.
- Insert the adapter into the corresponding hole.
- Lightly press the adapter to connect to the connector.
- Make sure the connection is secure and the adapter does not wobble.
- Insert the access card into the CAM module.
- Attach the CAM module with card to the CI adapter.
Make sure the card is installed correctly. The metal contacts should be directed towards the connector.
NTV+ transponders and their frequencies
A transponder is a device that receives, sends, or amplifies a signal. NTV Plus uses two types of transponders: with right and left circular polarization. Each of them has its own broadcast frequencies. Lists of transponders are given in the tables below.
- TV with built-in satellite receiver: selection features, connection, setup
Table of transponders with right polarization and the broadcast frequency they use on NTV+
| Transponder | Broadcast frequency, MHz | Name of TV channels | Satellite |
| 4 | 11785,02 | 36V | |
| 6 | 11823,38 | ||
| 8 | 11861,74 | ||
| 10 | 11900,10 | ||
| 12 | 11938,46 | ||
| 14 | 11976,82 | ||
| 16 | 12015,18 | ||
| 20 | 12091,90 | ||
| 22 | 12130,26 | ||
| 26 | 12207,00 | 36С | |
| 28 | 12245,34 | ||
| 30 | 12283,70 | ||
| 32 | 12322,06 | ||
| 36 | 12398,78 | ||
| 38 | 12437,14 |
Table of transponders with left polarization and their frequencies on NTV plus
| Transponder | Broadcast frequency, MHz | Name of TV channels | Satellite |
| 29 | 12264,50 | 36С | |
| 33 | 12341,00 |
From the tables you can find out at what frequencies your favorite channels are broadcast. This is relevant when manually setting up equipment.
Devices with right and left circular polarization use the same technical parameters:
- flow rate 27500 SR;
- FEC ¾.
However, they still differ in the type of modulation; the former use 8PSK DVB-S2, and the latter use QPSK DVB-S.
Manual setup of the NTV plus receiver
Setting up the NTV Plus receiver is possible both automatically and manually. When using the first method, the search for channels is carried out automatically; you do not need to enter additional parameters.
To use the manual configuration mode, you need to know the following parameters:
- satellite signal flow rate, denoted as SR;
- transponder polarization (R-right circular, L-left);
- channel broadcast frequency;
- local oscillator frequency.
Almost all the necessary data is listed in the tables above. Local oscillator frequency is 10750 MHz.
Knowing these parameters, you can start setting up. It is performed from the remote control. Instructions:
- Reset the receiver settings by step-by-step selecting the commands “Setup” → “Default installation” → “Channels” → “Antenna” → “Satellite setup”.
- Complete the reset by entering your password. By default it is 0000, otherwise it is the one set by the user.
- Next, select a satellite. If the service is blocked, you must remove and reinsert the smart card into the receiver.
- Specify data for setting up the transponder, namely polarization, channel broadcast frequency and level
- All that remains is to select the transponder and run the “Network Search” command.
If everything is configured correctly, after about half an hour the paid channels will become available for viewing.
Published:03/19/2019
List of NTV Plus transponders. Manual setup of the NTV Plus receiver. How to set up NTV Plus Vostok channels.
Search channels
There are two ways to search for new TV channels, automatic and manual:
- Automatic search does not require additional knowledge. Just run it and wait for the process to complete.
- Manual search is more professional and requires additional settings, but thanks to it, you can find all available TV channels.
Automatically
The automatic setup looks like this::
- Enter the menu using the remote control.
- Find the “Channel Search” subsection.
- Select this section and wait until the search ends. Upon completion, all found channels will begin broadcasting the image.
Resetting and setting parameters manually
The manual version is much more complicated, so for the best result you will need some knowledge. If you decide to do this yourself, use the following instructions:
- Before you start searching, you need to reset your previous settings. To do this, go to the “menu”, then the “setup” tab, select “default installation”, “channels”, click on the item “antenna”, “satellite setup”.
- After resetting the settings using the receiver, you need to configure the satellite dish, the system will ask you to enter a code, it is simple and most often - 0000.
- A tab with a huge list of satellites will appear in front of you, and you need to know exactly which one to choose.
Remove all marks that are opposite the satellites, otherwise their purity will be taken into account when searching. You must leave one check mark next to the Eutelsat W4-36E satellite. In some cases, these actions will not be available; you will need an access card to open them. - Check and, if necessary, set the transponder parameters. Recommended use: 12130 R, LNB levels: lower - 0, upper -10750).
- At the last stage, you need to enter the parameters in a special line. Enter the channel broadcast frequency in the “Manual setup” section. To start the search, select the previously specified transponder.
The channel search procedure takes a long time.
List of NTV Plus transponders
To start viewing, you must ensure that you have the following equipment:
- Television receiver for receiving high-quality video.
- High quality audio system.
- Antenna and receiver.
In some cases, additional equipment may be required, but usually the devices listed are sufficient for full operation.
Signal reception is determined not only by the quality of the equipment used, but also by the terrain of the surrounding area. Quality may be reduced in hilly areas, with high-rise buildings or tall trees in the immediate vicinity.
NTV transponders are used to transmit the signal. The devices used here are either right-handed or left-handed polarized. NTV broadcasts from Eurotelesat satellites.
Left circular polarization
If we consider transponders of this type, then you need to know that broadcasting gives access to the following channels:
- Operating at frequency 12334L. The following channels are included here: TNT, Domashny, NTV Mir, Pervy and STS. The flow rate is FEC, 27500 is three quarters. Viacces encoding is used.
- The frequency used here is 12265 L. The channels available are REN, Russia 24, Pyatnitsa, channel 5, Russia 1 and MIR. Almost all channels are included in multiplex No. 1. QPSK is used for broadcasting.
The following is information about other transponders of this type.
All channels listed here are available for comfortable viewing.
Right circular polarization
Transponders with right-hand polarization and circular frequency provide the following capabilities:
- On the frequency 12322 R you can watch the following channels: Men's Cinema, Kitchen, Nostalgia, NTV+ Sports, KVN, India, Our Cinema, Much TV, A Minor, Cinema Club, Auto+.
- When using the frequency 12437 R, the following are available for viewing: Arkhyz 24, Russian Bestseller, Live, RTR Planet, Country, Sarafan and others.
- At frequency 12245 R you can not only watch TV channels, but also listen to radio broadcasts. You can listen to the radio: Radio Vanya, KP, Avtoradio, Chanson, Russian Radio, Echo of Moscow and Maximum.
- At a frequency of 11900 R the following channels are shown: TV-1000, Gubernia, Viasat, Euronews.
- Using 11785 R, you can access the following: NTV+ for news broadcasting, Our Football, TNT, Yu, RBC, Zvezda, NTV, MATCH!
The following transponders are also used.
List of transponders that use right-hand polarization.
In all cases, this section uses the following characteristics:
- frequency 27500 Hz;
- FEC used is 3/4;
- Viaccess is used, providing paid access to content.
The video signal uses the MPEG-4 8PSK standard and uses DVB-S2 modulation.
The video describes in detail the kit for NTV Plus:
Transponders for HD
For those who prefer the highest quality video, HD transponders are intended. You can use the following devices:
- When using 12399 R, the Discovery Channel Russia, KHL TV, and Kinopremiere TV channels are available in high quality.
- On the frequency 12207 R you can watch the following channels: Amedia Premium, Eurosport 1 HD, TLC Russia, and History Russia.
- To receive video from TV 1000 Comedy HD, Viasat Nature, FOX Russia, Viasat Sports, Viasat History, and Viasat Sport East HD, you need to select the frequency 11930 R.
- On 11823 R you can watch Nickelodeon, Our Football, Match Football 1/2/3 HD, and MTV Live.
The following transponders can also be used.
Available HD transponders
To obtain a high quality signal, these devices use frequencies of 11800-12400 Hz. Here a signal is provided that does not affect the reception of those channels that are included in multiplexes No. 1 and No. 2.
Manual setup of the NTV plus receiver
The first step is to install the antenna. The following must be taken into account:
- Broadcasting is carried out from satellites of the Eurotelesat series, rotating around the Earth in the equatorial plane. 36A, 36B and 36C are used for this purpose.
- Therefore, the antenna should be turned in a southerly direction and directed along the compass. The satellite's inclination angle above the Earth's surface is 17-38 degrees.
- It is necessary to ensure reliable fastening of the bracket. Otherwise, over time, the focus of the antenna will shift, which will lead to a decrease in quality and loss of signal.
- The cable connecting the antenna and the television receiver must be of high quality and weather resistant.
When installing an antenna, you need to take into account the location of hills, tall trees and multi-story buildings, which can significantly reduce the quality of the received signal.
After the installation has been completed, you need to fine-tune the antenna. This must be done in accordance with the following rules:
- You need to familiarize yourself with the table of installation parameters, which is located on the NTV website. In accordance with it, the azimuth and inclination angle are precisely set.
- The cable from the antenna is connected to the digital set-top box being used. This must be done in accordance with the instructions for use of this device.
- After turning on the TV, you need to install the access card provided by the company.
This concludes the main part of the installation procedure.
The video describes the work of the receiver from this company:
Satellite Internet operators:
Gazprom
Tricolor
KiteNet
Lansat
Map link:
Setting the satellite dish tilt angle (elevation angle)
To correctly adjust the satellite dish according to the elevation angle, you need to know the parameters of your antenna. For an offset antenna, the main parameter is the offset angle β. You can find out the value of this parameter in the antenna datasheet or on the manufacturer’s website. For most manufacturers it is within 18°-27°.
Having found out the value of the offset angle β, you can calculate the value of the inclination angle Y=α-β for tuning to the satellite of your choice. Angle α—elevation angle for the selected satellite.
Do not be alarmed if, as a result of the calculations, you get a negative Y value; for offset antennas this is normal; the antenna will be directed slightly “to the ground”.
Setting the antenna rotation angle in azimuth (in the horizontal plane)
The azimuth of the antenna's beam axis to the satellite means the angle, expressed in degrees, formed between the line indicating the geographic direction to the north and the projection of the axis of the main lobe of the antenna's radiation pattern onto the plane of the ground surface at the installation site of the antenna aimed at the satellite.
The positive azimuth direction is determined by moving the antenna from the north direction clockwise.
True azimuth, or geographic azimuth, is the angle measured clockwise between the geographic meridian and the direction to an object.
Magnetic azimuth is the angle laid clockwise between the magnetic meridian (the direction of the compass needle to North) and the direction to the object.
Setting the rotation angle of the satellite dish converter
A positive value of the rotation angle corresponds to turning the converter clockwise, a negative value - counterclockwise. The rotation of the converter is indicated from the side where the satellite dish is located.
To receive signals from satellites broadcasting in circular polarization (TricolorTV, NTV+), the angle of rotation of the converter is not important.
Magnetic declination
Magnetic declination is the angle between the true meridian and the magnetic one. The eastern magnetic declination is considered positive, the western magnetic declination negative.
Determining the maximum height of an obstacle to be overcome
If, while working with an interactive map, there is an obstacle (tree, building, etc.) on the direction line to the satellite, near the installation site of the antenna system, you need to check whether this object is shielding the signal from the satellite.
To determine the maximum height of the obstacle to be overcome, move the marker
-symbolizing an obstacle to the place where the object under study is located.
In the Distance to obstacle column, the distance from the antenna installation site to the object will be displayed, in the Height of obstacle to be overcome column, the maximum height of the obstacle that will not interfere with satellite reception will be indicated.
Selecting a satellite (from a group of satellites)
This list contains the names of satellites located in geostationary orbit at the previously selected position (“Select satellite” menu).
Beam selection
Each satellite has a number of transponders (receivers). Depending on the direction of the transmitting antennas, transponders are divided into groups. The direction in which a group of transponders transmit is called a beam.
Since the same satellite can broadcast a signal to different parts of the earth (for example, to Russia and Africa), you need to select the beam of interest that covers the place where the satellite signal is supposed to be received.
How to use the card
Self-tuning of a satellite dish using a map
Determining satellite dish settings:
Enter the name of the satellite.
Select the name (coordinates) of the satellite you are interested in in the “Select satellite” list, or indicate the name of the satellite television operator (for example, MTS, Tricolor TV, NTV+)
Find the antenna installation address on the map.
To search for the coordinates of a satellite dish installation on the map, enter the address of the object in the “Address or object” field (located in the upper left part of the map). If the system finds several addresses that match the search parameters, you will be asked to select one of them. When you select the required address, the map will automatically adjust to the object of interest.
An alternative method for finding your current address is to use the Locate button. The method is especially effective if you are near the place where the satellite dish will be set up, and to access the map you use a device equipped with GPS (for example, a smartphone or tablet). In this case, the center of the map will be moved to the point with the coordinates obtained from the GPS device.
Specify the exact location of the satellite dish installation
On the satellite map it is necessary to specify the coordinates of the antenna installation location as accurately as possible. To do this, the map scale is increased, “Map Type” switches to the display mode of satellite images Google Map or Yandex Map (depending on which map is more detailed for your region). Use the left mouse button to mark the mounting point of the satellite dish. A marker with a line directed towards the satellite will appear at the specified location. The location of the marker can be changed by dragging it around the map.
Make sure that nothing interferes with the reception of the satellite signal - the direction line to the satellite does not cross large trees, tall buildings, etc. If the line crosses a large object, you need to make sure that it will not interfere with the signal reception. To do this, you can use the “Calculate obstacles” button. Drag the marker symbolizing the obstacle onto the object being examined. In the “Height of obstacles to be overcome” column, the maximum height of an object that will not interfere with reception will be calculated. If an object located in the satellite signal path is higher than this value above the antenna, it may interfere with reception. In this case, you will have to increase the height of the antenna installation, or choose a different location.
Selecting satellite dish size
Different satellites over different regions transmit signals of different strengths. This parameter is called Equivalent Isotropically Radiated Power (EIRP). The size of the satellite dish depends on the EIRP at the receiving point. You can determine the size of the satellite antenna required for reliable reception of satellite television from the table included with the receiving equipment. If you do not have such information, you can use the “Satellite coverage area map” (the Coverage area button).
After completing the above steps, all the necessary data for fine-tuning the satellite dish will be displayed above the map. From the antenna installation site, a direction line to the satellite will be drawn. If tuning to the selected satellite in a given location is not possible, the message “Reception of a signal from this satellite in the selected location is not possible!” will appear.
Satellite dish setup:
Assembly and installation of a satellite dish
Assemble the satellite dish according to the attached instructions, install the converter on it (if a linear polarization converter is used, it must be rotated to the required angle; for a circular polarization converter, this setting is not needed). Attach the bracket to the installation location and hang the antenna on it.
Pre-setting by azimuth (angle in the horizontal plane)
Make an approximate adjustment of the antenna in the horizontal plane - pointing the antenna towards a pre-selected object on the map (it is convenient to select the object on the direction line to the satellite).
If the adjustment is made using a compass, rotate the antenna at an angle equal to the value of the “Magnetic azimuth” parameter (rotation is carried out clockwise from the direction to North).
If during installation you do not have the opportunity to use a compass (or installation using a compass is not possible due to magnetic anomalies), and there are no obvious reference points for alignment on the satellite map, you can adjust by the sun. To do this, you need to click on the Sun direction button, after which a line will be built on the map from the installation location in the direction of the sun (the construction is made for the current time and changes during the day). Having determined the difference in angles between the direction towards the sun and towards the satellite, adjust the antenna (during installation it is convenient to navigate by the shadow).
Pre-setting by elevation angle (angle in the vertical plane)
Set the tilt angle of the satellite dish equal to the “Elevation Angle” parameter. If using an offset antenna, be sure to subtract the offset angle. The offset angle value can be taken from the documentation for the satellite dish or from the manufacturer’s website; usually it is within the range of 18°-27°. Do not be alarmed if during the installation process you find that the antenna is directed towards the ground; this is quite a common occurrence for offset dishes.
Fine tuning to satellite
If you do not use special devices to tune to the satellite, then connect a satellite receiver to the antenna. On the TV screen, in the satellite receiver settings, two scales “Signal Strength” (Signal Level) and “Signal Quality” will be displayed. Slowly rotate the antenna in a horizontal plane to the left and right by 10°-15°, trying to achieve a value on the “Signal Quality” scale of more than 70. If, after rotating the antenna, it was not possible to achieve this value (or the “Signal Quality” value has not changed at all), change the tilt of the antenna in the vertical plane a couple of degrees and repeat the above steps.
source