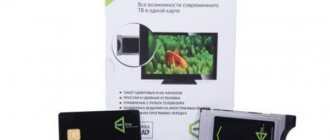
What is CAM
CAM is a special device that allows you to access paid satellite TV channels. Similar modules are available not only from NTV, but also from other Russian providers, but not all users know about them.
CI modules from NTV Plus are officially produced for use with modern televisions that have an appropriate slot and a built-in DVB S2 satellite tuner.
In fact, each user can purchase this device and insert it into their set-top box if it supports the CI Plus broadcast standard. Modern TVs, with a diagonal of forty inches or more, mostly come off the assembly line with a tuner already built inside, and support all modern modules.
More recently, devices that allow you to use the NTV CAM module and watch content in Ultra HD quality could be counted on the fingers of one hand.
Problems in the contact group
Fingers are a source of fat, which inevitably contaminates the contacts and leads to malfunctions of the reader. Understanding what to do to clean is quite simple. You need to use a light solvent that will remove grease, but will not damage the design and materials of the card.
It is recommended to use pure medical or formic alcohol, which can be purchased at any pharmacy. The procedure for cleaning the contact surfaces of the chip is as follows:
- the surface of the foil is thoroughly wiped with alcohol;
- the card is left to dry completely;
- The contact pads of the chip are carefully wiped with a school eraser.
After this, you can insert the card into the reader and check its functionality.
CI Plus standard and customization
Many users wonder what the CI Plus standard is and whether it will fit the standard Common Interface slots available in most receivers.
CI Plus is a modern standard for CAM CI devices, designed for comfortable access to paid TV content. It is highly reliable and has improved protection against pirate attacks, but it will not work with older console models that do not support CI Plus.
Setting up the device does not require much effort. It is enough to register the necessary NTV channels on your TV, install it in the slot, register on the official website of the satellite TV operator, and enjoy watching your favorite programs.
It is not recommended to go into the device menu and tinker with the settings - only if the subscriber clearly understands what parameters are being changed and for what purpose.
Antenna installation
Antenna installation
Having registered and received a set of equipment, the user can install it himself or contact the company’s specialists for this. However, many try to do all the work themselves, considering calling a specialist an expensive service.
Installing an antenna is a responsible task, so you should start by studying the instructions, and also make sure that all the components are in place, the cables are of sufficient length, and so on.
Selecting a location
NTV+ operator dish
The NTV+ operator dish includes several elements that need to be put together, following the instructions. The optimal location for its placement is an open space, not blocked by trees, wires, buildings and anything else that may interfere with signal reception. Usually this is the roof or wall of the house.
In this case, open air is the very place where the plate will be exposed to atmospheric phenomena. Therefore, it is worth considering in advance the possibility of heavy winds, and placing equipment under a stream of rainwater is not a good idea.
There are several coverage areas, depending on the geographic location. Each region has its own recommendations on which direction the dish should be pointed in order to reliably receive a signal from the satellite.
You can find out about them by reading the relevant forums, but there is a simpler way, one might say, a life hack - just look at how your neighbor’s plates stand.
Someone uses a compass and a map of the area to determine the direction of the satellite. Smartphone apps that determine location, such as SatFinder, also help.
It is better not to rush to “tightly” fix the antenna, since during setup you may need to change its position. The final tightening of the bolts is left for last, when all work is completed.
Pole mounting
Anchor self-wedging bolts
When installing a satellite dish, firstly, you must adhere to safety rules, since the work is carried out at height. Secondly, pay attention to the fastening of the support itself.
The stability and quality of the received signal and the safety of people passing below depend on how the entire structure is secured. If the antenna is not secured securely, it is likely to fall, causing the mirror to become deformed. There is no point in repairing the equipment; you will have to buy new one.
When mounting the antenna on a brick or concrete wall, do not use wooden plugs, caps, plastic dowels or nails. The bracket is attached to all accessible holes so that it fits tightly to the surface.
Self-propping anchor bolts are best suited for this task (it is more convenient to work with anchors with a wrench rather than with a screwdriver). For installation on a roof made of metal tiles or metal profiles, self-tapping screws with press washers are suitable.
At this stage, they don’t really tune in to the satellite - the dish is set approximately. For this reason, you don’t have to rush to tighten the fasteners tightly.
Cabling
It all depends on the wishes of the user. Usually cables are laid outside the house - this way they do not spoil the interior. The route itself is hidden in a groove to protect it from atmospheric influences.
When laying the cable, you should make sure that it is long enough. Otherwise, intermediate signal amplification may be required.
Connecting cables
Versions of the HDMI connector
The wire from the antenna is connected to a special connector on the TV, usually there are no problems with this. It’s more difficult to choose how to connect the set-top box, due to the variety of options:
- RCA, which are also called “tulips” for their colors. The receivers have a composite output for an adapter with a 3.5 mm jack (minijack, like on headphones). Classic TV inputs - each signal has its own socket. The connection is not complicated - just stick to the cable colors. RCA only works with an analog signal (the picture is not of the best quality), so it is not suitable for digital broadcasting;
- HDMI. The optimal interface for displaying “digits”. The connection is made with one cable, while the picture quality remains at a high level;
- SCART. An obsolete connector that reads analog and digital signals. The difficulty when choosing this option is to find an adapter for HDMI or “tulips”.
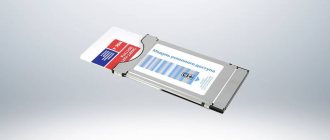
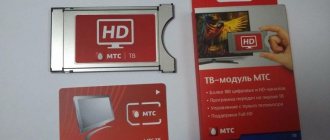
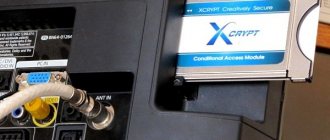
Installing an access card
This card is an analogue of a SIM card for a phone; it decodes the signal and opens blocked channels. First, it is inserted into the adapter - the CAM module, and then the latter is placed in the TV slot called CI +.
Fine tuning
The quality of the signal largely depends on weather conditions.
To do this, you will need 2 people: one is near the receiver, setting it up, the second is positioning the dish in such a way as to achieve the best signal reception. The receiver itself is connected to the TV and select “Signal Information” from the menu.
Next, the antenna is tuned to the satellite. It is slowly rotated around its axis, millimeter by millimeter, until the signal becomes stable, like the image on a TV. Having achieved a stable and powerful reception, the plate is finally fixed.
The quality of the signal largely depends on weather conditions, so it is better to set up the dish on a sunny, windless day. Clouds, wind, rain will only become obstacles.
Compatibility
Are modules from different TV providers compatible? The answer is no, they are not compatible. Despite their external similarity and the use of the same slot, they differ in the type of encoding.
For example, NTV modules use the Viaccess encoding type, while another popular provider Tricolor uses DRE Crypt. That is why devices of this type are usually sold immediately with an access card. This is not always convenient, since, like any equipment, they have the unpleasant property of breaking over time. One of the advantages of NTV is also the fact that the provider’s modules can be purchased without any problems without a card.
How to set up paid channels on TVs from different manufacturers
If the module is inserted correctly and the card is successfully activated, you should configure the channels. Depending on the brand, the following functions are selected:
- If the TV is made by LG, then the desired country is indicated in the “Options” tab. For LV it will be Germany or Finland, then go to settings and click “Auto search”, speed - fast.
- For Samsung models, after turning on the device, select auto-tuning in the “Channels” section in the menu, then select the “Cable” source and click “Digital”.
- For Philips TVs, select “Configuration” in the menu, then go to the channel setup mode, there select “Reinstall channels”. When asking for a country, indicate the one that is written on the back of the TV, on the sticker, indicate the mode as digital, the source as “Cable”, at the end go to “Automatic” and “Start”.
- In SHARP models, instead of searching for channels, there is an “Installation” item in the menu; you must select “Auto-installation”. Country – Finland, Sweden, Switzerland or France.
- On Sony, you select “Digital Configuration” in the installation menu, then you need to auto-scan for digital stations.
- In Panasonic, in the analog settings menu, click “Add TV signal”, then mark DVB-C and perform automatic search.
- Some models may require manual adjustment. In this case, the required frequency is indicated. It can be viewed on the provider's website.
- If your TV updates channels automatically, you should disable this feature. If this is not done, the settings made will be constantly lost.
Advantages and disadvantages
Let's start with the advantages of the device:
- it is no worse than the receiver, and allows you to watch similar channels in high quality;
- a subscriber with this device receives the same access to his personal account and personal account;
- the subscription fee is the same, but unlike the set-top box, the module takes up minimal space;
- Channel switching is carried out on the TV remote control; the subscriber does not need to do other manipulations on control devices.
As for the minuses, they are practically absent. The subscriber may lose access to some functions available on the receivers, such as the internal hard drive or interactive features not related to watching TV. But this cannot be called critical.
Benefits of use
Connecting such additional equipment allows you to make the most of the opportunity to comfortably receive information from the TV screen. Thanks to the purchase and installation of SMART cards from well-known providers (MTS, NTV+, Dom.ru, Tricolor TV), the user:
- enjoy high-quality digital broadcasting with increased clarity, which is less susceptible to interference and distortion with improved picture and sound;
- chooses the list of paid channels you need;
- has the ability to easily connect and disconnect paid channels;
- receives a text version of the TV program guide on its screen (depending on the provider and the capabilities of the TV model).
Bottom line
As an alternative to a regular CAM receiver, the NTV module is not suitable for everyone. To fully use it, you need a modern satellite set-top box that supports the CI Plus broadcast format, or a modern TV with an internal tuner that again supports the above format.
The choice of receiver or module has absolutely no effect on the quality of image and sound, and the functionality regarding watching satellite television will be the same in both cases.
Contact wear
Sometimes it happens that attempts to correctly insert the card into the receiver or reinstall the identifier in order to reinitialize the set-top box occur so often that the contacts of the chip are wiped. This is clearly visible from the condition of the foil pads. In this case, it is recommended to contact a branch of NTV PLUS to replace the smart card.
However, if making a new ID is not possible or takes a lot of time, you can try to fix the contacts yourself. For this:
- the card is removed from the reader;
- Carefully rub out through scratches on the foil pads with a highly soft graphite pencil;
- the chip is carefully inspected, the gaps between the contact pads are wiped with an ear stick, and graphite crumbs are removed in areas where treatment should not have been carried out.
After this procedure, the card is inserted into the reader slot to check its functionality.
This repair method is only suitable if there are thin abrasions on the chips. If the NTV smart card continues to be completely undetected, or does so uncertainly, the media must be replaced.
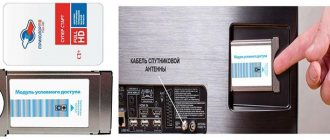
How to install a smart card
Such a card is installed either in a slot on the panel of the TV itself using a CAM module, or in a special receiver - as a rule, this is a branded TV set-top box of the service provider, for example, Tricolor. Before purchasing a smart card and CAM module, you need to make sure that the TV model allows the installation of such equipment. For example, modern Samsung and Lg LCD LED TV models have a slot for connecting a digital card via the CAM module on the rear panel.
Let's consider a step-by-step connection algorithm.
- Before installing the equipment, you must turn off the TV.
- First of all, the card is installed in the CAM module. Both are provided by the provider (MTS, NTV+, Dom.ru, Tricolor TV). The module into which the SMART card is inserted is not customizable equipment; it serves as a kind of adapter. When installed, the electronic chip on the plastic card should be located at the front wall of the module (as a rule, some kind of design is depicted on this side, for example, a service provider logo).
- Afterwards, the cartridge with the card inserted into it is installed in the appropriate slot. In this case, the connectors on the installed equipment and the CI/PCMCIA input must match. It is worth noting that most modern models of Samsung and LZh TVs have a shortened connector for the CAM module. After installation, more than half of the cartridge is visible. Therefore, when installing, do not try to insert it further.
- If the module with a SMART card is installed correctly, after turning on the TV, a corresponding entry will appear on the screen.
Most often, after installing such equipment, you need to manually configure digital broadcast TV programs, for example, from the MTS or Dom.ru provider. This process has its own characteristics for different TVs, and how to do this will be described below.