Available DVD connectors
Before proceeding with the procedure for connecting the DVD player to the TV, find the available ports.
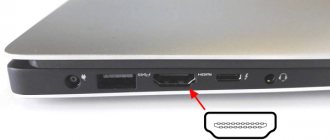
HDMI
This port is considered the most optimal method to connect the player to the TV. The connector can transmit video of any format to the screen without losing quality.
In terms of external parameters, HDMI is similar to a USB connector. The main difference is that the port is thin and oblong.
It is best to use cable form 2.0 (or higher). It is important that there is the “High speed with Ethernet” marking.
Choose wire from well-known brands. If difficulties arise, check with the markings on the connectors.
Scart
This is not the most convenient option. Although the quality of sound and picture does not suffer during transmission, this port is very rarely found on modern plasma panels and you will need an auxiliary wire for connection.
RCA
Another name for the connector is tulip. For many years, it has been the most common way to connect not only a DVD player, but also other television devices.
RCA has the following colors:
- red;
- white;
- yellow.
The first two are necessary for sound playback, the last one is used to transmit video images.
Connectors can be located on one side of the cable or on both sides at once. To avoid mistakes, refer to the colors on the TV and connectors.
S-Video
It is recommended to use this port to connect a DVD player when other options are not feasible. Data transfer through S-Video has limitations - it can only provide a picture for viewing. To transfer the audio track you will need an adapter.
What is a tulip
The cable itself is used to connect home theaters, sound bars, DVD players and game consoles to TV. What does he look like? One part of it is a contact pin extended forward, the diameter of which can be 3.2 or 3.18 mm. External length – 9 mm. This is the open part. Closed internal length – 6 mm. This pin is located inside a cylindrical contact with an internal diameter of 8 mm. The outer diameter of the rim depends on its thickness and does not have a specific standard. In slang, this part of the cable is called “dad”. On the other side of the cable there are three multi-colored connectors. Their colors are standard and are necessary to determine exactly which connector each of these connectors should be inserted into. The scheme is as follows:
- yellow is used to transmit a video signal;
- white transmits a mono signal or left audio channel;
- red is responsible for transmitting the right audio channel.
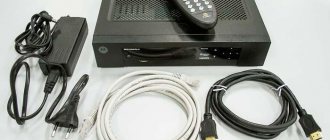
Adapters and cables for connecting DVD
It happens that plasma panels and DVD players do not have identical connectors. There is only one way out - using an adapter.
Wires that can be used for synchronization:
- SCART-RCA.
It is possible to use a single wire. Each plug reflects image and sound simultaneously. This wire is the best option. There is no confusion, and the transmitted information is not subject to distortion. - SCART – S-Video + 2RCA.
The S-Video cable is not capable of transmitting audio on its own. The solution to the problem is to install an additional 2RCA wire. - HDMI-RCA.
It is not advisable to use such a cable. The signal will be transmitted poorly, even though HDMI comes standard with the player.
Solved: Disable HDMI auto detection – Samsung Community
I'm really sorry for those for whom this still doesn't work. If you are not in the US, I cannot guarantee that the 1180 update will work. I seem to be getting mixed reviews from people overseas. I have to encourage you guys to contact support in your area as there is nothing I and other mods can do to help them find out. The only engineers/developers we have contact with are in the US. So as much as I'd like to help, I need you guys to reach out for help not only here, but there as well. Even if they don't have a social media support system, listen in on them on the phone.
Since this is a US forum and for US customers, the fix is update 1180, I'm marking this topic as resolved.
(Please note that this can be changed if anything changes, this is simply to ensure that other users have better access to the fix.) Be sure to click "✓ Accept as Solution" when you find the answer that works for you. Please note that notification emails are a DO NOT REPLY address, you must be logged in to the community page to respond.
View solution in original post
.
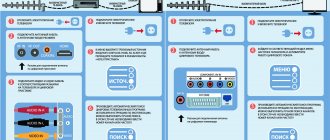
The process of connecting DVD to TV
To successfully complete the connection procedure, choose the best method for you, purchase a cable and follow the instructions. After the equipment is connected, evaluate the performance of the device.
During the connection process, the player and plasma panel must be disconnected from the electrical network.
Via HDMI
The simplest and easiest way to synchronize the player and plasma panel. The quality of transmitted information remains high. When connecting the device, follow the algorithm:
1. Find the connector you need on your TV. On almost all TVs it is located on the back panel. The required port is designated HDMI In.
2. Find the connector on the player. You can recognize it by its name – HDMI Out.
3. Connect both devices using a cable. Check how well the plug is positioned in the connector. If the cable was not included in the kit, you will have to purchase it.
4. Turn on the plasma panel and find the settings window using the remote control. Set to receive video and audio signals through the HDMI port.
5. Activate the player and check the connection.
6. Insert a disk drive or flash card, try to play the video, check how well the connection is.
Via RCA
This type of connection is used when the TV is an outdated model. There are no difficulties in this case.
To establish pairing, connect the cord with multi-colored plugs (in other words, “tulip”) into the connectors of the corresponding color. After these manipulations, you can try to play the video.
Tulip cable
This method has one drawback - the quality of the transmitted information will be “lame”.
Sometimes the player has not 3 color ports, as usual, but 5. This is considered an improved option. This configuration is designed to improve image quality. The number of ports does not affect the connection instruction. The procedure is carried out according to color.
Via S-Video cable
To connect the TV and DVD player in this way, you will need to purchase a special cable. The name of the port itself suggests that only a picture can be transmitted. Accordingly, in order for sound to be present on the TV, you have to buy another wire.
In everyday life, such a cable is called a “bell”. To enjoy watching videos, just connect the cable to the TV itself (via the S-Video port, also marked). No additional settings are needed.
Via SCART
As in the connection option described above, you will need one additional cord. The main difference between SCART is its impressive size.
Connection takes a few minutes. Take the cord and connect it to the corresponding ports on the player and plasma panel.
It happens that the TV has several SCART ports. You'll need the one that says "In" on it.
You can clearly see the methods of connecting the player to the TV in this video:
Additional recommendations
When connecting the player, the most important thing is to position the equipment correctly. Experienced users do not recommend installing the player on a plasma panel. This is because during operation the elements heat up (both in DVD and TV).
It is also wrong to place a DVD TV on top. Even if TB is small and mild. Players cannot boast of the reliability of their housing; it is made of plastic. The optimal solution is to purchase a special TV cabinet with a recess for the player.
It is advisable that both devices are close to each other. If the distance is too large, the wires begin to actively heat up. This affects the quality of transmitted information. If it is HDMI, the wires will not hold well in the socket when tensioned.
In order to connect a DVD player to a TV, you do not have to seek the services of specialists. You can do everything yourself if you follow the instructions. The device is turned off, connected with a specialized cable, and the signal source is selected. If the equipment has no defects, the synchronization process takes several minutes.
After purchasing a DVD player, a completely logical question arises: how to connect the DVD to the TV. It may seem to many that there is nothing complicated here. However, as practice shows, connection problems arise frequently. As a result, the process of setting up the player takes a whole day.
Individual cases
Quite rarely, but users encounter unusual situations and it seems that connection is impossible. In fact, the process simply has its own specifics.
TV with built-in player
In this case, you will not have to purchase a cable or any other equipment. The algorithm of actions is as follows:
- Pull out the tray that is designed specifically for discs.
- Turn on your favorite movie.
- Click on the "Play" button.
Connecting DVD to old TV
In this case, the RCA cable is used, which we have already discussed. Old TVs, which were released back in Soviet times, have only one connector - an antenna input. There are several connection options:
- An RF modulator can be used.
The essence of the work is that audio and video signals from the player are sent to the output via an RCA port. After this, the received information is converted and sent to the output. The player is thus connected to the antenna connector. - Making design changes to the TV itself.
To do this, buy and install an RCA socket. It will receive a composite signal. - Use the audio outputs of the player.
If the TV has only one port, then connect the wire to the audio outputs of the player. There will be 2 plugs of different colors. You will only need a white one; through it, connect the cable to the only port on the TV.
Regardless of the chosen method, after working with ports and cables, perform a number of actions:
- Go to settings using the remote control.
- Select Mono, L/Mono mode.
- Play the video.
Checking the functionality of the equipment
After manipulating the selected method of connecting the DVD to the TV, you need to check the operation of the equipment and, if necessary, make additional settings. The process is carried out as follows:
- devices are plugged into the socket and “Start” is activated;
- start the DVD player;
- press Setup on the player’s remote control;
- open the “image options” menu item;
- adjust the characteristics in accordance with the recommendations given or tips specified in the instruction manual;
- Choose your favorite equalizer option and sound level.
After the operations have been completed, in most cases you can watch your favorite movies in decent quality. For those who love a variety of special effects, experts recommend additionally purchasing suitable speakers, which are connected separately and enhance the audio display.
When purchasing a DVD player from any manufacturer, you should check the availability of a cable for connection, compatibility with the existing TV model, and sometimes you need to buy an adapter.
If you know the basic rules, connecting equipment and setting up will not take much time even for an inexperienced user.
Possible problems and their solutions
Although the process of synchronizing the plasma panel and DVD player is simple, users may encounter some difficulties.
The most common problems and ways to solve them:
- If the equipment does not work,
then first check the power supply. There is a possibility that the root of the problem lies in the wiring or socket. Try connecting the device to a different network. If it is the power supply system that is causing trouble, then it is best to contact a specialist. - If there is no sound and picture,
you need to check the condition of the wire that is used for synchronization. If defects are found, replace it with a new one. After replacement, configure the plasma panel. To do this, select “new signal reception source” in the menu. - If the device broadcasts a poor image,
check the reliability of the connection. The plug must fit tightly into the port. If a gap appears in the connector, then there is only one solution - contact service. - There is no signal.
Quite often the cause of the problem is a foreign object in the connector. This could be particles of debris or dust accumulation. Clean your equipment periodically. To do this, you can purchase a can of compressed air and blow out the connectors.
Samsung TV Blog – QLED TV | Frame | Premium UHD TV
From not very smart to really smart remote control in 60 years
Remote controls
have been around almost as long as televisions themselves. If you have relatives familiar with the leading TV technology of the 1950s, they may just remember the first (but finicky) wired TV remotes that could trip your pets or children. Additionally, there were remote controls that worked fine if you pointed them at the sensor correctly. Over time, more and more devices that connected to the TV became more popular. Your grandparents may have never had the need or desire to connect a new device to their then "newfangled" TV, but you or one of your tech-savvy friends probably connected at least one such device to the TV you knew. . Nowadays, after taking several turns on the road to television technology, we have a new standard: unified remote control and automatic detection. In short, One Remote Control and Auto Detection make it easy to watch your favorite shows on your Samsung smart TV, and we're sure that once you experience it for yourself, you'll wonder how you ever lived without it.
Firstly, what is auto detection?
The TVs that are now found in most homes have a variety of connected entertainment devices such as over-the-top devices, set-top boxes, Blu-ray players and gaming consoles. Managing connections can be challenging. But automatic detection makes it easier to find connected devices. Have you ever connected multiple HDMI devices to your TV only to be confused about which device is on which HDMI channel? Perhaps you're familiar with scrolling through the TV/AV channel input selection menu while trying to find your DVD player? Are you ready to give up? There is no need for this as automatic detection solves these problems. It knows more about your various devices than you expect. When a device is connected through one of the Quantum Dot TV's HDMI ports, Auto Detect automatically finds it and displays the device name. No longer wondering which gaming device you have: HDMI1 or 2.
What is a remote control?
The One Remote Control is a universal remote control, but it's no ordinary device. Remember how we just mentioned all those super gadgets, set-top boxes, Blu-ray players and gaming consoles you can find in your home these days? The problem is that these devices don't have one standard method of remote communication—infrared, Bluetooth, and Wi-Fi signals are sent around your living room through various remote controls that independently control these peripherals. One Remote Control takes care of it all as a universal remote control with a difference. Sure, it's small, but it's also a powerful and elegant solution to the problem of seamlessly managing all those different devices connected to your quantum dot TV.
Is One Remote Control difficult to set up?
Not at all. One of the great things about your quantum dot TV is that it does the lion's share of the setup so you don't have to. As mentioned earlier, simply plug in your HDMI device and the quantum dot TV will automatically recognize it. If necessary, the TV can also ask you some questions. The TV then wirelessly teaches One Remote Control what it needs to know to control the newly connected device - in the background, of course. If you want to use the connected device, it's as simple as selecting it in the Smart Hub, then pointing the remote to a real device and transfer control to it. Are you ready for fun!
Advanced smart remote control for smart entertainment
Do you want entertainment to be convenient? Various devices meant for fun don't have to become an unmanageable mess. Just think of all the remotes you can put away in that overcrowded box where outdated technology goes to die. With one remote control and auto-sensing, your Quantum Dot TV knows how to make it easier to access and control multiple devices for smooth, enjoyable entertainment, not to mention a clean living room table and fewer battery changes! Isn't it time you took a closer look at Samsung's smart TV, which is a quantum dot TV with a single remote control?
Topics: Smart remote control, single remote control, universal remote control, auto detection, smart hub, smart TV, quantum dot TV, quantum dot
.
Via coaxial cable
To connect the VCR to TV using a coaxial (antenna) cable, follow the simple step-by-step instructions:
- Insert the cable into the radio's RF/COAX Out connector.
- Connect the other plug of the wire to the TV - RF/COAX In.
- Turn on the video recorder, insert the cassette into it and press Play.
- Use the channel search to find the frequency on which the video and sound from the VCR will appear. Set the channel number through which the recording will be played.
- Enjoy watching.
As you can see, nothing complicated.