The presence of many remote controls and controllers complicates the life of the user of multimedia technology. It is much more attractive to have one universal device that combines all functions. However, most often such a hybrid is too expensive, and you have to put up with a battery of remote controls, buttons and sliders. Nevertheless, there is still a way out of the situation. It lies in a little-used feature hidden in the HDMI interface. We will pay attention to it, find out how it works and what is needed to use it successfully.
What is HDMI CEC
First, let's decipher the name of the technology we are talking about. CEC is an acronym that stands for “Consumer Electronics Control.” This translates into Russian as “Consumer Electronics Management”. The technology described is a protocol built into the HDMI interface. When used correctly, it allows you to control several devices at once from one remote control or controller. The number of such devices is limited to 10. For example, from the remote control of the DVB T2 set-top box you can adjust the volume of the speakers, TV settings, etc.
The technical design of the CEC is a two-way bus in the connection cable. In the pinout of a full-size connector (Type A), the pin is number 13. This channel is the remote control. Of course, for correct operation, CEC wiring must be present in the connected devices.
An interesting feature of the technology is that it does not have a single name. Each manufacturer markets it differently and under a separate name. Different companies have names such as SimpLink, Anynet, EasyLink, NetCommand and others. One way or another, the principle of operation remains the same, since it is based on a single technical solution.
Preparation: check the HDMI ports on the TV and computer, select a cable
First we need to check if our devices have the necessary ports. We also need an HDMI cable to connect. Let's look at everything in more detail. If you have everything, then you can proceed directly to connection and configuration.
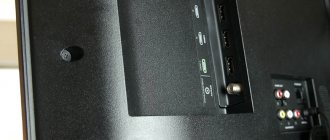
- The HDMI input on a TV is usually located on the side, or on the back panel (sometimes, both). They must be signed and numbered. They look like this (Philips on the left, LG on the right): If your TV has at least one such port, then everything will work out.
- Next, take a look at the back panel of your computer (I mean the system unit). There we need to find an HDMI output. HDMI can be on the motherboard (integrated graphics on new boards) or on the video card. But, even if you have this port on the motherboard (as I have in the photo below), and there is a separate discrete video card with an HDMI output, then the TV must be connected to the video card. I took a photo of the system unit in a horizontal position. In my case, the TV can be connected to the HDMI output on the video card. If your computer does not have an HDMI output, but has DVI, then you can buy a DVI-HDMI adapter. And if you only have the old VGA, then you can also use a VGA-HDMI adapter, but then the sound will not be output to the TV, since VGA is not a digital output. If you want to connect a TV and monitor to your computer at the same time, you will need either two HDMIs, or HDMI and DVI. We will also need the appropriate cables.
- The HDMI cable must be the length we need. If I'm not mistaken, they exist up to 20 meters. If you do not have a separate cable, you can use the one with which the monitor is connected. If you have it connected via HDMI. I have this cable: The most common, inexpensive cable.
If you have ports on both devices and have a cable, then you can connect.
Possibilities
Centralization of management opens up a number of possibilities for the user. Of course, the magnitude of the benefit of using HDMI CEC depends on the number of connected devices and their characteristics. There are several features that attract users to this technology. They are listed below.
- Unified control menu. With SEC you can access a specific device through the menu of another. This eliminates the need to use multiple remote controls.
- General information base. You can select one device on which it will be convenient to monitor the status of all connected equipment.
- Comfort in using the menu. If you have a monitor or TV in the system, it will be more convenient to control other devices, since the menu will be easy to read.
- Flexible use of the tuner. Using CEC, you can give the tuner different settings, depending on what device it is sending the signal to.
These are the four possibilities that CEC technology opens up for users. In fact, the list is wider, and it is preferable to master it through constant use.
Functions and benefits
As mentioned above, HDMI-CEC is an innovative technology with which the owner of a Samsung TV will be able to control various devices that are in your home and connected by cable, with just one universal remote control. This feature is built into the HDMI multimedia interface. It was designed for ease of use and management of various devices. With one remote control you can control up to 10 pieces of equipment. It is also important to note that all equipment is synchronized and configured automatically.
It turns out that HDMI-CEC is a special function that performs all the same functions as a simple standard remote control.
Anynet+ has the following features:
- activates electronic equipment that is part of a single network with one click on the desired button on the remote control;
- Switching connected units to standby mode, setting a timer or playing audio and video recordings with just one touch.
In order to execute the command, you need to set the settings on the recorder and start controlling through the device menu. All settings are made on the special “Plugins” tab. When you turn on the TV, the receiver starts in automatic mode. In a similar way, all home appliances are turned off. For more efficient use, you should choose equipment from one manufacturer. The best option, which is in particular demand, is Anynet+ for Samsung TV.
Setup and operation
The first step to use is to create an HDMI network. The minimum set required for this is a TV (or monitor) and a tuner (satellite, cable, T2, etc.). Once you've paired two CEC-enabled devices together and turned them on, you're ready to move on to the next step.
To use the technology, a special plugin is required. First, the TV switches to the tuner's data source. After this, a menu opens, the “Plugins” section. Find “HDMI CEC Setup”. Technology settings are located here. You need to make all the necessary changes, customizing its operation “to suit you”, and save them.
By opening the HDMI menu on your TV, you can get information about all devices connected through the interface. In the list you can see which of the connected equipment supports the extension we are interested in. Remote control will only be available for this list.
Supported Commands
Using CEC, you can issue the following commands to paired devices:
- Playback. The device becomes a source of signal - video and audio streams.
- Standby mode. The entire system goes into standby mode.
- Translation. Tuner settings are exported to another device.
- One touch recording. Recording starts immediately.
- Timer settings. One device controls the timer of the other.
- Information. Checks all system parameters.
- Management package. Controls playback.
- Tuner. Controls the tuner of another device.
- On-screen menu. The TV is used to display text.
- Routing. Switching between signal sources.
- Transfer of name. Sends the device name to the connected TV.
What cable is needed to connect devices?
As mentioned at the beginning of the article, a separate bus in the HDMI cable is responsible for CEC. However, not all interface specifications support Consumer Electronics Control. CEC bus support starts with HDMI 1.4.
Note that to use the technology you do not need to buy a special “sophisticated” cable. This is a standard feature included in the interface by default. It is enough to purchase products from a trusted manufacturer. However, this advice is relevant for the selection of all cables.
Important: It is advisable not to use Standard With Ethernet and High Speed With Ethernet cables. In these varieties, the 13th pin is occupied not by CEC, but by one of the buses responsible for accessing the Internet. All other types of cable can be safely used. This includes adapters that are used to connect a Windows computer or monitor to Android devices.
Viewing videos and photos
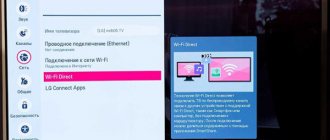
The method is suitable for TVs that support DLNA technology. Usually these are Smart TVs with the ability to connect to the Internet. To find out if your TV supports DLNA, check the specifications or contact support.
Samsung Support
To connect you need:
• A computer connected to the router via Wi-Fi or cable
• TV connected to the router via Wi-Fi or cable
It is better to connect devices to the router via cable; over Wi-Fi, “heavy” videos will be played jerkily.
- Connecting a laptop to a TV via HDMI - how to avoid mistakes
On this topic:
How to connect a Samsung TV to the Internet via Wi-Fi
How to connect a Samsung TV to the Internet via cable
Some popular options on the Internet:
https://homemediaserver.ru/index.html
Home
https://serviio.org/
Unfortunately, it is impossible to describe the connection algorithm in detail, because there are more than 2 thousand different models of TVs alone. The general connection algorithm is as follows:
1. Connect your computer and TV to the router.
2. Open the option to share your computer and share folders with the necessary files. An example of how to do this on Windows 10.
2. Install the program to create a DNLA server on your computer.
3. In the program, select folders on your computer from which videos and photos will be played.
4. In the program, select the desired file and find the item “Play on...” or something similar in meaning. Next, select your TV.
Some programs may not have such an item. In this case, you need to select your DLNA server as the source on the TV. On Samsung TVs, this is done by pressing the “Source” button on the remote control. Next, find the “Media resource directories” item and select files to view.
How the unified control system is implemented in devices
The Anynet HDMI CEC implementation is a separate plug-in, or extension, built into the functionality of household multimedia equipment. Manufacturers by default provide a number of features that are implemented. By opening the menu described in the previous section, you can disable unnecessary features and activate the necessary ones. Depending on the manufacturer, all or more of the following options may be offered:
- Transfer of names – information about active equipment;
- Setting activation and deactivation timers for all devices;
- Switching channels on the TV tuner;
- Access to the menu of all connected devices;
- Control the player from one remote control;
- Device routing;
- Group mode setting (for example, standby);
- Translation of commands to the paired device;
- Activation of the TV when you start playback on the player;
- Collection of information about all equipment in the system;
- Activation of recording pictures from TV to a storage device or connected device (Android, Windows PC).
If there are more than two devices on the system, not all offered functions may be active. PassThrough will help you find out what's available and what's not. This is a kind of diagnostic that checks the connection of all devices by transmitting control commands to them. The data obtained will help determine what functions will be available if the system consists of equipment from different brands.
Features of the SIMPLINK function
TVs that use the Simplink feature have unique characteristics. Let's discuss some of them:
Instant replay
By launching an external media device simultaneously with it, the TV is connected without additional commands.
Control with one remote control
Simplink makes it possible to control the TV remote control of pre-synchronized devices using a single device. If the TV uses the Magic function, some basic functions will be limited. These restrictions apply exclusively to Magic remote controls.
Power off
The remote control can control the automatic power supply. To do this, you will need to go to the Simplink HDMI-SEC settings synchronization menu. The configured synchronization will allow you to turn off all devices connected to the TV using the SIMPLINK program with one touch. The same goes for turning off any gadget connected to SIMPLINK - the TV will turn off along with it. However, this feature is not available on all devices.
How to set up HDMI CEC on devices from different manufacturers
Of course, the mechanism for activating CEC differs on devices from all manufacturers. This comes from a different approach to technology implementation. Not only its names differ, but also the presentation in the menu, as well as the available functions. To understand in more detail how to use all the capabilities of SES on a specific multimedia device, it is wise to refer to the operating instructions. In it or on the manufacturer’s official website you can find all the information about the supported modes, as well as how to activate and use them.
Note: The first element in a CEC-enabled system is the television or other video output device. The reason is the large screen, with which you can access menus and settings of paired equipment, as well as other advantages of the technology.
Perhaps it is worth paying a little attention to two brands - Samsung and LG. These manufacturers are among the leaders in the field of information technology, and, in particular, in the implementation of most of the capabilities of Consumer Electronics Control. Let's try to figure out how to set up TVs of these brands to take advantage of the SEC benefits.
Setting up Samsung TVs
The working name for Consumer Electronics Management at Samsung is AnyNet+. You need to find it in the settings menu and activate it. To do this, in the settings, follow the path “General” – “External Device Manager” – “AnyNet+”. If the firmware has placed the CEC in a different location in the menu, you can find it using the manufacturer's instructions.
After connecting the function, check it for correct operation. Find the “Source” key on the control panel. The external device will open. The source name should appear next to the signal source icon. If everything happened like this, then the pairing is working.
On LG TVs
As for LG, they named their variation “SimpLink HDMI CEC”. The protocol will only work on one specific port of the device. To find it, you need to click the same “Source” button. The dependent device must be connected and turned on. If everything is so, a hint will appear on the screen.
After a hint appears, you need to go to it with the menu cursor (using the navigation keys) and activate it. A new window will open allowing you to enable the SimpLink HDMI CEC utility.
Errors in their solution
If the HDMI-SEC function does not work, we recommend that you do the following:
- Make sure that all synchronized devices support the HDMI-SEC option.
- In the TV settings, check whether the desired option is activated and the list of selected devices for connection.
If you still cannot solve the problem in this way, you should check the integrity and quality of the HDMI cable connection.
The HDMI-SEC function is a simple and convenient way to forget about connection problems and stop juggling numerous remote controls. Most modern TVs are already equipped with a useful option. Therefore, many people just have to master the connection and configuration, and use their equipment comfortably.
Setting up an HDMI-connected TV in Windows
The screen resolution is adjusted automatically in most cases. So in Windows settings we can only change the multi-display mode. This is only relevant when a monitor and TV are connected to the PC. If there is only one display, then these settings are not needed.
The easiest way to change mode in Windows 10, Windows 8 and Windows 7 is the keyboard shortcut Win + P.
After clicking on them, the “Project” menu will appear. In the top ten it looks like this:
In Windows 7 like this:
Let's look at each mode in more detail.
- Computer screen only (turn off the projector) – in this mode, the image will only be on the monitor.
- Repeating (duplicate) – there will be the same image on the monitor and TV screen. There is one caveat to this mode. This is the screen resolution. For example, if, as in my case, your monitor resolution is 1920×1080, and your TV’s is 1366×768, then the monitor will be set to 1366×768 and the picture will not be very good. And if the monitor is 1920x1080 and the TV is also 1920x1080, then the picture will be clear on both screens.
- Expand – the desktop will be expanded to a second screen. In our case, this is a TV.
- Second screen only (projector only) is when the image from the computer will be displayed only on the TV. The monitor is turned off.
In most cases, these settings are quite sufficient.
Additional screen options
To open them, just right-click on an empty area of the desktop. In Windows 10, you need to select “Display Settings”, and in Windows 7 – “Screen Resolution”.
A settings window will open where you can see how many screens are connected to the computer.
You can also identify them (by clicking on the “Define” button), change the resolution of each screen and the operating mode (which I talked about above).
In Windows 7, the settings of a TV connected via HDMI look like this:
We figured out how to set up the image on the computer.