The transition to digital television cannot be avoided. And various modifications of antenna equipment began to appear on the market. Among them appeared an antenna with an amplification board for 5 to 12 volts.
Voltage is supplied to the antenna equipment from a digital dvb t2 set-top box, a TV via a USB injector or a network adapter with a rating of 5-12V/0.5Am. Next, we’ll figure out how to turn on the power to the antenna.
How to fix the problem
If the cables are in order and connected correctly, then use the solution to change the settings:
- In the parameters in the “Channel” section, specify the cable.
- Place a dash next to the country or indicate your own.
- In the cable settings tab, set the frequencies to 298,000-362,000 KHz.
- In the automatic search, indicate whether it is digital or analogue TV.
Did the described solutions fail? Contact your provider, there may be technical work on the line and you need to wait.
Possible problems and their solutions
When using a digital set-top box or tuner in combination with an indoor antenna, the following difficulties may occur:
- There is no reception at all. Typically this means the antenna is in a dead zone. You need to experiment with it, moving it around the room. If such a point where the signal is caught cannot be found, you should think about another reception method (satellite TV, digital broadcasting via the Internet, etc.).
- Only half of the channels are received (10 out of 20). This means that only one multiplex was caught. Here you need to find out the broadcast frequency of the repeater (for example, using the RTRS online service) and manually configure the second package of channels.
- The signal is received with interference. The picture freezes, the TV starts showing square spots on the screen, and the sound disappears. This means that in addition to the TV signal, the antenna began to receive extraneous noise (for example, from a Wi-Fi router). You should try to change its location and orientation to tune out the noise.
Previous
In order to watch digital television, you need an antenna. If it is possible to connect to a common house-wide cable, this is not a problem. But if you don’t have it in your house or you can’t connect to it, it doesn’t matter: in many cases, an indoor antenna will work just as well. Let's figure out how to configure it step by step, what needs to be taken into account and how to avoid possible difficulties.
Can't turn on my new TV after a power outage
We can't seem to turn on our new TV after a short power outage. This is the TV we have: https://www.samsung.com/uk/support/model/UE49MU6400UXXU but we can't find the power button anywhere on the TV or even know if it has one because we have I felt all around the TV and couldn’t find the power button. EDIT: Now we found the power button at the back where the red light usually comes on, we pressed the button and pressed and held it but it still doesn't light up. We also checked that all the wires are connected. The red light on the TV is completely off. Usually the red light is on and we turn on the TV using the remote control. We tried turning it on with both a regular TV and a Smart TV, and also plugged the TV's power cord into a different outlet because we thought maybe the outlet wasn't working. But it still seems like nothing turns on our TV. Can anyone advise what to do?
Thanks, this is much appreciated as we are all ignorant and very old people who don't understand the new TVs!
From Margaret.
.
Adding local analogue channels
If from the very beginning during auto-tuning it was indicated that both digital and analogue broadcasting were being searched, then there is no need to add anything, all TV channels have already been found. You also need to remember that some modern TV models no longer support manual tuning of over-the-air channels; they need to rescan the entire range again in auto-tuning mode.
If you first tuned in to digital channels and only later remembered that the nearest TV tower broadcasts not only federal multiplexes, but also local ones in analog format, you can catch them separately.
The algorithm of actions here is as follows:
- Turn on the menu, open the “Broadcast” tab.
- Select the signal source. In our case, this is an antenna.
- Switch to Manual Configuration mode.
- Specify the search for analogue channels only.
- Select "Create".
- Searching for analogue broadcast channels will take a few minutes.
If local television operates in the UHF range, there will be no problem: a digital antenna will receive it perfectly. If the channels operate in the meter range (MV), you will have to either install a combined all-wave antenna or abandon analogue television broadcasts.
- Digital channels on a Samsung TV without a set-top box. How to properly set up and watch new TV?
Checking if your Samsung TV supports digital TV
Before we begin directly searching for channels, let’s make sure that the TV is generally capable of receiving “digital”. Samsung's lineup includes many series and even more individual models. Not all of them have a built-in digital tuner, and some, although equipped with one, are made for the old DVB-T standard, and not DVB-T2, which is now used in Russia.
To do this, enter the model number in the “Search” line. If you find one, you can proceed to configuration.
| Model | Diagonal | DVB-T2 support |
| 19H4000 | 19 | + |
| LT19C350EX | 19 | + |
| LT22C350EX | 22 | + |
| LT23C370EX | 23 | + |
| LT24C370EX | 24 | + |
| LT27C370EX | 27 | + |
| PE43H4000 | 43 | + |
| PS43E497B2 | 43 | + |
| PS43F4900AK | 43 | + |
| PS51E497B2KXRU | 51 | + |
| PS51E537A3 | 51 | + |
| PS51E557D1 | 51 | + |
| PS51E6507 | 51 | + |
| PS51E8007G | 51 | + |
| PS51F4900AK | 51 | + |
| PS51F5500AK | 51 | + |
| PS51F8500AT | 51 | + |
| PS60F5000AK | 60 | + |
| PS64D8000 | 64 | + |
| PS64E8007 | 64 | + |
| PS64F8500AT | 64 | + |
| T24D310EX | 24 | + |
| T24D390EX | 24 | + |
| T24D391EX | 24 | + |
| T24D590EX | 24 | + |
| T27D390EX | 27 | + |
| T27D590EX | 27 | + |
| T28D310EX | 27 | + |
| UE22F5000AK | 22 | + |
| UE22F5400AK | 22 | + |
| UE22F5410AK | 22 | + |
| UE22H5020 | 22 | + |
| UE22H5600 | 22 | + |
| UE22H5610 | 22 | + |
| UE24H4070 | 24 | + |
| UE24H4080 | 24 | + |
| UE28H4000 | 28 | + |
| UE32EH5007 | 32 | + |
| UE32EH5047 | 32 | + |
| UE32EH5057 | 32 | + |
| UE32EH5307 | 32 | + |
| UE32ES5507 | 32 | + |
| UE32ES5537 | 32 | + |
| UE32ES5557 | 32 | + |
| UE32F4500AK | 32 | + |
| UE32F4510AK | 32 | + |
| UE32F5000AK | 32 | + |
| UE32F5020AK | 32 | + |
| UE32F5300AK | 32 | + |
| UE32F5500AK | 32 | + |
| UE32F6100AK | 32 | + |
| UE32F6200AK | 32 | + |
| UE32F6330AK | 32 | + |
| UE32F6400AK | 32 | + |
| UE32F6510AB | 32 | + |
| UE32F6540AB | 32 | + |
| UE32F6800AB | 32 | + |
| UE32H4000 | 32 | + |
| UE32H4270 | 32 | + |
| UE32H4500 | 32 | + |
| UE32H4510 | 32 | + |
| UE32H5303 | 32 | + |
| UE32H5500 | 32 | + |
| UE32H6230 | 32 | + |
| UE32H6350 | 32 | + |
| UE32H6410 | 32 | + |
| UE37ES6710 | 37 | + |
| UE39F5000AK | 39 | + |
| UE39F5020AK | 39 | + |
| UE39F5300AK | 39 | + |
| UE39F5500AK | 39 | + |
| UE40EH5007 | 40 | + |
| UE40EH5047 | 40 | + |
| UE40EH5057 | 40 | + |
| UE40EH5307 | 40 | + |
| UE40ES5507 | 40 | + |
| UE40ES6307 | 40 | + |
| UE40ES6547 | 40 | + |
| UE40ES6557 | 40 | + |
| UE40ES6857 | 40 | + |
| UE40ES6907 | 40 | + |
| UE40ES7207 | 40 | + |
| UE40ES7507 | 40 | + |
| UE40ES8007 | 40 | + |
| UE40F5000 | 40 | + |
| UE40F6100AK | 40 | + |
| UE40F6130 | 40 | + |
| UE40F6200AK | 40 | + |
| UE40F6330AK | 40 | + |
| UE40F6400 | 40 | + |
| UE40F6500AB | 40 | + |
| UE40F6510AB | 40 | + |
| UE40F6540AB | 40 | + |
| UE40F6650AB | 40 | + |
| UE40F6800AB | 40 | + |
| UE40F7000AT | 40 | + |
| UE40F8000AT | 40 | + |
| UE40FH5007K | 40 | + |
| UE40H4200 | 40 | + |
| UE40H4203 | 40 | + |
| UE40H5003 | 40 | + |
| UE40H5020 | 40 | + |
| UE40H5203 | 40 | + |
| UE40H5270 | 40 | + |
| UE40H5500 | 40 | + |
| UE40H6230 | 40 | + |
| UE40H6240 | 40 | + |
| UE40H6350 | 40 | + |
| UE40H6410 | 40 | + |
| UE40H6500 | 40 | + |
| UE40H6650 | 40 | + |
| UE40HU7000 | 40 | + |
| UE42F5000AK | 42 | + |
| UE42F5020AK | 42 | + |
| UE42F5300AK | 42 | + |
| UE42F5500AK | 42 | + |
| UE46EH5007 | 46 | + |
| UE46EH5047 | 46 | + |
| UE46EH5057 | 46 | + |
| UE46EH5307 | 46 | + |
| UE46EH6037 | 46 | + |
| UE46ES5507 | 46 | + |
| UE46ES5537 | 46 | + |
| UE46ES5557 | 46 | + |
| UE46ES6307 | 46 | + |
| UE46ES6547 | 46 | + |
| UE46ES6857 | 46 | + |
| UE46ES6907 | 46 | + |
| UE46ES7207 | 46 | + |
| UE46ES7500 | 46 | + |
| UE46ES7507 | 46 | + |
| UE46ES8000 | 46 | + |
| UE46ES8007 | 46 | + |
| UE46F5000AK | 46 | + |
| UE46F5020AK | 46 | + |
| UE46F5300AK | 46 | + |
| UE46F5500AK | 46 | + |
| UE46F6100AK | 46 | + |
| UE46F6330AK | 46 | + |
| UE46F6400AK | 46 | + |
| UE46F6500AB | 46 | + |
| UE46F6510AB | 46 | + |
| UE46F6540AB | 46 | + |
| UE46F6650AB | 46 | + |
| UE46F6800AB | 46 | + |
| UE46F7000AT | 46 | + |
| UE46F8000AT | 46 | + |
| UE46F8500AT | 46 | + |
| UE48H4200 | 48 | + |
| UE48H4203 | 48 | + |
| UE48H5003 | 48 | + |
| UE48H5020 | 48 | + |
| UE48H5203 | 48 | + |
| UE48H5270 | 48 | + |
| UE48H5500 | 48 | + |
| UE48H5510 | 48 | + |
| UE48H6230 | 48 | + |
| UE48H6350 | 48 | + |
| UE48H6410 | 48 | + |
| UE48H6500 | 48 | + |
| UE48H6650 | 48 | + |
| UE48H6800 | 48 | + |
| UE48HU8500 | 48 | + |
| UE50ES5507 | 50 | + |
| UE50ES6907 | 50 | + |
| UE50F5000AK | 50 | + |
| UE50F5020AK | 50 | + |
| UE50F5500AK | 50 | + |
| UE50F6100AK | 50 | + |
| UE50F6130 | 50 | + |
| UE50F6330AK | 50 | + |
| UE50F6330AK | 50 | + |
| UE50F6400AK | 50 | + |
| UE50F6500 | 50 | + |
| UE50F6650 | 50 | + |
| UE50F6800AB | 50 | + |
| UE50HU7000 | 50 | + |
| UE55ES6307 | 55 | + |
| UE55ES6547UXRU | 55 | + |
| UE55ES6557UXRU | 55 | + |
| UE55ES6857 | 55 | + |
| UE55ES6907UXRU | 55 | + |
| UE55ES7507 | 55 | + |
| UE55ES8007 | 55 | + |
| UE55F6100AK | 55 | + |
| UE55F6400AK | 55 | + |
| UE55F6800AB | 55 | + |
| UE55F7000AT | 55 | + |
| UE55F8000AT | 55 | + |
| UE55F8500AT | 55 | + |
| UE55H680 | 55 | + |
| UE55H6500 | 55 | + |
| UE55H6650 | 55 | + |
| UE55HU7000T | 55 | + |
| UE55HU7500T | 55 | + |
| UE55HU8700T | 55 | + |
| UE55HU9000T | 55 | + |
| UE60F6100AK | 60 | + |
| UE60F7000AT | 60 | + |
| UE65ES8007 | 65 | + |
| UE65F6400AK | 65 | + |
| UE65F8000AT | 65 | + |
| UE65F90800 | 65 | + |
| UE65HU7500T | 65 | + |
| UE65HU8700T | 65 | + |
| UE65HU9000T | 65 | + |
| UE75ES9000 | 75 | + |
| UE75ES9007 | 75 | + |
| UE75F6300 | 75 | + |
| UE75F6400AK | 75 | + |
| UE75F8200 | 75 | + |
| UE75HU7500T | 75 | + |
| UE78HU9000 | 78 | + |
| UE85S9AT | 85 | + |
| UE105S9 | 105 | + |
Didn't find your model? Don't panic! Use the recommendations from the article on checking for DVB-T2 support on your TV.
Other connection methods
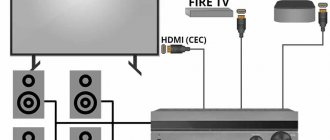
Well, if you don’t have USB on your TV, then all you have to do is use the power supply. A charging unit for a phone or tablet with a USB output and a rating of 5-12V/0.5A is suitable. The following shows a diagram of connecting active equipment from a digital terrestrial set-top box or TV through a divider. For this wiring method, the signal divider must be power-through. You can use a splitter for satellite television.
The second circuit does not use a divider, and the set-top boxes are connected in series through the loop output on the receiver. The power to the antenna equipment is turned on at the set-top box. The same as in the first connection option.
The connection diagram using the adapter can be found here.
Removing unnecessary channels and adjusting the order
To remove unnecessary channels, proceed as follows:
- Open the menu, go to the settings section and select “Broadcast”.
- Go to "Change Channels".
- Using the “Enter” button, you need to check the boxes that need to be deleted.
- Select “Delete” from the side menu.
- Press the Yes button to confirm and switch the TV to normal mode. Immediately after this, you can make sure that unnecessary channels are gone.
If we are talking about Samsung Smart TV, then removal is easier:
- Using the “Smart Hub” button you need to go to the system hub.
- In the form with the listed channels, you need to select the editing section (usually it is on the right at the top of the table).
- Guided by the system prompts at each step, you can select all unnecessary TV channels and delete them.
As for the order of channels, the TV arranges them in two ways:
- independently in the order in which I was able to find them during auto-tuning;
- using a list sent by the operator (as, for example, when connecting to NTV+ channels).
In the second case, sorting is impossible: you cannot reconfigure what the operator has installed, you can only delete unnecessary channels. In the first, the sorting looks like this:
- Go to the menu, select “Settings”.
- Click on “Broadcast” and go to the “Advanced Settings” tab.
- Select "Change" channel numbers" and specify "Enable" if the item is highlighted. If it is inactive, then proceed to the next step.
- Select “Change channel number” or go to the “Live broadcast” section (depending on the interface option).
- Here you need to open the “Channel List” tab and go to the “Change Channel” item.
- The desired TV channel is selected using the “Enter” button on the remote control; the check mark next to it lights up.
- Select the “Change number” option and use the arrow keys on the remote control to drag the channel to a new location.
- By pressing “Enter” again, the check mark is removed and the result is recorded.
If necessary, the procedure is repeated the required number of times.
When sorting channels on Samsung TVs, you need to take into account one of their features: if the digital ones in the general list are signed and have names, then the analog ones have only serial numbers. Accordingly, when sorting, the picture will be as follows:
- The digital channels will move in the list and one of them will take the position of the other.
- The list of analogue ones will not change, only a different program will be accepted under the old number.
Expert opinion Vitaly Sadovnikov Specialist in connecting and setting up digital television In addition to deleting and sorting, in the same tab you can also configure parental blocking of some TV channels from children. To do this, in the “Broadcast” section you need to select the “Blocking” item, turn it on, use the “Change channels” item to select the desired one and click on “Blocking” again. The TV will require you to enter a password. By default, it consists of 4 zeros (0000), but after entering, a window will open where you can specify yours.
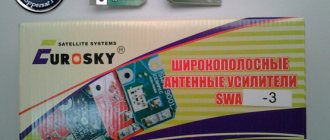
Antennas for receiving digital terrestrial television (UHF antennas) can be either active or passive. Active antennas are antennas with a built-in or external signal amplifier. Passive antennas do not have any amplifier, and are capable of receiving a signal at a short distance and with relatively direct visibility to the transmitting equipment.
Power is supplied to active antennas in different ways:
• via antenna cable; • via an additional cable ( the power supply is connected to a 220 Volt outlet); • via USB interface .
The antenna cable now powers most antennas sold. The convenience of this connection method is undeniable - just turn on the “antenna power” in your DVB-T2 receiver and everything works immediately (example REMO BAS-5101 antenna). But if you have a TV with DVB-T2 support, everything is more complicated, but more on that later.
A relatively large amount of receiving equipment is also connected via an additional power cable. For example, the antenna DELTA DIGITAL.12V - soon you will be able to see its review on our website.
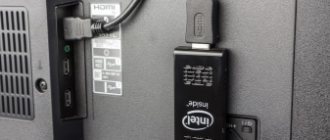
Active antennas powered via a USB interface have appeared relatively recently. Let us note right away that if you have a TV with a built-in DVB-T2 tuner, this is the most successful connection option. As an example, let’s take the active antenna “REMO BAS-5310USB HORIZON”, a review of which will also appear on our website.
If turning on the power to the antenna in a digital DVB-T2 receiver is simple, then how to supply power to the antenna on the TV? In leading brands (such as LG, SONY, Philips, Samsung) the “antenna power” item is simply missing.
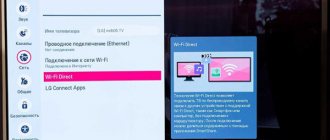
How to turn on the antenna power on an LG TV:
The response from LG support was as follows: our equipment does not have such a function.
How to turn on the antenna power on your Philips TV:
Similarly to LG, these TVs did not have such an item in the menu.
This begs the question - how to supply power to the active antenna in modern TVs? There is a possibility that power is always supplied to the antenna, i.e. When you connect the antenna, the TV immediately outputs +5V to the antenna. But this is not correct, because when a separate amplifier is turned on, a short circuit will occur. The option is no longer available.
It turns out that with modern TVs you can use either passive antennas or antennas with an external power supply. And now is the time to remember about an active antenna, the power of which is supplied via the USB interface - this is either the “REMO BAS-5310USB HORIZON” or its analogue.
Also, any 5V antenna can be powered from the USB output of the TV, even if it was not originally designed for this. proposes to switch all antennas to this method of power supply and abandon external power supplies altogether. The “REMO BAS-8001” USB injector was developed specifically for this purpose. You connect the antenna to the injector, connect the injector to the TV and forget about the bulky and in this case unnecessary power supply. Let us clarify that this method is only suitable for 5V active antennas.
We hope the article was useful.
3.8/5 — (108 votes)
You can ask questions about digital television on the DVBpro forum
Author: Alexander Vorobyov, 11 Feb 2021 | Permanent link to the page:
Features of connecting to TVs of different brands
The algorithm for connecting an indoor antenna to televisions of different brands is almost the same. But, each manufacturer has its own characteristics. These may be differences in the fastening of the connectors, the designations of the channel search settings. Before connecting, it is recommended to carefully study the instructions for use.
Samsung
Modern Samsung TV receivers are equipped with a built-in DVB-S/S2 tuner. To connect a digital antenna to a Samsung TV, you need to follow the instructions.
- Connect the antenna cable to the TV input, press start
- Enter the television menu, line “Broadcast” and select auto-tuning channels.
- Next, set the antenna source type.
- In the “Channel Type” line, specify the full search mode and start scanning.
After the search is completed, all found TV channels will be saved automatically.
LG
In most LG TV models, in addition to the usual Ant In connector, there is a special LNB Satellite IN connector, which means that there is a built-in TV tuner. This output is intended for connecting a satellite dish to watch free channels with no encoding. Tuning and searching for television channels or multiplexes is also done through the menu, indicating the type of antenna - satellite.
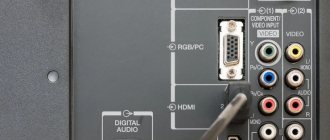
To connect an indoor antenna to an LG TV, first look at the type of connector, which can be:
- RF – coaxial threaded cylinder with a hole in the center;
- IEC standard, installed on older models.
To correctly search for signals, after connecting, you need to configure the user’s language panel and specify the search country in the “General Options” tab. Next, you can proceed to auto-search for channels.
- Select the “Settings” button on the remote control.
- Next, go to “Channels” and select auto search.
- Specify the type of input signal – antenna.
- In the pop-up tab, click “Full”, then “OK”.
- Activate the "Run" command.